Posted March 4, 2013 Author This is what I call custom made. I'm interested in seeing the final product!I'm interested in seeing that as well :D Current build: Project [No Name]: reboot Previous build: Project [NoName], watercooled Mini-ITX build Link to comment Share on other sites More sharing options... Link to post Share on other sites More sharing options...
Posted March 4, 2013 Author I have been making progress even I haven't been updating every little move I make :D Recently I got some old stuff sold, enough to buy motherboard, pump and top for it :) I have also made front cover and have been designing a place for fan controller on the front. I also received SSD's and ram from Kingston and I have taken photos from them. I will be writing a small unboxing and review of them when I get my build assembled in point where I can start installing OS for testing :) But now some sneak peek photos of the Kingston's products review :) More photos here http://rantanen88.kuvat.fi/kuvat/Rojut/M-ITX+Kotelo+projekti/HyperX/ Current build: Project [No Name]: reboot Previous build: Project [NoName], watercooled Mini-ITX build Link to comment Share on other sites More sharing options... Link to post Share on other sites More sharing options...
Posted March 6, 2013 Amazing. Subbed! Link to comment Share on other sites More sharing options... Link to post Share on other sites More sharing options...
Posted March 6, 2013 Author Amazing. Subbed!Thank you for the sub! Current build: Project [No Name]: reboot Previous build: Project [NoName], watercooled Mini-ITX build Link to comment Share on other sites More sharing options... Link to post Share on other sites More sharing options...
Posted March 11, 2013 Author Not much progress been made in some time. I have been busy selling stuff so I can finance this project :) I ordered Gigabyte Z77N-Wifi, Alphacool VPP655 and Alphacool HF D5 top for pump :) I also have been made progress with fan controller and with its colour scheme ;) More updates on that soon. So stay tuned, there is still a lot to do :) Current build: Project [No Name]: reboot Previous build: Project [NoName], watercooled Mini-ITX build Link to comment Share on other sites More sharing options... Link to post Share on other sites More sharing options...
Posted March 11, 2013 Just wondering about the psu. Modecom is kinda... cheap here in your system.. There are nice modular psu on the market soo..:D Link to comment Share on other sites More sharing options... Link to post Share on other sites More sharing options...
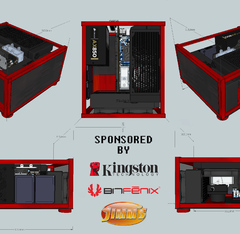
Posted March 11, 2013 Author Just wondering about the psu. Modecom is kinda... cheap here in your system.. There are nice modular psu on the market soo..:DOh nonononononono :D None of the parts that I have been using in photos where I demonstrated parts in the case won't be in final build. Parts like modecom PSU, Zotac motherboard, old black ice radiator and HD 5870 GPU I found from the closet and I use them to get idea how the parts are going to fit in the case. So no worries there are proper parts for this. Parts that are going to be in this one are listed in my first post. But here are main components again. CPU: Intel Core i7 2600K (Got it) Motherboard: Gigabyte Z77N-Wifi (Coming) Ram: Kingston HyperX Beast 2x8GB 1600Mhz (Sponsored) GPU: GTX 670 2Gb (Not yet) PSU: Super Flower Golden King Platinum 550w (Got it) SSD: Two Kingston HyperX 3K 120GB in Raid0 (Sponsored) + BitFenix cables and watercooling parts are in pictures at the first post :) Current build: Project [No Name]: reboot Previous build: Project [NoName], watercooled Mini-ITX build Link to comment Share on other sites More sharing options... Link to post Share on other sites More sharing options...
Posted March 12, 2013 Just wondering about the psu. Modecom is kinda... cheap here in your system.. There are nice modular psu on the market soo..:DSooo now it get it:D okay that one is really nice paltinum PSU. Good luck building it. Looking forward to your system!:D Link to comment Share on other sites More sharing options... Link to post Share on other sites More sharing options...
Posted March 12, 2013 Author So as I promised yesterday, here is an update on the fan controller :) I didn't like the original light blue backlight so I decided to change that to red. I tried different ways but I found this way best for me. ​ ​ Here is the BitFenix Recon in it's original condition. It is nice but it's backlight isn't good for my case. ​ To disassemble this, only 4 screws needs to be removed from the corners to get it apart. Touch panel was glued to the front so I had to be careful to remove it so it wouldn't broke. ​ This is what it looks like without covers. ​ ​ Next step was to get plastic film what I was going to use to make backlight red. Film wasn't red enough so I decided to use huge sharpie to color it more darker. But where is this going to be? I bet you will guess wrong. ​ ​ ​ Red film goes between backlight module and screen itself. I just slide the film between those and it goes there pretty smoothly. ​ ​ And in my opinion it works great! :) I left 5.25" metal piece out because I wont be needing it. Unfortunately as I was putting it together, I applied to much pressure in touch panel and heard the worst sound ever *SNAP* and touch panel was broken :( I have requested new one from BitFenix so it will be in working condition when i need it :) Thanks to BitFenix for sponsoring my build Current build: Project [No Name]: reboot Previous build: Project [NoName], watercooled Mini-ITX build Link to comment Share on other sites More sharing options... Link to post Share on other sites More sharing options...
Posted March 12, 2013 So as I promised yesterday, here is an update on the fan controller :) I didn't like the original light blue backlight so I decided to change that to red. I tried different ways but I found this way best for me. ​ ​ Here is the BitFenix Recon in it's original condition. It is nice but it's backlight isn't good for my case. ​ To disassemble this, only 4 screws needs to be removed from the corners to get it apart. Touch panel was glued to the front so I had to be careful to remove it so it wouldn't broke. ​ This is what it looks like without covers. ​ ​ Next step was to get plastic film what I was going to use to make backlight red. Film wasn't red enough so I decided to use huge sharpie to color it more darker. But where is this going to be? I bet you will guess wrong. ​ ​ ​ Red film goes between backlight module and screen itself. I just slide the film between those and it goes there pretty smoothly. ​ ​ And in my opinion it works great! :) I left 5.25" metal piece out because I wont be needing it. Unfortunately as I was putting it together, I applied to much pressure in touch panel and heard the worst sound ever *SNAP* and touch panel was broken :( I have requested new one from BitFenix so it will be in working condition when i need it :) Thanks to BitFenix for sponsoring my build Good job that looks so good, worked out well! | Contact Information | My Teamspeak : Austs1.gameservers.com:9334 | Steam: Iamtictac456 | My other aliases include Scruffy and Scruffy Biggems :) Link to comment Share on other sites More sharing options... Link to post Share on other sites More sharing options...
Posted March 13, 2013 Author So as I promised yesterday, here is an update on the fan controller :) I didn't like the original light blue backlight so I decided to change that to red. I tried different ways but I found this way best for me. ​ ​ Here is the BitFenix Recon in it's original condition. It is nice but it's backlight isn't good for my case. ​ To disassemble this, only 4 screws needs to be removed from the corners to get it apart. Touch panel was glued to the front so I had to be careful to remove it so it wouldn't broke. ​ This is what it looks like without covers. ​ ​ Next step was to get plastic film what I was going to use to make backlight red. Film wasn't red enough so I decided to use huge sharpie to color it more darker. But where is this going to be? I bet you will guess wrong. ​ ​ ​ Red film goes between backlight module and screen itself. I just slide the film between those and it goes there pretty smoothly. ​ ​ And in my opinion it works great! :) I left 5.25" metal piece out because I wont be needing it. Unfortunately as I was putting it together, I applied to much pressure in touch panel and heard the worst sound ever *SNAP* and touch panel was broken :( I have requested new one from BitFenix so it will be in working condition when i need it :) Thanks to BitFenix for sponsoring my build Well thank you! I think it looks good too :) Current build: Project [No Name]: reboot Previous build: Project [NoName], watercooled Mini-ITX build Link to comment Share on other sites More sharing options... Link to post Share on other sites More sharing options...
Posted March 15, 2013 Author Woohoo! Got stuff today and got some done too! From left to right. Alphacool VPP655T, Alphacool HF D5 Top and Gigabyte Z77N-Wifi This time I'm going to work on the pump. For my surprise this was with tacho wire already on it. I just didn't like the wires on this so some sleeving is in order. Also backside was not pleasing my eye and it needed to be changed. For sleeving these wires I used sleeving that I got last year from modDIY. I also use this for most wires that I didn't get from BitFenix. I started this by taking the lid off and taking fan & molex connectors off from wires too. I didn't bother to take pictures of sleeving progress because it is boring :D But sleeved wires are here and I decided to change connectors to black ones too. At this point I decided that I had to do something to the back lid. I found some 3D carbon vinyl from my drawer and I just had to put it in there. And to be honest, I am actually pretty proud how this pump and pictures turned out :) *Pads my own back* Please tell me if you want something explained or photographed in more detail. Current build: Project [No Name]: reboot Previous build: Project [NoName], watercooled Mini-ITX build Link to comment Share on other sites More sharing options... Link to post Share on other sites More sharing options...
Posted March 15, 2013 when this is complete, it NEEDS to be featured on the live-stream Link to comment Share on other sites More sharing options... Link to post Share on other sites More sharing options...
Posted March 15, 2013 Author when this is complete, it NEEDS to be featured on the live-streamI really hope so :D Current build: Project [No Name]: reboot Previous build: Project [NoName], watercooled Mini-ITX build Link to comment Share on other sites More sharing options... Link to post Share on other sites More sharing options...
Posted March 21, 2013 Author Tiny update/sneak peek before bigger update next week I wasn't so productive yesterday, managed to drill ten holes, tapped two of them and I made four holes for exhaust radiator.Btw the case looks nice with top rad mounted. I'll just leave it to your imagination. Current build: Project [No Name]: reboot Previous build: Project [NoName], watercooled Mini-ITX build Link to comment Share on other sites More sharing options... Link to post Share on other sites More sharing options...
Posted March 21, 2013 Looks very promising so far, can't wait to see more. These are the build logs I love. Link to comment Share on other sites More sharing options... Link to post Share on other sites More sharing options...
Posted March 22, 2013 Author Looks very promising so far, can't wait to see more. These are the build logs I love.Thank you! I'm glad it pleases you :) Current build: Project [No Name]: reboot Previous build: Project [NoName], watercooled Mini-ITX build Link to comment Share on other sites More sharing options... Link to post Share on other sites More sharing options...
Posted March 30, 2013 Any update on the project? I'm interested! :D Keep up the good work! Link to comment Share on other sites More sharing options... Link to post Share on other sites More sharing options...
Posted March 30, 2013 Author Any update on the project? I'm interested! :DKeep up the good work! Very well timed :D Actually uploading pictures now and then some time reserved for writing. Thank you and I will! Btw, I noticed your question in irc but I was AFK then and havent seen you since :) Current build: Project [No Name]: reboot Previous build: Project [NoName], watercooled Mini-ITX build Link to comment Share on other sites More sharing options... Link to post Share on other sites More sharing options...
Posted March 30, 2013 Author Finally an update on metal works! This time it is focused on mounting of the radiators. First I had to mark places for radiator screw holes. For this i used an old rad grill. For screws I used the ones that came with rads. I haven't decided yet that should I use these for final build and paint them or get new ones. Top rad had to have countersunk screws since lid needs to fit on top of it. Front rad mounted, I have to screw the front plate into the frame even it stays like that now. Note the copper showing thru the top radiator, I need to spray some paint on it. Top mounting turned out nicely. Next up some final pictures for this update. Current build: Project [No Name]: reboot Previous build: Project [NoName], watercooled Mini-ITX build Link to comment Share on other sites More sharing options... Link to post Share on other sites More sharing options...
Posted March 30, 2013 WOW, what a build. words can not describe. Just NICE!! Will be following you to the end of your artwork. Asus Maximus VI Hero , i5 4670k , 8gb Corsair vengeance ddr3, Asus HD 7970 matrix platinum, Corsair AX860, Ocz agility 3 120gb ssd, 1tb wd green hdd, custom water loop. All in an Antec p280 Link to comment Share on other sites More sharing options... Link to post Share on other sites More sharing options...
Posted March 30, 2013 Looking VERY good mate! ^,^ Are you building this pc for yourself or jimms? And build 1 for me too while your at it ;). -subscribed- Intel i5 3570k | MSI GTX 670 Power Edition/OC SLI | Asus Sabertooth Z77 | Corsair Vengeance LP 16GB | Fractal Design Newton R2 650W | NZXT Switch 810 SE Gun Metal | BenQ 24" XL2420T 120Hz | Corsair K90 | Logitech G500 / Logtitech Performance MX | Sennheiser PC 360 | Asus Xonar DGX | NVIDIA GeForce 3D Vision 2 Wireless Kit Link to comment Share on other sites More sharing options... Link to post Share on other sites More sharing options...
Posted March 30, 2013 Author WOW, what a build. words can not describe. Just NICE!! Will be following you to the end of your artwork. Thank you! After this build I'm going to make a new one. I have couple of different ideas so I hope you will follow those too :) Current build: Project [No Name]: reboot Previous build: Project [NoName], watercooled Mini-ITX build Link to comment Share on other sites More sharing options... Link to post Share on other sites More sharing options...
Posted March 30, 2013 Author Looking VERY good mate! ^,^ Are you building this pc for yourself or jimms?And build 1 for me too while your at it ;). -subscribed- I am making it for myself and you are second one who has said to me today that he wants one :D Before I started this project I showed the plans to the guy who let me use their workshop and the first thing he said that it should be put in production :D We'll see if more people really want one I could make it happen and from aluminium ofcourse :) And thank you for your kind words & sub :) Current build: Project [No Name]: reboot Previous build: Project [NoName], watercooled Mini-ITX build Link to comment Share on other sites More sharing options... Link to post Share on other sites More sharing options...
Posted March 31, 2013 Wow thanks for the update! This looks freaking awesome! I wish I knew how to work with metal and stuff. I really have to look into that soon! Maybe this summer. Again, keep up the good work and I'm looking forward to your future projects! Link to comment Share on other sites More sharing options... Link to post Share on other sites More sharing options...


.thumb.jpeg.9babd505c85c11addf31a285a02547cc.jpeg)


Create an account or sign in to comment
You need to be a member in order to leave a comment
Create an account
Sign up for a new account in our community. It's easy!
Register a new accountSign in
Already have an account? Sign in here.
Sign In Now