Jump to content

Experiment Nr. 5 (Final pics on page 8)

p0Pe

This build is so cool. The modding looks fantastic and I love the use of 3d printed parts.

Carbon Fire ITX PCCPU: i7-4770K@3.8Ghz GPU: Asus GTX 660 Cpu Cooler Corsair H80i Mobo: Asus Maximnus VI Impact RAM: Corsair 16gb 1600MHz PSU: Corsair CX500 Modular SSD: 2x120gb HDD: Seagate 2TB Keyboard:Corsair K70 Mouse: Logitech G700  Case Modded Bitfenix Prodigy

Link to comment
Share on other sites

Link to post
Share on other sites


sorry it had to be done 


attachicon.gifproject N.V..jpg


Hah. Well, I was more referring to a certain event on reddit a while back:D


This build is so cool. The modding looks fantastic and I love the use of 3d printed parts.


Glad you like it man:)


Time to do some prototyping. I was very excited to see how well the acrylic windows could be made. All the pieces of the window is angled, so this would be a challenge to machine. Luckily I got in touch with Justin O'Grady from Parvum Systems who offered to help me out. 
 
This is the first prototype piece that I got from them to test out the quality. I knew that the pieces had to be individually sanded and polished after machining, which is also why the window is not just one big piece.
 
10.jpg
 
This is a render of the top window and is the file that was sent to Parvum Systems.
 
02.JPG
 
The piece I got in the mail. 
 
03.JPG
 
You can see the milling traces on the top.
 
04.JPG
 
And here it can be seen in more detail. The piece can be milled a lot more precise but this was a test to see how this roughness would be to sand down.
 
05.JPG
 
To sand it, I used wet-sanding paper with a roughness of 800 grit. I somehow lost my 1200 and 2000 grit pieces, so it still needs some work.
 
07.JPG
 
Sanding the piece. Remember to use lots of water, and exchange it frequently when wet sanding, or the particles you just sanded off will scratch the piece.
 
08.JPG
 
after sanding with 800 grit.
 
09.JPG
 
still a rough result, but I also misplaced my polishing compound, so this is how the finish is at the moment.
Link to comment
Share on other sites

Link to post
Share on other sites

Amazing :)  nicely done

Desktop: Fractel Design R5 - i5 4670K @ stock - Asrock Z97 Extreme 4 - 16GB @ 1600MHz - Asus GTX 970 - Corsair RM650 - OCZ Vector 150 240GB - WD Blue 500GB - Noctua NH-D15

Peripherals & OS: KBC Poker 2 MX Blue - Zowie FK2 - Audio-technica ATH-M50s - Audioengine D1- Windows 10 Pro Monitor: Asus PA248Q 1920x1200

Link to comment
Share on other sites

Link to post
Share on other sites

amazing work


Everything looks Fantastic  :wub:


Thanks fuzzy! Glad you like it.


Amazing :)  nicely done


Thanks Bro!


Your cable management, tubing management, attention to detail and craftsmanship is really breathtaking. Certainly some very skilled work right here. Im looking forward to seeing further progress from you, first time I've seen you here...I should try and keep a better eye on the build blogs. I'd love to have the time and equipment to go to this level of building. A++ work from you my man, beautiful.


Thanks man! If you want a quick summerization of what I have done, check out my homepage www.hps.dk or facebook page: https://www.facebook.com/DesignsByHPS


I made a video showing off different types of watercooling dye that I want to show you guys!
 
 
Hope you enjoyed :)
Link to comment
Share on other sites

Link to post
Share on other sites

Looks really nice :)

I want to do an m-itx watercooled system someday.

Stuff:  i7 7700k @ (dat nibba succ) | ASRock Z170M OC Formula | G.Skill TridentZ 3600 c16 | EKWB 1080 @ 2100 mhz  |  Acer X34 Predator | R4 | EVGA 1000 P2 | 1080mm Radiator Custom Loop | HD800 + Audio-GD NFB-11 | 850 Evo 1TB | 840 Pro 256GB | 3TB WD Blue | 2TB Barracuda

Hwbot: http://hwbot.org/user/lays/ 

FireStrike 980 ti @ 1800 Mhz http://hwbot.org/submission/3183338 http://www.3dmark.com/3dm/11574089

Link to comment
Share on other sites

Link to post
Share on other sites

Looks really nice :)

I want to do an m-itx watercooled system someday.


I can only recommend it! I already have my next mod planned which will be smaller than this one:D


Fedt som altid! :D


Tak:D

Link to comment
Share on other sites

Link to post
Share on other sites

I can only recommend it! I already have my next mod planned which will be smaller than this one:D


Tak:D


My only problem is, I enjoy having 2 gpu's and massive radiator space. :/

Stuff:  i7 7700k @ (dat nibba succ) | ASRock Z170M OC Formula | G.Skill TridentZ 3600 c16 | EKWB 1080 @ 2100 mhz  |  Acer X34 Predator | R4 | EVGA 1000 P2 | 1080mm Radiator Custom Loop | HD800 + Audio-GD NFB-11 | 850 Evo 1TB | 840 Pro 256GB | 3TB WD Blue | 2TB Barracuda

Hwbot: http://hwbot.org/user/lays/ 

FireStrike 980 ti @ 1800 Mhz http://hwbot.org/submission/3183338 http://www.3dmark.com/3dm/11574089

Link to comment
Share on other sites

Link to post
Share on other sites

Do like me and build a radiator setup in a CaseLabs Pedestal:D It will come in very handy for my next mod that is for sure!

Link to comment
Share on other sites

Link to post
Share on other sites

I can only recommend it! I already have my next mod planned which will be smaller than this one:D


Tak:D

Väldigt snyggt!


Hoppas du fattar svenska:)

[spoiler= Dream machine (There is also a buildlog)]

Case: Phanteks Enthoo Luxe - CPU: I7 5820k @4.4 ghz 1.225vcore - GPU: 2x Asus GTX 970 Strix edition - Mainboard: Asus X99-S - RAM: HyperX predator 4x4 2133 mhz - HDD: Seagate barracuda 2 TB 7200 rpm - SSD: Samsung 850 EVO 500 GB SSD - PSU: Corsair HX1000i - Case fans: 3x Noctua PPC 140mm - Radiator fans: 3x Noctua PPC 120 mm - CPU cooler: Fractal design Kelvin S36 together with Noctua PPCs - Keyboard: Corsair K70 RGB Cherry gaming keyboard - mouse: Steelseries sensei raw - Headset: Kingston HyperX Cloud Build Log

Link to comment
Share on other sites

Link to post
Share on other sites

  • 2 months later...

Väldigt snyggt!


Hoppas du fattar svenska:)


En lille smule:D


Update to you all! I have been gone for quite some time, and think it is about time that I updated you all with some info.
First of all, I got a job! Starting next week I will be working at www.bpi.dk as a development engineer! So I am super excited about that!
 
But lets get to some of the stuff I have been doing since last update. I have a LOT of different stuff, mostly small things I have done, so it might be a bit messy, but here goes!
 
000.jpg
 
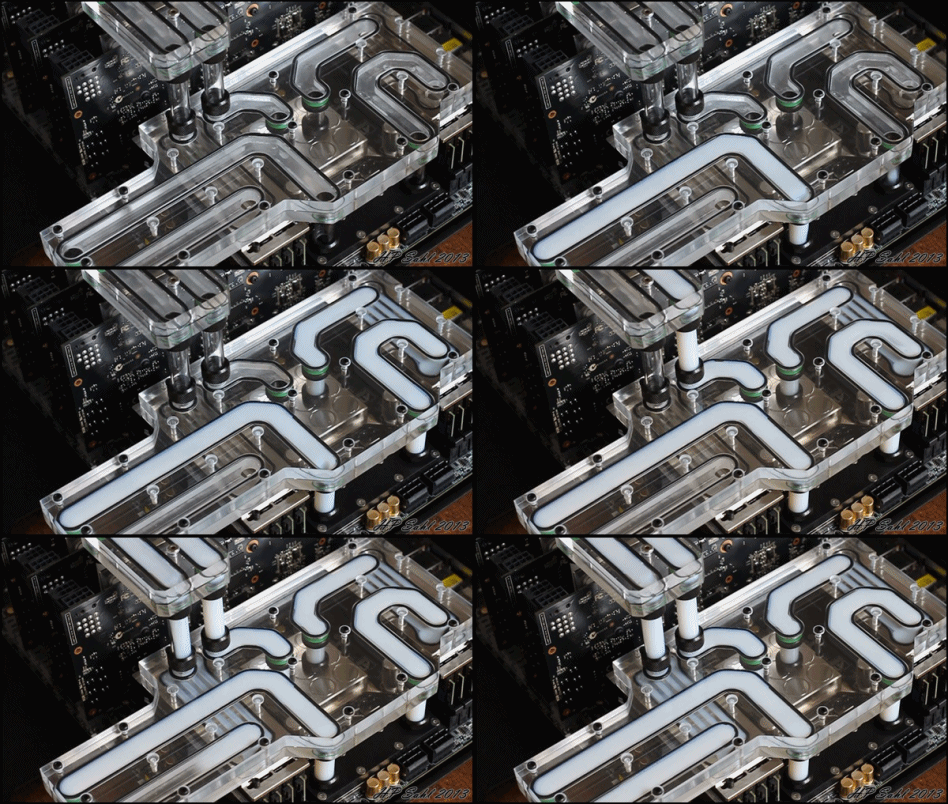
So, as in project NV, I wanted to make an interconnect plate for the motherboard components. One of the things that bugged me about N.V. was that it had dual loops. For this build I neither wanted or needed dual loops, so the logic thing was to implement the GPU in the interconnect block.
 
001.JPG
 
The actual block here was cut by a guy well known in the modding scene, Angel_od. Anyone that has seen his work knows that this guy is a friggin champ at machining, and anything he touches instantly turns into awesomeness with fireworks flying left and right, while little mexicans dances and cheers.
 
002.JPG
 
003.JPG
 
004.JPG
 
005.JPG
 
The general buildup of the block is the same system I used on N.V. For this I decided to go with smaller o-rings, to make it look more sexy.
 
006.JPG
 
007.JPG
 
Also as in N.V. I put the RAM cooler directly into the acrylic block. This time I made the RAM block the same level as the actual acrylic, also to streamline the design more.
 
008.JPG
 
With the new Bitspower Crystal link fittings. These things are AWESOME by the way:D
 
009.JPG
 
Everything connected without hardware. Thats a lot of acrylic and copper right there:D
 
010.JPG
 
Closeup
 
011.JPG
 
Another angle. You can see where I plan on putting the out and inlet. Might seem like a wierd position, but you will see why later.
 
012.JPG
 
Not a lot of room to work with. And as it turns out, my measurements was wrong, so I actually had to lower the block by 3 mm, causing the two fittings to almost touch!
 
013.JPG
 
More pictures of the block. I really really like how this came out!
 
014.JPG
 
015.JPG
 
016.JPG
 
017.JPG
 
018.JPG
 
Mounting time! This really is a neat little combo. ASUS Impact motherboard, Intel I7 4770K, 16 GB corsair Dominator Ram, 2 x Corsair Neutron GTX 240 gb ssd´s & an ASUS GTX780.
 
019.JPG
 
Now, as I showed before, the position of the inlet/outlet might seem a little strange, but this is because I wanted to have no watercooling other than the blocks in the actual case itself. If you read one of the last updates, you will see that I have made a seperate watercooling box that I will use to cool this and other builds. So all I needed to do was to route the inlet and outlet out of the case.
 
020.JPG
 
Fully mounted. I would go as far as to say that it will be hard to make a completely cooled motherboard + GPU + RAM system any tighter than this :D
 
You can also see that I startet on the sleeving using E22 telenois Sleeving and E22 cable combs. I have no idea why I have never used them before because they are AWESOME! Next update will contain full sleeving of everything, but I need to order some more combs first:P
 
021.JPG
 
Another closeup. I am still undecided on what dye to use, if any at all. 
 
024.JPG
 
The connection between the GPU and the interconnect block. 
 
025.JPG
 
And from the rear.
 
026.JPG
 
027.JPG
 
two top views.
 
029.JPG
 
030.JPG
 
031.JPG
 
Last but not least, a few pictures of the raw block!
 
I hoped you enjoyed this, and think it was worth the wait. Next up, I will try and finish the insides before I kill my wallet when starting on getting the outer shell made.
Link to comment
Share on other sites

Link to post
Share on other sites

Oh mama @p0Pe is back. Looking sexy love it man ! :) and congrats on the job.

Btw what about some transparent orange dye liquid I dont know why but It came to my mind first. Maybe similar color like on the PSU sticker ?


My modded Air 540 build

Spoiler


Link to comment
Share on other sites

Link to post
Share on other sites

Oooohhh. Really nice work p0Pe. Can't wait! Also, congratulations on the new job! Hope everything goes well.

Sorry for the convoluted speech pattern.

Link to comment
Share on other sites

Link to post
Share on other sites

Yesyesyesyes! cheerleader-happy.gif

BUILD LOGS: HELIOS - Latest Update: 2015-SEP-06 ::: ZEUS - BOTW 2013-JUN-28 ::: APOLLO - Complete: 2014-MAY-10
OTHER STUFF: Cable Lacing Tutorial ::: What Is ZFS? ::: mincss Primer ::: LSI RAID Card Flashing Tutorial
FORUM INFO: Community Standards ::: The Moderating Team ::: 10TB+ Storage Showoff Topic

Link to comment
Share on other sites

Link to post
Share on other sites

this is seriously one of the coolest things i have seen

Desktop - Corsair 300r i7 4770k H100i MSI 780ti 16GB Vengeance Pro 2400mhz Crucial MX100 512gb Samsung Evo 250gb 2 TB WD Green, AOC Q2770PQU 1440p 27" monitor Laptop Clevo W110er - 11.6" 768p, i5 3230m, 650m GT 2gb, OCZ vertex 4 256gb,  4gb ram, Server: Fractal Define Mini, MSI Z78-G43, Intel G3220, 8GB Corsair Vengeance, 4x 3tb WD Reds in Raid 10, Phone Oppo Reno 10x 256gb , Camera Sony A7iii

Link to comment
Share on other sites

Link to post
Share on other sites

 Dear god this build is jaw dropping 

truly a beast of a build wow just wow 

IntelCorei54670k,Maximus VI Formula,Swift tech H220, 16gigs Corsair Dominator platinums, Asus DCUII GTX 780,1x256 840 evo, 1x 2TB Segate barracuda, Corsair AX 860, 

3 X Noctua NF-F12, 2x Noctua NF A-14, Ducky Shine 3 Blue Leds Blue switches, Razer Death Adder 2012, Corsair vengence 1400  

Link to comment
Share on other sites

Link to post
Share on other sites

I like the mid plate idea. I don't see that on ITX builds as much. It is a cool idea to have very little tubing.

CPU-- AMD FX-8320 (Stock), Motherboard-- ASUS M5A99FX PRO R 2.0, RAM-- Team 8gb 1600Mhz, GPU-- Sapphire 7870 GHz with OC Edition, Case-- NZXT Tempest 210, PSU-- Corsair CX600m, HDD, 1tb Seagate & 2tb WD External, Monitor-- Dell S2240M IPS Display, Keyboard/Mouse-- Some Logitech keyboard and some Dell mouse, Speakers-- Logitech Z533

Link to comment
Share on other sites

Link to post
Share on other sites


Oh mama @p0Pe is back. Looking sexy love it man ! :) and congrats on the job.

Btw what about some transparent orange dye liquid I dont know why but It came to my mind first. Maybe similar color like on the PSU sticker ?


Thanks man!


I am still looking into what dye to use, if any.


Oooohhh. Really nice work p0Pe. Can't wait! Also, congratulations on the new job! Hope everything goes well.


Thanks man!


Yesyesyesyes! cheerleader-happy.gif


:D


this is seriously one of the coolest things i have seen


Glad you like it!


 Dear god this build is jaw dropping 

truly a beast of a build wow just wow 


Small beast:D


I like the mid plate idea. I don't see that on ITX builds as much. It is a cool idea to have very little tubing.


Thanks! Check out my previous build where I made my first version of it: 


I love the abstract look.


Glad you do!


Spent all night sleeving, and will have a new update soon:D Almost only need the outer panels now!

Link to comment
Share on other sites

Link to post
Share on other sites

dammmmm! that looks good

Thanks man!


Small update on the sleeving. Nate George was kind enough to ship me a few samples of the Teleios sleeving, and I instantly new that it would be what I was going to use in the case! Along with his cable combs, sleeving has just gotten so much more fun:D
 
m001.JPG
 
First I had to take apart the case to do the wires that came down from the motherboard, and the wires from the harddrive on the side.
 
m002.JPG
 
After that  I fixed the fans that are going to sit in the pedestal.
 
m003.JPG
 
Only needed power wires from one of the fans. If you solder together all 3 wires, you will mess up the signal from the fans, and not get a precise RPM reading.
 
m004.JPG
 
Cut to length and sleeved. It is hard, but enjoyable to get the sleeving and heatshrink in place properly in fans. Worth it in the end though.
 
m005.JPG
 
m006.JPG
 
Fans finished and ready to mount. Still need some minor parts so that they can be mounted to the pedestal.
 
m007.JPG
 
Wires for the 24 pin cut to length and crimped. This took far longer time than I want to admit.
 
m009.jpg
 
Worth it though. The original wire was faaaaar to long.
 
m008.JPG
 
The aftermatch. Need to clean this up, and get some pictures taken:D
Link to comment
Share on other sites

Link to post
Share on other sites

That  24pin <3

Desktop - Corsair 300r i7 4770k H100i MSI 780ti 16GB Vengeance Pro 2400mhz Crucial MX100 512gb Samsung Evo 250gb 2 TB WD Green, AOC Q2770PQU 1440p 27" monitor Laptop Clevo W110er - 11.6" 768p, i5 3230m, 650m GT 2gb, OCZ vertex 4 256gb,  4gb ram, Server: Fractal Define Mini, MSI Z78-G43, Intel G3220, 8GB Corsair Vengeance, 4x 3tb WD Reds in Raid 10, Phone Oppo Reno 10x 256gb , Camera Sony A7iii

Link to comment
Share on other sites

Link to post
Share on other sites

m008.JPG


The aftermatch. Need to clean this up, and get some pictures taken:D

i love how you just have a random cpu lying around on your table. I mean, i have one here too but mine is an old E6750 whereas this one looks a whole lot newer! :D

Love that build too btw ^^ But where did you get these cable spacing things you used on the 24pin? You got them from the US cause i dont know of a place to get them here in europe.

Gaming HTPC:

R5 5600X - Cryorig C7 - Asus ROG B350-i - EVGA RTX2060KO - 16gb G.Skill Ripjaws V 3333mhz - Corsair SF450 - 500gb 960 EVO - LianLi TU100B


Desktop PC:
R9 3900X - Peerless Assassin 120 SE - Asus Prime X570 Pro - Powercolor 7900XT - 32gb LPX 3200mhz - Corsair SF750 Platinum - 1TB WD SN850X - CoolerMaster NR200 White - Gigabyte M27Q-SA - Corsair K70 Rapidfire - Logitech MX518 Legendary - HyperXCloud Alpha wireless


Boss-NAS [Build Log]:
R5 2400G - Noctua NH-D14 - Asus Prime X370-Pro - 16gb G.Skill Aegis 3000mhz - Seasonic Focus Platinum 550W - Fractal Design R5 - 
250gb 970 Evo (OS) - 2x500gb 860 Evo (Raid0) - 6x4TB WD Red (RaidZ2)

Synology-NAS:
DS920+
2x4TB Ironwolf - 1x18TB Seagate Exos X20


Audio Gear:

Hifiman HE-400i - Kennerton Magister - Beyerdynamic DT880 250Ohm - AKG K7XX - Fostex TH-X00 - O2 Amp/DAC Combo - 
Klipsch RP280F - Klipsch RP160M - Klipsch RP440C - Yamaha RX-V479


Reviews and Stuff:

GTX 780 DCU2 // 8600GTS // Hifiman HE-400i // Kennerton Magister
Folding all the Proteins! // Boincerino

Useful Links:
Do you need an AMP/DAC? // Recommended Audio Gear // PSU Tier List 

Link to comment
Share on other sites

Link to post
Share on other sites

Create an account or sign in to comment

You need to be a member in order to leave a comment

Create an account

Sign up for a new account in our community. It's easy!

Register a new account

Sign in

Already have an account? Sign in here.

Sign In Now


×