With the dawn of the supposed "next gen" consoles, I started to think that maybe there is something to being able to sit on your couch and play games and watch movies on a big TV. So I started to consider my options and because running an HDMI cable from my main rig to the living room TV was just too easy, I thought maybe cramming a new Kaveri APU into a something like a NES would be cool. But since I've seen countless NES PCs around the internet I wanted to do something a bit more original, then was born the N64 PC!
My goal was to mod the case of an N64 to fit mini itx FM2+ motherboard sporting a A10 7850k (Which at 95W TDP will require some interesting cooling methods) and wire up all the original controller ports and switches to work just like a real N64. The finished product should be capable of playing most new AAA titles at 720p 30FPS (or play them through Steam in home streaming) and any emulator I wanted to put on it. I also had the idea of installing an internal XBOX 360 wireless controller adapter so I didn't have to have one plugged in the back all the time.
It was a pretty straight forward process, just four screws on the bottom of the console but unfortunately they are a proprietary tamper proof screw so either you have to do what I did and melt the end of pen to mould to the screw or buy a custom made bit. I'd strongly recommend the latter.
The innards of this thing are pretty interesting absolutely everything is attached to one tiny board, even things like the switches and the cartridge slot!
A test fit. It's going to take a lot of modding to make this thing fit!
Getting started on the dremelling!
The top.
The controller ports.
The Motherboard! I chose this one in particular for it's layout and it's inclusion of a mSata port. With that I don't have to mount a full 2.5" SSD inside the thing.
The CPU cooler. I chose this for no other reason than because it's small and apparently can cool a 95W TDP processor, let's hope that's true!
Both together.
Well, I can't really say I'm surprised it doesn't fit. I guess I'm to have to get creative!
The controller adapter.
Removed from their cases.
Starting de-soldering!
Started soldering the original controller ports. Now, if you're doing this yourself you're going to have to take a metal brush to the pins and really clean them. Just flux isn't going to cut it, I found out the hard way.
It's definitely going to require some better cable management.
The Xbox 360 Controller adapter. I got a knock off one 'cause I didn't want to spend the extra money just to tear it apart. My original plan with this thing was to hook up the case LED to the controller sync led and hook up the reset button to the sync button so when you pressed the sync(reset) button the case LED would blink kinda like on a 360.
Did I mention getting into one of these things is freaking impossible! It'd probably help if I had a slimmer screw driver or even a spudger but if you're patient enough you'll eventually break the seal.
Finally!
And it still works, which is a bonus!
So my plan now is to make a new bottom for the N64 out of acrylic this should gain me at least another centimetre of clearance and will make it more flexible if I need to raise the case even higher.
There! I'll come back and clean up the acrylic later.
And it still doesn't quite fit, hopefully it will when I get the feet back on.
My first crimp! To do this right you really need the right crimpers. I forget which ones I got but if someone really wants to know I'll go looking for them.
Soldering the crimped wires on.
I removed the switch from the Xbox controller adapter
And started to solder.
The connector went on nicely!
Doing some heat-shrinking, it really cleans up the wires.
Dem zip ties.
All installed into the case. It's looking nice!
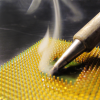
Uhh.. So I plugged in the Xbox controller adapter after wiring it up to see if it still worked and.. Well there was smoke and it got incredibly hot. It seems to have blew what I assume to be the capacitor above the 5v solder joint. I don't think I'll be able to find a replacement and I don't want to wire up another one just for the same thing to happen. So unless I can figure what caused this I guess this idea is going on hiatus.
The wiring for the USB everything seems to be in the right order.
Wring for the LED. Which upon closer inspection was wrong but I don't think that is what could have killed it.
I went back and cleaned up the base.
And made a back plate.
Also cut the feet accordingly.
Alright so that's everything I've done up until now. I don't know how frequent the updates are going to come for this but I'm hoping I'll finish this within the month!
This is also my first post on the forums so if there are any norms I'm breaking here or things I should feel free to let me know, thanks!


 SageC got a reaction from stoicmegazord in [Completed] Project N64 PC: A Kaveri HTPC inside a Nintendo 64
 SageC reacted to Jamtoad in any ideas how to fix a mech spacebar that has to be pressed in the center to regester?
 SageC got a reaction from Likwid in LTT vessel videos uploaded in dailymotion
 SageC got a reaction from mdavidat in Vice-President of CaseLabs calls out Thermaltake for directly copying their designs (Computex 2015)
 SageC got a reaction from EliminatingAngels in steam hacked. how long does support take?
 SageC got a reaction from Mattrixx in steam hacked. how long does support take?
 SageC got a reaction from CoolaxGaming in steam hacked. how long does support take?
 SageC got a reaction from TheSLSAMG in steam hacked. how long does support take?
 SageC got a reaction from Unhelpful in Opinion on "Caitlyn Jenner?"
 SageC got a reaction from blackadder in Do you even lift bruh?
 SageC got a reaction from Tim Drake in 500w Enough?
 SageC got a reaction from manikyath in 500w Enough?
 SageC got a reaction from blueballs in 500w Enough?
 SageC got a reaction from Fortress in Is an SSHD worth it?
 SageC got a reaction from Enderman in The Massive LTT Poll
 SageC got a reaction from Frankie in [Completed] Project N64 PC: A Kaveri HTPC inside a Nintendo 64


