Jump to content

4x10Gbit (40Gbit) Fiber-optic SAN/iPXE Network Boot Build Log

This is a project I've been meaning to get off the ground for quite some time. Given my work schedule I only predict I'll be able to work on it and post updates once a week so to all who chose to follow along I ask for your patience. 🙂


For those clicking because they're not familiar with the SAN & iPXE terminologies:

Spoiler

What is a SAN?

A SAN or Storage Area Network is a computer network focused to delivering block-level storage to connected clients. Unlike a NAS or File Server which many use SMB, NFS, or SSH/SFTP for the transferring of files between client & server a SAN will use protocols such as iSCSI (Internet Small Computer Systems Interface). Not only does iSCSI present a physical or virtual disk to the client Operating System as though it were directly connected but data is written to said network drive in the same manor as well.


What is iPXE Network Boot?

iPXE or Preboot eXecution Environment is a feature included with many makes and model of network adapter used in the booting of a network resource. Unlike traditional methods of booting a computer where-in you boot to a HDD/SSD, CD, or USB device iPXE enables your computer to reach out to a server on the network hosting the appropriate services to boot from. This can be a TFTP server, or a server hosting a iSCSI or NFS share.


This is a special network project I've been planning and have had in the works for a number of months. Finally I have everything I need to get it started and I figured some of you might like to follow along. I plan to write a full tutorial based on what ends up working here if you'd like to try building something like this yourself.


The focus of this build log is to setup a small series of servers so that they all boot off of a network resource. The reasons for doing this are:

  • Ease of Repairability
  • Reduce Downtime
  • Ease of Scalability
  • Overall it's very cool to me and I want to play with it. :3

The build log is going to consist of four main stages:

  1. Preparing the network hardware (assembling, configuring, firmware updates)
  2. Setting up our hypervisor server (installing NICs, configuring IP's, preparing Virtual Machines)
  3. Configuring the hosting servers (iSCSI & DHCP servers)
  4. Setting up the client servers (establishing iSCSI connections, installing OS's from scratch)

In the end these client servers will act as nodes and with this network additional nodes will be added in the future.


For the time being this is the network hardware we'll be working with:


2x PCIe-10G-SFP+ made by TG-NET based on the BCM57810S controller.

DSCF0153.thumb.JPG.dd0a470af5efd4693799d8f8b4226ed5.JPG

These will be installed in the hypervisor server and will be in charge of hosting the virtual disks our nodes will boot from.


3x 10Gbe SFP+ Mellanox ConnectX-2 MNPA19-XTR network cards

DSCF0154.thumb.JPG.91bcf0ee6ab8e08ee2ae928adb0d224d.JPG

These 10 Gigabit NIC's are very old but very cool for networking aficionados, did I mention they're cheap? 😛


14x FiberStore 10G SFP+ 850nm 300m transceivers.

DSCF0152.thumb.JPG.0dcfe6b77a721f04b22ed2b2a2ea4dc0.JPG

These are cheap SFP+ modules that convert the electrical signals that the NIC puts out and converts them to laser light signals that we can hook-up our fiber patch cables to.


7x OFNR LC/UPC-LC/UPC 50/125 OM4 Multimode Fiber-optic patch cables

DSCF0155.thumb.JPG.0ae29436c5410134bff32d053961d854.JPG

These are a inexpensive glass/ceramic composite fiber optic patch cables. They're easy to get and are good for short runs. I've only tested them for 10Gig up to 50ft but I'm sure you can use them for longer runs.


Tonight is just an introduction. I will try to get something started tomorrow. I'm excited to get this underway and to try and overcome the hurdles I'll inevitably have to cross. :old-grin:


DSCF0151.thumb.JPG.a598d881ee541c0d2880611d05b39193.JPG

Link to comment
Share on other sites

Link to post
Share on other sites

This is really cool!
Would be awesome if you could show the setup process of a machine that then will boot from a iSCSI attached drive, cause I have never worked with a bootable iSCSI drive and I wonder how you would even set this up in the beginning. I'd imagine you'd have to point to the iSCSI share during the installation process. Is that even possible with Windows? Is there some trickery to it? I WANNA SEE MOAR!


Link to comment
Share on other sites

Link to post
Share on other sites

nice! this should definitely be a cool project to follow along with.

are you running the connections straight from the host machine to the clients or are you using a switch of some kind?

Link to comment
Share on other sites

Link to post
Share on other sites

4 hours ago, Senzelian said:

This is really cool!
Would be awesome if you could show the setup process of a machine that then will boot from a iSCSI attached drive, cause I have never worked with a bootable iSCSI drive and I wonder how you would even set this up in the beginning. I'd imagine you'd have to point to the iSCSI share during the installation process. Is that even possible with Windows? Is there some trickery to it? I WANNA SEE MOAR!

Umm 😅, this is going to be strictly Linux/UNIX but in theory it's possible on Windows yes. For my implementation here we'll be configuring a GNU/Linux DHCP server. The DHCP server will respond to the iPXE query and provide it with the iSCSI server's IP & LUN#. There's some special setup involved in installing the OS but the DHCP server is the glue that holds it all together. Don't worry I will be going fully in depth step by step then later on re-writing it as a tutorial.


3 hours ago, RollinLower said:

nice! this should definitely be a cool project to follow along with.

are you running the connections straight from the host machine to the clients or are you using a switch of some kind?

These will be ran to a Ubiquiti US-16-XG. The more I think about this project the more I wish I went with a EdgeSwitch ES‑16‑XG but either will work. The easy way to set this up would have been to use a switch with a single 40 Gigabit interface but given that's not what I have here we're actually going to be running four separate DHCP hosted networks on four independent VLAN's.


I've thought to use Link Aggregation between the server and the switch to create a single 40Gig pipe but I've been given reason to believe that wouldn't work with an iSCSI workload. I would use multi-path but that requires everything to have an equal number of interfaces so that's off the table. Please tell me if I'm wrong otherwise. I think LA is only layer 2 so I don't see why it wouldn't work here.

Link to comment
Share on other sites

Link to post
Share on other sites

On 8/15/2021 at 1:59 PM, Senzelian said:

I WANNA SEE MOAR!

Follow the topic so you get notified when I post updates. 😉


First update! Now there are multiple directions I could go to start things off but first and foremost installing the NIC's seems appropriate. This server here with twenty-four 3.5" drive bays is my primary hypervisor server.


DSCF0156.thumb.JPG.fb68213564f0a1bb78711ba1475b3dad.JPG


As we can see I just so happen to have two PCI_e slots left to spare.


DSCF0157.thumb.JPG.2789ee278174923595ed0564f57201c5.JPG


The server runs a Debian Linux based distribution known as PROXMOX which uses QEMU/KVM a free and open source virtualizer.


1074117353_Screenshotfrom2021-08-2121-02-57.thumb.png.cef6934f97f6c2e7bde8f7beee480a24.png


It's proven it's usefulness and reliability under a wide variety of use scenarios including things like hardware pass-through (if you're not afraid to get into some nitty-gritty CLI action :old-grin:) but we won't be doing that for this project. 😛


Now ordinarily I wouldn't recommend using a hypervisor server for this. I'd recommend going bare metal but for this particular use case it's the most convenient for me and downtime for these systems won't be a big deal. How I plan on managing this SAN will be made more clear when we start getting into the software side of things.


After installing the NIC's and running the lspci -vnn command we can see that both are being recognized and PROXMOX has a driver for them to use.


...
81:00.0 Ethernet controller [0200]: Broadcom Limited NetXtreme II BCM57810 10 Gigabit Ethernet [14e4:168e] (rev 10)
        Subsystem: Broadcom Limited NetXtreme II BCM57810 10 Gigabit Ethernet [14e4:1000]
        Physical Slot: 5
        Flags: bus master, fast devsel, latency 0, IRQ 33, NUMA node 1
        Memory at fb000000 (64-bit, prefetchable) [size=8M]
        Memory at fa800000 (64-bit, prefetchable) [size=8M]
        Memory at fb810000 (64-bit, prefetchable) [size=64K]
        Expansion ROM at fbe80000 [disabled] [size=512K]
        Capabilities: [48] Power Management version 3
        Capabilities: [50] Vital Product Data
        Capabilities: [58] MSI: Enable- Count=1/8 Maskable- 64bit+
        Capabilities: [a0] MSI-X: Enable+ Count=32 Masked-
        Capabilities: [ac] Express Endpoint, MSI 00
        Capabilities: [100] Advanced Error Reporting
        Capabilities: [13c] Device Serial Number 40-8d-5c-ff-fe-3f-c4-78
        Capabilities: [150] Power Budgeting <?>
        Capabilities: [160] Virtual Channel
        Capabilities: [1b8] Alternative Routing-ID Interpretation (ARI)
        Capabilities: [220] #15
        Capabilities: [300] #19
        Kernel driver in use: bnx2x
        Kernel modules: bnx2x

81:00.1 Ethernet controller [0200]: Broadcom Limited NetXtreme II BCM57810 10 Gigabit Ethernet [14e4:168e] (rev 10)
        Subsystem: Broadcom Limited NetXtreme II BCM57810 10 Gigabit Ethernet [14e4:1000]
        Physical Slot: 5
        Flags: bus master, fast devsel, latency 0, IRQ 102, NUMA node 1
        Memory at fa000000 (64-bit, prefetchable) [size=8M]
        Memory at f9800000 (64-bit, prefetchable) [size=8M]
        Memory at fb800000 (64-bit, prefetchable) [size=64K]
        Expansion ROM at fbe00000 [disabled] [size=512K]
        Capabilities: [48] Power Management version 3
        Capabilities: [50] Vital Product Data
        Capabilities: [58] MSI: Enable- Count=1/8 Maskable- 64bit+
        Capabilities: [a0] MSI-X: Enable+ Count=32 Masked-
        Capabilities: [ac] Express Endpoint, MSI 00
        Capabilities: [100] Advanced Error Reporting
        Capabilities: [13c] Device Serial Number 40-8d-5c-ff-fe-3f-c4-78
        Capabilities: [150] Power Budgeting <?>
        Capabilities: [160] Virtual Channel
        Capabilities: [1b8] Alternative Routing-ID Interpretation (ARI)
        Capabilities: [220] #15
        Kernel driver in use: bnx2x
        Kernel modules: bnx2x
...
83:00.0 Ethernet controller [0200]: Broadcom Limited NetXtreme II BCM57810 10 Gigabit Ethernet [14e4:168e] (rev 10)
        Subsystem: Broadcom Limited NetXtreme II BCM57810 10 Gigabit Ethernet [14e4:1000]
        Physical Slot: 4
        Flags: bus master, fast devsel, latency 0, IRQ 37, NUMA node 1
        Memory at f8800000 (64-bit, prefetchable) [size=8M]
        Memory at f8000000 (64-bit, prefetchable) [size=8M]
        Memory at f9010000 (64-bit, prefetchable) [size=64K]
        Capabilities: [48] Power Management version 3
        Capabilities: [50] Vital Product Data
        Capabilities: [a0] MSI-X: Enable+ Count=32 Masked-
        Capabilities: [ac] Express Endpoint, MSI 00
        Capabilities: [100] Advanced Error Reporting
        Capabilities: [13c] Device Serial Number 40-8d-5c-ff-fe-3f-c5-98
        Capabilities: [150] Power Budgeting <?>
        Capabilities: [160] Virtual Channel
        Capabilities: [1b8] Alternative Routing-ID Interpretation (ARI)
        Capabilities: [1c0] Single Root I/O Virtualization (SR-IOV)
        Capabilities: [220] #15
        Capabilities: [300] #19
        Kernel driver in use: bnx2x
        Kernel modules: bnx2x

83:00.1 Ethernet controller [0200]: Broadcom Limited NetXtreme II BCM57810 10 Gigabit Ethernet [14e4:168e] (rev 10)
        Subsystem: Broadcom Limited NetXtreme II BCM57810 10 Gigabit Ethernet [14e4:1000]
        Physical Slot: 4
        Flags: bus master, fast devsel, latency 0, IRQ 123, NUMA node 1
        Memory at f7800000 (64-bit, prefetchable) [size=8M]
        Memory at f7000000 (64-bit, prefetchable) [size=8M]
        Memory at f9000000 (64-bit, prefetchable) [size=64K]
        Capabilities: [48] Power Management version 3
        Capabilities: [50] Vital Product Data
        Capabilities: [a0] MSI-X: Enable+ Count=32 Masked-
        Capabilities: [ac] Express Endpoint, MSI 00
        Capabilities: [100] Advanced Error Reporting
        Capabilities: [13c] Device Serial Number 40-8d-5c-ff-fe-3f-c5-98
        Capabilities: [150] Power Budgeting <?>
        Capabilities: [160] Virtual Channel
        Capabilities: [1b8] Alternative Routing-ID Interpretation (ARI)
        Capabilities: [1c0] Single Root I/O Virtualization (SR-IOV)
        Capabilities: [220] #15
        Kernel driver in use: bnx2x
        Kernel modules: bnx2x
...


The three clients that will be getting hooked up are these nodes that sit on-top of the server rack.


DSCF0162.thumb.JPG.a06a3d665b9266691f2bf573cdcc3bbd.JPG


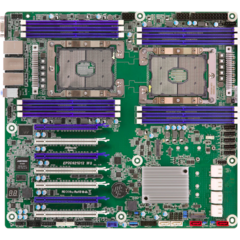
For those interested from left to right the system specs are as follows:


Sys1:

Spoiler

DSCF0165.thumb.JPG.fbb2781182c7d129a307bc77f8fb5262.JPG


CPU: Dual Intel Xeon E5-2670's

RAM: 96GB (12x8GB) Kingston UDIMM ECC DDR3 @ 1600MHz

Motherboard: ASRock Rack EP2C602-4L/D16


Sys2:

Spoiler

DSCF0164.thumb.JPG.087179914f2b9c4e3c27f634023785fe.JPG


CPU: Intel Core i7 5960X

RAM: 32GB (4x8GB) G.Skill Ripjaws X series DDR4 @ 2400MHz

Motherboard: MSI X99 SLI Plus


Sys3:

Spoiler

DSCF0163.thumb.JPG.da7b5a7c53bc91ffc10fc4372bbc1e72.JPG


CPU: Intel Core i7 3930K

RAM: 4x8GB G.Skill Sniper series DDR3 @ 1866MHz

Motherboard: ASUS Sabertooth X79


That's all I have time for today. I ran into several issues along the way getting these cards installed that simply ate up all my other time. If I can, tomorrow we'll create the virtual interfaces in PROXMOX, run all the fiberoptic cable, and possibly setup VLANs on the network switch.

Link to comment
Share on other sites

Link to post
Share on other sites

6 hours ago, Windows7ge said:

Follow the topic so you get notified when I post updates. 😉

Thanks for quoting me. I completely forgot to do that 😦


btw. where did you get these white honey comb front panels for your silverstone (I assume?) 4U rack cases? Are they 3d printed?


Link to comment
Share on other sites

Link to post
Share on other sites

1 minute ago, Senzelian said:

Thanks for quoting me. I completely forgot to do that 😦


btw. where did you get these white honey comb front panels for your silverstone (I assume?) 4U rack cases? Are they 3d printed?

Was thinking the same, those look like airflow monsters!

Link to comment
Share on other sites

Link to post
Share on other sites

1 minute ago, RollinLower said:

Was thinking the same, those look like airflow monsters!

Yeah! That's why I'm interested in it.
I have a Silverstone RM42-502 for which a friend of mine is currently still making a new front panel to house 3 120mm fans. I already have three Noctua NF-A12s sitting around for that, but making the front panel takes a while.


Link to comment
Share on other sites

Link to post
Share on other sites

22 minutes ago, Senzelian said:

Yeah! That's why I'm interested in it.
I have a Silverstone RM42-502 for which a friend of mine is currently still making a new front panel to house 3 120mm fans. I already have three Noctua NF-A12s sitting around for that, but making the front panel takes a while.

I'm doing a similar mod right now, check the 'vouwfabriek' link in my signature. 😉

Link to comment
Share on other sites

Link to post
Share on other sites

5 hours ago, Senzelian said:

btw. where did you get these white honey comb front panels for your silverstone (I assume?) 4U rack cases? Are they 3d printed?

5 hours ago, RollinLower said:

Was thinking the same, those look like airflow monsters!

These cases are modified Rosewill RSV-R4100's (Product page apparently no longer available). And those front bezels are indeed 3D printed based on my own design. Built for a little bit of aesthetic and maximum airflow as these nodes are for high compute applications and produce quite a bit of heat.


I have a old build log of when I built two of the three.

Bringing up this old topic also gives away what these boxes will be doing.

Link to comment
Share on other sites

Link to post
Share on other sites

So linking all of these NICs together as mentioned when answering a previous query is the Ubiquiti Unifi 16-XG-US. The Ubiquiti Unifi series of switches uses what's known as the Unifi Network Application which is a client side web browser app for managing Unifi products. Although it can integrate well for some users I'm more of a proponent for the device just hosting it's own WebUI (Ubiquiti's Edge series line-up). This comes at a premium though because it's a more enterprise like feature as oppose to pro-sumer.


Setup with the Network Application and registering the 16-XG-US it comes with all the bells and whistles you'd want to see from a fully managed layer 2 switch.


unifi-java-web-applet.thumb.png.451d942c71ee1439c979ecc765cbfe58.png


In the menu to the right you can see a rough layout of the switch ports along with the status of each interface. A nifty and convenient feature.


From here I hooked up the four interfaces leading from the switch to the hypervisor server.


DSCF0167.thumb.JPG.788b87b724a2f9dea0805234f291c10a.JPG


DSCF0168.thumb.JPG.b099dce83f9be62b71d72498768b43ec.JPG


Maybe it's just me but 40Gig worth of fiber networking coming out the back of a single server looks really sexy. 😆


Going into the switches configuration utility you can see that the four associated interfaces are now active at full 10Gig (blue).


hypervisor-connected.png.3ec3914c3c2dbb6e220238d8a1dc7436.png


From here we configure VLANs. For the uninitiated a VLAN (Virtual Local Area Network) also known as VLAN Tagging is a common feature on managed switches which enables the virtual segregation of ports. In other words you can have a switch behave like multiple independent switch. Of course there's much more to it than that but that's the quick and dirty explanation.


What I did is I created 4 profiles in the Unifi software. These profiles are the Default VLAN (VLAN1) then VLAN's 2-5.


vlan-profiles.thumb.png.e95f43fad1ae0f135bf6269d383c1e39.png


From here I grouped the ports as follows:

  • VLAN1 Ports: 1,2,3,4,13,14,15,16
  • VLAN2 Ports: 5,6
  • VLAN3 Ports: 7,8
  • VLAN4 Ports: 9,10
  • VLAN5 Ports: 11,12


vlan-grouping.png.7754798eee553892ffa12abb94022712.png


VLAN's 2,3,4, & 5 are the ones we're focused on. Getting everything plugged in and powered on we can now see all the applicable interfaces and their active ports.


nodes-connected.png.a5bfe5010f9e9407aea785f748da92f4.png


The switch is looking quite full now. Might have to think about an upgrade in the near future. :old-grin:


DSCF0169.thumb.JPG.7a0d54dd702262b9bf3d93715fd26191.JPG


Turning our attention to one of the nodes this is where the magic will happen.


mellanox.thumb.png.9d3339cde5b7383f57e87c190ea00231.png


It timed out because we haven't set up anything on the hypervisor yet but we will. What you'll want to note here is that each nodes NIC has the following MAC address:

  • i7 3930K: 00:02:c9:54:b6:44
  • i7 5960X: 00:02:c9:57:1e:ae
  • 2xE5-2670: 00:02:c9:57:1c:1a

Remembering these and which node they go to is going to be crucial to making this work. It's how iPXE will hand over control to our iSCSI disk once it's job is done.


And once again the time has come that I am simply out of time but we have all the hardware setup and we know it's basic functionality is good. We may run into issues down the road though as from previous experimentation with this I could not get DHCP to respond to a EPYCD8/7601 combo but I dropped the NIC in a DDR3 era machine and it booted to the virtual iSCSI drive no problem so I have high hope that we will have the 3930K rig & the Dual 2670 rig going but my thoughts of success with the 5960X rig are iffy. I do have a backup plan that involves an Intel X520-DA1 though. So look forward to that if it comes down to it. 😉


Until next week-end or a freak accident at work if I'm lucky. Good night!

Link to comment
Share on other sites

Link to post
Share on other sites

So where we left off last week we got all of the hardware setup and ready to go. Now we're going to start with with software side of things.


At the end of the last update I showed the Mellanox FlexBoot screen. This uses iPXE 1.0.0+. Now iPXE itself has a website where-in it's possible to either update the flash on the NIC, boot an updated flash from USB, or perform what is known as chain-loading where-in you have the DHCP server point iPXE on the NIC to a TFTP server which holds an updated iPXE file.


Of these options I've explored all of them and although the TFTP server is the smartest route if you have a large number of clients there's an issue with my NIC's where you need to tell the DHCP server to not send iPXE to the TFTP server after it retrieves the file or else it'll get stuck in a sort of boot-loop. However for my application here iPXE 1.0.0+ does the job just fine and I've not seen a reason yet to invest more time into solving the TFTP server issue though I may include instruction for setting that up anyhow in the tutorial.


Now for how you go about hosting the DHCP sever I'm sure the options are infinite but what I found works well for this hardware combination is a Debian distribution of GNU/Linux + isc-dhcp-server from the package manager.


I'm just going to download the latest LTS version of Ubuntu Server (20.04.3) and we'll give her a whirl. See if it works.


Getting the VM setup on the hypervisor I've gone ahead and configured the four 10Gig interfaces as bridges and passed them though using Paravirtualization. This (although unnecessary for the DHCP server) will allow full 4x10Gig throughput to the VM. In addition to this I've configured the interface IP addresses right from the installer menu as opposed to through netplan. Make things go a little faster/easier.


2019448218_Screenshotfrom2021-08-2915-11-25.thumb.png.73d9e078b642f73e2542e06f08ec3522.png

The 192.168.0.0/24 network is part of the home LAN so I can remote in if necessary. This will not facilitate the DHCP function as a DHCP server already exists on this network. I'm also using the 10.0.0.0/24 subnet so we're going to use subnets 10.1.0.0/24 - 10.4.0.0/24 for our four 10gig interfaces.


From here installing the DHCP server is as easy as:

sudo apt install isc-dhcp-server

You'll find it's configuration file located in:

/etc/dhcp/dhcpd.conf

Writing this file is actually pretty strait forward and simple even for a complex setup like this. We will have to jump back and forth between this and the iSCSI server though since they depend on one another to work but lets make sure DHCP is working first and that our NIC responds.


I've gone ahead and written up a starter configuration for the four interfaces since we don't yet know which physical interface goes to which virtual NIC. More will need to be added later:

subnet 10.1.0.0 netmask 255.255.255.0 {
    range 10.1.0.2 10.1.0.254;
    option routers 10.1.0.1;
#    next-server 10.1.0.X;
#    filename "undionly.kpxe";
}

subnet 10.2.0.0 netmask 255.255.255.0 {
    range 10.2.0.2 10.2.0.254;
    option routers 10.2.0.1;
#    next-server 10.2.0.X;
#    filename "undionly.kpxe";
}

subnet 10.3.0.0 netmask 255.255.255.0 {
    range 10.3.0.2 10.3.0.254;
    option routers 10.3.0.1;
#    next-server 10.3.0.X;
#    filename "undionly.kpxe";
}

subnet 10.4.0.0 netmask 255.255.255.0 {
    range 10.4.0.2 10.4.0.254;
    option routers 10.4.0.1;
#    next-server 10.4.0.X;
#    filename "undionly.kpxe";
}

And now we save/exit & restart the DHCP service:

systemctl restart isc-dhcp-server.service


To my delight on the first try we have an IP on our client! :old-grin:


441873295_Screenshotfrom2021-08-2916-01-44.png.207e2b5681623bc5d6d63ad840ab1c96.png


As an added bonus our other two clients also got IPs. I couldn't screen-capture these unfortunately. A raw picture of the monitor will have to do.


DSCF0170.thumb.JPG.17c3680927885a7c74b872fae5504b98.JPG


DSCF0171.thumb.JPG.4ecc36e8f7b34955f124a5edb92055de.JPG


What this information also tells us is that the VLAN's on our Ubiquiti US-16-XG are setup correctly and working since the switch now has four DHCP networks connected to it and each of our clients got an IP from a different subnet. It's important that these broadcast domains are isolated from one another otherwise the DHCP servers would fight one another when receiving requests.


So it would appear physically & logically the layout is:

  • i7-5960X rig got the 10.2.0.0/24 subnet
  • 2xE5-2670v1 rig got the 10.3.0.0/24 subnet
  • i7-3930K rig got the 10.4.0.0/24 subnet

Now as will be explained later it's important that each client's IP doesn't change going from iPXE -> Operating System. What IP each client get's during Network Boot doesn't matter so long as it doen't change when iPXE hand control over to the OS. To control the IP we're going to tell the DHCP server to only hand out a specific IP to a given MAC address for each machine. Now that we know which VLAN each box is associated with we can do that.


So my configuration file now looks like this:

subnet 10.1.0.0 netmask 255.255.255.0 {
    range 10.1.0.10 10.1.0.254;
    option routers 10.1.0.1;
#    next-server 10.1.0.X;
#    filename "undionly.kpxe";
}

subnet 10.2.0.0 netmask 255.255.255.0 {
    range 10.2.0.10 10.2.0.254;
    option routers 10.2.0.1;
#    next-server 10.2.0.X;
#    filename "undionly.kpxe";
}

host boinc-rig-5960x {
    hardware ethernet 00:02:c9:57:1e:ae;
    fixed-address 10.2.0.11;
#    option root-path "iscsi:10.2.0.2::::iqn.2021-8.boinc.com:lun2";
}

subnet 10.3.0.0 netmask 255.255.255.0 {
    range 10.3.0.10 10.3.0.254;
    option routers 10.3.0.1;
#    next-server 10.3.0.X;
#    filename "undionly.kpxe";
}

host boinc-rig-2x2670v1 {
    hardware ethernet 00:02:c9:57:1c:1a;
    fixed-address 10.3.0.11;
#    option root-path "iscsi:10.3.0.2::::iqn.2021-8.boinc.com:lun3";
}

subnet 10.4.0.0 netmask 255.255.255.0 {
    range 10.4.0.10 10.4.0.254;
    option routers 10.4.0.1;
#    next-server 10.4.0.X;
#    filename "undionly.kpxe";
}

host boinc-node-3930k {
    hardware ethernet 00:02:c9:54:b6:44;
    fixed-address 10.4.0.11;
#    option root-path "iscsi:10.4.0.2::::iqn.2021-8.boinc.com:lun4";
}

I realized I had mean't to create a reserved set of IP's in the event I want to host servers that provide other services to the nodes on these networks so you'll see many of the IP's have changed but to show how the host fixed-address option works here's the 2x2670v1 rig's iPXE page again after saving the changes.


2135305619_Screenshotfrom2021-08-2918-03-48.png.4685a37a24b66f11357843617c245eed.png


I'm going to take a break here. We have the DHCP server setup the iSCSI server is next. I'll go into more detail on it as that get's started.

Link to comment
Share on other sites

Link to post
Share on other sites

This update is going to be short since I'm out of time again.


To host our iSCSI server I explored the Debian tgt package extensively. No matter what I did I could not get iPXE to boot to any iSCSI volume hosted on it. After asking for help from the internet and getting no reply I decided to take a shot in the dark on a OS based entirely on something different that I once used a long time ago for file storage. FreeNAS or the now known as TrueNAS CORE I believe. Both are derived from a OS known as FreeBSD a UNIX-like OS. Completely different from Debian. And guess what. It worked.


Sticking to the theme of 100% CLI everything I swapped out FreeNAS for FreeBSD and it behaved identically. Unfortunately I tested this arrangement so long ago and haven't stayed in touch with it that I can't remember much about how to configure FreeBSD since its commands although similar to Debian differ enough to be a PITA. :old-tongue: Not to mention the process to setup the OS is completely different.


So this is going to take me some time to re-figure out but I'll keep you all posted.

Link to comment
Share on other sites

Link to post
Share on other sites

Welcome to FreeBSD! A UNIX-like Operating System.


31232462_Screenshotfrom2021-09-0411-35-05.png.d61032aec64be404d6b6b466f5d228ce.png


Compared to Debian based solutions the first annoying thing you learn about FreeBSD is that the package manager is not installed by default. 😕

root@boinc-iscsi:~ # pkg install nano
The package management tool is not yet installed on your system.
Do you want to fetch and install it now? [y/N]: 

If you're used to Debian sudo also doesn't exist by default:

iscsi@boinc-iscsi:~ $ sudo pkg install nano
-sh: sudo: not found
iscsi@boinc-iscsi:~ $ 

To fix this as root after installing the package manager we first install sudo with:

pkg install sudo

After this edit the sudoer's file with:

visudo

And append your users at the end of the file:

user ALL=(ALL) ALL

You can invoke your own restrictions if you want to but we're not worried about that here.


There's no restarting of any services. If you now try to use sudo you'll see the following prompt:

We trust you have received the usual lecture from the local System
Administrator. It usually boils down to these three things:

    #1) Respect the privacy of others.
    #2) Think before you type.
    #3) With great power comes great responsibility.

Password:

Type your password and you can now execute commands you otherwise couldn't unless you were root.


From here let's configure our network interfaces since FreeBSD doesn't have the most advanced UI during the OS installation. We can edit our interfaces with:

sudo nano /etc/rc.conf

A we can see during install FreeBSD only configured out primary interface:

hostname="boinc-iscsi"
ifconfig_vtnet0="inet 192.168.0.202 netmask 255.255.255.0"
defaultrouter="192.168.0.1"
sshd_enable="YES"
# Set dumpdev to "AUTO" to enable crash dumps, "NO" to disable
dumpdev="AUTO"
zfs_enable="YES"

Meanwhile we have a grand total of 5. Our four 10gig's of which don't have IP's yet:

iscsi@boinc-iscsi:~ $ ifconfig
vtnet0: flags=8863<UP,BROADCAST,RUNNING,SIMPLEX,MULTICAST> metric 0 mtu 1500
	options=4c07bb<RXCSUM,TXCSUM,VLAN_MTU,VLAN_HWTAGGING,JUMBO_MTU,VLAN_HWCSUM,TSO4,TSO6,LRO,VLAN_HWTSO,LINKSTATE,TXCSUM_IPV6>
	ether e2:39:57:4b:46:99
	inet 192.168.0.202 netmask 0xffffff00 broadcast 192.168.0.255
	media: Ethernet autoselect (10Gbase-T <full-duplex>)
	status: active
	nd6 options=29<PERFORMNUD,IFDISABLED,AUTO_LINKLOCAL>
vtnet1: flags=8822<BROADCAST,SIMPLEX,MULTICAST> metric 0 mtu 1500
	options=4c07bb<RXCSUM,TXCSUM,VLAN_MTU,VLAN_HWTAGGING,JUMBO_MTU,VLAN_HWCSUM,TSO4,TSO6,LRO,VLAN_HWTSO,LINKSTATE,TXCSUM_IPV6>
	ether c2:43:98:8c:e7:36
	media: Ethernet autoselect (10Gbase-T <full-duplex>)
	status: active
	nd6 options=29<PERFORMNUD,IFDISABLED,AUTO_LINKLOCAL>
vtnet2: flags=8822<BROADCAST,SIMPLEX,MULTICAST> metric 0 mtu 1500
	options=4c07bb<RXCSUM,TXCSUM,VLAN_MTU,VLAN_HWTAGGING,JUMBO_MTU,VLAN_HWCSUM,TSO4,TSO6,LRO,VLAN_HWTSO,LINKSTATE,TXCSUM_IPV6>
	ether 86:33:ed:aa:0a:17
	media: Ethernet autoselect (10Gbase-T <full-duplex>)
	status: active
	nd6 options=29<PERFORMNUD,IFDISABLED,AUTO_LINKLOCAL>
vtnet3: flags=8822<BROADCAST,SIMPLEX,MULTICAST> metric 0 mtu 1500
	options=4c07bb<RXCSUM,TXCSUM,VLAN_MTU,VLAN_HWTAGGING,JUMBO_MTU,VLAN_HWCSUM,TSO4,TSO6,LRO,VLAN_HWTSO,LINKSTATE,TXCSUM_IPV6>
	ether e2:f3:c6:e5:55:79
	media: Ethernet autoselect (10Gbase-T <full-duplex>)
	status: active
	nd6 options=29<PERFORMNUD,IFDISABLED,AUTO_LINKLOCAL>
vtnet4: flags=8822<BROADCAST,SIMPLEX,MULTICAST> metric 0 mtu 1500
	options=4c07bb<RXCSUM,TXCSUM,VLAN_MTU,VLAN_HWTAGGING,JUMBO_MTU,VLAN_HWCSUM,TSO4,TSO6,LRO,VLAN_HWTSO,LINKSTATE,TXCSUM_IPV6>
	ether d2:5f:2e:4d:48:64
	media: Ethernet autoselect (10Gbase-T <full-duplex>)
	status: active
	nd6 options=29<PERFORMNUD,IFDISABLED,AUTO_LINKLOCAL>
lo0: flags=8049<UP,LOOPBACK,RUNNING,MULTICAST> metric 0 mtu 16384
	options=680003<RXCSUM,TXCSUM,LINKSTATE,RXCSUM_IPV6,TXCSUM_IPV6>
	inet6 ::1 prefixlen 128
	inet6 fe80::1%lo0 prefixlen 64 scopeid 0x6
	inet 127.0.0.1 netmask 0xff000000
	groups: lo
	nd6 options=21<PERFORMNUD,AUTO_LINKLOCAL>
iscsi@boinc-iscsi:~ $ 

First. Let's test which NIC is connected to which VLAN by running DHCP across all four.


Back to our network configuration file I've edited it to request an IP automatically on all four interfaces:

hostname="boinc-iscsi"
ifconfig_vtnet0="inet 192.168.0.202 netmask 255.255.255.0"
defaultrouter="192.168.0.1"
sshd_enable="YES"
# Set dumpdev to "AUTO" to enable crash dumps, "NO" to disable
dumpdev="AUTO"
zfs_enable="YES"

ifconfig_vtnet1="DHCP"
ifconfig_vtnet2="DHCP"
ifconfig_vtnet3="DHCP"
ifconfig_vtnet4="DHCP"

Now we save/exit & restart the network service.

sudo service netif restart

And like that all our interfaces received IP's on their respective VLAN's:

vtnet1: flags=8863<UP,BROADCAST,RUNNING,SIMPLEX,MULTICAST> metric 0 mtu 1500
	options=4c07bb<RXCSUM,TXCSUM,VLAN_MTU,VLAN_HWTAGGING,JUMBO_MTU,VLAN_HWCSUM,TSO4,TSO6,LRO,VLAN_HWTSO,LINKSTATE,TXCSUM_IPV6>
	ether c2:43:98:8c:e7:36
	inet 10.1.0.10 netmask 0xffffff00 broadcast 10.1.0.255
	media: Ethernet autoselect (10Gbase-T <full-duplex>)
	status: active
	nd6 options=29<PERFORMNUD,IFDISABLED,AUTO_LINKLOCAL>
vtnet2: flags=8863<UP,BROADCAST,RUNNING,SIMPLEX,MULTICAST> metric 0 mtu 1500
	options=4c07bb<RXCSUM,TXCSUM,VLAN_MTU,VLAN_HWTAGGING,JUMBO_MTU,VLAN_HWCSUM,TSO4,TSO6,LRO,VLAN_HWTSO,LINKSTATE,TXCSUM_IPV6>
	ether 86:33:ed:aa:0a:17
	inet 10.2.0.10 netmask 0xffffff00 broadcast 10.2.0.255
	media: Ethernet autoselect (10Gbase-T <full-duplex>)
	status: active
	nd6 options=29<PERFORMNUD,IFDISABLED,AUTO_LINKLOCAL>
vtnet3: flags=8863<UP,BROADCAST,RUNNING,SIMPLEX,MULTICAST> metric 0 mtu 1500
	options=4c07bb<RXCSUM,TXCSUM,VLAN_MTU,VLAN_HWTAGGING,JUMBO_MTU,VLAN_HWCSUM,TSO4,TSO6,LRO,VLAN_HWTSO,LINKSTATE,TXCSUM_IPV6>
	ether e2:f3:c6:e5:55:79
	inet 10.3.0.11 netmask 0xffffff00 broadcast 10.3.0.255
	media: Ethernet autoselect (10Gbase-T <full-duplex>)
	status: active
	nd6 options=29<PERFORMNUD,IFDISABLED,AUTO_LINKLOCAL>
vtnet4: flags=8863<UP,BROADCAST,RUNNING,SIMPLEX,MULTICAST> metric 0 mtu 1500
	options=4c07bb<RXCSUM,TXCSUM,VLAN_MTU,VLAN_HWTAGGING,JUMBO_MTU,VLAN_HWCSUM,TSO4,TSO6,LRO,VLAN_HWTSO,LINKSTATE,TXCSUM_IPV6>
	ether d2:5f:2e:4d:48:64
	inet 10.4.0.10 netmask 0xffffff00 broadcast 10.4.0.255
	media: Ethernet autoselect (10Gbase-T <full-duplex>)
	status: active
	nd6 options=29<PERFORMNUD,IFDISABLED,AUTO_LINKLOCAL>

It's important that these IP's don't change though. It's convenient to verify and see that each virtual interface is numerically the same as it's respective subnet. That makes things easier.


Going back to the network editor we can now set a Static IP on each NIC:

hostname="boinc-iscsi"
ifconfig_vtnet0="inet 192.168.0.202 netmask 255.255.255.0"
defaultrouter="192.168.0.1"
sshd_enable="YES"
# Set dumpdev to "AUTO" to enable crash dumps, "NO" to disable
dumpdev="AUTO"
zfs_enable="YES"

ifconfig_vtnet1="inet 10.1.0.2 netmask 255.255.255.0"
ifconfig_vtnet2="inet 10.2.0.2 netmask 255.255.255.0"
ifconfig_vtnet3="inet 10.3.0.2 netmask 255.255.255.0"
ifconfig_vtnet4="inet 10.4.0.2 netmask 255.255.255.0"

Restarting the service again we can see our changes took:

vtnet1: flags=8863<UP,BROADCAST,RUNNING,SIMPLEX,MULTICAST> metric 0 mtu 1500
	options=4c07bb<RXCSUM,TXCSUM,VLAN_MTU,VLAN_HWTAGGING,JUMBO_MTU,VLAN_HWCSUM,TSO4,TSO6,LRO,VLAN_HWTSO,LINKSTATE,TXCSUM_IPV6>
	ether c2:43:98:8c:e7:36
	inet 10.1.0.2 netmask 0xffffff00 broadcast 10.1.0.255
	media: Ethernet autoselect (10Gbase-T <full-duplex>)
	status: active
	nd6 options=29<PERFORMNUD,IFDISABLED,AUTO_LINKLOCAL>
vtnet2: flags=8863<UP,BROADCAST,RUNNING,SIMPLEX,MULTICAST> metric 0 mtu 1500
	options=4c07bb<RXCSUM,TXCSUM,VLAN_MTU,VLAN_HWTAGGING,JUMBO_MTU,VLAN_HWCSUM,TSO4,TSO6,LRO,VLAN_HWTSO,LINKSTATE,TXCSUM_IPV6>
	ether 86:33:ed:aa:0a:17
	inet 10.2.0.2 netmask 0xffffff00 broadcast 10.2.0.255
	media: Ethernet autoselect (10Gbase-T <full-duplex>)
	status: active
	nd6 options=29<PERFORMNUD,IFDISABLED,AUTO_LINKLOCAL>
vtnet3: flags=8863<UP,BROADCAST,RUNNING,SIMPLEX,MULTICAST> metric 0 mtu 1500
	options=4c07bb<RXCSUM,TXCSUM,VLAN_MTU,VLAN_HWTAGGING,JUMBO_MTU,VLAN_HWCSUM,TSO4,TSO6,LRO,VLAN_HWTSO,LINKSTATE,TXCSUM_IPV6>
	ether e2:f3:c6:e5:55:79
	inet 10.3.0.2 netmask 0xffffff00 broadcast 10.3.0.255
	media: Ethernet autoselect (10Gbase-T <full-duplex>)
	status: active
	nd6 options=29<PERFORMNUD,IFDISABLED,AUTO_LINKLOCAL>
vtnet4: flags=8863<UP,BROADCAST,RUNNING,SIMPLEX,MULTICAST> metric 0 mtu 1500
	options=4c07bb<RXCSUM,TXCSUM,VLAN_MTU,VLAN_HWTAGGING,JUMBO_MTU,VLAN_HWCSUM,TSO4,TSO6,LRO,VLAN_HWTSO,LINKSTATE,TXCSUM_IPV6>
	ether d2:5f:2e:4d:48:64
	inet 10.4.0.2 netmask 0xffffff00 broadcast 10.4.0.255
	media: Ethernet autoselect (10Gbase-T <full-duplex>)
	status: active
	nd6 options=29<PERFORMNUD,IFDISABLED,AUTO_LINKLOCAL>

And if we go back to our DHCP server we should be able to ping all four of these interfaces.


And we can:

boinc@dhcp-server:~$ ping 10.1.0.2 -c 4
PING 10.1.0.2 (10.1.0.2) 56(84) bytes of data.
64 bytes from 10.1.0.2: icmp_seq=1 ttl=64 time=0.518 ms
64 bytes from 10.1.0.2: icmp_seq=2 ttl=64 time=0.530 ms
64 bytes from 10.1.0.2: icmp_seq=3 ttl=64 time=0.389 ms
64 bytes from 10.1.0.2: icmp_seq=4 ttl=64 time=0.601 ms

--- 10.1.0.2 ping statistics ---
4 packets transmitted, 4 received, 0% packet loss, time 3061ms
rtt min/avg/max/mdev = 0.389/0.509/0.601/0.076 ms
boinc@dhcp-server:~$ ping 10.2.0.2 -c 4
PING 10.2.0.2 (10.2.0.2) 56(84) bytes of data.
64 bytes from 10.2.0.2: icmp_seq=1 ttl=64 time=0.801 ms
64 bytes from 10.2.0.2: icmp_seq=2 ttl=64 time=0.532 ms
64 bytes from 10.2.0.2: icmp_seq=3 ttl=64 time=0.586 ms
64 bytes from 10.2.0.2: icmp_seq=4 ttl=64 time=0.582 ms

--- 10.2.0.2 ping statistics ---
4 packets transmitted, 4 received, 0% packet loss, time 3064ms
rtt min/avg/max/mdev = 0.532/0.625/0.801/0.103 ms
boinc@dhcp-server:~$ ping 10.3.0.2 -c 4
PING 10.3.0.2 (10.3.0.2) 56(84) bytes of data.
64 bytes from 10.3.0.2: icmp_seq=1 ttl=64 time=0.757 ms
64 bytes from 10.3.0.2: icmp_seq=2 ttl=64 time=0.491 ms
64 bytes from 10.3.0.2: icmp_seq=3 ttl=64 time=0.518 ms
64 bytes from 10.3.0.2: icmp_seq=4 ttl=64 time=0.483 ms

--- 10.3.0.2 ping statistics ---
4 packets transmitted, 4 received, 0% packet loss, time 3051ms
rtt min/avg/max/mdev = 0.483/0.562/0.757/0.113 ms
boinc@dhcp-server:~$ ping 10.4.0.2 -c 4
PING 10.4.0.2 (10.4.0.2) 56(84) bytes of data.
64 bytes from 10.4.0.2: icmp_seq=1 ttl=64 time=0.649 ms
64 bytes from 10.4.0.2: icmp_seq=2 ttl=64 time=0.572 ms
64 bytes from 10.4.0.2: icmp_seq=3 ttl=64 time=0.404 ms
64 bytes from 10.4.0.2: icmp_seq=4 ttl=64 time=0.536 ms

--- 10.4.0.2 ping statistics ---
4 packets transmitted, 4 received, 0% packet loss, time 3068ms
rtt min/avg/max/mdev = 0.404/0.540/0.649/0.088 ms

So the four interfaces are up and working on their respective subnets.


From here we need to connect the disks we plan to have our iSCSI clients use and I've just gone ahead and done that in PROXMOX. 4x128GB virtual disks should be more than sufficient.


2008779053_Screenshotfrom2021-09-0413-16-21.png.493c8a910e3335e3ab6545994a7eddec.png


On FreeBSD we can use the following command to list connected drives:

geom disk list

The output of which will read as:

Geom name: da0
Providers:
1. Name: da0
   Mediasize: 68719476736 (64G)
   Sectorsize: 512
   Stripesize: 4096
   Stripeoffset: 0
   Mode: r3w3e5
   descr: QEMU QEMU HARDDISK
   ident: (null)
   rotationrate: unknown
   fwsectors: 63
   fwheads: 255

Geom name: cd0
Providers:
1. Name: cd0
   Mediasize: 971974656 (927M)
   Sectorsize: 2048
   Mode: r0w0e0
   descr: QEMU QEMU DVD-ROM
   ident: (null)
   rotationrate: unknown
   fwsectors: 0
   fwheads: 0

Geom name: da1
Providers:
1. Name: da1
   Mediasize: 137438953472 (128G)
   Sectorsize: 512
   Stripesize: 4096
   Stripeoffset: 0
   Mode: r0w0e0
   descr: QEMU QEMU HARDDISK
   ident: (null)
   rotationrate: unknown
   fwsectors: 63
   fwheads: 255

Geom name: da2
Providers:
1. Name: da2
   Mediasize: 137438953472 (128G)
   Sectorsize: 512
   Stripesize: 4096
   Stripeoffset: 0
   Mode: r0w0e0
   descr: QEMU QEMU HARDDISK
   ident: (null)
   rotationrate: unknown
   fwsectors: 63
   fwheads: 255

Geom name: da3
Providers:
1. Name: da3
   Mediasize: 137438953472 (128G)
   Sectorsize: 512
   Stripesize: 4096
   Stripeoffset: 0
   Mode: r0w0e0
   descr: QEMU QEMU HARDDISK
   ident: (null)
   rotationrate: unknown
   fwsectors: 63
   fwheads: 255

Geom name: da4
Providers:
1. Name: da4
   Mediasize: 137438953472 (128G)
   Sectorsize: 512
   Stripesize: 4096
   Stripeoffset: 0
   Mode: r0w0e0
   descr: QEMU QEMU HARDDISK
   ident: (null)
   rotationrate: unknown
   fwsectors: 63
   fwheads: 255

Now we can proceed with setting up iSCSI.


Of all the things not pre-installed on FreeBSD an iSCSI server service actually comes baked right in. We start by creating a configuration file with:

nano /etc/ctl.conf

And I'm going to test the configuration file with:

portal-group pg0 {
        discovery-auth-group no-authentication
        listen 0.0.0.0
        listen [::]
}

target iqn.2021-9.boinc.com:lun1 {
        auth-group no-authentication
        portal-group pg0

        lun 0 {
                path /dev/da1       
        }
}

target iqn.2021-9.boinc.com:lun2 {
        auth-group no-authentication
        portal-group pg0

        lun 0 {
                path /dev/da2
        }
}

target iqn.2021-9.boinc.com:lun3 {
        auth-group no-authentication
        portal-group pg0

        lun 0 {
                path /dev/da3
        }
}

target iqn.2021-9.boinc.com:lun4 {
        auth-group no-authentication
        portal-group pg0

        lun 0 {
                path /dev/da4
        }
}

I actually don't know if this will work but it looks the most correct to me. We could use CHAP authentication and/or designate client IP's for tightened security but I won't go into that here since it's a non-concern.


To have to iSCSI server service start at system boot append this to the /etc/rc.conf file:

ctld_enable="YES"

To start the service without restarting the server run:

service ctld start

You should get the following output:

Starting ctld.
ctld: /etc/ctl.conf is world-readable

We can now test if it's possible to connect to the four virtual iSCSI drives.


For speed and convenience we'll test it with the DHCP service since it's already connected to all four subnets. Using open-iscsi it appears my FreeBSD configuration might require tweaking but we can try rolling with it how it is for now:

boinc@dhcp-server:~$ sudo iscsiadm -m discovery -t sendtargets -p 10.1.0.2
10.1.0.2:3260,-1 iqn.2021-9.boinc.com:lun1
10.1.0.2:3260,-1 iqn.2021-9.boinc.com:lun2
10.1.0.2:3260,-1 iqn.2021-9.boinc.com:lun3
10.1.0.2:3260,-1 iqn.2021-9.boinc.com:lun4
boinc@dhcp-server:~$ sudo iscsiadm -m discovery -t sendtargets -p 10.2.0.2
10.2.0.2:3260,-1 iqn.2021-9.boinc.com:lun1
10.2.0.2:3260,-1 iqn.2021-9.boinc.com:lun2
10.2.0.2:3260,-1 iqn.2021-9.boinc.com:lun3
10.2.0.2:3260,-1 iqn.2021-9.boinc.com:lun4
boinc@dhcp-server:~$ sudo iscsiadm -m discovery -t sendtargets -p 10.3.0.2
10.3.0.2:3260,-1 iqn.2021-9.boinc.com:lun1
10.3.0.2:3260,-1 iqn.2021-9.boinc.com:lun2
10.3.0.2:3260,-1 iqn.2021-9.boinc.com:lun3
10.3.0.2:3260,-1 iqn.2021-9.boinc.com:lun4
boinc@dhcp-server:~$ sudo iscsiadm -m discovery -t sendtargets -p 10.4.0.2
10.4.0.2:3260,-1 iqn.2021-9.boinc.com:lun1
10.4.0.2:3260,-1 iqn.2021-9.boinc.com:lun2
10.4.0.2:3260,-1 iqn.2021-9.boinc.com:lun3
10.4.0.2:3260,-1 iqn.2021-9.boinc.com:lun4

It appears with all four LUNs being apart of the group listening on all interfaces (0.0.0.0) all LUN's will be accessible on all four subnets. This may not be a bad thing for my use case but we will have to test and see later.


To connect to the first iSCSI drive we run the command:

sudo iscsiadm --mode node --targetname iqn.2021-9.boinc.com:lun1 --portal 10.1.0.2 --login

And we get the output:

Logging in to [iface: default, target: iqn.2021-9.boinc.com:lun1, portal: 10.1.0.2,3260] (multiple)
Login to [iface: default, target: iqn.2021-9.boinc.com:lun1, portal: 10.1.0.2,3260] successful.

We can also see the connection was made from the FreeBSD console:


1118864842_Screenshotfrom2021-09-0414-20-29.png.5029b000a971a94dd93c41ce7727b91f.png


If we run the lsblk command on the DHCP server we now have a 128GB connected volume:

NAME   MAJ:MIN RM  SIZE RO TYPE MOUNTPOINT
loop0    7:0    0 55.4M  1 loop /snap/core18/2128
loop1    7:1    0 70.3M  1 loop /snap/lxd/21029
loop2    7:2    0 32.3M  1 loop /snap/snapd/12704
loop3    7:3    0 32.3M  1 loop /snap/snapd/12883
sda      8:0    0   64G  0 disk 
├─sda1   8:1    0  512M  0 part /boot/efi
└─sda2   8:2    0 63.5G  0 part /
sdb      8:16   0  128G  0 disk 
sr0     11:0    1  1.2G  0 rom

And going ahead and connecting the other three using the other three network interfaces yields the same results:

NAME   MAJ:MIN RM  SIZE RO TYPE MOUNTPOINT
loop0    7:0    0 55.4M  1 loop /snap/core18/2128
loop1    7:1    0 70.3M  1 loop /snap/lxd/21029
loop2    7:2    0 32.3M  1 loop /snap/snapd/12704
loop3    7:3    0 32.3M  1 loop /snap/snapd/12883
sda      8:0    0   64G  0 disk 
├─sda1   8:1    0  512M  0 part /boot/efi
└─sda2   8:2    0 63.5G  0 part /
sdb      8:16   0  128G  0 disk 
sdc      8:32   0  128G  0 disk 
sdd      8:48   0  128G  0 disk 
sde      8:64   0  128G  0 disk 
sr0     11:0    1  1.2G  0 rom

You can logout from the drive if need be with

sudo iscsiadm -m node -u

Be careful as this will disconnect ALL of your iSCSI sessions.

Logging out of session [sid: 1, target: iqn.2021-9.boinc.com:lun1, portal: 10.1.0.2,3260]
Logging out of session [sid: 2, target: iqn.2021-9.boinc.com:lun2, portal: 10.2.0.2,3260]
Logging out of session [sid: 3, target: iqn.2021-9.boinc.com:lun3, portal: 10.3.0.2,3260]
Logging out of session [sid: 4, target: iqn.2021-9.boinc.com:lun4, portal: 10.4.0.2,3260]
Logout of [sid: 1, target: iqn.2021-9.boinc.com:lun1, portal: 10.1.0.2,3260] successful.
Logout of [sid: 2, target: iqn.2021-9.boinc.com:lun2, portal: 10.2.0.2,3260] successful.
Logout of [sid: 3, target: iqn.2021-9.boinc.com:lun3, portal: 10.3.0.2,3260] successful.
Logout of [sid: 4, target: iqn.2021-9.boinc.com:lun4, portal: 10.4.0.2,3260] successful.


So we're now ready to start installing the OS on our clients which is where the magic sauce happens. It will involve some GNU/Linux trickery which some of you seem keen on learning. I'll post more about that later today or tomorrow. For now I'm going to take a break.

Link to comment
Share on other sites

Link to post
Share on other sites

*sign* The taste of defeat...for now...


733148437_Screenshotfrom2021-09-0522-20-30.png.049e4142bae9cca235921364426d6db6.png


I've been at this all day and I'm close but it's getting late and I'm tired. I don't want to reveal what I'm doing to make it work if it doesn't work. There are still several variables I need to go over both software and hardware wise including some more Googling. This procedure isn't as simple as slap a MNPA19-XTR in your rig and you're off to the races, no I see different responses from different system hardware.


I need more time. I think I'm going to go back to my roots and see if it's the latest version of Ubuntu Server that's causing the problem. I still have the original motherboard/hardware combo which I tested and verified worked 9 months ago. It booted Ubuntu from over the network but I believe that was v20.04.1.


Have to conduct more tests. Depending on how things play out I will likely buy a Intel X520-T1 and see if that influences the hardwares behavior.

Link to comment
Share on other sites

Link to post
Share on other sites

16 hours ago, Windows7ge said:

*sign* The taste of defeat...for now...

Oh no. But I see you're tired, considering you wrote "sign" instead of "sigh" 😜

I hope you get it to run soon!


Link to comment
Share on other sites

Link to post
Share on other sites

5 minutes ago, Senzelian said:

Oh no. But I see you're tired, considering you wrote "sign" instead of "sigh" 😜

I hope you get it to run soon!

My eyes were heavy while I was typing that so definitely yes. 😆


Still tinkering with it as we speak. I re-wrote the FreeBSD iSCSI file as such:

portal-group pg0 {
        discovery-auth-group no-authentication
        listen 10.1.0.2
}

portal-group pg1 {
        discovery-auth-group no-authentication
        listen 10.2.0.2
}

portal-group pg2 {
        discovery-auth-group no-authentication
        listen 10.3.0.2
}

portal-group pg3 {
        discovery-auth-group no-authentication
        listen 10.4.0.2
}

target iqn.2021-9.boinc.com:lun1 {
        auth-group no-authentication
        portal-group pg0

        lun 0 {
                path /dev/da1
        }
}

target iqn.2021-9.boinc.com:lun2 {
        auth-group no-authentication
        portal-group pg1

        lun 0 {
                path /dev/da2
        }
}

target iqn.2021-9.boinc.com:lun3 {
        auth-group no-authentication
        portal-group pg2

        lun 0 {
                path /dev/da3
        }
}

target iqn.2021-9.boinc.com:lun4 {
        auth-group no-authentication
        portal-group pg3

        lun 0 {
                path /dev/da4
        }
}


What this has done is when you run a discovery request using iscsiadm over a network interface it will only show you the relevant LUNs:

root@ubuntu-server:~$ sudo iscsiadm -m discovery -t sendtargets -p 10.3.0.2
10.3.0.2:3260,-1 iqn.2021-9.boinc.com:lun3

I don't think this is the problem but it was bothering me. What looks to be the issue is a hand-off problem.


iPXE -> GRUB = success

GRUB -> Ubuntu = fail...


It looks to start loading the OS but then promptly loses the connection...which is why I'm thinking to re-validate the config on the original hardware I tested this on but I just so happened to come across what looks to be the original guide I followed 9 months ago and it clarified a couple of things for me so we're trying this once more.

Link to comment
Share on other sites

Link to post
Share on other sites

One step forward. Only one though. 😕


Turns out one of the issues was staring me right in the face the whole time.


Screenshot from 2021-09-05 22-20-30.png


Note:

requested target "InitiatorName=iqn.2021-9.boinc.com:lun2" not found


This error was caused due to a mis-written grub file (my mistake):

GRUB_CMDLINE_LINUX_DEFAULT="quiet splash ip=dhcp ISCSI_INITIATOR=InitiatorName=iqn.2021-9.boinc.com:lun3 ISCSI_TARGET_NAME=InitiatorName=iqn.2021-9.boinc.com:lun3 ISCSI_TARGET_IP=10.3.0.2 ISCSI_TARGET_PORT=3260"

Should have been written as:

GRUB_CMDLINE_LINUX_DEFAULT="quiet splash ip=dhcp ISCSI_INITIATOR=iqn.2021-9.boinc.com:lun3 ISCSI_TARGET_NAME=iqn.2021-9.boinc.com:lun3 ISCSI_TARGET_IP=10.3.0.2 ISCSI_TARGET_PORT=3260"

Now we don't drop into initramfs with a drive inaccessible error but we do still freeze after logging into the iSCSI drive which means the OS still doesn't load.


Finding the small problems still means progress though. I just wish I noticed it sooner because I'm out of time again. Will have to pick this up Saturday/Sunday. :old-grin:

Link to comment
Share on other sites

Link to post
Share on other sites

Oh shit, oh jeez! It's working lolol IT'S WORKING!!! XD


774221953_Screenshotfrom2021-09-1020-42-09.thumb.png.217df5e745c555c2531e42655b45e0b2.png


This is not a directly connected disk (nor a physical one - but it can be if you want):

boinc@boinc-node-4:~$ sudo fdisk -l /dev/sda

Disk /dev/sda: 128GiB, 137438953472 bytes, 268435456 sectors
Disk model: CTLDISK
Units: sectors of 1 * 512 = 512 bytes
Sector size (logical/physical): 512 bytes / 4096 bytes
I/O size (minimum/optimal): 4096 bytes / 524288 bytes
Disklabel type: gpt
Disk identifier: COADC91C-19B9-46OF-B2AD-255EB8BB2561

Device     Start       End   Sectors  Size Type
/dev/sda1   2048      4095      2048    1M BIOS boot
/dev/sda2   4096 268433407 268429312  128G Linux filesystem


Will get the other two nodes up and running using the same exact method (hopefully) if successful I can share the process in detail! :old-grin:

Link to comment
Share on other sites

Link to post
Share on other sites

Many trials have been passed in the last couple days but we finally have three working machines (with some catches) booting off the network with quite a bit of knowledge learned along the way.


First and foremost. The process. In a previous post I outlined the two commands required to discover and login to iSCSI volumes:

sudo iscsiadm -m discovery -t sendtargets -p 10.1.0.2
sudo iscsiadm --mode node --targetname iqn.2021-9.boinc.com:lun1 --portal 10.1.0.2 --login

What you need to do is open a shell during the installation process of your preferred Debian distro and run these commands. The below example being Ubuntu Server.


1719329682_Screenshotfrom2021-09-0517-24-52.thumb.png.f80d441311497560316b05c6cab0a980.png


After these commands are ran the iSCSI volume will appear as a destination to where you can install the OS.


Once the OS is installed don't reboot! Go back into shell and run the commands:

mount --bind /dev /target/dev
mount -t proc proc /target/proc
mount -t sysfs sys /target/sys
chroot /target
hostname -F /etc/hostname

This switches our systems active focus from the live media to the iSCSI volume.


From here make sure the following packages are installed with:

apt install initramfs-tools open-iscsi systemd


Next we tell the OS to load the iSCSI driver during system boot:

echo "iscsi" >> /etc/initramfs-tools/modules


Then for those already familiar with how iSCSI works we set the Initiator name:

echo "InitiatorName=iqn.2021-9.boinc.com:lun3" > /etc/iscsi/initiatorname.iscsi
touch /etc/iscsi/iscsi.initramfs
update-initramfs -u


Now I don't know if a Static IP is crucial yet. It's possible when the DHCP lease is up it could cause problems but leaving the DHCP server to handle reserved IP addresses works perfectly. Will have to do extended testing to verify.


I did have to omit some data from the DHCP config because I mistakenly set a Default Gateway (option routers) for each of our subnets none of which have a route to the Internet. Adding a # converts a line to a comment so that takes care of that.


...

subnet 10.1.0.0 netmask 255.255.255.0 {
    range 10.1.0.10 10.1.0.254;
#    option routers 10.1.0.1;
#    next-server 10.1.0.X;
#    filename "undionly.kpxe";
}

...


After this we edit GRUB with:

nano /etc/default/grub


And edit the line GRUB_CMDLINE_LINUX_DEFAULT="XXXXX XXXXXX" as follows:

GRUB_CMDLINE_LINUX_DEFAULT="XXXXX-XXXXXXXX ip=dhcp ISCSI_INITIATOR=iqn.2021-9.boinc.com:lun3 ISCSI_TARGET_NAME=iqn.2021-9.boinc.com:lun3 ISCSI_TARGET_IP=10.3.0.2 ISCSI_TARGET_PORT=3260"


Now we update GRUB:

update-grub


When this is done exit shell and reboot the machine.


Something to note which I discovered at like 12:30AM last night is that iPXE 1.0.0+ does not support UEFI boot. If your installer creates a 512MB /boot/efi partition your distro is booting via UEFI and you'll find yourself stuck at this screen indefinitely:


396381697_Screenshotfrom2021-09-1218-24-10.png.7c262d281c51b1f694a6846a256da521.png


Now it's possible with chainloading an updated version of iPXE or loading iPXE from USB that it may support UEFI boot but from my experience I couldn't for the life of me to get chainloading to work how it was supposed to but it's something I'll go over still when I write the tutorial.


After this the system should boot all the way to either a desktop environment or a CLI shell if you used a server distro.


Running fio on all three boxes simultaneously I saw some pretty impressive numbers from my 8x7200RPM RAID10 array. Handling three clients full brrr like a champ. Higher than SATA SSD Peak performance.


965190217_Screenshotfrom2021-09-1218-51-24.png.5fe9f63dc1a21a415745233f4b4bce2b.png


I'm just about out of time again but I still have a couple of things left I'd like to explore. I want a means to power the systems ON/OFF over the network.


OFF is easy. I can just use password-less Public/Private Key Authentication and pass the shutdown command. Easypeasy


ON is going to be tougher. Now I've explored WOL (Wake On LAN) multiple times but I could never get it to work but I'd like to give it another shot and see if I can get a Linux server to send the Magic Packet. If I can I can run a script from cronjob to shutdown the servers at a specific time.


I'll have to get on both of those.

Link to comment
Share on other sites

Link to post
Share on other sites

6 hours ago, Senzelian said:

These numbers are sexy af. 😍

Back when I first validated this setup 9 months ago the iSCSI performance was beyond abysmal and I don't know what the culprit was. Nice to see I didn't have to troubleshoot it 9 months later. 😅


Something I need to test is if giving the FreeBSD VM more CPU & RAM does anything. Right now it's only got 8 cores & 8GB of RAM of which is at a constant 79~80% utilization. I wonder if there's some sort of RAM caching going on here...might be able to increase the multi-client performance.

Link to comment
Share on other sites

Link to post
Share on other sites

A little bit of extended testing shows very good stability over the course of a period of days. Right now the 2x2670v1 server has been up for over 4.5 days and ran in 12hr cycles at 87.5% CPU utilization for BOINC and hasn't faulted with any errors.


In addition to this the FreeBSD console hasn't reported any errors with iSCSI which helps reassure that the connection is stable over a period of days. Even longer testing is still going to be needed but things are looking up. :old-grin:


As far as WOL (Wake-on-LAN) goes I've already looked up some tutorials that mention two Debian packages that could send the Magic Packet, those being etherwake & wakeonlan the former being the guides more recommended option. Unfortunately every attempt to use it resulted in failure with the error:

SIOCGIFHWADDR on eth0 failed: No such device

As it appears wakeonlan is installed as a dependency for etherwake so running it instead showed not perfect but promising results.


The MSI X99A-SLI PLUS motherboard has a NIC built in that responds to wakeonlan very well. However I'm still having trouble getting the Sabertooth X79 & ASRock Rack EP2C602-4L/16D to respond. Slow works in progress but I hope to find answers to them soon.

Link to comment
Share on other sites

Link to post
Share on other sites

It's looking like I'm going to have to abandon the WOL function. At least for now. Working with various network controllers on different motherboards they don't all want to respond to whatever the Magic Packet is that Etherwake sends given Ubuntu claims it's enabled and working on all three systems yet only one responds.


I investigated the MNPA19-XTR to see if I could WOL over the fiber network but that's not looking promising either. 😕


One thing that is clearly supported on all three systems however is Wake on RTC (Real Time Clock).


210919213027.thumb.png.d0e58714dfec622fd8576a393f037638.png


MSI_SnapShot.thumb.png.6fd1ed1d52f632ba16eaf4a3eb507a58.png


210919211151.png.8885e9094d5b76f221fe3836556f4cab.png


This doesn't give me as dynamic of control over when the systems power on but it will still get the job done. I may look into replacing the MNPA19-XTR with something else. I'm still fancying the Intel X520-DA1. I wonder if that could be configured with both iPXE & WOL... 🤔


For now this will have to do. It's not a bad second option though. Better than having the systems idle all day when they're not doing anything. Less noise. Less power wasted.


To make sure they all sync and power on at the right time though it's important that Ubuntu knows the Time Zone which I find it notoriously does not figure it out automatically. By running the command:

sudo dpkg-reconfigure tzdata

And following the on screen prompts it's pretty easy to correct though. This fixes the BIOS clock so it turns on when it's supposed to.


As for powering off this can be handled with a crontab job and some permission edits.

sudo visudo

Add the line:

%sudo ALL= NOPASSWD: /sbin/shutdown

Save/Exit


Now:

# Shutsdown server at 8AM every day.
0 8 * * * /home/boinc/shutdown.script


shutdown.script

#!/bin/bash

sudo shutdown now


So now crontab will shut the servers down at 8AM and the BIOS will turn the servers on at 8PM. Not what I was hoping for to handle this but maybe if I get WOL figured out I'll be able to have a VM handle remote power on & off but this arrangement should handle it fine for now.

Link to comment
Share on other sites

Link to post
Share on other sites

Small update. According to direct Intel documentation the Intel X520 does not support WOL. 😕


Still, a more modern replacement to the MNPA19-XTR would be nice.


I had plans to end the build log here but it looks possible I could consolidate the Debian DHCP server into the UNIX iSCSI server as FreeBSD appears to support DHCP. If possible I'd like to re-explore Chain-Loading over TFTP so we can get UEFI boot to work. I'd also like to explore consolidating this server into FreeBSD. This way the tutorial I write could be installed on a system bare metal simplifying the setup for readers.


Now that we have three servers which so far reliably boot to their respective iSCSI drives and turn on/off when they're supposed to we can start experimenting with ways to consolidate the services. That won't be tonight but we'll see what the weekend brings. 😛


Link to comment
Share on other sites

Link to post
Share on other sites

Create an account or sign in to comment

You need to be a member in order to leave a comment

Create an account

Sign up for a new account in our community. It's easy!

Register a new account

Sign in

Already have an account? Sign in here.

Sign In Now

×