Posted February 10, 2014 Author Like it, nice touches with the custom work to the sound card and everything, if your really good at soldering and electical maybe in the future you can get your own cable kits and sleaving and make custom length cable and custom sleaving. everything looks good, well done. Once the custom loop is done the next step is to do cables yes But never done it before so need some practice first. Link to comment Share on other sites More sharing options... Link to post Share on other sites More sharing options...
Posted February 13, 2014 @ArumanBE I have to thank you for documenting this. Just got back from Home Depot with some new cans of paint. I'm in the process of building a new PC and I have had a sound blaster z for less than a year now. The red clashes completely with the new build, but thanks to your mod I've created a new design for the shroud. Hopefully I'll be able to post a build log on Saturday. I've never soldered anything before, but I'm a pretty good painter. Link to comment Share on other sites More sharing options... Link to post Share on other sites More sharing options...
Posted February 13, 2014 Author @ArumanBE I have to thank you for documenting this. Just got back from Home Depot with some new cans of paint. I'm in the process of building a new PC and I have had a sound blaster z for less than a year now. The red clashes completely with the new build, but thanks to your mod I've created a new design for the shroud. Hopefully I'll be able to post a build log on Saturday. I've never soldered anything before, but I'm a pretty good painter. Be sure to post pics. I can't wait to see another soundblaster z beeing modded. tbh, the soldering isn't that hard. if you plan on doing this i would be happy to give you some tips. Link to comment Share on other sites More sharing options... Link to post Share on other sites More sharing options...
Posted February 13, 2014 Nice build man! But the front design of the case looks "meh". Developer by day, Gamer by night CPU - Intel i7 4770k | MOBO - MSI G45 Gaming | RAM - G.Skill RipJaws X 1600mhz 4x4gb CL7 | CASE - NZXT H440 | GPU - MSI R9 290 | PSU - Corsair RM850 | SSD - Samsung 840 EVO 128gb | HDD - Western Digital Black 2TB Link to comment Share on other sites More sharing options... Link to post Share on other sites More sharing options...
Posted February 13, 2014 Author Nice build man! But the front design of the case looks "meh". thx :-) i know the N200 doens't have a sexy front but it's a plastic shroud so no cutting in that :-) But if you have any id what to do with it pls share. I cracked my brain over it for severall hours now. There will be a bay reservoir in it shortly but that doens't change anything about the overall appearance. Link to comment Share on other sites More sharing options... Link to post Share on other sites More sharing options...
Posted February 13, 2014 thx :-) i know the N200 doens't have a sexy front but it's a plastic shroud so no cutting in that :-) But if you have any id what to do with it pls share. I cracked my brain over it for severall hours now. There will be a bay reservoir in it shortly but that doens't change anything about the overall appearance. Sadly im not that good in case modding. Haha Developer by day, Gamer by night CPU - Intel i7 4770k | MOBO - MSI G45 Gaming | RAM - G.Skill RipJaws X 1600mhz 4x4gb CL7 | CASE - NZXT H440 | GPU - MSI R9 290 | PSU - Corsair RM850 | SSD - Samsung 840 EVO 128gb | HDD - Western Digital Black 2TB Link to comment Share on other sites More sharing options... Link to post Share on other sites More sharing options...
Posted February 21, 2014 Be sure to post pics. I can't wait to see another soundblaster z beeing modded. tbh, the soldering isn't that hard. if you plan on doing this i would be happy to give you some tips. What kind of LEDs did you use? I don't want to get the incorrect spec. Link to comment Share on other sites More sharing options... Link to post Share on other sites More sharing options...
Posted February 21, 2014 Author sbz white.jpg What kind of LEDs did you use? I don't want to get the incorrect spec. That white looks pretty good. Nice job. I used: 5mm Water Clear Blue LED Iv:typ. 1000mcd If: 20mA Uf: 3.2V Link to comment Share on other sites More sharing options... Link to post Share on other sites More sharing options...
Posted March 16, 2014 Hey everyone, I just modded my SBZ thanks to the info and inspiration from ArumanBE. My case lights are white so I went with 1400mcd white LED's (3.1v-.3.3v) that I got off ebay and voila! GOODBYE RED! I may paint the shield one day but for now, I'm just glad I have harmony in my case once again. Link to comment Share on other sites More sharing options... Link to post Share on other sites More sharing options...
Posted March 16, 2014 the dreaded sound card Nice improvements!! Beneath this mask there is more than flesh. Beneath this mask there is an idea, Mr. Creedy, and ideas are bulletproof. As I get older I get angrier more cynical, meaner. I feel some warning posts coming. I feel a ban coming. I was warned. CPU-i5 2400 GPU-Sapphire Radeon HD 7970 OC Mobo-H67MA-D2H-B3 Ram-G.Skill Ripjaws 8gb 1333mhz Case-Fractal Define R4 PSU-Corsair CX750 Storage-Samsung EVO 250gb, 1tb WD Black,Hitachi 1tb Other stuff-Corsair K90, M90 Cooling-3x 140mm Fractal fans Sound-Sennheiser HD438 headphones Link to comment Share on other sites More sharing options... Link to post Share on other sites More sharing options...
Posted March 16, 2014 Author Looks very good, was happy to help you out. Link to comment Share on other sites More sharing options... Link to post Share on other sites More sharing options...
Posted March 16, 2014 Very nice lighting there. Link to comment Share on other sites More sharing options... Link to post Share on other sites More sharing options...
Posted March 17, 2014 Thanks everyone and thanks again Aruman! Link to comment Share on other sites More sharing options... Link to post Share on other sites More sharing options...
Posted March 17, 2014 Author update: due to some issues at work i didn't had much time to work on my rig. Now i finally have some more time again so it's time to do some work on the build. I had a good long think where i want to go with this. I did some measuring and i came to the conclusion that the N200 is just not big enough for a nice custom loop.So i did some research for another case. i cancelled my order for the water components. Did a new order and ...Here it is. The first of many packages. The Corsair Carbide Air 540.When linus did the overview of this case i just loved it. Support for 360 mm and 240 mm rad, much place for a nice ress and pump. And a butload of cable management space.I also got some cable sleeving material. So keep tuned guy's the updates r comming. Link to comment Share on other sites More sharing options... Link to post Share on other sites More sharing options...
Posted March 24, 2014 Author Update:Ok so i had some building time over the weekend and the case came out so nice. My second screen finaly arrived so had a lot of unpacking and building to do.Here a couple of pictures of the final result.For monitoring during overclocking a second screen is very helpfull.I got a stable +165MHz on the core and a +310MHz on the memory. Running the card at core: 1123 MHz and the memory: 3314 MHz without touching the voltage.So i'll prly get some more out of it when i liquid cool it.The finished build. Lol makes me regret ever go with a Micro-ATX MB Maybe next gen upgrade don't know yet. It does the trick for now.Some nice blue sleeved cables finishes it all of real nice.The back-side is actualy made for 140mm but untill i can start building my loop this will have to do.Don't need extra lighting in the case at this point. 6 led fans do the trick Also front I/O panel cables r sleeved.Final shot of the build before i start on the loop. According to my track and trace my rads and res will comme tomorrow.Stay tuned Link to comment Share on other sites More sharing options... Link to post Share on other sites More sharing options...
Posted March 24, 2014 Hey everyone, I just modded my SBZ thanks to the info and inspiration from ArumanBE. My case lights are white so I went with 1400mcd white LED's (3.1v-.3.3v) that I got off ebay and voila! GOODBYE RED! I may paint the shield one day but for now, I'm just glad I have harmony in my case once again. you should sand your geforce gtx logo so it will be white, it would really fit in OT: nice build #killedmywife #howtomakebombs #vgamasterrace Link to comment Share on other sites More sharing options... Link to post Share on other sites More sharing options...
Posted March 24, 2014 The RAM has leds in it? Link to comment Share on other sites More sharing options... Link to post Share on other sites More sharing options...
Posted March 24, 2014 Author The RAM has leds in it? Yes they have. To bad you can't turn them on all the time. They light up in a random patern. Link to comment Share on other sites More sharing options... Link to post Share on other sites More sharing options...
Posted March 24, 2014 IF only you could find a way to change the gforce logo. This build is sick by the way. http://www.speedtest.net/my-result/3600597951 Link to comment Share on other sites More sharing options... Link to post Share on other sites More sharing options...
Posted March 24, 2014 Author IF only you could find a way to change the gforce logo. This build is sick by the way. Thx, i don't think there is a way to change it. I have taken the card appart to c how far i could get. But it's molded together the letters and led's. But no prob for my build cause the stock cooling will be removed for a waterblock that fits the build Link to comment Share on other sites More sharing options... Link to post Share on other sites More sharing options...
Posted March 24, 2014 My motherboard has Creative sound blaster software that came with it. Do you think getting your sound card would do any difference? Link to comment Share on other sites More sharing options... Link to post Share on other sites More sharing options...
Posted March 24, 2014 Author My motherboard has Creative sound blaster software that came with it. Do you think getting your sound card would do any difference? Depending on wat motherboard you have yes. I won that card during a contest, but i would buy it myself if i didn't had one. The difference in soundquality is huge comparing to the onboard. On a cheaper pair of headphones you won't hear any difference. But on my sennheiser headphone there is a difference. And also the card had a headphone amp so it can go much louder. Link to comment Share on other sites More sharing options... Link to post Share on other sites More sharing options...
Posted March 26, 2014 Author Update:time to do some more work.Let's do something about the all black front First lets take it all appart.Some sanding and cleaningA bit of paint on both of them.And now time to dry.Oh god that looks good :-) really happy with the result. Could be that i decide to go a bit darker. But we'll c once it's installed.All together again good result.Until next time!!! Link to comment Share on other sites More sharing options... Link to post Share on other sites More sharing options...
Posted March 26, 2014 Your build looks great man! Good job. Come and join the awesome Official LTT Star Citizen Org at LTT Conglomerat, GTA 5 LTT Crew at LTT Conglomarate PC Specs - 4770k - OC 4.5GHz - GTX 780 SC - 16GB HyperX - NZXT H440 White - Corsair H100i - Corsair AX750 - Samsung Evo 250GB - 2 x PA238Q - ATH-M50 - Link to comment Share on other sites More sharing options... Link to post Share on other sites More sharing options...
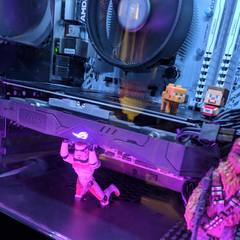
Posted April 15, 2014 Author Update:This isn't an actual update, more something i wanted to try out while waiting for all my LC parts.Something many of us would love to do but don't want to start doing it So here goes.Let's change the color on the Geforce GTX 780. I love the look of the cooler but the green light doesn't fit in every theme. Thats wat we r going to change.Don't need to take of the entire heatsink. just the shroud of the cooler.Thats the part we want :-)Just pop it out, it isn't even glued in or anything. just pres it out.Take a light grain sanding paper and sand of the paint. wat you get is a grey/white clearish rubber. It's just a thin layer of paint you need to take of. The rubber isn't colored so it's an easy job taking it of.Then you take some lightbulb paint and make it the color you want.put it back in to the thingy Assemble the cooler again and ... done Only missing my pump and tubing before i can start building my loop.Stay tuned Link to comment Share on other sites More sharing options... Link to post Share on other sites More sharing options...

.png.255947720031a641abdac78e663b681c.png)


Create an account or sign in to comment
You need to be a member in order to leave a comment
Create an account
Sign up for a new account in our community. It's easy!
Register a new accountSign in
Already have an account? Sign in here.
Sign In Now