Jump to content

Version Water - Fractal Define C [PostBuildLog]

For Science!

21b.thumb.jpg.58b50a2edde687fc662e16913200fd36.jpg


So this build continues from a previous build where I used an AIO and air for a dual GPU setup. However although the AIO worked beautifully, I got gradually annoyed at how the twin turbines that the GTX1080 Turbo was in comparison. So I decided to go full custom watercooling - so yes, AIOs can be a gateway drugs towards a full custom loop. This is my first loop on my first PC :)

So this was the air-cooled build, as nice as it was, the GPUs were loud AF.

01.thumb.jpg.40b9d93e7b1d375258ce1452a4903f38.jpg


To make watercooling worth it with the 7700L, obligatory delid. You can see how much TIM there was on the die.

02.thumb.jpg.24de36f864e0cb11f8e2f080dd63a0f8.jpg


and on the IHS

03.thumb.jpg.b7949d7e298b5d4baed96c491645d842.jpg


Cleaned using scraping and isopropanol. The TIM was replaced with ThermalGrizzly Conductonaut.

04.thumb.jpg.6ce29fa9bf42db521a531f8ac1a97498.jpg


Boys and girls, make sure your computer still POSTs after doing something crazy like a delid. Also, wasabi is not a good thermal compound, would not recommend.

05.thumb.jpg.51e7db6f45b512b51dab2ff0e8c1dc2e.jpg


Dissassembly of the GPU block. I was very lucky to find a waterblock for the 1080-Turbo. Bitspower was the only company that made a full cover block for this card.

06.thumb.jpg.bfb889d3439d125bf8ac47cdd2453f5a.jpg


Cleaned the GPU :)

07.thumb.jpg.1b22e68028908712987b4e2ec7a54a9e.jpg


Following the instruction with the pads, and using the EKWB method with arctic MX-4 thermal compound.

08.thumb.jpg.8264309909774c8484c8e7edc5748095.jpg


Assembled block

09.thumb.jpg.5a8c8085e8a852d628b1d7596430be79.jpg


While Bitspower blocks are perceived as more expensive than for example EKWB. One should remember they come with backplates by default.

10.thumb.jpg.a3ee9487d6509544a6c945e336505448.jpg


Since space is such an issue in the Define C, I bodged up some custom feet for my D5 pump using the UNI-holders from EK. Super-glued some HDD spacers for rubber feet and velcro for extra stability.

11.thumb.jpg.116b88650af964712c4c0e03ae4f4c69.jpg


Make sure you get a drain port. This is made from a male-to-male dual rotary, T-splitter, and a ball-valve.

11a.thumb.jpeg.3f095295c03e84666db667706ce79db1.jpeg


Installation of the monoblock. Its for the Strix motherboard, but is also compatible for the prime.

12.thumb.jpg.b1e3a231d95fd04d664a852f2f6d5745.jpg


After re-mounting the motherboard, the next thing that had to go in was a 360 mm radiator with the fans - any other order meant that this wouldn't go in. White chromax for accents, but removed from the side that contacts the radiator for a better seal against the radiator. 3 fans connected to one header with a splitter.

13.thumb.jpg.f26bb21a91830095bc86c50ae3ed75dc.jpg


Returning the dual-GPU block. Note for future builders, would highly recommend removing the SLI bride when building.

14.thumb.jpg.5c3217581f03b7fef98c91be2fc1fd37.jpg


Mounting the top 240 mm radiator.

15.thumb.jpg.ba78be4d992be534238fdee6af9cad2b.jpg


Much darker in the interior as a result.

16.thumb.jpg.3884aec8a6bd81d1eeadd639d674cb26.jpg


Looking into ways to mounting the floating reservoir. Currently trying the uni-holder + res mounts. Notice how the D5 pump barely clears the PSU shroud and so the custom feet was necessary since other methods made the pump too tall.

17.thumb.jpg.6f2544ebfe3e666fa059f02f8670bc36.jpg


In the end I used just a uni-holder to prop the res from the bottom, and the hardline tubing also keep the res up to a degree.

18.thumb.jpg.f5c3a28c156fb13c1ecf85ab47956723.jpg


Installation of the Koolance flow meter & multiplier, my original intention was to hook this up to the CPU_FAN header so that if flow dropped too low, the PC would shut down. However the multipler takes too long to kick in and I was sometimes failing to post (Due to cpu fan error) and so after establishing I had a good flow rate, this was removed.

19.thumb.jpg.becacb68fd08b6609573dfafa095d69d.jpg


System was filled up using EK-CryoFuel. However I managed to kill quite a lot of my LED strips, presumably during the filling process because some of them were still plugged into the PSU molexes. So you can see that the monoblock is dead, and that the left LED strip bottom section was fixed to yellow for some reason. Also the SLI bridge was also fixed so some kind of green. Lesson learnt: unplug even unimportant components like LED strips during the filling .

20.thumb.jpg.40951ae2a0dcc348e43bcceb46a6198e.jpg


So I replaced the LED strips and the SLI bridge (didn't like the ROG one too much anyway, I think it went well with the original build, but the EVGA looks much better for this waater one). Also, custom cables! I also removed the koolance meter since I was getting more than 1 gpm so was happy to settle for that knowledge.

21.thumb.jpg.c1cdb9ae264f075ff51d5fa0e3ea9b2d.jpg


Chaos in the back, the panel still closes, but it is very tight :P

20a.thumb.jpg.7e9995e56ae23a05720d3511d5752a7a.jpg


RAM clearance. Basically none, the 30 mm rad + 25 mm fan barely clears the LPX memory.

22.thumb.jpg.bf1e27825b3684b27fd0a1b58f04bd25.jpg


GPU clearance, again barely clears with a 30mm rad + 25 mm fan. This can be made easier if you mount the fan outside of the case between the front panel. But I take pride in the face that everything fits inside my case.

23.thumb.jpg.59051a606c02a925532df3a37d173695.jpg


The only thing I don't like is that the bottom tube is not quite parallel to the bottom of the case. Maybe to be redone in the next scheduled maintenance.

21a.thumb.jpg.65afc860f0d3c60242485e344d4b4a0d.jpg


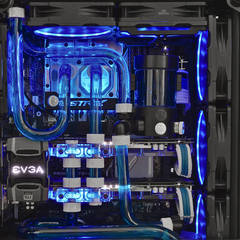
Side panel still fits, yay

21b.thumb.jpg.58b50a2edde687fc662e16913200fd36.jpg


Link to comment
Share on other sites

Link to post
Share on other sites

19 minutes ago, For Science! said:

Dissassembly of the GPU block. I was very lucky to find a waterblock for the 1080-Turbo. Bitspower was the only company that made a full cover block for this card.

Isn't the 1080 turbo running on a founders board? couldn't you have just used any FE block? or have I been misinformed somewhere along the way?

Link to comment
Share on other sites

Link to post
Share on other sites

Just now, Zyndo said:

Isn't the 1080 turbo running on a founders board? couldn't you have just used any FE block? or have I been misinformed somewhere along the way?

Its a custom PCB unfortunately

Link to comment
Share on other sites

Link to post
Share on other sites

Noice!

Intel HEDT and Server platform enthusiasts: Intel HEDT Xeon/i7 Megathread 


Main PC 

CPU: i9 7980XE @4.5GHz/1.22v/-2 AVX offset 

Cooler: EKWB Supremacy Block - custom loop w/360mm +280mm rads 

Motherboard: EVGA X299 Dark 

RAM:4x8GB HyperX Predator DDR4 @3200Mhz CL16 

GPU: Nvidia FE 2060 Super/Corsair HydroX 2070 FE block 

Storage:  1TB MP34 + 1TB 970 Evo + 500GB Atom30 + 250GB 960 Evo 

Optical Drives: LG WH14NS40 

PSU: EVGA 1600W T2 

Case & Fans: Corsair 750D Airflow - 3x Noctua iPPC NF-F12 + 4x Noctua iPPC NF-A14 PWM 

OS: Windows 11


Display: LG 27UK650-W (4K 60Hz IPS panel)

Mouse: EVGA X17

Keyboard: Corsair K55 RGB


Mobile/Work Devices: 2020 M1 MacBook Air (work computer) - iPhone 13 Pro Max - Apple Watch S3


Other Misc Devices: iPod Video (Gen 5.5E, 128GB SD card swap, running Rockbox), Nintendo Switch

Link to comment
Share on other sites

Link to post
Share on other sites

IS that a 240+360 or just 240?

Build

Spoiler

Ryzen 5 1600, Cooler Master Hyper 212 Evo, Gigabyte X470 Gaming 7. TeamGroup Viper 4133mhz 16gb, XFX RX 480 8 GB (1000mhz cause dying), Samsung 850 EVO 250 GB M.2 SSD, An old 1tb 5400 rpm 2.5" HDD, TeamGroup 480gb & Kingston 480gb ssds (May RAID 0), 1TB Western Ditigal HDD, EVGA 750W G2 PSU, Phanteks P400s

----------X-----------X------------

Link to comment
Share on other sites

Link to post
Share on other sites

Link to comment
Share on other sites

Link to post
Share on other sites

2 minutes ago, For Science! said:

Its a 240 + 360

Oh ok... NOICE. 

Build

Spoiler

Ryzen 5 1600, Cooler Master Hyper 212 Evo, Gigabyte X470 Gaming 7. TeamGroup Viper 4133mhz 16gb, XFX RX 480 8 GB (1000mhz cause dying), Samsung 850 EVO 250 GB M.2 SSD, An old 1tb 5400 rpm 2.5" HDD, TeamGroup 480gb & Kingston 480gb ssds (May RAID 0), 1TB Western Ditigal HDD, EVGA 750W G2 PSU, Phanteks P400s

----------X-----------X------------

Link to comment
Share on other sites

Link to post
Share on other sites

  • 2 years later...

hi!

I am thinking of doing a build like this, i also got the define C case, (without a window)


Just wondering, hows the noise levels on your GPU's after this build? did it improve? Worth doing for just the noise improvement?

Link to comment
Share on other sites

Link to post
Share on other sites

20 hours ago, sondreni said:

hi!

I am thinking of doing a build like this, i also got the define C case, (without a window)


Just wondering, hows the noise levels on your GPU's after this build? did it improve? Worth doing for just the noise improvement?

oh yeah, much quieter compared to blower gpus 2x. well worth it for noise improvement.

Link to comment
Share on other sites

Link to post
Share on other sites

Create an account or sign in to comment

You need to be a member in order to leave a comment

Create an account

Sign up for a new account in our community. It's easy!

Register a new account

Sign in

Already have an account? Sign in here.

Sign In Now

×