Search the Community
Showing results for tags 'modded'.
-
Hi, I recently bought a SCPH-50004 PS2 with a matrix modchip. This is my first ever experience with burning any games tho, idk if I'm doing something wrong or if the laser might just be trash, since I didn't have any way of testing it since I don't own any real PS2 games. What I did was to download a PS2 game ISO and then burn it onto a x16 speed DVD-R at x8 speed using ImgBurn, now when I put the disc in the console I can hear a couple clicks and after some time the clicks will stop, after some more time the console shows a disc reading error. anything im doing wrong or what is it? grateful for any help I might get cheers
-
Hello, fellow nerds! I have a pair of Astro A40trs collecting dust, bought them for random use on ebay for like $35, and I have another pair with a MixAmp. Has anyone ever tore these down and modded them? like new drivers, improved sealing and insulation, updated mobos...etc. I personally love the design and I love to make items truly "mine", maybe it's nostaligia since the original A40s were the god tier when I got into PC gaming and getting my own stuff and following gaming influencers like Seananners and Machinima then Mr Sark and so on. Would love some experiences, thoughts, assistance on this!!!
-
 Dose amazon and other companys mod pcs to run steam and certain apps for windows? Some friend of mine is saying that when they bought a pc and non would run steam and are saying pcs that run steam are modded windows. They also said that the companys mod cpus and gpus. Can you mod them or no? Pretty dam sure you cant
 -
Hi I'm new here and I hope I'm in the right section for this. If not please point me in the right direction so that I know where to go. Thank you. Umm, I need some help with reading a Crash Report if its not to much trouble; I'm using Forge and it's Mods. So far Minecraft works with out the Mods added in the Mods folder. I've been trying to figure out what's wrong and have come up empty handed. I would greatly appreciate it if someone could help be. Thank you for your time, - Mei-Len666 crash-2021-03-12_11.05.49-client.txt
-
 Ok so I've been working on this for the past two day days and I can't seem to figure it out; (Also I'm running Ubuntu 20.04) I've been following this tutorial https://www.linuxnorth.org/minecraft/modded_linux.html#Step 4 - Configure your new Modded Minecraft Server, and I can't get past step four. I keep receiving this error when I try to load the forge-universal.jar (I renamed the file so I wouldn't have to retype the file every four seconds) A problem occurred running the Server launcher.java.lang.reflect.InvocationTargetException at java.base/jdk.internal.reflect.NativeMethodAccessorImpl.invoke0(Native Method) at java.base/jdk.internal.reflect.NativeMethodAccessorImpl.invoke(NativeMethodAccessorImpl.java:62) at java.base/jdk.internal.reflect.DelegatingMethodAccessorImpl.invoke(DelegatingMethodAccessorImpl.java:43) at java.base/java.lang.reflect.Method.invoke(Method.java:566) at net.minecraftforge.fml.relauncher.ServerLaunchWrapper.run(ServerLaunchWrapper.java:70) at net.minecraftforge.fml.relauncher.ServerLaunchWrapper.main(ServerLaunchWrapper.java:34) Caused by: java.lang.ClassCastException: class jdk.internal.loader.ClassLoaders$AppClassLoader cannot be cast to class java.net.URLClassLoader (jdk.internal.loader.ClassLoaders$AppClassLoader and java.net.URLClassLoader are in module java.base of loader 'bootstrap') at net.minecraft.launchwrapper.Launch.<init>(Launch.java:34) at net.minecraft.launchwrapper.Launch.main(Launch.java:28) ... 6 more I've tried reinstalling it, I've tried removing the files and redownloading it, I've tried just about everything that my smooth brain can do but I can't just seem to figure it out. I've looked at this github post thing and this looks like my best bet but honestly I'm not sure they even knew what they were talking about: https://github.com/MinecraftPortCentral/Cauldron-Issues/issues/26 I'm at my wits end and all I want to do is play Minecraft with my stupid friends... Send help!
-
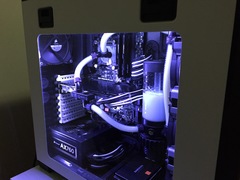
CEC Warp Core The Warp Core is a culmination of 4 months of work and over 200 hours of shopping, planning, fitting, building, rebuilding, re-rebuilding, busting, fixing, modding and testing until it was rocksteady and ready to take on the heaviest loads this hardware is capable of on a water loop. Beautiful, Chaotic, Powerful and an undeniable statement piece; this PC was an absolute pleasure to build and we miss it in the shop every day. (Below the parts list is detailed build information) Parts List: ~CPU: Intel i9 9900k 8C/16T ~GPU: EVGA 2080TI SC Ultra 11GB ~RAM: 32GB (4x8) Corsair Vengeance RGB Pro 3200mhz, CL16 ~Motherboard: ASUS ROG Maximus X Formula ~Storage1: Samsung Evo Plus 1TB NVME M.2 ~Storage2: Crucial P2 1TB NVME M.2 ~Power Supply: Enermax MaxRevo 1350W 80+ Gold ~Case: GamerStorm Quadsteller (Modified) ~Cable Extensions: LinkUp Orange ~RGB: Corsair DRGB Strips (2 x 4 pack) ~RGB: Corsair DRGB Lighting Node ~RGB: 2 x EZDIY DRGB Diffused Strips ~Fans: 2 x Noctua Chromax Black ~Fans: 3 x AI Aureola Duo 80mm ARGB Ring ~Fans: 7 x Antec Prizm 120ARGB Waterloop >CPU Block: EK-Quantum Velocity LGA1151 >GPU Block: EK-Vector 2080TI >Main Pump: SWIFTECH MCP35X >Top Pump: XSPC Photon >Reservoir: 2 x 300mm >Tubing: PrimoChill PrimoFlex 3/8x5/8 10ft >Coolant: Corsair XL5 1L Blue x 2 ----Fittings---- >BitsPower 15 x 3/8x5/8 Compression Matte Black >BitsPower 4 x 3/8x5/8 45 DEG Rotary Matte Black >Bitspower 1 x 3/8x5/8 T-Fitting Matte Black >BitsPower 2 x 3/8x5/8 MiniValve Matte Black >BitsPower 6 x 3/8x5/8 Various Extenders __________________________________________________ Build Story and Information: The Warp Core started out as a motherboard, a case and an idea that quickly turned into sketches, head scratching and many long hours. Performance Choices: Motherboard: Honest is; we started this build less than 4 months after establishing our company and we got this Maximus Formula X board for a steal; absolutely certain we could make something stunning with it. The board is performant, stays cool and is beautiful. CPU: The baddest CPU that can fit on the Z370 chipset; simple as that. GPU: We started out with an Asus GeForce RTX 2080TI O11G Dual-Fan OC Edition aaaaaaand…. The memory died … we still have it as a memento in our shop. In the end, we settled on the EVGA 2080TI SC Ultra 11GB as a replacement due to the global price spikes and availability issues at the time at building making it extraordinarily difficult to find another ASUS card. RAM: The Corsair Vengeance Pro RGB is longstanding, reliable RAM that mixes fabulously with the i9 9900k. At 3200mhz and CL16 this RAM just makes sense. Storage: The most notably performant PCIE 3.0 NVME available was the obvious choice here backed up by some peppy NVME game storage. Power Supply: 1350W of headspace on a rig that can pull nearly 800W from the wall… yes please. Aesthetic Choices: The Case: We ended up having to Dremel fit the reservoirs, top pump and a few other items in order to get a clean and performant system. The Quadstellar Case underwent further modification with the removal of the front opaque flaps in order to show off our signature RGB styling and to further improve cooling. Working in a 70lb water cooled system on a slant produced further loop issues for draining and filling that we ended up working some creative plumbing magic to fix. The Lighting: The Warp Core is equipped with over 200 Addressable LEDs inside 11 x Digital RGB Ring Fans, 9 x DRGB light strips, 4 x DRGB RAM modules, GPU and CPU Water Blocks and motherboard lights. The Warp Core's lighting functionality and customizability is through the roof. We ended up running everything through OpenRGB for full Digital control over multiple inputs: this allowed us to set 9 one-click lighting profiles for hassle-free instant lighting swaps. The Water Loop: Our goal here was to provide an alien looking, wild and wildly effective water loop with a true CEC signature look. Our inspiration here is in the name. We wanted it to look imposing, complex and exactly what you’d expect opening up a starship warp drive. We built in a dual valve system to drain this loop with a chimney. The whole system holds over a half gallon of liquid and including the 28 fittings, dual res and rad; the loop is right at 14ft in length. Performance Numbers: The Warp Core’s water loop was set up with an extended and dedicated top loop splitting off of the combined dual reservoir for the GPU. This configuration outputs extra head pressure into the radiator allowing for a distro block level of efficiency without a distro block. The i9 9900k will turbo on it’s own up to 5.1Ghz all-core without thermal throttling. The 2080TI was able to outperform some lower-end RTX 3080s rocking extremely stable frames and temps while never going above the loop water temp. The GPU maxed out around 65C after 6 hours at 100% full system load while benchmarking at 22.2C ambient room temperature. In our 100% system load testing, this system pulls a continuous 750W+ from the wall. We maxed out the GPU VRMs at 367W along with the thermal transfer capacity of the 9900k die size sporting our IC-Diamond thermal paste topping out around 85C at 5.1GHz All-Core. At one point we considered de-lidding the 9900k and applying liquid metal, but ultimately decided against it as this was a more sustainable thermal solution. Summary: As CEC’s first Ultra Custom, the Warp Core was both a success story and learning experience. We have several more Ultra Custom Rigs in the works and are looking forward to bringing those into the limelight!
-
Join the newest Revolution at the: English Losers |Helis|BBP|loot+|1PP|PVP|Bases|Traders|AirDrop SYSTEM: PC Discord: https://discord.gg/ynTzuVpSPd Welcome Aboard! After the Z Virus wiped out most of the population, it left only the strongest-willed individuals to survive the aftermath. The CDC (Chernarus Disease Control) Team are working relentlessly on a cure for this forsaken virus. With tensions growing between the newly formed clans / gangs, survival of the fittest has become a way of life. So grab a rifle, and join us in the greatest, rapidly growing community, in this fight to dominate the once populated wasteland. Explore the lands of Chernarus, find the highest tier loot in our custom military zones scattered around this post-apocalyptic wasteland. Tens of custom places, traders and areas to explore, gather loot and get involved in part of the most vicious PvP action. Test your luck and skill with our Regular Supply Drops, provided by the CDC. With the chance of getting one of 3 types of drops, you can possibly receive items ranging from medical / building supplies all the way to raid tools and highest tier weapons and armour! Meet new players and form a team, create alliances and dominate the leader boards TOGETHER. So.. WHO ARE WE? The EL Server is one like no other.. We force the qualities of teamwork and cooperation into action in order to grow and survive. Progression is key in this post apocalyptic wasteland. The careful economy set in place joint with numerous community and custom made mods make this server a challenging one to dominate alone. With our friendly, active staff team, we aim to provide you all with a smooth and fun experience. You can always chat with us on our Discord! We have a support ticket system to answer any issues you may find during your playthrough! With PvP being enabled globally around the map of Chernarus, KOS is something to expect. Daring Player interactions and situations will fuel your drive to constantly search for better gear. With this, we host a series of custom events which will allow players to fight each other for rewards. The CDC are constantly hiring the militia groups scattered around the map to complete tasks for them. They always pay handsomely. Some ground rules (Which you can find on our Discord PVP is always enabled, of course, no camping outside trader zones up to a 300m safe zone in some areas and 150m in the black market. KOS is enabled, making this experience truly reliant on teamwork in order to secure the loot and grow your way up the server! Whether you want to approach an enemy guns blazing or take them out silently with hitman precision, the choice is yours. Create an alliance, do as you will in order to grow your name. You can make money in many numerous ways using our trader systems! There are 3 safe traders at Green Mountain and Klen, and a black market trader at the Biathlon Arena. These traders buy and sell the gear you need to build a base and survive. From basic tools, to heavy weaponry. We have added the cannabis mod into our server which is a true money maker! Many different types of seeds spawn around the map inside hunting shacks and greenhouses, some strains selling for over 60k! Base building is essential in order for you and your clan to secure the loot you've gained! We have added a few mods to help with that such as BaseBuildingPlus, Codelocks etc. This will ensure your enemies have a hard time getting in! (all rules written on discord about bases) Raiding is enabled, meaning people can use raid tools such as breach charges to get into someone's base. Join the action, grow the movement. Become part of the EL. Bank Capacity (inside ATM's) is 250k! This PC server is hosted on the highest quality hardware with lightning fast UK speeds, 3 hour restarts and a brilliant team of experienced staff! With an active discord staff, any problems can be promptly dealt with. If you're looking for a great place to enable your teamwork skills as well as survival instincts, you've come to the right place. Join us at the English Losers Server and become the reason that people fear crossing fields, why people double lock their doors, why people stay in groups at night. Join the revolution and make a change in the world of Chernarus. https://discord.gg/ynTzuVpSPd English Losers |Helis|BBP|loot+|1PP|PVP|Bases|Traders|AirDrop
-
 Budget (including currency): €150-€200 Country: Netherlands Games, programs or workloads that it will be used for: Hosting a Minecraft server (I'd like it to be able to handle modpacks like Feed the Beast) Other details (existing parts lists, whether any peripherals are needed, what you're upgrading from, when you're going to buy, what resolution and refresh rate you want to play at, etc): this is something I'd like to figure out to maybe get it in the near future, but I don't really have a date to need it to be done. I am kind of new in researching parts and I've hit a roadblock, what parts would I need? I don't need support for a high refreshrate or whatever, because I am only going to use it for hosting the server on and nothing else. That's why I'd like it to not be very expensive but I don't know what is needed for this build in specific. Thanks!
 -
-
 So I want to make PC Build that is dedicated to being a server, most of the time, modded minecraft And what helps the decision is that there aren't any hosting providers that is close to our area (Saudi Arabia) that can give us under 100 ping, not terrible but not that great either Here's the build I came up with: PCPartPicker Part List CPU: Intel Core i3-9100F 3.6 GHz Quad-Core Processor ($78.00 @ B&H) Motherboard: Gigabyte B365M DS3H Micro ATX LGA1151 Motherboard ($74.99 @ B&H) Memory: G.Skill Ripjaws Series 16 GB (4 x 4 GB) DDR4-2666 Memory ($86.99 @ Newegg) Storage: HP EX900 120 GB M.2-2280 NVME Solid State Drive ($34.99 @ Monoprice) Power Supply: EVGA 500 W 80+ Certified ATX Power Supply ($40.98 @ Newegg) Total: $315.95 Prices include shipping, taxes, and discounts when available Generated by PCPartPicker 2020-04-01 20:03 EDT-0400 My goal: making it cheaper if possible I looked up the best single core performance CPU from here, and then picked up the best from the cheapest I thought about taking a ryzen instead, while its a bit slower and pricier, the mobo will be significantly cheaper (~$40/30) but I retained from that since it's slower and does need higher clocked RAM to get the most out of it Also, I will be running MC Eternal modpack (~300 mods), and my upload speed is around 8MB/s, Wish should cut it We are around 3-4, maybe sometimes up to 8 but mostly 3 or 4 Should this build cut it for exploring and building machines without lag/low TPS? I also got that I didn't need any cooler for the build, is this correct? because it weirded me out (I originally added 212 Evo cooler) the only thing that im not sure about is the quad channel memory, as I might want it to be 32GB in the future (to open more servers on the same machine), as I've heard quad channel might help the performance, specially in minecraft I will be running like 1 Modpack and maybe 2 Vanillas (Maybbe If I'm about that life I might open another modpack at the same time, but probably a lighter version) Also I could use it for other stuff such as storing, so its somewhat worth the investment Note: I want to build my own because I like having fun with computers and servers And im pretty sure I made poor choices or forgot something from an aspect of the build/minecraft server, any help would be appercaited! thanks
 -
After seeing a few excellent build guides I've decided to share my work in progress here on the LTT forums. Backsoory I started with 1200 CAD, bought a 960m laptop, got into tech (Linus, Austin, bitwit, Jay etc.) I immediately got off that burning ship, willingly taking the hit of $100 loss I took in selling. My original plan was to buy a Pascal laptop but found them out of my budget. I thankfully found a Deepcool Genome + 32GB Ripjaw V (4x8) for $200 CAD on KIJIJI (heads up, lots of kijiji) Bought 1060 6gb on kijiji for $325 CAD On boxing day I purchased my (taxes included) $440 i7 6700K $120 GIGABYTE Z170XP-SLI $70 Corsair CX650M $38 2 pack SF120s $135 crappy monitor $70 Gamdias Mechanical keyboard + mouse combo I built it immediately and was super happy about it
-
Would you buy this card for 118$??? Its currently the cheapest 1050ti i can find A guy is selling this online. He said its working 100%. Is it too risky to buy it?
-
Hi, has anyone got any tips or experience with building a desk PC? I'm looking for some tips on a good amount fans to keep it cool, were should I buy cable grommets and also were do i buy USB and power buttons. Also, some do's and don'ts on the build would be good. Any more information would be great.
-
as you can see in the video there is an app off market called snapchat ++ which gives you so much more things to do without being limited on snapchat but its only available for the ios phones so anyone know how i can get it for android?
-
Project: OLD SCHOOL I built this MOD back in November 2012 as a result of my desire to utilize an iconic case and my desire to run OSX. It took some serious thought, a lot of hard work and a lot of time consuming elbow grease, as there were several factors that came into play with the formulation and completion of this MOD. (No true MOD is ever really completed. It is, and always will be an ongoing project) I started out with an PowerMac G3 case (Yes, I know it has been done perhaps a thousand times before, BUT not in this fashion) as I liked the design and it has attained the reputation as almost a work of art. My feelings were that Apple may have missed the mark slightly by not offering any “Bling” or customization on this case. All of the cases that I have come across browsing the web that were painted had the paint applied to the outside of the case. Nice, but it took away from the depth of the appearance of the case. I fixed this. All it took was countless hours (over 65) of wet sanding and polishing of the original polycarbonate case. (No… you cannot use paint strippers or lacquer thinner or other such chemicals as it would fog the plastic almost instantly) I took the 4 corner pieces and cleaned them masked off the “inset stripe” areas and shot them with high gloss white and then covered it with high gloss black IMRON. (All of the painting was done to the inside of the components.) I applied 1/8th pin striping tape to the area around the relief for the apple appliqué and masked it off. I shot the rest of the inside with the same gloss black paint as before and removed the masking and the pin stripe tape and shot it with a “frost” paint to give the area a frosted look. (This is the area around the apple and leaf appliqué) so that I could give it some indirect backlighting. That was the hard part. Now I was ready for the easy stuff. I removed all of the interior components, trimmed off a corner of the CD/DVD carrier (that would interfere with the placement of the new motherboard), removed the original motherboard stand offs in lieu of new ones placed to meet the requirements of the new motherboard. I shot all of the interior and exterior metal components with flat black paint as well as the rear plastic panel. The front plastic panel was painted in both high gloss and satin black paints to give a slight contrast. Green LED’s were placed behind the front apple logo as well as on the original power button. (Both the power button and the reset button are functional with the modding to the circuit I did) Holes were drilled and cut outs made to accommodate a front panel audio out / line in ports as well as 2 USB ports. (Got this nifty little setup from an old HP that was laying around) After placement of the new motherboard standoffs and cutting out for the back plate I modded the white plastic closures slide for the new standoffs. After determining the location of the fans I made the cut outs for them and airbrushed them gloss black) (Yeah, Noctua fans are normally a hideous tan and bone color) The plastic back cover was trimmed by the power plug to allow the use of my power supply and holes were made in the plastic cover to accommodate the wireless antennas. Perform touch up paint on the case, sleeve the wiring, mod the Hard drive mount on the bottom to accommodate the SSD, Protect the wires and cables inside the box with rubber and plastic edge guard moldings, Detail cable and zip tie the whole works after installing 2 green 4”CCF lights on the exterior metal sides ONLY after installing reflective foil tape on the sides. (To reflect the green lighting to the outside) That was the looks … as for the hardware; I used what I had as I am on a budget until I find employment, so it is truly Old School Retro with the components as listed below. Motherboard: Gigabyte GA-G33M-S2L Processor: Intel E8600 (Overclocked @ 4GHz.) Memory: 4GB GSKILL DDR2 PC2-8500 Video: NIVIDIA 8800GTS 512 Drives: HDD1=Kingston V100 96GB SATA SSD (OSX install) HDD2= WD1.5TB SATA HD (Windows 7 install) Optical= Toshiba SATA CD/DVD Power supply: Thermaltake Purepower RX-550 Processor cooling: Scythe Big Shrunken 2 Rev. B Case Cooling: Noctua NF-P12-1300 120mm Fans Wireless: Mini PCI-E to PCI-E adaptor with Atheros AR8131 chipset USB: 10 ports (2 Front, 4 Rear + 4 via PCI interface card) Audio: Front: Lline out and Mic in, Rear Line out and Mic in. I run it a 4GHz (1.33125Volts Vcore1.3160) all the time and idle temp is 33C and at 100% load (Orthos 6 hours) it goes to 54C. (@26C ambient temp) It pulls an 11.809 1M calculation in superpi-mod v1.5. It is pretty snappy with 10.6.8 and Windows 7 x64 Pro. Install method for OSX was found here on Insanely Mac : http://www.insanelym...e-ga-ep45-ds3l/ with the necessary changes to work on my specific motherboard as well as a custom modded DSDT. This is not the fastest or the most powerful system here, BUT it is affordable and it meets the criteria of a MODDED BOX. IMHO a mod is not just spending tons of money bolting together a bunch of hardware of the latest and greatest to get a supercomputer that will more than likely be underutilized but rather the customization of a system that has your own signature on it and it works well when you need it to and does what you want it to. There are systems here that would make Apple itself drool as they are very impressive and they cost substantially less than an Apple equivalent and they are exquisite in their own way. My goal was to make an affordable system that will work well with what 90% of all Mac users utilize their systems for. I had 10.7 installed as well as a problematic 10.8 on this originally but neither performs as well as the 10.6; and as the almighty Apple goes, the newer software is almost forcing you to buy (Their) newer hardware. It is Apple’s way of perpetuating sales of their hardware. Coming next will be a new build from a G4 case but there will be a few unique features found nowhere else on a rebuild/conversion of the G4 case. Can you say anodized non-ghetto brushed aluminum? I will now get off my soapbox….. and ask What’s your MOD?
-
-
So I want to host a modded Minecraft server with a Raspberry Pi 3 B. I will have max 5 players. (175 mods) The Pi has 1Gb of RAM, 1.2GHz and has 4 cores (64 bit). I have an 8GB flash drive I can use as a storage device for it (23.23Mbs read 10Mbs write) I was wondering if anyone who had done anything like this before knew how I could do it and if it would work with the PI. Thanks. (I already know about this website but it's for a vanilla server not modded.)
-
-
The server started, and it seemed to function correctly for some time, but after awhile I got kicked and whenever I rejoined I either timed out or just disconnected. Here's the log file: Current mod list: latest (1).log
-
 Ok, so I'm looking for a sold station preferably. I would only use it for things like xbox controllers, Nintendo 3ds' ect. So small boards, with small connections. I have found some for around 40 with temp control a few tips ect. Also have found them cheaper on sale. Can anyone recommend one that is 20 bucks? And actually works, with temp control? Led indicator would be nice, I have saw some almost that cheap, and one for 20 but cannot relocate it. Would those cheaper ones on Amazon for 35 bucks, some are even a two in one, with a heat gun and station and Led indicator, worth it? I mean the Hakko and other well received brands are not that much more. Also those cheap tips, without a brand, or a brand you can find any info on, has anyone used any before? I saw 5 tips, that were equal to some Hakko tip, and they were about 2 bucks. I wouldn't mind building my own with parts from China, I mean a whole station is just a little stand/holder, a AC supply, with a box with a dial to controll the heat, hopefully with an LED. If anyone has ever done this I would be interested in how it turned out, and what was used. Alibaba has all the stuff seperate to make fully loaded stations for cheap as heck, you could even make it a brand and make profit, nd that's exactly what most of those off brand or no brand cheap ones are. I saw one one with tips Led temp display, dial, sponge ect, idk the watts but it was higher than I needed by about 20 I remember, they had some off brand station that came with everything for 25 and there gone or I cannot find it, it was on there site, I saw one 9n Walmarts site as well for about 8 bucks more, sadly I dont remember what it was called or can find it. Would it be smart to buy a used Hakko or trusted Station, say one thats usually 65 to 80 bucks maybe 100, if it was "slightly used" or "works like new" and priced at 20 bucks or so? I would rather not use just a pen that plugs in the wall, and be able to see the temp, there is one pen with temp displayed on the actual pen it self with a small dip or buttons. This was a Chinese brand on Amazon, and very cheap, would that get the job done, and be good for someone with little experience? I've used stations a few times, not in a while, have used a torch to solder Jewlery more lol and that's a bit different, but close lol the small movements and needing to get it perfect, in fact now thinking it's probably harder with a full blown torch and doing just as small solders.
 -
Hi again .... In the old days when Vista was released ... I stuck with Winborg XP ... This Os worked 95% like XP, but had all the tosh stripped out + it came with a load of handy programs including the BSOD screen saver ( unlocked with hot-keys) that allowed me to leave my laptop un-attended in a Beijing cafe cos most people thought i was knackered I was thinking of doing the same when they released Win 8 (yuk), but I stuck with official Win7 this time. However I find myself in a similar situ once again & am wondering if anyone knows of a modded version of Win 10 that has a good rep, that I can have a play around with? Does this type of modding on current OS`s still happen these days?
-
So my current configuration of Minecraft WAS stable. but I went to my computer and cleaned it up. during this I uninstalled a bunch of programs I thought I didn't use anymore. But then I found that Minecraft crashes whenever I try to fullscreen it. Which is a problem as I can't see my hotbar. No problem, just update java (It's been bugging me, anyway). And now It crashes even before going to the title screen. The error is this The game crashed whilst unexpected errorError: java.lang.RuntimeException: No OpenGL context found in the current thread. Other threads point to this problem being fixed by installing an Intel chipset driver. But my computer uses ryzen. A ryzen 1400 on a b350 board to be exact. And that did remind me that I uninstalled something that was called "AMD software" before this started happening. I tried installing the appropriate Chipset driver on AMD's website, and I did a reboot. but the problem still persists.
-
Im playing on an modded minecraft server with an modpack called FTB sky odyssey or soemthing like that. Its an skyblock server, with almost no blocks around me so u might think it will run good on my pc. But no. I get HUGE lag spikes and my pc can barely keep an solid 60fps with low settings. I can usually run vanilla minecraft at highest settings with solid 60fps, and sometimes even with ultra shaders. Well back to the problem, i can randomly get HUGE lag spikes whenever im doing stuff, and it usually runs at 50fps. I have around 6gb ram allocated to minecraft and it barely uses 3gb ram while playing, and it doesnt max out anything in task manager. So i wanna whats causing these lag spikes and if there are any fix. PC SPECS: Ryzen 3 2200g (stock) a320m-hdv r3.0 8gb ram (stock) XFX rs rx480 4gb (stock) As you can see my pc should be able to run almost any new games (may have to lower settings in some games) without any problem. And heres an screenshot of my fps drops. Ive also noticed that when these fps drops happen are the "tick" at almost 100% on the debug pie. while not having fps drops, are the "tick" and "game render" sharing the pie with like 50-50 each.
-
Hey, so I was running into some issues with my system crashing and someone suggested that my gpu's bios may be modded. I bought my Aorus Rx570v 4gb off of someone I knew, and the issue with the card is that you have to run ATIKDMAG.patcher after everytime you update/install gpu drivers, or else it wont work. When i run GPU-Z and identify the bios, it reads "Multiple Graphics Devices Found" and points towards a base AMD Radeon Rx570, and AMD Radeon Rx570g bios, not an Aorus/ Gigabyte bios. The subvender does say Gigabyte. My base clock is 1150 core and 2000 memory, which seems low but idk... Could my gpu's bios be modded, or is it just a case of manufacturing? Thanks, and any help would be appreciated! System: Win 10 64bit Ryzen 7 2700 Asrock B450M Pro4 16gb Corsair Vengeance LPX CL16 Aorus Rx570 4gb Riotoro Enigma G2 650w
-
im looking for somebody to play spin tires mudrunner with becuse i just got it must have discord and beable to speek fluent English


.thumb.png.04e024ba8b293063dde2d321fea39dd5.png)


.thumb.gif.e708622e8d5e86ebefec94621ac0693d.gif)