Jump to content

Project: Evolv RGB

MadG4mer

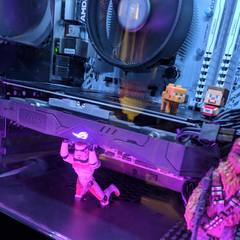
Little update is here! I have updated the mainpost and here is pick of some parts that have arrived.

image.jpeg

image.jpeg

image.jpeg

image.jpeg

image.jpeg

image.jpeg

image.jpeg

image.jpeg

Link to comment
Share on other sites

Link to post
Share on other sites

What are the Capacitors and Resistors for?

Main System Specs:

  • Intel Core i5 6500 3.2GHz CPU
  • Gigabyte GA-H170-D3H Motherboard
  • Kingston HyperX Fury 16GB 2400MHz, Gskill Ripjaws 8GB
  • Asus GTX 1060 Turbo
  • Kingston HyperX Savage 240GB SSD
  • Seagate 1TB NAS Grade HDD x2
  • Thermaltake NiC F3 Cooler
  • EVGA Supernova 750 G2 Power Supply
  • NZXT S340 Red/Black Case
  • Noctua NF-F12 Fan x2

Laptop Specs:

  • Intel Pentium N3700 CPU
  • 4GB Kingston RAM
  • Intel HD Graphics
  • Windows 10 Home

Peripherals:

  • Microsoft Wired 600 KB
  • Dell 2003 Mouse
  • HP Compaq LA2206x Monitor
  • Logitech X530 5.1 Speakers
  • Roland RH-5 Headphones
Link to comment
Share on other sites

Link to post
Share on other sites

5 hours ago, Warning said:

What are the Capacitors and Resistors for?

Arduino for the complete RGB control.

Link to comment
Share on other sites

Link to post
Share on other sites

12 minutes ago, MadG4mer said:

Arduino for the complete RGB control.

Great! Sounds very interesting!

Main System Specs:

  • Intel Core i5 6500 3.2GHz CPU
  • Gigabyte GA-H170-D3H Motherboard
  • Kingston HyperX Fury 16GB 2400MHz, Gskill Ripjaws 8GB
  • Asus GTX 1060 Turbo
  • Kingston HyperX Savage 240GB SSD
  • Seagate 1TB NAS Grade HDD x2
  • Thermaltake NiC F3 Cooler
  • EVGA Supernova 750 G2 Power Supply
  • NZXT S340 Red/Black Case
  • Noctua NF-F12 Fan x2

Laptop Specs:

  • Intel Pentium N3700 CPU
  • 4GB Kingston RAM
  • Intel HD Graphics
  • Windows 10 Home

Peripherals:

  • Microsoft Wired 600 KB
  • Dell 2003 Mouse
  • HP Compaq LA2206x Monitor
  • Logitech X530 5.1 Speakers
  • Roland RH-5 Headphones
Link to comment
Share on other sites

Link to post
Share on other sites

I made PCB for RGB lightning and I thought to use ATMega8 but I put ATMega328(Arduino microprocessor). I also put one header so I can easy hook up sensors or other stuffs. This small PCB is on aluminium L-profile and screwed in 5.25 space. PCB is connected to internal serial port.

And here is completed lightning: short video of my Phanteks Enthoo Pro RGB mod.

Whole build you can see at https://linustechtips.com/main/topic/615589-dual-xeons-worth-or-not/


I used ATMega328's EEPROM so I can choose effects during posting and booting. I also made windows app to define effect and lightning according to CPU usage as option.


Untitled.jpg

Link to comment
Share on other sites

Link to post
Share on other sites

2 hours ago, srmarkovic said:

Arduino source. Maybe you'll find few interesting lines.

CaseLed.ino

I made little chip prototype with the Fritzing but I quickly found out how limited that app is. Also what did you use to design the pcb?

Link to comment
Share on other sites

Link to post
Share on other sites

Well I have been using a lot of different software in my 30 years doing electronics  Protel, Orcad, PCB editor and soo.. The best software with almost all possible component with Circuit, PCB, component editor is Diptrace.  You can download free edition which will 100% fit your needs. Making boards with traces wider than 0.1mm is easy. Use Shematic editor make schematic then call PCB editor, make good placement and print on special PCB paper (works with 0.1mm) or find glossy paper from magazine (0.5mm) place paper on bakarpertinax use iron for 10min and rest you probably know. I need less then 10 easy minutes from design to PCB. Doing circuit with SMD is much easier and you don't have to make holes (I saw mosfets and resistors you bought). SMD components are better for soldering and I made so small boards with a lot of components which are also cheaper than passtrough components. This board I put in post I designed and made for 15 minutes so it is not so nice but works good.

Link to comment
Share on other sites

Link to post
Share on other sites

Ironing is less usually 5-7 minutes. You can also use standard components as SMD, put it on circuit side and bend pins to board. Holes needs a lot of time.


If you have internal COM port on board and if you want I can put Diptrace PCB file of RGB controller. I used 28 pins  IC socket for ATMega which I soldier like smd.


For my last computer I used cheap esp-8266 (google it, it is great as wifi for Arduino, but also great as standalone mpc) to turn PC via wifi. With this I use simple WOL through Ethernet in my home network but I can wake it up through wifi or Internet.

Link to comment
Share on other sites

Link to post
Share on other sites

34 minutes ago, srmarkovic said:

Well I have been using a lot of different software in my 30 years doing electronics  Protel, Orcad, PCB editor and soo.. The best software with almost all possible component with Circuit, PCB, component editor is Diptrace.  You can download free edition which will 100% fit your needs. Making boards with traces wider than 0.1mm is easy. Use Shematic editor make schematic then call PCB editor, make good placement and print on special PCB paper (works with 0.1mm) or find glossy paper from magazine (0.5mm) place paper on bakarpertinax use iron for 10min and rest you probably know. I need less then 10 easy minutes from design to PCB. Doing circuit with SMD is much easier and you don't have to make holes (I saw mosfets and resistors you bought). SMD components are better for soldering and I made so small boards with a lot of components which are also cheaper than passtrough components. This board I put in post I designed and made for 15 minutes so it is not so nice but works good.

I bought the passthrough versions as Im just starting with the electronics and wanted to do some breadboard prototyping and may want to change design afterwards. Will move to the topmounted versions when I start to get some experience.

Link to comment
Share on other sites

Link to post
Share on other sites

2 minutes ago, MadG4mer said:

I bought the passthrough versions as Im just starting with the electronics and wanted to do some breadboard prototyping and may want to change design afterwards. Will move to the topmounted versions when I start to get some experience.

You had Diptrace?

Link to comment
Share on other sites

Link to post
Share on other sites

On 18. heinäkuuta 2016 at 8:12 PM, srmarkovic said:

You had Diptrace?

Sorry for Late answer. I played around with the Diptrace and it Seems like a fine piece of software, I just need to learn little bit more to use it correctly.

Link to comment
Share on other sites

Link to post
Share on other sites

I am here shaking from exitement. Parts are already in the truck and coming here soon. Its still my first build and I have been waiting for my parts over a month now. (Ordered 19.6.)

Link to comment
Share on other sites

Link to post
Share on other sites

  • 2 weeks later...
On 7/30/2016 at 11:30 PM, MadG4mer said:

I have now been using my build for week or so and can only say that it was 100% worth the money. I will post dissassembly and reassembly when all my parts have come but for now here are some benchmarks.


Timespy (DX12): http://www.3dmark.com/spy/135197

Fire Strike (DX11): http://www.3dmark.com/fs/9471027

I am interested in processor bench. What is Cinabench 15 score, please?

Link to comment
Share on other sites

Link to post
Share on other sites

I benched it in cinebench but you will have to wait for the evening as Im away for today.

Link to comment
Share on other sites

Link to post
Share on other sites

  • 3 weeks later...

This thread is not dead but it is paused until I finish my YO-test (Final test in Finnish high school)

Link to comment
Share on other sites

Link to post
Share on other sites

Create an account or sign in to comment

You need to be a member in order to leave a comment

Create an account

Sign up for a new account in our community. It's easy!

Register a new account

Sign in

Already have an account? Sign in here.

Sign In Now

×