Jump to content

"Rainbow Dash Wizardry Mark II", my Overclocked, Quiet, RGB PC Build

Rainbow Dash Wizardry Mark II (RDW MK2) is my personal evolved, completed gaming rig I built and tinkered over the last few months of 2020 after her departure from the "Mark I" status. It was inspired from the PC built in LTT's Ultimate RGB PC Build Guide but made to suit my needs - optimized for overclocking and whisper quiet operation, even during a heavy, synthetic workload.


When RDW was in her Mark 1 days in 2019, she was temporarily used as a PXE Boot Server at my workplace (an internet gaming café in Singapore) to boot 84 diskless gaming PCs for my customer's enjoyment for 3 months. But her job as a server is complete and she is now back with me and I upgraded and evolved her.


This build was designed to ensure that the user get:

- A no compromises, stable gaming experience with very high frame rate

- Continuous synthetic, overclocked load without throttling 

- basking in RGB Glory (which is something a gaming PC "NEEDS" now) 

- Very Whisper Quiet operation

- Able to cool and work as well even in a non Air Conditioned environment of up to 34C


The name Rainbow Dash Wizardry came from LTT's Ultimate RGB PC Build Guide - "So let's turn the light's out... And bask, in it's outrageous Rainbow Dash Wizardry!" - Linus Sebastian

and because I am a Brony (a male fan of My Little Pony: Friendship Is Magic), there's no doubt that Rainbow Dash is best pony and the RGB build is the thing!


Feel free to ask me if you have any questions on the build! :D


RDW MK2 (2020) Full Specs

Spoiler

CPU: Intel Core i9-9900k (4.9Ghz, 1.275V, AVX2, LLC5)

RAM: G Skill Trident Z RGB DDR4 32GB 3200Mhz CL16 (XMP II Enabled)

MB: ASUS Z390 Maximus XI Gene

GPU: "DERPON3 RTX 2080 Ti" (EVGA RTX 2080 Ti XC Ultra)

SSDs: 2 x Samsung 970 EVO 500GB, 1 x Samsung 860 EVO 1TB, 1 x Samsung 860 EVO 500GB

HDDs: 1 x WD Blue 5400RPM 2TB, 1 x WD Blue 5400RPM 4TB

OS: Windows 10 Pro


PSU: Corsair HX750 2018 80 Plus Platinum

CASE: Lian Li PC-011 Dynamic

CPU Cooler: Corsair H150i Pro with 3 x Noctua NF-A12x25s as Push and 3 x Cooler Master Air Balance RGBs as Pull

GPU Cooler: NZXT G12 bracket, Corsair H100i V2 with 2 x Noctua NF-A12x25s as Push.

RGB: Corsair Lighting Node Pro + Expansion Kit


RDW MK1 (2019) as server, Full Specs

Spoiler


CPU: Intel Core i7-8700k (5.0Ghz, 1.25V, AVX2, LLC5)

RAM: G Skill Trident Z RGB DDR4 32GB 3200Mhz CL16 (XMP II Enabled, fully used to cache all SSD data), Before: Corsair Vengance LPX RGB DDR4 32GB 3200Mhz CL16 (XMP I)

MB: ASUS Z390 Maximus XI Gene, Before: ASUS Z370-G ROG Strix Gaming 

GPU: - (Onboard for console purposes), mixture of, Gigabyte Aorus GTX 1080 Ti, Zotac RTX 2080 AMP! Edition and Galax RTX 2080 Ti SG Edition.

Network Card: Intel converged network adapter x540-t2 (Dual 10Gigabit)

SSDs:

- 1 x Samsung 970 EVO 500GB - Server OS & PXE Boot Drive Storage

- 2 x Samsung 860 EVO 1TB - in Raid 0, as Client Disk D, for hot/popular games like Fortnite, LoL, CS:GO, etc

- 1 x Samsung 860 EVO 2TB - Client Disk E, for not-so-popular games and retro/classic games like CS 1.6, Command and Conquer Generals

- 1 x Samsung 970 EVO 500GB + 1 x Samsung 1TB Samsung 860 EVO 1TB - used for "Writeback" a.k.a temporary image file storage, so that the system undoes any change once a client PC restarts/shutdown, to make sure it's idiot proof.

HDDs: - (duh, 84 PCs are getting booted!)


PSU: Cooler Master V750 (80 Plus Gold, 2015 model)

CASE: Armaggeddon Nimitz TR7000 (A watered down version of the 011 Dynamic LOL)

CPU Cooler: Corsair H150i Pro with 3 x Noctua NF-F12 iPPC 3000s as Pull

Additional Fans: 2 x Noctua NF-F12 iPPC 3000s, 1 x Noctua NF-A12x15

RGB: Armaggeddon Infineon RGB Controller w 4 RGB Strips.


EDIT 1: Added tags, added 95% completion paragraph and spoiler, fixed some sentence errors.

EDIT 2: Swapped pictures due to some updates, repositioned radiator, added 2 slot rear bracket on GPU.

EDIT 3: Added Sleeved PSU Cables for the CPU, ATX and GPU port.

EDIT 4: Added 3D Mark Time Spy result

EDIT 5: Finished thread, 100% completion. Updated 3D Mark Time Spy result


333.thumb.jpg.7bc0a9ef212d666df6d35c32348e8d1e.jpg


334.thumb.jpg.2c5a870921d32766f68d47cc9a45b7eb.jpg


IMG_7622.jpg


Capture.thumb.PNG.75419f02bfa5df0e15bfac421290cef2.PNG


Read more info of 3D Mark result here: https://www.3dmark.com/3dm/49310899


Old/Before Pictures:

Spoiler

Old Pictures - After shifting radiator 

1.thumb.jpg.5452c8873eaf49e834701e7e9c263f74.jpg


2.thumb.jpg.a3e899dfd14024603ea4b1ee95ca5edb.jpg

Original Pictures

IMG_7619[1254].jpg


IMG_7621.jpg


3D Mark Time Spy w 9700k

3DMark.thumb.PNG.f5e8d409b4b5f791461ccd0b7c178502.PNG


Edited by SapphireJasper
*Check "EDIT" sentences in post
Link to comment
Share on other sites

Link to post
Share on other sites

Nice build! The system certainly received an appropriate title. 

"Make sense? Oh, what fun is there in making sense?"
-Discord

Link to comment
Share on other sites

Link to post
Share on other sites

  • 2 weeks later...

I ordered a dual slot rear bracket and after about 20 days of waiting, it has arrived.


I needed it since the XC Ultra card had a Triple slot rear bracket that could not fit on the Cooler Master Vertical GPU Mount. Initially my build had temporarily no bracket and the GPU was loose.

3.jpg.0a16fbab868f906d4145e4f7d76a9ad6.jpg


This also allowed me to reposition the radiator, giving my build a cleaner look.


Before:


Spoiler

IMG_7621.thumb.jpg.61501f17a17c3c63822a7483b574327e.jpg


After:


Spoiler

1.thumb.jpg.5452c8873eaf49e834701e7e9c263f74.jpg


Link to comment
Share on other sites

Link to post
Share on other sites

  • 1 month later...

So finally after about 1.5 months from my last post, Singapore has eased some of the Circuit Breaker measures, allowing many shops and businesses to open again. I head back to Sim Lim Square yesterday to get some sleeved PSU cables.


1472080320_IMG_79561391.jpg.50d57d88571893b3c57e79627c4567c2.jpg


I also reworked the cable management for the GPU because it looks untidy!


Before:

491472199_IMG_79571393.jpg.4ab188c9b08386ac6b802220e37f9e53.jpg


After (This was the best I could do):

1300266796_IMG_79611395.jpg.284d28da013e7e3a5962de6475dfeb8f.jpg


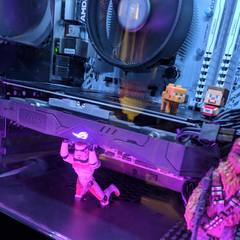
New pics! And there's ponies in the computer! :P

Spoiler

333.thumb.jpg.c7db917c2cbd77859ab9ccc784153f34.jpg


334.thumb.jpg.ce173025349d1162cf96e8ad83358824.jpg


Link to comment
Share on other sites

Link to post
Share on other sites

I love this build. The Excessive Amount Of RGB Is AMAZING!!! Nice job

  • CPU
    AMD Ryzen 5 3600
  • Motheboard
    MSI - MPG X570 GAMING EDGE WIFI (Socket AM4) USB-C Gen2 AMD Motherboard
  • RAM
    CORSAIR - Vengeance RGB PRO 32GB (2PK 16GB) 3.2GHz PC4-25600 DDR4 DIMM Unbuffered Non-ECC Desktop Memory Kit with RGB Lighting - Black
  • GPU
    MSI - NVIDIA GeForce RTX 2060 SUPER 8GB GDDR6 PCI Express 3.0 Graphics Card - Black/Gray
  • Case
    CORSAIR - iCUE 220T RGB Airflow ATX Mid-Tower Smart Case - Black
  • Storage
    WD - Blue 500GB Internal SATA Solid State Drive Seagate - Barracuda 2TB Internal SATA Hard Drive for Desktops
  • PSU
    CORSAIR - RMx Series 850W ATX12V 2.4/EPS12V 2.92 80 Plus Gold Modular Power Supply - Black
  • Display
    Samsung - Odyssey CRG5 series 24” LED Curved FHD FreeSync monitor - Black
  • Keyboard
    Razer Cynosa Chroma
  • Mouse
    Razer Mamba Elite
  • OS
    Windows 10 Home
Link to comment
Share on other sites

Link to post
Share on other sites

12 hours ago, Phoned_ said:

I love this build. The Excessive Amount Of RGB Is AMAZING!!! Nice job

Thank you! :D

Link to comment
Share on other sites

Link to post
Share on other sites

  • 1 month later...

Time for the final piece of the puzzle!


"Upgrading" the CPU to a 9900K.


This build is 100% done!


Got it for a good deal. Not a golden chip. But a decent undervolt at 4.9/4.7; I'll take it for the better multithreaded performance :P


And new Timespy Score! (I thought a 9900K could get me to 99% of all but oh well.. :P )


63980896_IMG_82061469.thumb.jpg.8143b09674934250adc4f3e33825878c.jpg


Capture.thumb.PNG.367c2aa4341ea06dc00ea6e153c78afd.PNG

Link to comment
Share on other sites

Link to post
Share on other sites

Create an account or sign in to comment

You need to be a member in order to leave a comment

Create an account

Sign up for a new account in our community. It's easy!

Register a new account

Sign in

Already have an account? Sign in here.

Sign In Now

×