Jump to content

How to take good photos of PCs? [+/- LEDs]

Dear all experienced photographers,


I'm dabbling in trying to document my builds at a higher quality, and was wanting to seek advice of generally capturing PCs in a good light. If anybody has general advice for taking nice photos of PC and PC parts, let me know below! Treat me like a complete beginner, I appreciate any advice on both actual camera settings (I am using a Canon 450D, if it makes a difference) and also things to do when processing the image (I am trying to use Darktable).


As a beginning I have taken two sets of photos with and without LEDs, with +/- 2 AEB and combined them to produce an HDR image that I color corrected and tweaked some shadows. The first two things that are obvious already are:


1. Get a tripod since the Darktable HDR doesn't do alignment :P

2. Dust out PC


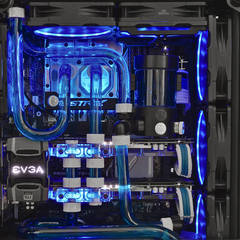
2 out of 3 of the uncombined images with LEDs on

led_0_05.thumb.jpg.627c660158d11c01002212008c6d9b52.jpgled_1_05.thumb.jpg.e57339a48348fc14b8cdfe6b1699fca0.jpg


Combined HDR image (uncorrected) and tweaked, the blues are a bit too vibrant, in real life the blues are a bit murkier because of the fluorescence, but that seems very hard to reproduce after the HDR combination. Looking back now, the first image above is probably closest to what it actually looks like in real life, so I clearly butchered this one during the processing.

led_2_05.thumb.jpg.2c06d706ea54494ce0a47787e45f6861.jpgled_4_05.thumb.jpg.3c64e020bfcecb00722fffa781a41ce2.jpg


For without LEDs also similar and the color correction seems to be easier (unedited, like what it looked like at the time, more idealistic colors)

noled_1_05.thumb.jpg.f8efe63337cb7ae64ca515d1f980adef.jpgnoled_2_05.thumb.jpg.0af409e3a706467bb4fddee599aa82a4.jpgnoled_3_05.thumb.jpg.1bea084964827c889293c2587c243bfe.jpg

Link to comment
Share on other sites

Link to post
Share on other sites

5 hours ago, OnyxArmos said:

Whoa that PC is sexy as fuck

Thanks :). Some more pics trialing HDR +/- LED combos. Again, don't mind the dust....


IMG_6917-hdr_01.thumb.png.93abcda5896f28884bee720b961b0f66.png

IMG_6920_01.thumb.png.741a65a4e1a118f859ff844cad2393cd.png''IMG_6923-hdr_01.thumb.png.aaa7b2cfbb8dbbe0396a93058ea4da59.png'IMG_6932-hdr_01.thumb.png.e7c09190edee324de9f5f6eebbebc450.png

Link to comment
Share on other sites

Link to post
Share on other sites

Another batch from a different environment. Still not 100% convinced I am doing much better than a smart phone. No LEDs, office lighting


IMG_6938_01.thumb.jpg.47550e2721229d9b2ad9b6834042e9a8.jpg


IMG_6941_01.thumb.jpg.84665627c3f4c599384cf4f8648105bb.jpg


IMG_6952_01.jpg.3414f49b901fb1140469d732dab273fd.jpg


IMG_6962_01.thumb.jpg.8ab7b60c517bec6c4eede5eb82510571.jpg


IMG_6954_01.jpg.0c962ac0f4cec75ed22557f89a558515.jpg

Link to comment
Share on other sites

Link to post
Share on other sites

As odd as it might sound initially, one of the things you can do to help your photography has absolutely nothing to do with your camera hardware or post-processing software:


Create a clean, aesthetically pleasing environment to shoot in.


Having a distraction-free background not only ensures the focus of each photo is squarely on the components you want to showcase, but also minimizes the amount of photoshopping/retouching you have to do afterwards.

Shoot against a monochromatic grayscale background to start.

On 12/18/2018 at 7:42 PM, For Science! said:

IMG_6938_01.thumb.jpg.47550e2721229d9b2ad9b6834042e9a8.jpg

Notice how, in this picture, the reflection in the glass detracts from the appearance of all those beautiful cards?

You can control it by blocking the reflection with a non-reflective black cloth background.

Set up your camera angle, find out what portion of the room is being reflected, and then your black stop in front of that.

Your case interiors will stand out and you'll get back all the detail that you're losing to reflection highlights right now.

Link to comment
Share on other sites

Link to post
Share on other sites

25 minutes ago, LyondellBasell said:

-

Yes, great advice that I could implement in a more controlled environment. Thats a little bit more difficult in this particular case since it was literally just my work office desk. But your advise about putting something light absorbing is on-point.


Any advice for doing the same for square-on photos with the side panel on and avoiding self reflection?

Link to comment
Share on other sites

Link to post
Share on other sites

1 hour ago, For Science! said:

Yes, great advice that I could implement in a more controlled environment. Thats a little bit more difficult in this particular case since it was literally just my work office desk. But your advise about putting something light absorbing is on-point.


Any advice for doing the same for square-on photos with the side panel on and avoiding self reflection?

Oh for sure. You're definitely off to a good start, the background control tips are just the first/easiest implementation that comes to mind.


Avoiding self-reflection is definitely part of the challenge of cutting down ambient light, while maximising subject light.

Off the top of my head, there are two ways to do this without spending good money:


  1. Kill the lights in the room. Let the lights in the case illuminate the interior for you, if it's still not enough you can probably add another internal LED strip in the color of your choice to boost the amount of available light. This will cut down on the amount of reflections by decreasing the total amount of light that hits you and your camera and gets reflected in the side panel.
  2. If killing the room lights is not an option, you can build a matte box to kill the reflections as best you can. 1860155920_IMG_20181220_1853052.thumb.jpg.6be6b44950d89e59bbc43a76dc635996.jpg

Excuse the absolute garbage drawing, but you can use cardboard, covering in non-reflective black material, to create a "hollow pyramid" shape with a hole cut at the apex for your camera lens. Position the matte box as close as possible to the tower (taking your photo's composition into account, of course). This will cut down on the amount of reflections by shielding the ambient light reflected off you and your camera from your subject. 


Hope this helps!


Link to comment
Share on other sites

Link to post
Share on other sites

Got a mini tripod (yay). Also learnt some tricks with denoising and color profiles and a bit of masking. The UV pictures which looked like ass before is a bit better now (or at least looks more like what it looks like in real life).


IMG_6981-hdr_13.thumb.png.c76ad1639d326b4e26ffb4e31989edc0.png

Link to comment
Share on other sites

Link to post
Share on other sites

  • 3 weeks later...

Today's practice with a towel as a makeshift white background.


Small aperture

IMG_7351-hdr_02.thumb.jpg.10c6e325cd01c5d6fec7424320b84dd2.jpg


Wider Aperture

IMG_7348-hdr_01.thumb.jpg.3617e5279056174cd264a694a355af02.jpg

Link to comment
Share on other sites

Link to post
Share on other sites

Today's practice using a strong white LED to illuminate the inside of the case (actually plant growlight)

IMG_7417_01.thumb.jpg.9630a83e058de17403cb96bea07c6b4b.jpg

Link to comment
Share on other sites

Link to post
Share on other sites

Converted my plant grow tent into a temporary light box. Didn't have a white background so used some light blue non-ironed bed sheets so the background looks a bit shite. I think the quality can be improved if I get a proper white background


Characterised my lens a bit better too, F/10-12 seems to be sharpest without effects of diffraction.


EOS 450D

EF-S 18-55 f3.5-5.6 IS

1/20

F/10.0

ISO 200

Focal length: 55 mm

Focus distance: 1.48 m


Postprocessing applied:

White balance, vibrane, crop and rotate, chromatic aberrations, hot pixel, sligt denoise.
IMG_7897.thumb.jpg.809e884726cf35a481fdfa053e22183e.jpg


Unedited (base curve applied)

IMG_7897_01.thumb.jpg.512f0f237274006d668ebcf1f9ff41b9.jpg


Link to comment
Share on other sites

Link to post
Share on other sites

If you throw enough money at a problem, it will be solved. My 50 mm prime lens (Canon F/1.8 STM) arrived today and WOW I am impressed by the image quality. HDR works like a treat and the bokeh is great too.


IMG_7961_03.thumb.jpg.004722308607993ba9130b1a609f13aa.jpg


IMG_8039-8043_01_03.thumb.jpg.a004f0f51d84fd729eb2973b7be2dfda.jpg

Link to comment
Share on other sites

Link to post
Share on other sites

12 minutes ago, KevinTYJ said:

A bit of editing also helps? IDK if you like my style of edits tho

Personally, looks a little bit too sharp for me. I actually prefer a slightly desaturated look for this case since its a bit truer to the eye.


Anothrr edit.

11131_1920.thumb.jpg.dcb9f5a84f070104560e32ec8eb26c86.jpg


I guess wide angled shots would be good for close up dynamic shots, but would introduce some distortions when trying to take an image of the whole pc (and fill the frame at the same time)?

Link to comment
Share on other sites

Link to post
Share on other sites

Got a CPL filter today, thought it would help cut reflections when taking photos of PCs with side panels. Seems to work great for acrylic panels, not too sure if it has the same effect on TG though. I think it looks great how you can really see through the acrylic when the polarizer is turned on.


CPL off

IMG_8401_01.thumb.jpg.ae761d03d28c249f391a25bb139f59c9.jpg


CPL on

IMG_8400_01.thumb.jpg.8fcd07bfae6d10d3e24f1ecfc822426f.jpg


Link to comment
Share on other sites

Link to post
Share on other sites

Proper(ish) white background with improper lighting, a new 2nd hand camera, and a lens :)


IMG_0311.thumb.jpg.54cde71926c9992707ef3c2e7ff8e76e.jpg

Link to comment
Share on other sites

Link to post
Share on other sites

On 1/21/2019 at 7:06 PM, For Science! said:

Got a CPL filter today, thought it would help cut reflections when taking photos of PCs with side panels. Seems to work great for acrylic panels, not too sure if it has the same effect on TG though. I think it looks great how you can really see through the acrylic when the polarizer is turned on.

On 1/27/2019 at 6:52 PM, For Science! said:

Proper(ish) white background with improper lighting, a new 2nd hand camera, and a lens :)

These are great! Stick with it, as I'm sure you can see already, a little cleanup work and the right lighting techniques go a long way.


Link to comment
Share on other sites

Link to post
Share on other sites

Create an account or sign in to comment

You need to be a member in order to leave a comment

Create an account

Sign up for a new account in our community. It's easy!

Register a new account

Sign in

Already have an account? Sign in here.

Sign In Now

×