Jump to content

BOINC-Node-3 Hardware Upgrade!

Something I like to do when I decommission hardware from my personal home-lab is put the life of the perfectly still usable equipment into medical research. I do this through BOINC/WCG. Over the next couple of days I'll be upgrading the old desktop hardware in my 3rd node with decommissioned server hardware from my primary hypervisor server. I hope everyone who wants to follow along enjoys and asks questions as we go through the process of dismantling, cleaning/prepping, re-assembling, building, and putting into service the "new" equipment! :old-grin:


P1000343.thumb.JPG.c556962dda19710d83326729b9367b98.JPG

Link to comment
Share on other sites

Link to post
Share on other sites

Today we're just going to start by getting things taken apart to assess the level of dust that has accumulated. If I remember correctly I last dusted out this server...sometime around late summer? Going into fall? So it's been a few months.


Right off the bat taking apart the CPU coolers dust has built up relatively badly.


P1000345.thumb.JPG.80b26ee951dbba29e1fba59534ffbfb5.JPG


The amount stuck to the fan blades themselves isn't bad but I'll give them a cleaning too.


Getting a look around the CPU sockets and even the RAM slots there's been quite a bit of ingress of fine particle dust.


P1000346.thumb.JPG.401a790d08f8465e2c7541489468658f.JPG


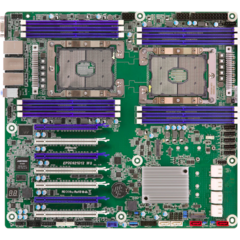
Getting a look under the hood we can see the first of two Intel Xeon E5-2698v3 processors.


P1000348.thumb.JPG.fa732c97d4d38bff977449c3ab7cd128.JPG


Removing the CPU I can actually see some dust has found it's way underneath it and is intermingled with the pins. I'll have to try and get some of that out. It's looking like I might very well be removing the metal retention bracket as there is also quite a bit of dust around the socket itself.


For anyone coming over from the hypervisor server upgrade you might notice the RAM installed is not the same RAM that was in the hypervisor server. I cannot justify leaving those DIMMs in this server due to their capacity. It's be utter overkill so I've opted to give this box a very modest 64GB in 4x16GB RDIMM ECC @ 2666MHz.


P1000349.thumb.JPG.af6e9bdd0ce7b09937088c1ed01deb14.JPG


Now for those paying attention you'll know that the E5-2698v3 only supports up to 2133MHz so we're actually bottle-necking it but the good new is the BOINC/WCG tasks are in no way memory intensive or reliant on high memory bandwidth so dual channel @ 2133MHz will be more than sufficient for our needs here.


With everything finally fully pulled apart we can start the cleaning process.


P1000354.thumb.JPG.4f877a0004477e737e0cc677d9039a54.JPG


 But that won't be until tomorrow. 😛 Goodnight!

Link to comment
Share on other sites

Link to post
Share on other sites

6 hours ago, Windows7ge said:

so dual channel @ 2133MHz will be more than sufficient for our needs here

Boooo, booo. Go big or go home. Booo! 🙃


Also liking those x16 slots on that board, RIP the first one though for a big GPU, ram not in a good place for that.

Link to comment
Share on other sites

Link to post
Share on other sites

5 hours ago, leadeater said:

Boooo, booo. Go big or go home. Booo! 🙃


Also liking those x16 slots on that board, RIP the first one though for a big GPU, ram not in a good place for that.

Hey, I'm saving 8 DIMMs for the upcoming AMD EPYC build. I tossed those eight 64GB DIMMs in my other EPYC box. I think they could utilize it better. Also I don't think even the v4 series goes higher than 2400MHz.


Eh, I'm less than impressed. The bottom 3 slots are CPU1, top 3 are CPU2. Why they couldn't give CPU1 two x16 slots given this boards lack of other PCIe I/O I don't know unless the built-in Intel X540-T2 uses eight of them.

Link to comment
Share on other sites

Link to post
Share on other sites

Starting with the motherboard and I know some people would consider this sacrilege. I just went around and cleaned it using a Q-tip. It works relatively well at getting in nooks and crannies. Obviously it can't fit in every gap but we're not aiming for absolute perfection here.


Around the back of the motherboard I noticed this unfortunate sight:


P1000355.thumb.JPG.1efce255583a826cc0d0c8e773e729a1.JPG


How it happened, when it happened, why it happened, and how it has impacted the system...no idea. As far as I've noticed this broken trace has had 0 impact on system operations. It starts at the ASPEED AST2400 Baseboard Management Controller. Then goes -> capacitor -> resistor -> broken trace -> transistor bases on the back of the motherboard. So it switches a series of logic gates.


What these are responsible for I have no idea. I could fix it by soldering in a bodge wire but the risk that I may make things worse rather than better makes me hesitant. I can't say this has any impact on the features I need. If the system ever starts misbehaving I'll keep this in mind though.


Moving on for now I could see the built-in Intel X540-T2 was filthy so I decided to pop the top:


P1000356.thumb.JPG.39b64bd46b63745f4b60b7ffcfdeaafd.JPG


I've always had trouble keeping this things temps in check and I can see two reason why that might be.

  1. That's not a very generous heatsink.
  2. Apparently it uses a thermal pad as opposed to thermal paste and I see no good reason for why Super micro opted for a thermal pad. I might just mod this with some Noctua NT-H1. Add a couple washers to the heatsink pins if I have to to make up the gap difference.

If I popped the top on one I might as well pop the rest. Wow these South Bridges are small these days.


P1000357.thumb.JPG.075eb995f4be5e19c6de4500e8435bf1.JPG


That is the Intel C612 chipset and it's smaller than a 3-pin fan header. I'll be getting rid of that pink stuff and giving it the same treatment as the X540-T2.


Assuming I know what I'm looking at (I don't) I think this thing as a 5 phase VRM system for both CPUs:


P1000359.thumb.JPG.4a0f735b596c0bf0f05c5dbb2fb57a6c.JPG


I get that they're Xeons and you're not going to be overclocking them but as a server motherboard I feel like 6 or 8 would have been more appropriate. I mean this socket goes up to 22 core CPUs. Wanna keep em fed...but that's just me.


After going over all of that and dusting every deep crevasse I could fit a Q-tip in this is where we're at.


P1000362.thumb.JPG.30d28e14e9da2c69d93b2788ac4ff902.JPG


Not perfect but a lot better than where it was. Next up is cleaning up those silicon chips & VRMs, replacing thermal compound and installing replacement thermal pads.

Link to comment
Share on other sites

Link to post
Share on other sites

4 minutes ago, RollinLower said:

what case is this board going to be living in? will you be rackmounting again?

Remember the iPXE 4x10Gig build log and these airflow monsters?


DSCF0162.JPG


Modified Rosewill RSV-R4100's.


Despite their short depth they will hold SSI EEB 12" x 13" motherboards. I hope to someday rack-mount them but I lack the floor space at the moment and my rack is only 25U so not right now but someday...someday. I do have plans though to make 6U of space in the rack because Windows here wants a GPU compute server and the GRID K2 has his eye. 👀

Link to comment
Share on other sites

Link to post
Share on other sites

24 minutes ago, Windows7ge said:

Remember the iPXE 4x10Gig build log and these airflow monsters?

Modified Rosewill RSV-R4100's.


Despite their short depth they will hold SSI EEB 12" x 13" motherboards. I hope to someday rack-mount them but I lack the floor space at the moment and my rack is only 25U so not right now but someday...someday. I do have plans though to make 6U of space in the rack because Windows here wants a GPU compute server and the GRID K2 has his eye. 👀

Lovely! Do write up your findings with the K2 aswell, i've got a K2 sitting here that i never really got any use out of. Seems like a waste to just have it sit on my desk looking pretty...

Link to comment
Share on other sites

Link to post
Share on other sites

1 hour ago, RollinLower said:

Lovely! Do write up your findings with the K2 aswell, i've got a K2 sitting here that i never really got any use out of. Seems like a waste to just have it sit on my desk looking pretty...

I have to pick one up and test it's compatibility with the latest versions of PROXMOX. I've found evidence supporting that the GRID K2 can be used on PROXMOX. Enabling vGPU will be an adventure though and seeing if it works. Personally I kind of like the idea of just using the two GPU cores independently but that's going to be reliant on vGPU due to IOMMU Groups. Someone tried splitting the IOMMU Group before. It didn't work. I'll document the chronicles that that adventure will be though. Will have to validate that it works before I go full scale. I'm thinking 6 GPU's.


HOWEVER that's a conversation for another day/time. Back on topic. So I added a couple plastic washers to the heatsink pins.


P1000364.thumb.JPG.d4dea5e3c1950f3f3d6af30abf5e7da6.JPG


The washers came from some GPU waterblocks. Seems like good a repurpose as any. They're about as thick as the thermal pad was and the springs aren't that strong anyhow so this should add just enough pressure to account for the loss of thickness.


I think this will do us more good than using one of those spongy pads again. I'm damn sure none of the AIC variants use a thermal pad so here's some of the good stuff.


P1000365.thumb.JPG.06da1a49b5c35ad6091ce5ac8b9dcc0e.JPG


P1000367.thumb.JPG.bd3c6ba00ecc786c9c4093cf367429d4.JPG


Looks good. Springs didn't bottom out but they are pretty close to it. We won't be seeing weather or not it helped because I learned that the interfaces HAVE to be negotiated to 10Gigabit for this thing to let the heat out. If one or both interfaces are only running at Gigabit the chip runs substantially cooler but hopefully this will help a bit regardless.


Working on the south bridge next this pink thermal gunk is the absolute worst. The garbage has the consistency of bubble gum and required way too much elbow grease to get this much off. It'll have to do.


P1000368.thumb.JPG.875771b17cc258f45f2288bce883bc01.JPG


Getting it remounted was a little sketchy. Hopefully I didn't wreak the PCH. Though we won't be using it so it possibly won't matter.


Looking at the CPU VRM the thermal pads appear to be approx 0.4mm in thickness and about 7mm x 50mm in L x W. The closest I have on hand is 0.5mm in small sheets and they're dodgy so who knows how well they'll performance. Nothing to it but to do it I suppose.


P1000371.thumb.JPG.9b6caca43c5046576f8c2d4856cc6cee.JPG


Then I just went ahead and got everything remounted.


P1000372.thumb.JPG.ffac051f527e26491bf1fcc71ae983f6.JPG


Looks good. Hopefully everything still works when we go to turn it on. :old-grin:

Link to comment
Share on other sites

Link to post
Share on other sites

Next up are the fans. These are Delta AUB0912VH's.


P1000373.thumb.JPG.13da50bbc79fbfd01926f3efbb1008bd.JPG


They're not supposed to be gray. 😆 Let's fix that.


P1000375.thumb.JPG.b6f49aa28a5bbf5b00c8aca670b3fb7d.JPG


Much better.


That's all I'll be getting done tonight. Tomorrow we fix up the heatsinks. The last time I tackled them I just used a hose but it's winter time now so I'm thinking I'll just blow them out.

Link to comment
Share on other sites

Link to post
Share on other sites

I didn't go too crazy with cleaning off the coolers but they still look a million times better.


P1000377.thumb.JPG.48e2c61aa5aa8b893cba9c36fe045168.JPG


I should mention for anybody curious they are the Noctua NH-D9L. The mounting kit is the Intel Narrow ILM LGA2011/2011-v3. Had to call up Noctua to get them because these only came with Intel's Square ILM. Noctua sent me the two mounting kits at no charge which was nice.


Getting them mounted is easy enough and the OCD in me made sure the NOCTUA text was in the same direction on both coolers even though technically the sockets themselves face opposite directions. 🙃


P1000379.thumb.JPG.a2a9df6e9346902d07dc6cd52db823ca.JPG


As a last minute alteration to the hardware I opted to move out the Delta fans in substitution for the default fans that normally come with the coolers.


P1000382.thumb.JPG.32e95a63f18e14822680dab5d13bf733.JPG


Noctua's NF-A9 PWM. They cap at 2000RPM but are considerably quieter than the 3000RPM Deltas. We'll see how the temps are and if it's an issue I can always swap them back.


If you noticed the weird snake of fan cables it's because Supermicro has a very strange fan header layout. None are marked CPU FAN, we have FANA, FANB, then FAN1 - 6. Why FANA & FANB are on the opposite end of the motherboard if both are meant for the CPU sockets I have no idea. I wasn't on the design team.


At this point though the motherboard is fully ready to go. Time to take a look at the current server and start gutting it.

Link to comment
Share on other sites

Link to post
Share on other sites

This is the box receiving the hardware upgrade.


P1000386.thumb.JPG.0f18b8a983be96b4c4eefb9a775a98c0.JPG


The PSU is already gone because I needed to steal it for a motherboard test. 😛


Specs:

Intel Core i7-5960X

MSI X99A SLI PLUS

32GB 4x8GB G.Skill Ripjaws4 DDR4 2400MHz 15-15-15-35

1000W Kingwin Lazer LS-1000 PSU.

Corsair H100i Liquid Cooler

Noctua NF-F12 PWM fans.


  • The GPU isn't really worth going over it's just for display out but for the GPU aficionados it's the PNY GeForce 8400GS.
  • The other PCI_e card is a SFP+ Mellanox ConnectX-3 CX311A Network Adapter and this is going to be our storage for this node. I'll be going into that more later.
  • The fans above the CPU are a mod I did a while ago because I overclocked the CPU to 4.4GHz and the VRM's were getting toasty so I rigged some active cooling in there. We might repurpose those fans.
  • The chassis itself as I discussed with RollinLower is the Rosewill RSV-R4100 and has been modified fairly heavily. I needed compact chassis with 3 front 120mm fans but couldn't find any. So what do you do when what you need doesn't exist? Make it! :old-grin:


For now. Gutting time!


P1000388.thumb.JPG.20904ba1f2300818deb2beaef7011cda.JPG


The front Noctua fans are going to get repurposed in another build. The fans I plan to put in this box haven't arrived yet so for now everything must go and get a full dusting.


P1000389.thumb.JPG.bb7e358c73d9adb4886a94a24f8d96d5.JPG


I really don't want to add unnecessary PSU cables so I'm going to make a brief intermission to modify these fans.


P1000390.thumb.JPG.eaef2b7e84712b8a0b31a1de5ea6b467.JPG


They're basic, noisy but move good air so I don't want to junk them. I just hate that they're Molex with no option to adapt them. So I'll do that myself.


Couple sacrificial fan noise reducers.


P1000391.thumb.JPG.0e00a1c141f343bc52f6e669f1de058a.JPG


  1. Cut all the ends off.
  2. Strip the wire back.
  3. Prep for soldering. 😎

P1000393.thumb.JPG.d14f409d06cfef0452a593aebd31c61a.JPG


Some soldering and a little heat-shrink later I could almost pass them as factory. /s 😆


P1000394.thumb.JPG.2fa751c38c5d01bbfbbf3a6a3b59dc6b.JPG


Went ahead and re-arranged the standoffs. Nice to see even a cheap chassis like this has all the mounting holes for a high-end server-board like this. Put in the I/O cover, drop in the motherboard. Bobs your aunty.


P1000400.thumb.JPG.7378c0f376519589add158432d984071.JPG


You can see where I plugged in the rear fans. Much better than daisy-chaining molex connectors. 🙄 All it will do is provide power and drive them at 100%. No TACH, no PWM. That's fine though.


That'll be it for tonight. Tomorrow we can get the PSU in, AICs, turn it on, change some BIOS settings (assuming I didn't break the motherboard removing heatsinks) while we wait for the front fans to arrive.


Good Night!

Link to comment
Share on other sites

Link to post
Share on other sites

From here I can start running front panel wiring. I modded it so everything goes out the back but whatever.


Honestly Supermicro picked the worst possible location for the front panel headers. Complete opposite end of the motherboard. Had to re-route some cables to make them reach.


P1000401.thumb.JPG.43e1d4d4c76ae51e429564426b982e23.JPG


Not pretty but it'll have to do. Also had to look up the front panel header information because of course they're not labeled on the motherboard.


1219973105_Screenshotfrom2022-01-1014-41-13.png.e2be264b9339df107f3248540f9304e2.png


I don't know what the heck this pinout is but whatever. Might have issues with the HDD activity LED but to be honest I don't know if that's going to work given there's no storage in this server.


Moving on for anybody who wanted to know more about the expansion cards we're installing it's only going to be one and that is the Mellanox ConnectX-3 CX311A:


P1000405.thumb.JPG.a163e51d6822baf0fad99b69c400d03b.JPG


This is a very compact, reliable, cool running, inexpensive, and functional 10Gig NIC. As we go though the first power on tests I'll elaborate on how this is going to act as our server storage.


Got that installed and went ahead and tossed in the PSU:


P1000407.thumb.JPG.c5e343f7fed0a594127429d59eadb32e.JPG


Now we just wait for the front 120mm fans to arrive in the mail and we can get this show on the road.

Link to comment
Share on other sites

Link to post
Share on other sites

A few things appear to have gone wrong. And it looks like we have to try to address them.


Firstly. The fans I wanted to use were from an AIO cooler I ordered. I had to cancel it because as it turns out the cooler didn't support the socket I needed it for So we're using some random cheap chassis fans for now:


P1000408.thumb.JPG.32438f908b652eb32b49fbb1507b5ebf.JPG


P1000412.thumb.JPG.3d5047a9a91653b3ac25cb838b1ee835.JPG


As a quick & dirty test to make sure I didn't break anything I got the box up and running on my server rack. It boots the OS off the fiberoptic network without any issue. We're also doing temperature testing since we replaced thermal paste and thermal pads on everything.


P1000413.thumb.JPG.f4987296a2483691e33ee56e4e69bf8f.JPG


The good news is everything is holding steady at fairly acceptable temperatures.


624932725_Screenshotfrom2022-01-1223-12-43.png.25470462f306e02c98b5ee82c3e2df9e.png


Only thing I don't really like is VRM temps on CPU2 but they don't have a fan pointed directly at them which is why I think they're 10°C higher.


The bad news is I tried to gain access to the remote console and got an error:


725180205_Screenshotfrom2022-01-1223-10-39.png.c839a678e7ba13cb904051bde33c9dac.png


I tried it on my laptop, desktop, and Windows machine. Everything won't connect. Now this could be a network configuration issue...or...it could have something to do with that broken trace coming off the BNC...tomorrow I think we're going to be taking the motherboard back out and repairing that trace. Even if it doesn't fix this issue I think it's worth a shot given outside of a BNC reset we shouldn't be having this issue.

Link to comment
Share on other sites

Link to post
Share on other sites

Final update. I "repaired" the copper trace on the motherboard and the Remote Console started working again. So now I know why that wire is important.


Outside of this I got the system setup in its final resting place and it's chugging along fabulously. So that concludes this build log.

Link to comment
Share on other sites

Link to post
Share on other sites

Create an account or sign in to comment

You need to be a member in order to leave a comment

Create an account

Sign up for a new account in our community. It's easy!

Register a new account

Sign in

Already have an account? Sign in here.

Sign In Now

×