Jump to content

K39 4L Mini-ITX case custom aesthetic mods and AIO watercooled build

35760

I originally posted this on the sffpc subreddit, but wanted to share here as well.

First of, I wanted to preface by saying that this mod is done purely for fun. There are no significant benefits to performance or cooling in this build, it was just a thought of "what if I tried a crazy miniature AIO watercooling mod in a sffpc case". I knew going in that it would purely be an aesthetic mod done for my personal amusement, I just decided to share this crazy idea with the Internet. Otherwise, I hope you'll find this little project somewhat entertaining.


So I've seen a lot of cool Mini-ITX builds pop up lately and decided I wanted to build one myself. At first, it was a simple plan of getting all the standard components and just assembling them like everybody else. But then I thought, these bigger 10L+ Mini-ITX cases have the ability to fit 120mm, 240mm AIOs and even full custom watercooling, but what if I took one of the smallest sffpc cases out there and tried modding a couple of small AIOs on it, watercooling both CPU and GPU, while not leaving the confines of the case?


I set out to the wild lands of Taobao and AliExpress and eventually stumbled upon the K39 (or PK39) case. I really liked the low profile look and it was only 4L, one of the tiniest sffpc cases with a Mini-ITX mobo, dual slot mini GPU and 1U Flex PSU compatibility. And so, I bought it. Additionally, I needed to find other stuff, like a couple of cheap disposable AIOs, small rads, some heatsinks etc. and since I didn't like the plain aluminum side panels, I bought a few acrylic sheets and standoffs.


Meanwhile, I already purchased the internals and the specs are:


ASUS ROG Strix B450-I

Ryzen 5 3600X

PNY GeForce RTX 2060 6GB XLR8 GPU

HyperX Fury 8GB 3200MHz DDR4 CL16 x2

Crucial P1 1TB NVMe SSD


Now, in hindsight, more sensible options would be the base R5 3600, GTX 1660 Super and probably a cheaper mobo, but I decided to kick it up a notch. After everything arrived from Amazon, the 500w Flex PSU just arrived from Ali as well and I ran a few tests open aired to see if the little bastard can handle the load. Surprisingly, it held out great, ran a few benchmarks and gamed a bit and saw no issues. I obviously swapped the PSU fan to a Noctua, much quieter.


Post image


Fast forward a few months (since the Holidays hit, AliExpress was being super slow) and I had all the components ready to build. I first started with disassembling the two AIOs and fitting them to the small 40x80mm Alphacool rads, also equipped with 40mm Noctua fans.


Post image


Post image


Obviously, I painted the fans black as well (excluding the fan blades) for aesthetic purposes. The AIO filling process is a bit finicky, but you can find multiple guides on YouTube on how to disassemble and refill AIOs, so I won't bore you with that. Either way, I thought they came out great.


My red K39 case arrived, but I wasn't a huge fan of the color and since they haven't had black in stock anywhere, I've decided to paint it myself. While I was at it, I painted the PSU and the fans. I also made a few small cuts on the top sides of the case with a dremel to make room for the small rads.


Post image


Post image


After everything dried, I started some test fitting. I barely had space for both rads, which is mainly the reason I went with acrylic side panels.


Post image


As I ran some tests (which I'll share in more detail later), I realized I'd have to break my own rule a bit and add a small 90x15mm top fan to help the little guys push air through the thick rads. That meant adding a top acrylic panel as well, otherwise it wouldn't look great.


Post image


Post image


I was done cutting the acrylic, then screwed in the standoffs and made sure everything fits.


Post image


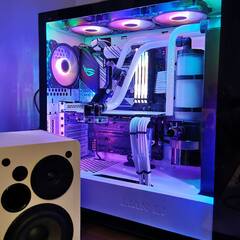
And so, after a few more tedious dry fits and a sloppy cable management, I was finally done!


Post image
Post image
Post image
Post image

As happy as I am with the results, I'm sure I have some rough edges and some of you might take this concept and elevate it to the next level, so I'm hoping to see some of that. I'll also leave a link to the full gallery, if people want to see a few more angles and build process.


https://imgur.com/a/ox2Yvc9


And now, the benchmark results.


I would say that the temps match the would-be standard air cooled system, but again, we're doing this for fun. Here are some numbers:


https://imgur.com/jX0Yq4V

https://imgur.com/IhIAiSp

https://www.3dmark.com/3dm/43270583


Imo, GPU temps aren't great, but they weren't great with the original cooler to begin with and would start thermal throttling way faster in FurMark. Realistically, it reaches around 83-85c in demanding games like Metro Exodus on all high settings with RTX on and barely breaks 76c in 3DMark, Doom and other less demanding apps. I might switch back to the original heatsink with fan setup, unfortunately, even though the difference is negligible. This is also why I said 1660 Super would be a better choice, way lower TDP.


On the other hand, CPU temps have slightly improved. The CPU runs at stock in every scenario, I might fiddle with overclocking later, but these are base numbers so far. While it was idling at around 46-53c with a Wraith Spire cooler, the modded AIO idles at around 34-40c. Cinebench R20 max temps with Wraith Spire would go above 90c, while the AIO managed to stay at around 84c multiple times. During gaming it's even better, usually staying at around 75c and lower.


Last thing is the noise. While both CPU and GPU air cooled stress tests would crank the fans into sound levels of a very loud hair dryer (with same or worse temps mind you), the AIO mod keeps it relatively quiet, barely going over 50db, and that's me holding the mic almost at point blank range. I could swap the Noctua 40mm fans for Chinese 10000+ rpm fans, but these are extremely loud, so that wouldn't be ideal, although might improve the cooling overall.


Post image


In conclusion, would I recommend this mod to those looking for better cooling and performance? Probably not, but if you have any suggestions or ideas on how to improve this build, I'd be glad to hear your opinions. I'll say this again, this was purely done for fun and realizing a crazy idea I had. It's not ideal, but I'm happy with the final results either way.

Link to comment
Share on other sites

Link to post
Share on other sites

Create an account or sign in to comment

You need to be a member in order to leave a comment

Create an account

Sign up for a new account in our community. It's easy!

Register a new account

Sign in

Already have an account? Sign in here.

Sign In Now

×