
DOMINATOR® TITANIUM RGB 96GB (2x48GB) DDR5 DRAM 6600MT/s CL32 Intel XMP - MSI CARBON WIFI Z690 - I9-14900K

1 hour ago, enzoray said:I just cant figure how to manually set everything..
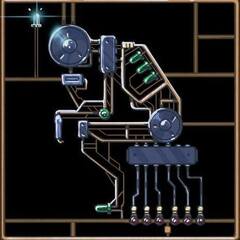
First, go into the BIOS, go to Advanced mode, and head to the overclocking tab. Scroll all the way to the bottom until you find "Memory-Z"

Click through the following menus:

Pick either of those

Once through there, make a note of the Max Bandwidth, Memory Voltage, DRAM tCL, tRCD, tRP, and tRAS CLK values:

Hit escape until you're back at the main OC menu, then scroll back up until you're at the DRAM Settings section. Change the IMC : DRAM clock ratio to 1/2 : 1 (Gear2) and set the DRAM Frequency to the value you copied down above:

Then go into the Advanced DRAM Configuration menu and change the Command Rate to 2N, the tCL, tRCD, tRP, and tRAS values to what you copied down above. Set tRCDW to the same as tRCD, though that isn't as important as the auto settings for that board should set it to the same as tRCD by default.

Hit escape to go back to the main OC tab and scroll back down to the bottom. Set the DRAM Voltage and DRAM VDDQ settings to voltage setting you copied down before. When you set DRAM Voltage, that should automatically set VDDQ to the same value, but double check to make sure that it does.

Afterwards, press F10 to save and exit, and hopefully it will boot. If not, you'll need to start dropping the DRAM frequency until it starts working.
Note that there might be slight differences in how the BIOS is organized from your board to mine since I'm on a different motherboard (Z690 Unify-X) and I know it does have some extra settings due to it being more OC optimized, though all the settings I listed should be the same as they're available on every LGA 1700 motherboard and they're both MSI Z690 boards.
50 minutes ago, enzoray said:Managed to set them at 5600 but cant get higher than that..
What memory slots are you using? It should boot 6000+ unless you're not in slots 2 and 4 counting from the CPU socket.
Also make sure to quote so we get a notification, I just happened to see this.

-
Featured Topics
-
Topics
-

ulookuglynoob ·
Posted in Phones and Tablets0 -

nick name ·
Posted in Networking2 -
 2
2 -
 2
2 -
 1
1 -
 5
5 -
 8
8 -
Cyber Akuma ·
Posted in CPUs, Motherboards, and Memory1 -
 9
9 -
 0
0
-
-
play_circle_filled

Latest From GameLinked:
Are you excited for Doom: The Dark Ages? - Gamers 2 Gamers


Create an account or sign in to comment
You need to be a member in order to leave a comment
Create an account
Sign up for a new account in our community. It's easy!
Register a new accountSign in
Already have an account? Sign in here.
Sign In Now