Search the Community
Showing results for tags 'case mods'.
-
This one was a real labor of love. It took me about 3 years, multiple restarts to get things exactly right, etc., etc. This one was not for the faint of heart! Lots of time at home during the pandemic is not necessarily bad for productivity... Custom paint, custom wires, custom cut (and bent, in one crazy ill-advised instance) glass tubing, painted the motherboard and lots of the hardware components. Some difficulties along the way: Never going with an MSI motherboard again. Just an awful software suite. My zeal for the Aquacomputer Aquabus interface knew no bounds...But I took it too far by getting the Aquacomptuer D5 Next pump. It's a cool device...Unless you intend to keep it tucked away. Let's just say that rebuilding and resizing glass tubing is not fun at all when the pump keeps giving you trouble. Thank goodness for EK's shifted vertical GPU mount. The only way to put an inverted GPU in a vertical position, as far as I can tell (unless you fab it yourself).
-
Why Did I Do This?: The Avexir RAM I have in my rig had yellow and black heat sinks with yellow LEDs. The color scheme of my next build is white and black so I had to change this. While I can't remove the LEDs I can just small amounts of tape and aftermarket heat sinks to cover them. As the RAM doesn't seem to get above room temp, I am not worried about leaving them naked. However, the LEDs may cause a problem if they get too hot but I doubt they will. Here Are Some Images: First Stick, Two sicks, Graveyard shot, Final product, Back at home, Whats Next?: I expect to release the followup entry later this week or early next week depending on the delivery of the sinks. As for my other blogs, Smokey Attempts: The Red Mod and Smokey's Chronicles, I will be making small updates every day and I plan big ones for this weekend, early next week. Thank You :)
-
How Much Longer?: eBay claims my VRM and VRAM coolers will arrive next this friday. I know this is an estimate so I might be looking at a delivery next week which will mean no big updates this weekend. Possibly next week I will get the time to mod the test card but I am working on a couple of other builds which are taking up some time. I may do a short blog entry on them on my main blog: Smokey's Chronicles :. Keep up to date with my personal build at my other blog: Smokey Attempts: PC In A Drawer :. Whats Next?: Well I'm limited by dilivary dates and spare time arround my college work, job and the builds I am working on but I will try and get little updates like this out every day for each of my blogs. Thank You :)
-
Where Am I Getting It From?: I'm sure there are many more places over seas where you an get modding supplies but in the UK we are limited to websites like Kustompcs.co.uk and Overclockers.co.uk. These sites offer great ready built mods and a wide selection of coolers, heat sinks and fans but lack things like velcro reels, screws, nuts and wood glue. So I'm getting all of the stuff for this build, barring the MDF, from eBay. I have finished the list of items I need and added some that I want, like the NZXT Sentry. Here is a link to my eBay collection: http://www.ebay.co.uk/cln/luk_bris/Smokey-Attempts-PC-In-A-Drawer/165712357013:. Whats Next? Planing to do more of these little updates leading up to this weekend when I will post the results of the red mod. Follow my other blog, Smokey Attempts: The Red Mod, for more updates on the GPU modding. Thank you :)
-
Disclaimer: Okay, I am not an expert modder. In fact, this is my first endeavor into the trade so I would love to get some help from the community. Which is the whole reason that I made this blog. It is not, in any way, a guide. So with that out of the way, I'll start going into my plan so far. Quick Overview: Woodwork: Going for MDF over plywood was my first major choice as it will affect the budget for the rest of my build. My local builders merchant had a special so I grabbed a 2.5m by 1.5m, 9mm sheet for like £11. Once I have the Drawer bottom cut out and holed, I will test this with all the guts of my PC. To actually fix everything down, I am grabbing a 50 pack of M3 55mm screws and 100M3 nuts. This cost me arround £10 but is alot more that I hope to use. Screws: M3 screws will fit motherboard and radiator holes nicely and in my case, they fit my GPU too. This is a bonus because I can now mount my 290xs flat, and lower the height of the drawer. Length wise, 55mm is enough for the; front radiator, fan, filter and grill arrangement. Moreover, longer screws mean I can fix the motherboard and GPUs higher above the base for better cable management. Graphics Cards: As for my GPUs I intend to red mod my 290xs with Corsair H60s. I understand that circular coolers are easier to mod but at this time, I can get a refurbished H60 for only £5 more that a H55. 12 black cable ties where enough to mount the cooler well enough to get contact but I don't have any VRM coolers at this time so I could bench the card. Geil do some 290x/290 heat sinks but they are only available from the US, still waiting for them to turn up. Should only be a week now and they come with pads. I have some MX2 Compound for my cards and CPU and I will use small amounts of this for the VRAM sinks. RAM: My Avexir RAM is great but has yellow LEDs that will clash the the black and white color scheme. I could sell the and get some better RAM but that would take a while and cost me. So I went for just getting some basic black and while, full cover heat sinks to block the LEDs. Storage and PSU: Finally, I have a HDD and an SSD that I need to mount with velcro to the bottom on the drawer. Next to each other, the velcro should provde enough height for the SATA cable to attach. My PSU s the last component I need to fix into the case. More velcro for this, I will mount it with he fan facing down so I can cut out a hole and fix filters to the 120mm fan. I will also cut ventilation holes in the bottom portion of the case to allow air to get the the fan. Bottom Compartment: This bottom compartment will also hold all the elongated cables so I can open the drawer fully without having to unplug anything. Cut off from the drawer by a rubber grommet so that no air can escape this way, I will have three 120mm fans at the rear of the case to match the 120mm rad and fan arrays at the front. Whats next? The next entry will be on the GPU; modding, testing, overclocking and benching. For much more detailed look at this, check out my other blog £Smokey Attempts: The Red Mod". Thank you. :)
-

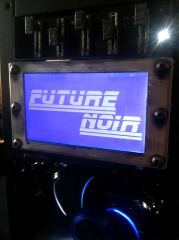
LCD Screen on NZXT "Future Noir" Blade Runner Tribute PC by Mnpctech
Mnpctech posted a gallery image in Members Albums Category
From the album: BLADE RUNNER PC by Mnpctech
LCD screen on "Future Noir" Blade Runner PC created for NZXT by Mnpctech -
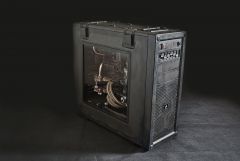
From the album: keenan's "project marshlands" Corsair case mod
keenan's "project marshlands" with c70 mnpctech window -
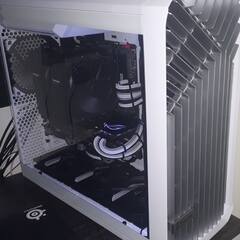
 Hey A couple of weeks ago I made a custom case for an old pc I got from my uncle. But while installing the pc on that test bench like case I made I broke the motherboard. And because that case is smaller than the case of my main desktop I thought it would be a good idea to put my main pc in there. The only problem is that I don't have a bracket to hold graphics card so the graphics card will only be supported by the PCIE slot. I've got a GTX 1060 with a single fan design so it's not that heavy and the motherboard is placed horizontally so it's not really hanging of the slot. But will that be enough to support it? Because I don't want to break a second motherboard. In the picture you can see the case with the old pc installed. I aprecciate all the help Senne
-
I apologize in advance for drastic lighting changes in the pictures. I have been stubborn in using my camera in manual mode only and as such my inexperience shows. My brother's laptop died. That's gotta be one of the more common reasons why we PC builders end up making a custom PC for my family. Since the laptop was already quite old, with a Core 2 Duo and DDR2 RAM, I proposed a complete computer update that my brother could use for homework and some games for quite a while. Then when I started planning for my brother's computer, @Comic_Sans_MS suggested that I give my brother my i3 and take the chance to upgrade my CPU. So I did, and after some frustrating price hunting for cheap LGA 1155 motherboards, I finally am able to call this log complete. On to the parts list then. CPU: Intel Core i3-2100. This CPU served me well for 5 years, and it shall serve my brother now. Cooling: Arctic Freezer 11 LP. $15. I gotta say, I'm quite impressed by this little cooler. Keeps the i3 at 65C under AIDA64, at minimum fan speed. Motherboard: Intel DZ68DB. $35 on Ebay. A steal to be honest, the BIOS is a bit meager but it does the job. RAM: 4GB Samsung. Gifted by a friend. Should upgrade to 8GB soon but for now it will do. GPU: GTX 650 Ti. Another hand-down, it should be enough for his games at 900p. Storage: ADATA SP550 120GB. $45. Gotta snatch one before flash prices go up up up. Also his 500GB laptop drive. PSU: Antec Basiq BP350 (The FSP one). $28. The cheapest thing I could find on tier 5 or up. @STRMfrmXMN I think the reason why mine is pretty silent whereas yours was loud af, is maybe you got the CWT BP350, and I got the FSP one (mine has no PFC, ewww). Case: Some cheap shit for $4. It actually didn't come with motherboard standoffs, so I had to engineer my way into a motherboard mounting mechanism. (cfr pictures) TOTAL Spent: $127. Equivalent after currency exchange rates. Really not bad for the kind of computer that my brother got, but the hand-me-downs helped a looooot. WARNING: Large pictures (5184x3888) Below. The Arctic Freezer 11 LP really doesn't look that bad. The mounting mechanism is probably the cheapest thing, just two plastic bars with push pins. Unfortunately I wasn't able to hide the double molex to 6-pin adapter. I know what I'm doing, I swear! The 650 Ti actually still has the idle fan off feature that I gave it through a modded BIOS. Some case pics. First, a look at it bare, then a look at the mounting mechanism for the motherboard, then a full build. Case steel was as thin as it gets, the motherboard is tougher than its tray and that concerns me, but I'll leave it be for now and maybe stamp a fragile sticker into the thing. Obligatory PSU shot The SSD says hi! Thanks for giving this build log a read! I hope you liked it. @deXxterlab97 Any time I work with blue PCB I feel like tagging you is mantadory.
-
Hey LTT! This will be my very first case mod with a older case, i did some case modding before like painting, case floors etc but i never modded a case without any water cooling support what so ever, to a fully supported water cooling case. i did this pure for fun and to try out some modding with limited tools. all the bending was done by hand i did not have any tools for that, but most of the 2mm aluminium bending wasn't to difficult to do by hand. i used 2mm aluminium for these mods and some 3D carbon fiber vinyl for wrapping the plates. there will be a build log with this modded case as i'm planning to water cool in this case. i plan to use a 360mm radiator in the front and a 280mm radiator in the top and i might put another 120mm radiator in the back. i tried to get the best quality pictures with my phone so they won't be the Best quality you've ever seen alright enough talking and time for some pictures. original case: for more HERE After mods: for more pictures i made down the way click HERE
-
Sup folks, Not too long ago I made a post about putting a model car inside of a PC case. Well, it has arrived today! It's apparently silver-plated... Yikes! Didn't know that (stupid)... I'm reconsidering whether I'd put this in my case, as it's beautiful, but I don't know how well silver-plated stuff reacts to heat (probably around 30~40°C in the case). Maybe you guys know. Anyway, here are the pictures! Bought some cheapo LED strip to see how it reflects the light, looks pretty cool! Let me know your thoughts! Regards, TJ
-
Hey all, hope y'all having a great day! I'm back again with another post and this time I have upped my build to a new level. Now before everyone starts suggesting to get a standard ATX full tower case, I am hellbent on using the Powermac G5 case and I will not be changing my plans to use it. Now with that said. I plan on building my personal PC inside the 2005 Powermac G5 case as seen here (link to Ebay): http://www.ebay.com.au/itm/PowerMac-G5-empty-enclosure-case-build-custom-Mac-PC-Hackintosh-B-grade-/162188602959?hash=item25c331ae4f:g:wBoAAOSwh-1W2oJG I have also decided that this build below suits my needs exactly and are within my budget (link to PC Part Picker): http://au.pcpartpicker.com/list/RKTH3F Now knowing that the G5 case doesn't accommodate for standard ATX form factors, I want to get some opinions and suggestions on how I would mod the internals and the rear of the case to mount the motherboard and have the PCI slots line up with the PCI IO brackets. Some people have put up walkthroughs, blog posts and youtube videos, however, I still don't quite understand the process fully but am really keen to undertake this project. I am thinking about installing a Motherboard mounting plate but am unsure if this would put the slots out of alignment with the IO brackets. I am welcome to any comments and suggestions Thanks
-
Yo people of the internet I'm in dire need of your help. Recently build my first PC and im pretty stoked with the turnout. One major gripe I have is that after spending the extra money to get the strix 1080 I had completely overlooked the fact that I wouldn't even be able to see the badass triple fan madness going on with this GPU. I'm committed to sidemounting the GPU, so that it's parallel to the motherboard and that the fans on the shroud are facing the left hand side of the case, but really have a problem with sawing through me new phanteks enthoo evolv TG cause its the sexiest case around (i.m.p). I was wondering if anyone had build or bought a piece to replace the 7 expansion slot covers which maintains some airflow and cover the port requirements of a Asus GTX 1080 Strix. I have access to Solidworks, 3D printers and a lasercutter but have little to no experience using them and would like to explore all purchase options before starting another project on top of college work. If anyone else has done this themselves in Solidworks please link me the file with a list of any add ins required for it. Any help is greatly appreciated as most people I've spoken to so far have just said that a company needs to make them already.
-
Show us the awesome mods that you in the LTT community have done to either make your system look dop, perform better or both. It can be 5foot mod, 10foot mod or 24-hour mod. Show us how creative you are by changing your old or semi new rig and tell us the mod you have done. Pictures are most welcome.
-
I hope this is ok to post a video here, thought putting it in off topic would be ok. This is something I thought would be of interest to case modders and the like \ Ok so this tutorial is based around the JQ6500 MP3 sound module, it's a little pcb that does what it says, plays back mp3's! The version I used in the video has internal flash and 5 triggers, each trigger plays back a set mp3. There a version that uses a micro SD card (JQ6500-28P) Triggers are pulled low to activate, in the video I just tied the trigger 1 to ground so it played the first mp3 every power up. In a PC you could install this on the power, reset, mouse button or even something like an eject button (if you rock a CD drive like I do ) (or even on the trigger ground of a 3.5mm headphone jack) All those things pull low hehe I would recommend a diode on the trigger just to be safe however Also in the demo I did, because I have the trigger 1 pulled low constantly, the USB driver sometimes has issues loading but in most cases (where you would permanently)do this you aren't going to be changing the sound anyhow Also one last thing, this module runs on 3.3~5V, if you install it on a 3.3v rail, please either disconnect or use a blocking diode on the VCC pin. The usb +5v and VCC pin are common (electorally connected) Let me know if you guys like tutorials like this
-
Hi Linus / world, For too long the house hold of PlayStation gamers has become a messy court room. The defendant: A. Sony PlayStation 4 The Prosecution: A. Literally everyone with ears The charge: A. Ridiculously loud heat sink fans Proposed solution: A. Custom modify an M-ITX or M-ATX case such that a PS4 internals can be bolted in and that a all-in-one CPU/GPU cooler can be attached so that our ears may focus on gaming and not the screams of a poorly designed heat sink. So what say you? Are you interested in such a task? Being a man for the people and providing all DIY gamers the chance to improve their PS4? I look forward to seeing such a video in the future.
-
 Hi, So basically I ordered a very cheap LGA 1151 mining motherboard (a long with everything else) for a sub $250 CAD gaming PC and I forgot it doesn't have any RGB headers so I was thinking of buying some USB RGB Strip Lights to make everything look a bit nicer. So as the title says will the USB port from a PCI-E X1 Riser provide 5v at ~1.5amps or would I be better off soldering it to the PSU?
 -
I have the vivo atx case but I want a glass or or see through panel what’s the best way to go about thAt should I buy a different side panel that has tempered glass or diy it
-
Hello all, So I recent got the NZXT Nuka-cola case, and I wanted to get the glass panel etched with either the nuka-cola symbol on it, or the Nuka-Cola Mascot on it so that it would look cooler. Anyone know where I can find a second panel just in case? Also places in CA where I can get custom etching would also be nice too. Thanks
-
I just finished my first custom loop and need help. I had to put the fans in the front so I could fit the radiator and pump/res in the case. I am wondering what the best way to go about modifying the front panel for airflow would be. I can separate the Metal from the plastic on the front panel. But want to know what would be best to cut both out. I don't want to go all the way to the edge of the panel, I just want a big rectangle hole. and I might put some kind of grating to make it look nice. Just wondering if anyone has done this or what tools would work best to cut and leave good looking edges.
-
Has anyone come up with a really good, professional looking method for adding a filter back there? I've always wanted to do that to one of my cases that has negative pressure, but I don't want to do anything jenky like use zip ties or whatever. I want it to look clean. It doesn't feel like metal so nothing magnetic will work. Is there anything designed specifically for these vents that'll work? Maybe something that sticks on or maybe bolts on through the vent holes? The case I want to do this too is the Corsair 200r
-
Introduction Hello internet people. So I am doing my fist build log for, what I think, is a rather big project. As the name title says the name of the project is [The Grid], where I'll be taking an old Antec Lanboy Air Blue, heavily modifying it to bring it up to modern standards while keeping it's style and function in tact, and giving it a Tron/Cyberpunk theme. Pictures of the Case This is the case. At this point it still has it's fully original looks, though I admit I've already removed the usb and audio ports at this time, along with front fans that were hard wired to the case. Build Components Processor: Intel Core i7 8700k Motherboard: Gigabyte Z370 AORUS Gaming 7 Memory: 64GB Team T-Force Night Hawk RGB DDR4-3200 Storage: 1TB Samsung 970 Evo M.2 1TB Samsung 970 Evo M.2 250GB Samsung 860 Evo M.2 1TB Western Digital Velociraptor 10000 RPM 1TB Western Digital Velociraptor 10000 RPM 8TB Seagate Ironwolf 7200 rpm Video Card: 2-way SLI: MSI GTX 1080 Ti Armor x2 Power Supply: Corsair 1200W 80+ Platinum Fully Modular Optical Drive: Pioneer BDR-211UBK (4k Blu Ray) (now a maybe) Case Fans: 6 120mm be quiet! SilentWing 3 PWM Monitor: 2 Acer XB281HK 28" 3840x2160 60Hz Additional Items: Vantec 4-channel 6 Port Sata PCIe RAID Host card ORICO Monster USB 3.0 PCI - Express Card with 5 Rear USB 3.0 Ports and 1x Internal USB 3.0 20-PIN Connector Controller Adapter Card (PVU3-502I) Liquid Cooling Components Radiators: 2 EK-CoolStream SE 240 2 EK-CoolStream SE 120 Processor Waterblock: NCore V1D GPU Waterblock: 2 EK-FC1080 GTX Ti TF6 - Acetal+Nickel / 2 V1 Tech Blank Backplate w/ RGB Reservoir: EK-RES X3 250 RGB Pump: EK-XTOP Revo Dual D5 PWM Serial Pipes: Acrylic Additional: Aquacomputer G1/4" Filter with Stainless Steel Mesh, Ball Valves and Mounting Plate Parts to be Modded In Silverstone Tek Aluminum 3.5-Inch Drive Bay with USB 3.0X4 and HD Audio Ports (FP32B-E) Lian-Li PW-ICO1NH45 450mm USB3.1 Type-C Gen2/10G Internal Power Cables CableMod WideBeam Hybrid LED Kit - RGB / UV Parts Explanation So some of the parts aren't the final choice, this is a year long build after all, and technology constantly advances. The Graphics cards might get swapped out for the GTX 1180/2080, whatever they decide to call it, which last I heard has been pushed back til the fall though, my understanding is, there is no official confirmation on when it's going to get released. I'm also keeping an eye out for Intel's 9th generation i7, that could cause me to have to swap out the processor and motherboard, if it's compatible with the NCore V1D. Some of the parts were chosen, because I already own them, such as all of the storage drives, except the 960 Pro, and I've already backed the Kickstarter for the V1D. Lighting For lighting I'm going to be mostly using El-wire, El-Tape, and El-pads. I'm kind of surprised I don't see this stuff used more often in case modding, as it does have some advantages over LEDs. Now some people will notice I have a WideBeam Hybrid LED Kit on my list of parts, that's mostly for the UV lighting. Additional Thoughts I'm currently trying to figure out what to do about the areas where you would mount the front fans. See the case had 2 fans that were hardwired to the case, which connect them to these little nobs that you could use to control the speed. At this point I'm just not sure what to do with them, as they are completely useless. That should be it for now. I'll be reserving the next 6 or 7 posts for future updates. Edit: Thought I should mention, I did get my hands on a second Lanboy Air Blue. Both cases were a little beaten up, one much more so than the other, and missing parts. However, together they made one perfect case. So for that one fan case with the broken off nob, I do have a replacement for that, should I decide to just ignore the nobs and leave them as is.
-
Hi there, Just want to outline a few things that I'm expecting out of this potential mod before I get into it. - Windowed Side Panel - Flush window or some way of making it look neat Those are the only requirements... since I'm very noob status for case modding this is where I ask for help. How would you guys cut out a hole in your side panel and put a window into it? I'm using a super old case so it's not that big of an issue but I plan to add like a stealthy/sleeper look so you don't know there's decent hardware in there but there is. Any thoughts?
-
Hello LTT family, coming up soon I will be building a custom gaming PC for my brother. I have all the components on standby he has the case and power supply which he will be sending me, however I would like to paint his case as close to the shade of brown as his dog was. His dog passed away a few weeks ago I'd like to do this as a surprise to him is there anyone who can make any suggestions? I am open the any and all suggestions to brand of paint, where to buy, ect. Thanks for your help.
-
So I seen the DIY desk PC on the llt channel which made me more inclined to finally build a desk PC of my own however there was some things about the LTT desk that I didn't like and not to mention I have very little woodworking skills and the little experience that I do have has shown me to create shoddy pieces at best so bearing all this in mind I thought there may be a simpler way of building something similar, I love Ikea it's great but I knew if I was to cut a hole in an ikea desk and attach a box with a pc in it the the under side the whole thing would fall apart so I thought if I buy a sheet of MDF glue it to the underneath of the ikea table then cut the square out of the both pieces and attach the box to the underneath of the MDF. any suggestions, ideas or criticism would be greatly appreciated