


Tpbmods
-
Posts
30 -
Joined
-
Last visited
Reputation Activity
-

 Tpbmods got a reaction from Badomen in Project Fuel by Tpbmods
What a wild project this one was...The Inwin 925 is by far the most prestigious case Ive ever worked with.
An absolute crowd pleaser at work and 100k views on Tpbmods, THIS IS FUEL!
Spec List:
CPU - i7 8700k Delidded @5.2ghz
Mobo - Maximus X Code in that Floro Red
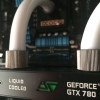
GPU - RTX 2070S on EKWB Vector Acrylic
Ram - TeamGroup Vulcan Z 16gb (Thanks to Mikes Computer Shop)
PSU - Inwin pb1250w Sleeved with Teleios(Mainframe), combed with Clockwerk ind. Knuckles
Storage - TeamGroup Delta Max ARGB SSD
Lighting - TeamGroup Captain ARGB Controller
Cooling - Inwin Aurora 120 ARGB
Watercooling - All EKWB Baby! That FLT 360 d5 was a NIGHTMARE to get in here.
Combined with 2 360x45 rads, and a whole plethora of Quantum Torque fittings, the Velocity blocks kept everything chilly.
And I cant forget that gorgeous res designed by Leighton B!
-
 Tpbmods got a reaction from Anthony_95 in Project Fuel by Tpbmods
What a wild project this one was...The Inwin 925 is by far the most prestigious case Ive ever worked with.
An absolute crowd pleaser at work and 100k views on Tpbmods, THIS IS FUEL!
Spec List:
CPU - i7 8700k Delidded @5.2ghz
Mobo - Maximus X Code in that Floro Red
GPU - RTX 2070S on EKWB Vector Acrylic
Ram - TeamGroup Vulcan Z 16gb (Thanks to Mikes Computer Shop)
PSU - Inwin pb1250w Sleeved with Teleios(Mainframe), combed with Clockwerk ind. Knuckles
Storage - TeamGroup Delta Max ARGB SSD
Lighting - TeamGroup Captain ARGB Controller
Cooling - Inwin Aurora 120 ARGB
Watercooling - All EKWB Baby! That FLT 360 d5 was a NIGHTMARE to get in here.
Combined with 2 360x45 rads, and a whole plethora of Quantum Torque fittings, the Velocity blocks kept everything chilly.
And I cant forget that gorgeous res designed by Leighton B!
-
.png.8f60cc6df2cefee7b1ee5519d74b7bf0.thumb.png.1ff7cb82fc22a225a88a32f46f488c33.png) Tpbmods got a reaction from Meganter in Project Fuel by Tpbmods
Tpbmods got a reaction from Meganter in Project Fuel by Tpbmods
What a wild project this one was...The Inwin 925 is by far the most prestigious case Ive ever worked with.
An absolute crowd pleaser at work and 100k views on Tpbmods, THIS IS FUEL!
Spec List:
CPU - i7 8700k Delidded @5.2ghz
Mobo - Maximus X Code in that Floro Red
GPU - RTX 2070S on EKWB Vector Acrylic
Ram - TeamGroup Vulcan Z 16gb (Thanks to Mikes Computer Shop)
PSU - Inwin pb1250w Sleeved with Teleios(Mainframe), combed with Clockwerk ind. Knuckles
Storage - TeamGroup Delta Max ARGB SSD
Lighting - TeamGroup Captain ARGB Controller
Cooling - Inwin Aurora 120 ARGB
Watercooling - All EKWB Baby! That FLT 360 d5 was a NIGHTMARE to get in here.
Combined with 2 360x45 rads, and a whole plethora of Quantum Torque fittings, the Velocity blocks kept everything chilly.
And I cant forget that gorgeous res designed by Leighton B!
-
 Tpbmods got a reaction from zeusthemoose in Project Fuel by Tpbmods
What a wild project this one was...The Inwin 925 is by far the most prestigious case Ive ever worked with.
An absolute crowd pleaser at work and 100k views on Tpbmods, THIS IS FUEL!
Spec List:
CPU - i7 8700k Delidded @5.2ghz
Mobo - Maximus X Code in that Floro Red
GPU - RTX 2070S on EKWB Vector Acrylic
Ram - TeamGroup Vulcan Z 16gb (Thanks to Mikes Computer Shop)
PSU - Inwin pb1250w Sleeved with Teleios(Mainframe), combed with Clockwerk ind. Knuckles
Storage - TeamGroup Delta Max ARGB SSD
Lighting - TeamGroup Captain ARGB Controller
Cooling - Inwin Aurora 120 ARGB
Watercooling - All EKWB Baby! That FLT 360 d5 was a NIGHTMARE to get in here.
Combined with 2 360x45 rads, and a whole plethora of Quantum Torque fittings, the Velocity blocks kept everything chilly.
And I cant forget that gorgeous res designed by Leighton B!
-
Tpbmods got a reaction from Anthony_95 in The Industry by Tpbmods
Well here we are, Just like 2019, The Industry is finally done!
It's been a long and fruitful journey this year; and I cant wait to show everyone what I have in works for 2020.
I want too give my greatest appreciation to Inwin USA, EK Waterblocks, TeamGroup and Dazmode for their continued support.
And I want to thank each and every one of you for following along on this journey of mine, It means a lot to me!
System specs:
Case: Inwin 905, CNC'd by @PartyBrosDesign
Cpu - Intel i7 8700k
Mobo - Maximus Formula z370
Gpu - Strix 2080
Ram - 16gb (4x4) TeamGroup T-Force DarkZ
PSU - Inwin PL850w
Cables - Tpbmods
Loop:
Cpu - EK Velocity Acetal
Gpu - EK RTX Strix
Pump/Res - Xres 140 Revo D5 Glass
Rads - EK SE360/PL240
Fittings - EK 16mm Torque Series
Fans - Inwin Sirius Loop 120mm
-
 Tpbmods got a reaction from BiG StroOnZ in The Industry by Tpbmods
Well here we are, Just like 2019, The Industry is finally done!
It's been a long and fruitful journey this year; and I cant wait to show everyone what I have in works for 2020.
I want too give my greatest appreciation to Inwin USA, EK Waterblocks, TeamGroup and Dazmode for their continued support.
And I want to thank each and every one of you for following along on this journey of mine, It means a lot to me!
System specs:
Case: Inwin 905, CNC'd by @PartyBrosDesign
Cpu - Intel i7 8700k
Mobo - Maximus Formula z370
Gpu - Strix 2080
Ram - 16gb (4x4) TeamGroup T-Force DarkZ
PSU - Inwin PL850w
Cables - Tpbmods
Loop:
Cpu - EK Velocity Acetal
Gpu - EK RTX Strix
Pump/Res - Xres 140 Revo D5 Glass
Rads - EK SE360/PL240
Fittings - EK 16mm Torque Series
Fans - Inwin Sirius Loop 120mm
-
Tpbmods got a reaction from Meganter in The Industry by Tpbmods
Well here we are, Just like 2019, The Industry is finally done!
It's been a long and fruitful journey this year; and I cant wait to show everyone what I have in works for 2020.
I want too give my greatest appreciation to Inwin USA, EK Waterblocks, TeamGroup and Dazmode for their continued support.
And I want to thank each and every one of you for following along on this journey of mine, It means a lot to me!
System specs:
Case: Inwin 905, CNC'd by @PartyBrosDesign
Cpu - Intel i7 8700k
Mobo - Maximus Formula z370
Gpu - Strix 2080
Ram - 16gb (4x4) TeamGroup T-Force DarkZ
PSU - Inwin PL850w
Cables - Tpbmods
Loop:
Cpu - EK Velocity Acetal
Gpu - EK RTX Strix
Pump/Res - Xres 140 Revo D5 Glass
Rads - EK SE360/PL240
Fittings - EK 16mm Torque Series
Fans - Inwin Sirius Loop 120mm
-

-
 Tpbmods got a reaction from Andrijaaa in Project Velika Planina
Ahh yes, The Big Mountain
Velika Planina was named and themed in respect to EKWB and this gorgeous piece of mountain, and the beautiful purple flowers that bloom in its plateau.
Fun fact, its only an hour drive from EK HQ!
-
 Tpbmods got a reaction from Gegger in Project Velika Planina
Another month, another build... one of my top 3 favorite projects of this year. Velika Planina was named and themed in respect to EKWB and this gorgeous piece of mountain, and the beautiful purple flowers that bloom in its plateau. Fun fact, its only an hour drive from EK HQ!
This one is special to me, in so many ways! Tried out some new painting techniques, first time playing with fresh off the line watercooling, and I had the opportunity to document my work in finer detail and use the parts provided to me to create tutorials.
I made all the fan splitters from scratch and terminated the RGB fans into 1 plug per radiator.
This project was graciously sponsored by EKWB, It took almost 3 years modding to get the YES... And damn does it feel amazing.
The Tou2.0 Inspired front panel for the Inwin 303 came to me after having this case sitting at my feet for nearly 2 whole years.
System specs:
Cpu - Intel i7 8700k, Delidded at 5.2ghz
Mobo - Asus Maximus Code, with Mountain peak inspired paint
Gpu - EVGA RTX 2070 XC
Ram - TeamGroup T-Force Nighthawk 4x8gb @ 3200mhz , with Mountain peak inspired paint
OS Storage - Samsung 970 evo m.2
Game Storage - TeamGroup T-Force Delta 2 SSD , with Mountain peak inspired paint and UV LED's
PSU - Seasonic Focus +Gold 850w
Cables - Tpbmods, Made with Teleios
Full EKWB Cooling solution:
Cpu - Velocity RGB Nickel + Plexi
Gpu - Vector RTX 2080 RGB Nickel + Plexi w/Nickel backplate
Pump/Res - Xres 140 Revo D5 RGB Wrapped in mountains.
Rads - 1 PE/1 SE Coolstream 360
Fittings - All Torque series angled and HTC 16mm
Fans - Vardar 120ER RGB
Coolant - CryoFuel Indigo Violet
And now, in no particular order of favoritism, I give you... Velika Planina
-
 Tpbmods got a reaction from WWicket in Project Velika Planina
Another month, another build... one of my top 3 favorite projects of this year. Velika Planina was named and themed in respect to EKWB and this gorgeous piece of mountain, and the beautiful purple flowers that bloom in its plateau. Fun fact, its only an hour drive from EK HQ!
This one is special to me, in so many ways! Tried out some new painting techniques, first time playing with fresh off the line watercooling, and I had the opportunity to document my work in finer detail and use the parts provided to me to create tutorials.
I made all the fan splitters from scratch and terminated the RGB fans into 1 plug per radiator.
This project was graciously sponsored by EKWB, It took almost 3 years modding to get the YES... And damn does it feel amazing.
The Tou2.0 Inspired front panel for the Inwin 303 came to me after having this case sitting at my feet for nearly 2 whole years.
System specs:
Cpu - Intel i7 8700k, Delidded at 5.2ghz
Mobo - Asus Maximus Code, with Mountain peak inspired paint
Gpu - EVGA RTX 2070 XC
Ram - TeamGroup T-Force Nighthawk 4x8gb @ 3200mhz , with Mountain peak inspired paint
OS Storage - Samsung 970 evo m.2
Game Storage - TeamGroup T-Force Delta 2 SSD , with Mountain peak inspired paint and UV LED's
PSU - Seasonic Focus +Gold 850w
Cables - Tpbmods, Made with Teleios
Full EKWB Cooling solution:
Cpu - Velocity RGB Nickel + Plexi
Gpu - Vector RTX 2080 RGB Nickel + Plexi w/Nickel backplate
Pump/Res - Xres 140 Revo D5 RGB Wrapped in mountains.
Rads - 1 PE/1 SE Coolstream 360
Fittings - All Torque series angled and HTC 16mm
Fans - Vardar 120ER RGB
Coolant - CryoFuel Indigo Violet
And now, in no particular order of favoritism, I give you... Velika Planina
-
 Tpbmods got a reaction from kelvinhall05 in How to manage 12v RGB cables with Tpmods
Hey guys and gals, Tpbmods here with a how to manage 12v RGB cables tutorial.
This is an advanced mod, do not attempt this if you cant A:Solder, B:Fix mistakes, and ? Afford to replace the hardware if you ruin it.
The tools you will need for this mod are quite simple, and any modder will have these on hand.
Soldering Iron, Solder, wire cutters, Xacto(optional), lighter or heatgun, Heatshrink! And optionally, Sleeving.
Start by getting all your cables run as clean and snug as possible, and mark the cables where they will be cut.
A tip from Alex Banks over at Bit-Tech, is to make little wings out of tape to keep note of orientation.
once your wires are stripped and splayed, get them all taped together and tap em together with a bit of solder.
Always make sure to use heatshrink! Take the time to get everything as snug and clean as possible
And thats it! Clean up the cables, use a few zap straps to tidy it up!
Now get out there and clean up those wires!
-
 Tpbmods got a reaction from kirashi in How to paint EK Radiators with Tpbmods
Hey everyone, Tpbmods here!
Today Im here to tell you, Stop painting your damn radiator fins... I mean, show you how to paint your EK Radiators!
Unlike pretty much every other radiator on the market, EKWB designed theirs to be taken apart.
The process is simple, can be done in a reasonable time frame(paint dependent) and takes nearly no real skill to pull off!
The Tools - All you need to pull apart your EK rad is a blade to pop the badge, a Torx T10 for the 8 screws in the top and bottom, and a 9mm Allen key for the extensions.
Sanding - Prep is key! The more time you spending working on the surface to be painted, the better your finish will be.
I personally used a palm sander and 180grit wet/dry to make quick work of the original finish.
You can do this by hand, with a power tool, sandblaster, or even paint stripper/Easy Off oven spray.
Once you're happy with the finish, clean the surface from all dusts and oils.
Because I am using a high pigment acrylic paint, my only interest was getting to some bare metal for paint adhesion.
I lightly put the screws back in because I planned on hanging these, and didn't want paint where it shouldn't be.
Painting - Like sanding, this can be done in many ways. My weapon of choice is high pigment, acrylic based rattle can.
Rattle Can, Airbrush, paint gun. Maybe you want to hit it with some alcohol stain or get it plated? Proper prep and patience is key
Here I hit the frames with a VERY light coat of chrome base just to have a strong and bright base to get my color to really pop.
After painting, it was time to wait. For some people, this can be hours or even days depending on the finish you want to go for, and the paint you are using.
With my choice in paint, my dry time is quick; and time between coats is even faster. And because I didnt want to bother with clearcoat, its done!
Now its time to very carefully reassemble your gorgeous new frame back around the interior core, taking extra care not to smash things around anywhere the frame comes in contact with itself.
The last thing you want, is chipping or scratching that fresh new look. Get the extensions reinstalled, and then re-apply your EK badge! Adhesive got ruined? double sided tape works wonders!
Hope this has been helpful, and I cant wait to see what you come up with
-
 Tpbmods got a reaction from TheSLSAMG in How to paint EK Radiators with Tpbmods
Hey everyone, Tpbmods here!
Today Im here to tell you, Stop painting your damn radiator fins... I mean, show you how to paint your EK Radiators!
Unlike pretty much every other radiator on the market, EKWB designed theirs to be taken apart.
The process is simple, can be done in a reasonable time frame(paint dependent) and takes nearly no real skill to pull off!
The Tools - All you need to pull apart your EK rad is a blade to pop the badge, a Torx T10 for the 8 screws in the top and bottom, and a 9mm Allen key for the extensions.
Sanding - Prep is key! The more time you spending working on the surface to be painted, the better your finish will be.
I personally used a palm sander and 180grit wet/dry to make quick work of the original finish.
You can do this by hand, with a power tool, sandblaster, or even paint stripper/Easy Off oven spray.
Once you're happy with the finish, clean the surface from all dusts and oils.
Because I am using a high pigment acrylic paint, my only interest was getting to some bare metal for paint adhesion.
I lightly put the screws back in because I planned on hanging these, and didn't want paint where it shouldn't be.
Painting - Like sanding, this can be done in many ways. My weapon of choice is high pigment, acrylic based rattle can.
Rattle Can, Airbrush, paint gun. Maybe you want to hit it with some alcohol stain or get it plated? Proper prep and patience is key
Here I hit the frames with a VERY light coat of chrome base just to have a strong and bright base to get my color to really pop.
After painting, it was time to wait. For some people, this can be hours or even days depending on the finish you want to go for, and the paint you are using.
With my choice in paint, my dry time is quick; and time between coats is even faster. And because I didnt want to bother with clearcoat, its done!
Now its time to very carefully reassemble your gorgeous new frame back around the interior core, taking extra care not to smash things around anywhere the frame comes in contact with itself.
The last thing you want, is chipping or scratching that fresh new look. Get the extensions reinstalled, and then re-apply your EK badge! Adhesive got ruined? double sided tape works wonders!
Hope this has been helpful, and I cant wait to see what you come up with
-
 Tpbmods got a reaction from W-L in How to paint EK Radiators with Tpbmods
Hey everyone, Tpbmods here!
Today Im here to tell you, Stop painting your damn radiator fins... I mean, show you how to paint your EK Radiators!
Unlike pretty much every other radiator on the market, EKWB designed theirs to be taken apart.
The process is simple, can be done in a reasonable time frame(paint dependent) and takes nearly no real skill to pull off!
The Tools - All you need to pull apart your EK rad is a blade to pop the badge, a Torx T10 for the 8 screws in the top and bottom, and a 9mm Allen key for the extensions.
Sanding - Prep is key! The more time you spending working on the surface to be painted, the better your finish will be.
I personally used a palm sander and 180grit wet/dry to make quick work of the original finish.
You can do this by hand, with a power tool, sandblaster, or even paint stripper/Easy Off oven spray.
Once you're happy with the finish, clean the surface from all dusts and oils.
Because I am using a high pigment acrylic paint, my only interest was getting to some bare metal for paint adhesion.
I lightly put the screws back in because I planned on hanging these, and didn't want paint where it shouldn't be.
Painting - Like sanding, this can be done in many ways. My weapon of choice is high pigment, acrylic based rattle can.
Rattle Can, Airbrush, paint gun. Maybe you want to hit it with some alcohol stain or get it plated? Proper prep and patience is key
Here I hit the frames with a VERY light coat of chrome base just to have a strong and bright base to get my color to really pop.
After painting, it was time to wait. For some people, this can be hours or even days depending on the finish you want to go for, and the paint you are using.
With my choice in paint, my dry time is quick; and time between coats is even faster. And because I didnt want to bother with clearcoat, its done!
Now its time to very carefully reassemble your gorgeous new frame back around the interior core, taking extra care not to smash things around anywhere the frame comes in contact with itself.
The last thing you want, is chipping or scratching that fresh new look. Get the extensions reinstalled, and then re-apply your EK badge! Adhesive got ruined? double sided tape works wonders!
Hope this has been helpful, and I cant wait to see what you come up with
-
 Tpbmods got a reaction from Lord Mirdalan in How to paint EK Radiators with Tpbmods
Hey everyone, Tpbmods here!
Today Im here to tell you, Stop painting your damn radiator fins... I mean, show you how to paint your EK Radiators!
Unlike pretty much every other radiator on the market, EKWB designed theirs to be taken apart.
The process is simple, can be done in a reasonable time frame(paint dependent) and takes nearly no real skill to pull off!
The Tools - All you need to pull apart your EK rad is a blade to pop the badge, a Torx T10 for the 8 screws in the top and bottom, and a 9mm Allen key for the extensions.
Sanding - Prep is key! The more time you spending working on the surface to be painted, the better your finish will be.
I personally used a palm sander and 180grit wet/dry to make quick work of the original finish.
You can do this by hand, with a power tool, sandblaster, or even paint stripper/Easy Off oven spray.
Once you're happy with the finish, clean the surface from all dusts and oils.
Because I am using a high pigment acrylic paint, my only interest was getting to some bare metal for paint adhesion.
I lightly put the screws back in because I planned on hanging these, and didn't want paint where it shouldn't be.
Painting - Like sanding, this can be done in many ways. My weapon of choice is high pigment, acrylic based rattle can.
Rattle Can, Airbrush, paint gun. Maybe you want to hit it with some alcohol stain or get it plated? Proper prep and patience is key
Here I hit the frames with a VERY light coat of chrome base just to have a strong and bright base to get my color to really pop.
After painting, it was time to wait. For some people, this can be hours or even days depending on the finish you want to go for, and the paint you are using.
With my choice in paint, my dry time is quick; and time between coats is even faster. And because I didnt want to bother with clearcoat, its done!
Now its time to very carefully reassemble your gorgeous new frame back around the interior core, taking extra care not to smash things around anywhere the frame comes in contact with itself.
The last thing you want, is chipping or scratching that fresh new look. Get the extensions reinstalled, and then re-apply your EK badge! Adhesive got ruined? double sided tape works wonders!
Hope this has been helpful, and I cant wait to see what you come up with
-
Tpbmods reacted to Deltawing457 in Had a great time and have two requests for LTX 2020
I filled it out to help your data set
-

.thumb.jpg.b9e98c40b3a5d5ff15454f7a974dc480.jpg) Tpbmods got a reaction from CPotter in Had a great time and have two requests for LTX 2020
Tpbmods got a reaction from CPotter in Had a great time and have two requests for LTX 2020
@Metalshark I am running an independent survey for those who attended LTX19. I am trying to compile data to be used as a tool for job acquisition.
As someone with 16 years of customer service oriented business, event planning and social media marketing; I will be applying for the Event Coordinator position, as soon as @CPotter is home If you would like to have your say on my NOT LMG OFFICIAL Survey, its linked here. https://forms.gle/66AxbXK39ibh72Ve8
-
Tpbmods reacted to CPotter in Post LTX 2019 Survey
Thanks again SO, SO MUCH to all who attended LTX 2019 featuring DreamHack this past weekend. Help us improve our event by filling out this survey:
https://docs.google.com/forms/d/e/1FAIpQLSeXbBXfa6kw1jrzsQon9Fdb-HPdjCTP0zpIzkZnrmfmNohblQ/viewform
-
 Tpbmods got a reaction from peger in CMWS19 Project Maple
Back at it again with another completed project. This time, the stakes are higher than a Canadian flag on July 1st.
Project Maple is my entry into the Cooler Master Case mod world series novice modding division.
This was proudly sponsored by Swiftech USA who provided me with pretty much every single piece they sell.
Build List:
Mobo - Asus Maximus X Code - Painted
CPU - i5 9600k @ 4.8ghz
GPU - MSI 1080ti Aero OC
Ram - TeamGroup T-Force Nighthawk 4x8gb 3200mhz
SSD - TeamGroup T-Force 240gb
PSU - Seasonic focus+ Gold 850w
Case - Cooler Master MB530p with plenty of cosmetic mods.
Watercooling:
CPU - Swiftech Apogee SKF Prestige w/Iris ARGB
GPU - Swiftech Komodo 1080ti w/CMWS19 painted backplate.
Pump/Res - (Cut down to 170mm) Swiftech Maelstrom 200mm(170mm) d5 w/Iris ARGB
Radiators - 3x Swiftech Hydrae GT(120/240/360) Painted Tornado red
Compression Fittings - Nanoxia CF 16mm hardline painted
Angled and extension Fittings - Swiftech Dual 45 rotary &15mm
Drain - Dazmode Darkside Pushvalve
Fluid - SwifTech "Mayhem" Dyes in distilled, and 1 drop of Dead Water
Misc:
Fans - Swiftech Helix 120mm w/Iris ARGB
Controllers - Swiftech Iris ARGB Eco Controllers
Cables - Tpbmods created, using Telios Sleeving from Mainframe Customs
Cable Combs - Nanoxia CF with splatter paint job
Paint - BombingScience.Com Ironlak/Moltow/FlameBlue
-
 Tpbmods got a reaction from jiyeon in CMWS19 Project Maple
Back at it again with another completed project. This time, the stakes are higher than a Canadian flag on July 1st.
Project Maple is my entry into the Cooler Master Case mod world series novice modding division.
This was proudly sponsored by Swiftech USA who provided me with pretty much every single piece they sell.
Build List:
Mobo - Asus Maximus X Code - Painted
CPU - i5 9600k @ 4.8ghz
GPU - MSI 1080ti Aero OC
Ram - TeamGroup T-Force Nighthawk 4x8gb 3200mhz
SSD - TeamGroup T-Force 240gb
PSU - Seasonic focus+ Gold 850w
Case - Cooler Master MB530p with plenty of cosmetic mods.
Watercooling:
CPU - Swiftech Apogee SKF Prestige w/Iris ARGB
GPU - Swiftech Komodo 1080ti w/CMWS19 painted backplate.
Pump/Res - (Cut down to 170mm) Swiftech Maelstrom 200mm(170mm) d5 w/Iris ARGB
Radiators - 3x Swiftech Hydrae GT(120/240/360) Painted Tornado red
Compression Fittings - Nanoxia CF 16mm hardline painted
Angled and extension Fittings - Swiftech Dual 45 rotary &15mm
Drain - Dazmode Darkside Pushvalve
Fluid - SwifTech "Mayhem" Dyes in distilled, and 1 drop of Dead Water
Misc:
Fans - Swiftech Helix 120mm w/Iris ARGB
Controllers - Swiftech Iris ARGB Eco Controllers
Cables - Tpbmods created, using Telios Sleeving from Mainframe Customs
Cable Combs - Nanoxia CF with splatter paint job
Paint - BombingScience.Com Ironlak/Moltow/FlameBlue
-
-
-
 Tpbmods got a reaction from DeZoTriX in Project Glacier
Welcome to Project Glacier, the biggest headache of 2019.
After dozens of setbacks from terrible weather, waiting on parts from all over the place,
and tons of issues with paint... I present to you: Glacier
I want to thank all my sponsors, and supporters.
TeamGroup(ram), Alphacool(block/pump), Swiftech(fans)
And ofcourse Anatoly and Dazmode for all his support!
Mobo - ROG Maximus Code z370
CPU - i7 8700k Delidded/LM/Rockitcool Copper IHS
GPU - MSI 1080TI OC
Ram - T-Force TeamGroup Delta 2 RGB 16gb 4x4
PSU - Seasonic 850w Platinum
Storage:
M.2 - ADATA XPG sx8200 gen3 x4 240gb
SSD - Samsung 850 evo 500gb
SSHD - Seagate Firecuda 2tb
HDD - Seagate Barracuda Compute 4tb
Watercooling:
Fans - Swiftech Iris Helix ARGB 120mm
CPU - Alphacool Eisblock
GPU - EKWB EKFC1080ti
Pump - Alphacool Eisbaer d5
Radiators - EKWB PL 360
Temp Sensor - Thermaltake
Hardline Fittings - Thermaltake 16mm
Angled Fittings - Dazmode Darkside/Bitspower/Nanoxia
Drain Valve - Dazmode Darkside Pushvalve system
Misc fittings - Dazmode Darkside for a vast majority of them
Cables - Which I make myself!
Sleeving - Mainframe Customs Telios and Dazmode Darkside
Wire - 18awg that I ordered from PC Mods Canada
Connectors - Mainframe Customs and Dazmode (depends on the connector)
Pins - Mainframe Customs
Combs - v1Tech
-
 Tpbmods got a reaction from Fasauceome in Project Paracosmos
Cant remember the last time I built an MITX. This little gemm was never designed to be a CRAZY mod,
This project was designed to showcase the capabilities of the Swiftech drive x3 h240, and its expandable nature!
Paracosmos started in a VERY different direction that I wasnt happy with. So, I went out and got a new mobo and case, and started over.
Build List:
Mobo - Asus Strix z390-i
CPU - Delidded i3 8350k @ 5.3ghz
GPU - MSI 1080ti Aero OC
Ram - TeamGroup T-Force Nighthawk 2x8 3000mhz
SSD - TeamGroup T-Force Rainbow 240gb
PSU - Seasonic Focus + gold 850w
Case - Heavy airflow modded NZXT h200i
Watercooling:
CPU - Swiftech Apogee LT w/Iris ARGB
GPU - EKWB 1080ti
Pump/Res/Rad - Swiftech Drive x3 H240/Swiftech Hydrae GT 240
Fittings - Nanoxia 1/2"
Angled Fittings - Nanoxia CF 45's
Fluid - Mayhem Pastel w/ Swiftech dyes
Misc:
Fans - Swiftech Helix 120mm w/Iris ARGB
Controllers - Swiftech Iris ARGB Eco Controllers
Lighting - Dazmode Darkside Rigid RGB
Cables - Tpbmods created, using Telios Sleeving from Mainframe Customs
Cable Combs - V1Tech


.png.8f60cc6df2cefee7b1ee5519d74b7bf0.thumb.png.1ff7cb82fc22a225a88a32f46f488c33.png)


.thumb.jpg.b9e98c40b3a5d5ff15454f7a974dc480.jpg)


