


k4p84
-
Posts
220 -
Joined
-
Last visited
Reputation Activity
-

 k4p84 got a reaction from SaTaN_17 in Anodising an Intel stock heatsink
Right then, let's finish this !!
First off those rainbow cables had to go. I did snip the cable of a Corsair PWM fan here as come hell or high water I could not find 26 gauge 4 conductor black sheathed ribbon cable, if anyone does know of a decent source in the UK please post up.
Remove the very shiny sticker, head over to the solder station and de-solder the original cables and solder in the new ones .
Now we need to make a black sticker to cover the whole top of the cooler and just because we can let's cover up the cable channel too.
Simply place some paper over the area and do the same as if one was brass rubbing to create an outline of the design that is needed. Scan the outline and import the image into your software of choice, draw out the design and plot that file on some lovely matte black vinyl.
tah dah !!
As you can see I added some tabs to the cable channel portion so I could wrap them around so that any cable strain would not pull the sticker straight off.
Once applied we have a beautiful stealthed out Intel cooler.
So there we have one stealth cooler that simply looks far better than it did at the start.......... but wait........................
Dare I say it looked a little too plain...
A little head scratching later and I was torn between adding the CPU model number to the top of the cooler or adding the intel logo...
The logo won the mental battle and after cutting it out of some 'intel blue' vinyl behold the masterpiece in all it's glory !!
Intel marketing people if you see this, this is what you should be sending out, make it happen :-)
Here endeth the mod.
If anyone does need some help with anodising or vinyl cutting for either direct application or for painting masking please let me know I am happy to assist in any way I can.
Regards
Ed
-
k4p84 got a reaction from SaTaN_17 in Anodising an Intel stock heatsink
Hi all,
Here we have a little mod to the intel stock cooler. I know many do not hold the stock cooler with much regard but I have always felt that as a stock heatsink it is nice and compact and quiet for most of the installer base.
So we will be anodising the aluminium part of the heatsink black.
Let's go through a few anodising info.
It is an aluminium oxide layer on the surface of the aluminium to protect the more reactive bare aluminium.
There are different types of anodising to give your parts more desirable features like resistance to mechanical / chemical / temperature as well as a method to colourise parts.
Here we will just be doing cosmetic anodising as I want to turn the part black.
So the heatsink needs disassembling and cleaning. I passed it through an ultrasonic cleaner to help remove any dirt as the cooler has been used.
Now I will not have pictures of the parts going through the tanks as there are other customers parts going through too.
A quick overview of the process from here :
Jigging - mount parts on a jig so that they can be moved through the different tanks without needing to be handled directly and so that current can be passed through more pieces more efficiently. These can be simple as a stiff wire to custom make jigs for repeat customer parts or difficult to hold due to size or weight.
Cleaning - any material that prevents the chemicals from contacting the aluminium will prevent the process occurring on that area. This can be beneficial if you need a grounding surface for example (aluminium oxide is non conductive on the whole) but if you have grease / dirt on the surface you will end up with a blemish.
Anodising - here the anodic layer is put down, the parts size will increase by a few microns. The anodic layer is porous, think a metal sponge.
Dying - if you are clear anodising you skip straight to sealing (spoilers... :-) ) otherwise parts are dipped into a dye that enters the porous surface. To get different shades you dip the parts for different times, maybe 5 seconds for very light to a few minutes for stronger colours. Fun fact you can't dye white as the white pigment is too large to fit into the porous surface, if you can make a smaller white pigment you will be rich !!
Sealing - generally done in a chemical bath but can also be achieved with boiling water you close the surface of the anodic layer sealing in the colour(s)
Drying - leave the parts jigged up in a hot room to dry off all the water
In between each tank you must thoroughly rinse the parts so you do not contaminate the following tank or to stop the dying process for example.
Now the process does change depending on the properties that you would like to bring out and the materials been used. You may need to use different chemicals, times, temperatures and voltages but as an overview that should give you an idea of what goes on.
Always let your parts sit for 24 hours to let the sealing go off fully and then clean them off, general purpose kitchen cleaners work great with a nice towel. (do not use anything bleach based it will damage the layer)
Now to reassemble the heatsink and take some more pictures.
I may revisit this the put a sticker over the stock intel on and replace all the wiring making the whole unit a stealth cooler.
A few myths / more info :
It will cover the base metal surface finish. If you anodise a polished part you get a polished finish, anodise a media blasted part you get a dust finish. If you have imperfections in your surface finish they are not hidden so finishing off your metal surface well is important. You can brighten the surface finish giving you from a matte chalk board effect to a very slight sheen, this would be mainly done on dust / sandblasted finishes.
It is sticky. If you handle a part and it feels sticky or it takes fingerprints that part was not sealed well. The best way to explain this is that the anodic layer is porous prior to sealing, this is how colour is held in the layer. Parts are chemically sealed but can also be heat sealed so if you have parts you want to seal boil them in water for 10 minutes.You can anodise at home. Sure you can but the chemicals used and given off are not very pleasant as well as disposal of said chemicals needs to be done safely.
You can re anodise parts. You can but you need to remove the previous anodic layer. This is eroded away chemically so the parts do get very slightly smaller each time you do this. In practice (depending on tolerances etc) you could anodise a part 2-3 times before things like threads get to sloppy for example.
The process will dissolve other metals. Very true, you can anodise aluminium and titanium but other metals will be dissolved and if done too often will result in needing to clean out your tanks more often. You can mask over parts that can not be removed, press fitted threaded inserts for example. Chemically resistant tapes as well as rubber based fluids can be used to mask them off from the chemicals.
You can remove anodising with oven cleaner. True again, strips it off but is not very precise.
So there we go we have a lovely black heatsink. I did not paint the parts as getting a good finish in the intricate surface would be difficult and I did not want to put a layer of paint over the metal to insulate it as I do not want the effectiveness of the heatsink to be reduced.
Many other effects can be achieved as you can see from another piece I did that week for a friend ..
If you have any questions etc post up and I will try to help out.
Regards
Ed
-
 k4p84 got a reaction from Eru in PSU coil insulator "burnt"
When you have finished your repair may one suggest you use a PSU tester rather than your rig to see if it works, one would not like to damage any other components.
-
 k4p84 got a reaction from ed4546 in Frequent Display driver crashing
download the latest drivers direct from the vendor.
use this : http://www.guru3d.com/files-details/display-driver-uninstaller-download.html
remove all remains of the old drivers.
boot into safe mode (software above has that option)
install the new drivers.
cross fingers, toes and eyes and hope it fixed the issue.
-
 k4p84 got a reaction from 0x1e in Save to HHD and not SSD.
create Videos, Pictures, Music, Documents folders on the HDD, remap the My Videos... etc folders to these locations.
-
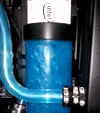
 k4p84 got a reaction from callum.mcconnell in Water cooling help... PLEASE
What is watercooled, CPU, GPU, RAM, MB.... if you built the loop yourself ?
Are you using AIO coolers ?
Did it work when it was air cooled / stock ?
Did you jump the PSU to bleed the sys ?
It can be perfectly normal behaviour for a sys to power cycle a few times when the PSU is plugged in.
Basically we are trying to narrow down what may be causing any issues, more info is a good start.
-
k4p84 reacted to Olivertheguy in Anodising an Intel stock heatsink
It should come like that from the factory, I would pay an extra $3 for that heck I would pay $20
-
 k4p84 got a reaction from 0ld_Chicken in Anodising an Intel stock heatsink
Right then, let's finish this !!
First off those rainbow cables had to go. I did snip the cable of a Corsair PWM fan here as come hell or high water I could not find 26 gauge 4 conductor black sheathed ribbon cable, if anyone does know of a decent source in the UK please post up.
Remove the very shiny sticker, head over to the solder station and de-solder the original cables and solder in the new ones .
Now we need to make a black sticker to cover the whole top of the cooler and just because we can let's cover up the cable channel too.
Simply place some paper over the area and do the same as if one was brass rubbing to create an outline of the design that is needed. Scan the outline and import the image into your software of choice, draw out the design and plot that file on some lovely matte black vinyl.
tah dah !!
As you can see I added some tabs to the cable channel portion so I could wrap them around so that any cable strain would not pull the sticker straight off.
Once applied we have a beautiful stealthed out Intel cooler.
So there we have one stealth cooler that simply looks far better than it did at the start.......... but wait........................
Dare I say it looked a little too plain...
A little head scratching later and I was torn between adding the CPU model number to the top of the cooler or adding the intel logo...
The logo won the mental battle and after cutting it out of some 'intel blue' vinyl behold the masterpiece in all it's glory !!
Intel marketing people if you see this, this is what you should be sending out, make it happen :-)
Here endeth the mod.
If anyone does need some help with anodising or vinyl cutting for either direct application or for painting masking please let me know I am happy to assist in any way I can.
Regards
Ed
-
k4p84 got a reaction from 0ld_Chicken in Anodising an Intel stock heatsink
Hi all,
Here we have a little mod to the intel stock cooler. I know many do not hold the stock cooler with much regard but I have always felt that as a stock heatsink it is nice and compact and quiet for most of the installer base.
So we will be anodising the aluminium part of the heatsink black.
Let's go through a few anodising info.
It is an aluminium oxide layer on the surface of the aluminium to protect the more reactive bare aluminium.
There are different types of anodising to give your parts more desirable features like resistance to mechanical / chemical / temperature as well as a method to colourise parts.
Here we will just be doing cosmetic anodising as I want to turn the part black.
So the heatsink needs disassembling and cleaning. I passed it through an ultrasonic cleaner to help remove any dirt as the cooler has been used.
Now I will not have pictures of the parts going through the tanks as there are other customers parts going through too.
A quick overview of the process from here :
Jigging - mount parts on a jig so that they can be moved through the different tanks without needing to be handled directly and so that current can be passed through more pieces more efficiently. These can be simple as a stiff wire to custom make jigs for repeat customer parts or difficult to hold due to size or weight.
Cleaning - any material that prevents the chemicals from contacting the aluminium will prevent the process occurring on that area. This can be beneficial if you need a grounding surface for example (aluminium oxide is non conductive on the whole) but if you have grease / dirt on the surface you will end up with a blemish.
Anodising - here the anodic layer is put down, the parts size will increase by a few microns. The anodic layer is porous, think a metal sponge.
Dying - if you are clear anodising you skip straight to sealing (spoilers... :-) ) otherwise parts are dipped into a dye that enters the porous surface. To get different shades you dip the parts for different times, maybe 5 seconds for very light to a few minutes for stronger colours. Fun fact you can't dye white as the white pigment is too large to fit into the porous surface, if you can make a smaller white pigment you will be rich !!
Sealing - generally done in a chemical bath but can also be achieved with boiling water you close the surface of the anodic layer sealing in the colour(s)
Drying - leave the parts jigged up in a hot room to dry off all the water
In between each tank you must thoroughly rinse the parts so you do not contaminate the following tank or to stop the dying process for example.
Now the process does change depending on the properties that you would like to bring out and the materials been used. You may need to use different chemicals, times, temperatures and voltages but as an overview that should give you an idea of what goes on.
Always let your parts sit for 24 hours to let the sealing go off fully and then clean them off, general purpose kitchen cleaners work great with a nice towel. (do not use anything bleach based it will damage the layer)
Now to reassemble the heatsink and take some more pictures.
I may revisit this the put a sticker over the stock intel on and replace all the wiring making the whole unit a stealth cooler.
A few myths / more info :
It will cover the base metal surface finish. If you anodise a polished part you get a polished finish, anodise a media blasted part you get a dust finish. If you have imperfections in your surface finish they are not hidden so finishing off your metal surface well is important. You can brighten the surface finish giving you from a matte chalk board effect to a very slight sheen, this would be mainly done on dust / sandblasted finishes.
It is sticky. If you handle a part and it feels sticky or it takes fingerprints that part was not sealed well. The best way to explain this is that the anodic layer is porous prior to sealing, this is how colour is held in the layer. Parts are chemically sealed but can also be heat sealed so if you have parts you want to seal boil them in water for 10 minutes.You can anodise at home. Sure you can but the chemicals used and given off are not very pleasant as well as disposal of said chemicals needs to be done safely.
You can re anodise parts. You can but you need to remove the previous anodic layer. This is eroded away chemically so the parts do get very slightly smaller each time you do this. In practice (depending on tolerances etc) you could anodise a part 2-3 times before things like threads get to sloppy for example.
The process will dissolve other metals. Very true, you can anodise aluminium and titanium but other metals will be dissolved and if done too often will result in needing to clean out your tanks more often. You can mask over parts that can not be removed, press fitted threaded inserts for example. Chemically resistant tapes as well as rubber based fluids can be used to mask them off from the chemicals.
You can remove anodising with oven cleaner. True again, strips it off but is not very precise.
So there we go we have a lovely black heatsink. I did not paint the parts as getting a good finish in the intricate surface would be difficult and I did not want to put a layer of paint over the metal to insulate it as I do not want the effectiveness of the heatsink to be reduced.
Many other effects can be achieved as you can see from another piece I did that week for a friend ..
If you have any questions etc post up and I will try to help out.
Regards
Ed
-
 k4p84 got a reaction from neebuilda in Anodising an Intel stock heatsink
Hi all,
Here we have a little mod to the intel stock cooler. I know many do not hold the stock cooler with much regard but I have always felt that as a stock heatsink it is nice and compact and quiet for most of the installer base.
So we will be anodising the aluminium part of the heatsink black.
Let's go through a few anodising info.
It is an aluminium oxide layer on the surface of the aluminium to protect the more reactive bare aluminium.
There are different types of anodising to give your parts more desirable features like resistance to mechanical / chemical / temperature as well as a method to colourise parts.
Here we will just be doing cosmetic anodising as I want to turn the part black.
So the heatsink needs disassembling and cleaning. I passed it through an ultrasonic cleaner to help remove any dirt as the cooler has been used.
Now I will not have pictures of the parts going through the tanks as there are other customers parts going through too.
A quick overview of the process from here :
Jigging - mount parts on a jig so that they can be moved through the different tanks without needing to be handled directly and so that current can be passed through more pieces more efficiently. These can be simple as a stiff wire to custom make jigs for repeat customer parts or difficult to hold due to size or weight.
Cleaning - any material that prevents the chemicals from contacting the aluminium will prevent the process occurring on that area. This can be beneficial if you need a grounding surface for example (aluminium oxide is non conductive on the whole) but if you have grease / dirt on the surface you will end up with a blemish.
Anodising - here the anodic layer is put down, the parts size will increase by a few microns. The anodic layer is porous, think a metal sponge.
Dying - if you are clear anodising you skip straight to sealing (spoilers... :-) ) otherwise parts are dipped into a dye that enters the porous surface. To get different shades you dip the parts for different times, maybe 5 seconds for very light to a few minutes for stronger colours. Fun fact you can't dye white as the white pigment is too large to fit into the porous surface, if you can make a smaller white pigment you will be rich !!
Sealing - generally done in a chemical bath but can also be achieved with boiling water you close the surface of the anodic layer sealing in the colour(s)
Drying - leave the parts jigged up in a hot room to dry off all the water
In between each tank you must thoroughly rinse the parts so you do not contaminate the following tank or to stop the dying process for example.
Now the process does change depending on the properties that you would like to bring out and the materials been used. You may need to use different chemicals, times, temperatures and voltages but as an overview that should give you an idea of what goes on.
Always let your parts sit for 24 hours to let the sealing go off fully and then clean them off, general purpose kitchen cleaners work great with a nice towel. (do not use anything bleach based it will damage the layer)
Now to reassemble the heatsink and take some more pictures.
I may revisit this the put a sticker over the stock intel on and replace all the wiring making the whole unit a stealth cooler.
A few myths / more info :
It will cover the base metal surface finish. If you anodise a polished part you get a polished finish, anodise a media blasted part you get a dust finish. If you have imperfections in your surface finish they are not hidden so finishing off your metal surface well is important. You can brighten the surface finish giving you from a matte chalk board effect to a very slight sheen, this would be mainly done on dust / sandblasted finishes.
It is sticky. If you handle a part and it feels sticky or it takes fingerprints that part was not sealed well. The best way to explain this is that the anodic layer is porous prior to sealing, this is how colour is held in the layer. Parts are chemically sealed but can also be heat sealed so if you have parts you want to seal boil them in water for 10 minutes.You can anodise at home. Sure you can but the chemicals used and given off are not very pleasant as well as disposal of said chemicals needs to be done safely.
You can re anodise parts. You can but you need to remove the previous anodic layer. This is eroded away chemically so the parts do get very slightly smaller each time you do this. In practice (depending on tolerances etc) you could anodise a part 2-3 times before things like threads get to sloppy for example.
The process will dissolve other metals. Very true, you can anodise aluminium and titanium but other metals will be dissolved and if done too often will result in needing to clean out your tanks more often. You can mask over parts that can not be removed, press fitted threaded inserts for example. Chemically resistant tapes as well as rubber based fluids can be used to mask them off from the chemicals.
You can remove anodising with oven cleaner. True again, strips it off but is not very precise.
So there we go we have a lovely black heatsink. I did not paint the parts as getting a good finish in the intricate surface would be difficult and I did not want to put a layer of paint over the metal to insulate it as I do not want the effectiveness of the heatsink to be reduced.
Many other effects can be achieved as you can see from another piece I did that week for a friend ..
If you have any questions etc post up and I will try to help out.
Regards
Ed
-
 k4p84 got a reaction from NaLu in Anodising an Intel stock heatsink
Hi all,
Here we have a little mod to the intel stock cooler. I know many do not hold the stock cooler with much regard but I have always felt that as a stock heatsink it is nice and compact and quiet for most of the installer base.
So we will be anodising the aluminium part of the heatsink black.
Let's go through a few anodising info.
It is an aluminium oxide layer on the surface of the aluminium to protect the more reactive bare aluminium.
There are different types of anodising to give your parts more desirable features like resistance to mechanical / chemical / temperature as well as a method to colourise parts.
Here we will just be doing cosmetic anodising as I want to turn the part black.
So the heatsink needs disassembling and cleaning. I passed it through an ultrasonic cleaner to help remove any dirt as the cooler has been used.
Now I will not have pictures of the parts going through the tanks as there are other customers parts going through too.
A quick overview of the process from here :
Jigging - mount parts on a jig so that they can be moved through the different tanks without needing to be handled directly and so that current can be passed through more pieces more efficiently. These can be simple as a stiff wire to custom make jigs for repeat customer parts or difficult to hold due to size or weight.
Cleaning - any material that prevents the chemicals from contacting the aluminium will prevent the process occurring on that area. This can be beneficial if you need a grounding surface for example (aluminium oxide is non conductive on the whole) but if you have grease / dirt on the surface you will end up with a blemish.
Anodising - here the anodic layer is put down, the parts size will increase by a few microns. The anodic layer is porous, think a metal sponge.
Dying - if you are clear anodising you skip straight to sealing (spoilers... :-) ) otherwise parts are dipped into a dye that enters the porous surface. To get different shades you dip the parts for different times, maybe 5 seconds for very light to a few minutes for stronger colours. Fun fact you can't dye white as the white pigment is too large to fit into the porous surface, if you can make a smaller white pigment you will be rich !!
Sealing - generally done in a chemical bath but can also be achieved with boiling water you close the surface of the anodic layer sealing in the colour(s)
Drying - leave the parts jigged up in a hot room to dry off all the water
In between each tank you must thoroughly rinse the parts so you do not contaminate the following tank or to stop the dying process for example.
Now the process does change depending on the properties that you would like to bring out and the materials been used. You may need to use different chemicals, times, temperatures and voltages but as an overview that should give you an idea of what goes on.
Always let your parts sit for 24 hours to let the sealing go off fully and then clean them off, general purpose kitchen cleaners work great with a nice towel. (do not use anything bleach based it will damage the layer)
Now to reassemble the heatsink and take some more pictures.
I may revisit this the put a sticker over the stock intel on and replace all the wiring making the whole unit a stealth cooler.
A few myths / more info :
It will cover the base metal surface finish. If you anodise a polished part you get a polished finish, anodise a media blasted part you get a dust finish. If you have imperfections in your surface finish they are not hidden so finishing off your metal surface well is important. You can brighten the surface finish giving you from a matte chalk board effect to a very slight sheen, this would be mainly done on dust / sandblasted finishes.
It is sticky. If you handle a part and it feels sticky or it takes fingerprints that part was not sealed well. The best way to explain this is that the anodic layer is porous prior to sealing, this is how colour is held in the layer. Parts are chemically sealed but can also be heat sealed so if you have parts you want to seal boil them in water for 10 minutes.You can anodise at home. Sure you can but the chemicals used and given off are not very pleasant as well as disposal of said chemicals needs to be done safely.
You can re anodise parts. You can but you need to remove the previous anodic layer. This is eroded away chemically so the parts do get very slightly smaller each time you do this. In practice (depending on tolerances etc) you could anodise a part 2-3 times before things like threads get to sloppy for example.
The process will dissolve other metals. Very true, you can anodise aluminium and titanium but other metals will be dissolved and if done too often will result in needing to clean out your tanks more often. You can mask over parts that can not be removed, press fitted threaded inserts for example. Chemically resistant tapes as well as rubber based fluids can be used to mask them off from the chemicals.
You can remove anodising with oven cleaner. True again, strips it off but is not very precise.
So there we go we have a lovely black heatsink. I did not paint the parts as getting a good finish in the intricate surface would be difficult and I did not want to put a layer of paint over the metal to insulate it as I do not want the effectiveness of the heatsink to be reduced.
Many other effects can be achieved as you can see from another piece I did that week for a friend ..
If you have any questions etc post up and I will try to help out.
Regards
Ed
-
k4p84 got a reaction from NaLu in Anodising an Intel stock heatsink
Hey all,
Thanks for the comments :-)
Sooo I decided I could not leave this little mod in it's current state, this weekend we shall see the final vision...
Replacement stealth cabling and plug
Stealth sticker
I may even break out the studio lights to take some better pictures of the finished project.
Regards
Ed
-
 k4p84 got a reaction from Ceatra in Anodising an Intel stock heatsink
Hi all,
Here we have a little mod to the intel stock cooler. I know many do not hold the stock cooler with much regard but I have always felt that as a stock heatsink it is nice and compact and quiet for most of the installer base.
So we will be anodising the aluminium part of the heatsink black.
Let's go through a few anodising info.
It is an aluminium oxide layer on the surface of the aluminium to protect the more reactive bare aluminium.
There are different types of anodising to give your parts more desirable features like resistance to mechanical / chemical / temperature as well as a method to colourise parts.
Here we will just be doing cosmetic anodising as I want to turn the part black.
So the heatsink needs disassembling and cleaning. I passed it through an ultrasonic cleaner to help remove any dirt as the cooler has been used.
Now I will not have pictures of the parts going through the tanks as there are other customers parts going through too.
A quick overview of the process from here :
Jigging - mount parts on a jig so that they can be moved through the different tanks without needing to be handled directly and so that current can be passed through more pieces more efficiently. These can be simple as a stiff wire to custom make jigs for repeat customer parts or difficult to hold due to size or weight.
Cleaning - any material that prevents the chemicals from contacting the aluminium will prevent the process occurring on that area. This can be beneficial if you need a grounding surface for example (aluminium oxide is non conductive on the whole) but if you have grease / dirt on the surface you will end up with a blemish.
Anodising - here the anodic layer is put down, the parts size will increase by a few microns. The anodic layer is porous, think a metal sponge.
Dying - if you are clear anodising you skip straight to sealing (spoilers... :-) ) otherwise parts are dipped into a dye that enters the porous surface. To get different shades you dip the parts for different times, maybe 5 seconds for very light to a few minutes for stronger colours. Fun fact you can't dye white as the white pigment is too large to fit into the porous surface, if you can make a smaller white pigment you will be rich !!
Sealing - generally done in a chemical bath but can also be achieved with boiling water you close the surface of the anodic layer sealing in the colour(s)
Drying - leave the parts jigged up in a hot room to dry off all the water
In between each tank you must thoroughly rinse the parts so you do not contaminate the following tank or to stop the dying process for example.
Now the process does change depending on the properties that you would like to bring out and the materials been used. You may need to use different chemicals, times, temperatures and voltages but as an overview that should give you an idea of what goes on.
Always let your parts sit for 24 hours to let the sealing go off fully and then clean them off, general purpose kitchen cleaners work great with a nice towel. (do not use anything bleach based it will damage the layer)
Now to reassemble the heatsink and take some more pictures.
I may revisit this the put a sticker over the stock intel on and replace all the wiring making the whole unit a stealth cooler.
A few myths / more info :
It will cover the base metal surface finish. If you anodise a polished part you get a polished finish, anodise a media blasted part you get a dust finish. If you have imperfections in your surface finish they are not hidden so finishing off your metal surface well is important. You can brighten the surface finish giving you from a matte chalk board effect to a very slight sheen, this would be mainly done on dust / sandblasted finishes.
It is sticky. If you handle a part and it feels sticky or it takes fingerprints that part was not sealed well. The best way to explain this is that the anodic layer is porous prior to sealing, this is how colour is held in the layer. Parts are chemically sealed but can also be heat sealed so if you have parts you want to seal boil them in water for 10 minutes.You can anodise at home. Sure you can but the chemicals used and given off are not very pleasant as well as disposal of said chemicals needs to be done safely.
You can re anodise parts. You can but you need to remove the previous anodic layer. This is eroded away chemically so the parts do get very slightly smaller each time you do this. In practice (depending on tolerances etc) you could anodise a part 2-3 times before things like threads get to sloppy for example.
The process will dissolve other metals. Very true, you can anodise aluminium and titanium but other metals will be dissolved and if done too often will result in needing to clean out your tanks more often. You can mask over parts that can not be removed, press fitted threaded inserts for example. Chemically resistant tapes as well as rubber based fluids can be used to mask them off from the chemicals.
You can remove anodising with oven cleaner. True again, strips it off but is not very precise.
So there we go we have a lovely black heatsink. I did not paint the parts as getting a good finish in the intricate surface would be difficult and I did not want to put a layer of paint over the metal to insulate it as I do not want the effectiveness of the heatsink to be reduced.
Many other effects can be achieved as you can see from another piece I did that week for a friend ..
If you have any questions etc post up and I will try to help out.
Regards
Ed
-
 k4p84 got a reaction from sirtoby in Anodising an Intel stock heatsink
Hi all,
Here we have a little mod to the intel stock cooler. I know many do not hold the stock cooler with much regard but I have always felt that as a stock heatsink it is nice and compact and quiet for most of the installer base.
So we will be anodising the aluminium part of the heatsink black.
Let's go through a few anodising info.
It is an aluminium oxide layer on the surface of the aluminium to protect the more reactive bare aluminium.
There are different types of anodising to give your parts more desirable features like resistance to mechanical / chemical / temperature as well as a method to colourise parts.
Here we will just be doing cosmetic anodising as I want to turn the part black.
So the heatsink needs disassembling and cleaning. I passed it through an ultrasonic cleaner to help remove any dirt as the cooler has been used.
Now I will not have pictures of the parts going through the tanks as there are other customers parts going through too.
A quick overview of the process from here :
Jigging - mount parts on a jig so that they can be moved through the different tanks without needing to be handled directly and so that current can be passed through more pieces more efficiently. These can be simple as a stiff wire to custom make jigs for repeat customer parts or difficult to hold due to size or weight.
Cleaning - any material that prevents the chemicals from contacting the aluminium will prevent the process occurring on that area. This can be beneficial if you need a grounding surface for example (aluminium oxide is non conductive on the whole) but if you have grease / dirt on the surface you will end up with a blemish.
Anodising - here the anodic layer is put down, the parts size will increase by a few microns. The anodic layer is porous, think a metal sponge.
Dying - if you are clear anodising you skip straight to sealing (spoilers... :-) ) otherwise parts are dipped into a dye that enters the porous surface. To get different shades you dip the parts for different times, maybe 5 seconds for very light to a few minutes for stronger colours. Fun fact you can't dye white as the white pigment is too large to fit into the porous surface, if you can make a smaller white pigment you will be rich !!
Sealing - generally done in a chemical bath but can also be achieved with boiling water you close the surface of the anodic layer sealing in the colour(s)
Drying - leave the parts jigged up in a hot room to dry off all the water
In between each tank you must thoroughly rinse the parts so you do not contaminate the following tank or to stop the dying process for example.
Now the process does change depending on the properties that you would like to bring out and the materials been used. You may need to use different chemicals, times, temperatures and voltages but as an overview that should give you an idea of what goes on.
Always let your parts sit for 24 hours to let the sealing go off fully and then clean them off, general purpose kitchen cleaners work great with a nice towel. (do not use anything bleach based it will damage the layer)
Now to reassemble the heatsink and take some more pictures.
I may revisit this the put a sticker over the stock intel on and replace all the wiring making the whole unit a stealth cooler.
A few myths / more info :
It will cover the base metal surface finish. If you anodise a polished part you get a polished finish, anodise a media blasted part you get a dust finish. If you have imperfections in your surface finish they are not hidden so finishing off your metal surface well is important. You can brighten the surface finish giving you from a matte chalk board effect to a very slight sheen, this would be mainly done on dust / sandblasted finishes.
It is sticky. If you handle a part and it feels sticky or it takes fingerprints that part was not sealed well. The best way to explain this is that the anodic layer is porous prior to sealing, this is how colour is held in the layer. Parts are chemically sealed but can also be heat sealed so if you have parts you want to seal boil them in water for 10 minutes.You can anodise at home. Sure you can but the chemicals used and given off are not very pleasant as well as disposal of said chemicals needs to be done safely.
You can re anodise parts. You can but you need to remove the previous anodic layer. This is eroded away chemically so the parts do get very slightly smaller each time you do this. In practice (depending on tolerances etc) you could anodise a part 2-3 times before things like threads get to sloppy for example.
The process will dissolve other metals. Very true, you can anodise aluminium and titanium but other metals will be dissolved and if done too often will result in needing to clean out your tanks more often. You can mask over parts that can not be removed, press fitted threaded inserts for example. Chemically resistant tapes as well as rubber based fluids can be used to mask them off from the chemicals.
You can remove anodising with oven cleaner. True again, strips it off but is not very precise.
So there we go we have a lovely black heatsink. I did not paint the parts as getting a good finish in the intricate surface would be difficult and I did not want to put a layer of paint over the metal to insulate it as I do not want the effectiveness of the heatsink to be reduced.
Many other effects can be achieved as you can see from another piece I did that week for a friend ..
If you have any questions etc post up and I will try to help out.
Regards
Ed
-
.thumb.gif.ad36bec38a1dbf5dfb79fb9feda55ee5.gif) k4p84 got a reaction from QueenDemetria in Anodising an Intel stock heatsink
k4p84 got a reaction from QueenDemetria in Anodising an Intel stock heatsink
Hi all,
Here we have a little mod to the intel stock cooler. I know many do not hold the stock cooler with much regard but I have always felt that as a stock heatsink it is nice and compact and quiet for most of the installer base.
So we will be anodising the aluminium part of the heatsink black.
Let's go through a few anodising info.
It is an aluminium oxide layer on the surface of the aluminium to protect the more reactive bare aluminium.
There are different types of anodising to give your parts more desirable features like resistance to mechanical / chemical / temperature as well as a method to colourise parts.
Here we will just be doing cosmetic anodising as I want to turn the part black.
So the heatsink needs disassembling and cleaning. I passed it through an ultrasonic cleaner to help remove any dirt as the cooler has been used.
Now I will not have pictures of the parts going through the tanks as there are other customers parts going through too.
A quick overview of the process from here :
Jigging - mount parts on a jig so that they can be moved through the different tanks without needing to be handled directly and so that current can be passed through more pieces more efficiently. These can be simple as a stiff wire to custom make jigs for repeat customer parts or difficult to hold due to size or weight.
Cleaning - any material that prevents the chemicals from contacting the aluminium will prevent the process occurring on that area. This can be beneficial if you need a grounding surface for example (aluminium oxide is non conductive on the whole) but if you have grease / dirt on the surface you will end up with a blemish.
Anodising - here the anodic layer is put down, the parts size will increase by a few microns. The anodic layer is porous, think a metal sponge.
Dying - if you are clear anodising you skip straight to sealing (spoilers... :-) ) otherwise parts are dipped into a dye that enters the porous surface. To get different shades you dip the parts for different times, maybe 5 seconds for very light to a few minutes for stronger colours. Fun fact you can't dye white as the white pigment is too large to fit into the porous surface, if you can make a smaller white pigment you will be rich !!
Sealing - generally done in a chemical bath but can also be achieved with boiling water you close the surface of the anodic layer sealing in the colour(s)
Drying - leave the parts jigged up in a hot room to dry off all the water
In between each tank you must thoroughly rinse the parts so you do not contaminate the following tank or to stop the dying process for example.
Now the process does change depending on the properties that you would like to bring out and the materials been used. You may need to use different chemicals, times, temperatures and voltages but as an overview that should give you an idea of what goes on.
Always let your parts sit for 24 hours to let the sealing go off fully and then clean them off, general purpose kitchen cleaners work great with a nice towel. (do not use anything bleach based it will damage the layer)
Now to reassemble the heatsink and take some more pictures.
I may revisit this the put a sticker over the stock intel on and replace all the wiring making the whole unit a stealth cooler.
A few myths / more info :
It will cover the base metal surface finish. If you anodise a polished part you get a polished finish, anodise a media blasted part you get a dust finish. If you have imperfections in your surface finish they are not hidden so finishing off your metal surface well is important. You can brighten the surface finish giving you from a matte chalk board effect to a very slight sheen, this would be mainly done on dust / sandblasted finishes.
It is sticky. If you handle a part and it feels sticky or it takes fingerprints that part was not sealed well. The best way to explain this is that the anodic layer is porous prior to sealing, this is how colour is held in the layer. Parts are chemically sealed but can also be heat sealed so if you have parts you want to seal boil them in water for 10 minutes.You can anodise at home. Sure you can but the chemicals used and given off are not very pleasant as well as disposal of said chemicals needs to be done safely.
You can re anodise parts. You can but you need to remove the previous anodic layer. This is eroded away chemically so the parts do get very slightly smaller each time you do this. In practice (depending on tolerances etc) you could anodise a part 2-3 times before things like threads get to sloppy for example.
The process will dissolve other metals. Very true, you can anodise aluminium and titanium but other metals will be dissolved and if done too often will result in needing to clean out your tanks more often. You can mask over parts that can not be removed, press fitted threaded inserts for example. Chemically resistant tapes as well as rubber based fluids can be used to mask them off from the chemicals.
You can remove anodising with oven cleaner. True again, strips it off but is not very precise.
So there we go we have a lovely black heatsink. I did not paint the parts as getting a good finish in the intricate surface would be difficult and I did not want to put a layer of paint over the metal to insulate it as I do not want the effectiveness of the heatsink to be reduced.
Many other effects can be achieved as you can see from another piece I did that week for a friend ..
If you have any questions etc post up and I will try to help out.
Regards
Ed
-
 k4p84 got a reaction from Silverer in Can't access re-purposed hard drive
one may have greater success using Linux (live USB etc)
ps any particular reason that you can not use the NAS to access the data ?
-
 k4p84 got a reaction from Brett22 in Finding a Power supply
just pick a branded one corsair, coolermaster, seasonnic, etc. Don't touch an unbranded / unknown branded PSU it is just not worth it
-
 k4p84 got a reaction from Agent181 in Turnip shirt
Hey all,
I have had this design for the Turnip shirt in my head for a few weeks.
Feedback ?
Regards
Ed
-
 k4p84 got a reaction from KemoKa in Turnip shirt
Hey all,
I have had this design for the Turnip shirt in my head for a few weeks.
Feedback ?
Regards
Ed
-
 k4p84 got a reaction from Nowak in Turnip shirt
Hey all,
I have had this design for the Turnip shirt in my head for a few weeks.
Feedback ?
Regards
Ed
-
 k4p84 got a reaction from lbrwnie in Turnip shirt
Hey all,
I have had this design for the Turnip shirt in my head for a few weeks.
Feedback ?
Regards
Ed
-
 k4p84 got a reaction from 79 Potatoes in Turnip shirt
Hey all,
I have had this design for the Turnip shirt in my head for a few weeks.
Feedback ?
Regards
Ed
-
 k4p84 got a reaction from stconquest in Turnip shirt
Hey all,
I have had this design for the Turnip shirt in my head for a few weeks.
Feedback ?
Regards
Ed
-
 k4p84 got a reaction from STRMfrmXMN in Turnip shirt
Hey all,
I have had this design for the Turnip shirt in my head for a few weeks.
Feedback ?
Regards
Ed
-


.thumb.gif.ad36bec38a1dbf5dfb79fb9feda55ee5.gif)


