


sakthi
-
Posts
40 -
Joined
-
Last visited
Reputation Activity
-

 sakthi reacted to Mangeloco in Ultimate Case modding GUIDE - Submit your tutorials - Show off your mod!
Hello guys!!
Long time fan of LTT here, but only just now that I had the guts to register and post my first thingy.
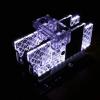
Project name: Custom Desktop case for a music studio.
After some long nights of brainstorming, we decided upon modding a Bass drum.
This is what a bass drum looks like for those who didn't know.
After looking around for some references of already built ones, i was left very unsatisfied with the only few models already done. they were too random, too 'un-wow'-ish
On with it
First, to study how this bass drum actually fit together, 'pre-mod'. Pretty basic. a empty wood cylinder from inside, with two platic sheets with a metal cap, pressed by another bigger metal cylinder.
After sketching some incomprehensible stuff on some old napkin lying around,
How to reproduce that cover thing, while keeping the aspect of the bass drum? i decided to keep the black metal cylinder, but recreate the other piece with Plexiglas. I drew two cylinder, one to fit in the metal cylinder, and the other as larger edge below it, for the metal cylinder to bite on and push it into position.
Designed them on Autocad
then forward to the bookshop to lazer cut these babies
So, for the covers, the back one i did a full opaque black Plexiglas, with a hole for a 23mm fan
the front one i went for a tinted back one to give a nice look when the led's inside would go on
(yea, i forgot the S on productions. going to have to add it as vinyl sticker later on... perks of designing stuff at 4am...)
Now, onto the case specifics. I wanted the whole build to have some kind of cool 'futuristic' aspect, and didn't want to just screw the parts all around the edges of the case. so I went and installed 2x 3mm metal vertical stems in the middle of the case, screwing them both sides with bolts and cutting off the remaining length .
P.s: That's NOT me just a friend helping out with the heavy work ^.^
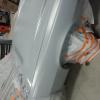
I needed some parts from an actual case, such as the Motherboard back plate, and the HDD tray, so i went and bought the cheapest 'modular' case I could find.
That's before
and that's after
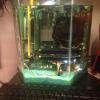
to save some space and make it look even better, i screwed the HDD tray on the back of the back plate, to get to this
and since the self-levitating PSU has not yet been invented (sadly ) i had to come out with one extra piece of design to support the PSU. Another piece of Plexiglas that i had to hold on top of the fire for around 15 minutes to be able to bend it... damn 5 mm thickness...
i screwed it on the back plate just where the PSU would usually be.
Then i added some RGB led strips to the back of the case
and the rest was just getting all the pieces together, for a result of:
Hope you guys liked
Really hope i posted it on the right section/topic of the forum... this one bugs me quite a lot
Waiting for your comments
#loveyoulinus
-
sakthi reacted to Golfball_Pro in New build July: Should I wait for Skylake?
When building a new PC, hardware advances so quickly that if you're waiting for the latest and greatest to be released, then you will end up waiting forever. If you wait for Skylake, by the time it is released, you may end up wanting to wait again because company X says they will release product Y in another month. You wait for product Y and after it is released...
you get the idea.
You want my opinion? Build now. Unless you absolutely HAVE TO have the latest and greatest there is, it doesn't make sense to wait or you may end up waiting forever.
I just built an Ivy Bridge PC about 5 months ago because I found an awesome deal on a processor, motherboard and GPU (not a bundle by the way, I bought them separately). In comparison to my old build, it was much better. Sure it isn't the latest and greatest, but for my needs right now, it's enough and gets the job done.
A comparatively similar Haswell build would have cost me about 35% more but I would only have got maybe 10-15% more performance out of the Haswell build.
I guess what it comes down to is, unless there is a feature or performance increase that you absolutely must have, build a Haswell machine now, and save yourself the potential headaches that may come with a new product on the market. Haswell is tested and there are more people using it: if you find any weird issues, there is more of a chance of finding someone who found the issue too and can help you fix it. With any new product, most of the time you're on your own until more people adopt the new platform and start using it.
-Golfball_Pro
-
 sakthi got a reaction from AddonCustoms in Custom sleeved PSU cables?
my suggestion would be to go on ebay and look for it, many of these big name company's charge a lot for custom cables, don't forget about shipping !
look for 'Modpcuk' on ebay.. they have quite the range of products
another company would be 'ultimate personal computers' they offer good pricing and free shipping on orders above $50
they are also a member in this forum
-
 sakthi got a reaction from Statecat in Custom sleeved PSU cables?
my suggestion would be to go on ebay and look for it, many of these big name company's charge a lot for custom cables, don't forget about shipping !
look for 'Modpcuk' on ebay.. they have quite the range of products
another company would be 'ultimate personal computers' they offer good pricing and free shipping on orders above $50
they are also a member in this forum
-
sakthi reacted to x Relentless Xx in To Paint, or Not to Paint?
disassemble the entire case and paint it in parts. That is the best, and correct way to paint a case, if you paint an assembled case, you WILL GUARANTEED miss spots and wont like the look of it. Like anything else, dont cut corners, take your time, and do it right the first time.
Fairly old but great guide to make your paintjob look REALLY good
-
sakthi reacted to SketchyD in [Unofficial LTT] NZXT H440 Owners Club
I recently bought this case, and shortly thereafter upgraded mobo, cpu and cooler.
H440 white/black
Core i7-4790k @4.6GHz with Kraken x61
ASUS Maximus VII Formula
G.Skill Ripjaws X 1600 (2x8GB)
Powercolor 7850 (leftover)
Samsung 840 Pro 256GB
EarthWatts EA750 (leftover, next upgrade, for a modular)
I've got it running good, and reasonably cool, but I think I can optimize the airflow better. I'm currently using the stock case and Kraken fans. I had fitment issues mounting the radiator as a top exhaust with fans in pull config, so it's a front intake. I moved the the 3x120mm to top exhaust, but the one in the front position is currently not connected, as it's partially blocked, and doesn't seem to make a noticable difference either way. 140mm is still in rear as exhaust. I'm considering buying a 140mm that matches the rear, and doing a push/pull config on the radiator, and moving the top front 120 to the rear exhaust, but not sure it's neccessary. Any suggestions are welcome.
I don't have any good pics, but here's one:
-
sakthi reacted to llTheGOOSE in [Unofficial LTT] NZXT H440 Owners Club
My Rig:
Have since reran the sleeved cables, and tidied that up a lot. Now running power to my graphics card from behind the Right SSD, and it looks so much neater!
Specs in my Sig
-
sakthi reacted to vicosem in [Unofficial LTT] NZXT H440 Owners Club
Here is my new build. Quite a long project but it's finally completed. B)
SPECS:
CPU: Intel Core i7-4790K @4.6ghz CPU Cooler: Noctua NH-D15 CPU Fans: NoiseBlocker NB-BlackSilentPro PL-PS 120mm Motherboard: Asus Z97-AR Memory: Kingston Fury Black Series 16GB (2 x 8GB) DDR3 @2133mhz SSD (X2 in RAID 0): Samsung 850 EVO-Series 250GB HDD: Seagate Barracuda 2TB 3.5" 7200RPM Video Card: Gigabyte GeForce G1 GTX 970 4GB Case: NZXT H440 (Black/Red) Power Supply: Cooler Master V850 850W 80+ Gold Monitor: AOC Q2770PQU 1440p IPS If you are intereseted I may create a detailed build log in a separate post. -
 sakthi got a reaction from fredrodregus in Tech Confession Time!
i am still using a mouse which i stole from my school 4 years ago !
-
sakthi reacted to brob in need help with cable sleeving color combination
I like the multi-color, it fits with the arctic camouflage theme. But they are all pretty decent.
-
sakthi reacted to Zah in How easy is it to ship a fully made computer?
The worst part is it took the graphics cards with it.
-
sakthi reacted to BAPEsta in Post Linus Memes Here! << -Original thread has returned
You're*
Otherwise, THANK YOU for some epic laughs!
-
 sakthi got a reaction from NerdNinja in 3D Printing a Headphone Hook for a Case!
Well its a great idea, thanks for sharing it !
-
 sakthi got a reaction from phillrulz in Raspberry pi Portable HTPC
i dont find making a enclosure is practical, because.. it will be very bulky !
i would keep it looking cool and mysterious, so people who sees it, get confused, and think i am a genius
-
sakthi reacted to Turdsandwitch in Quick weekend case mod
just a quick case mod/tidy up i thought id do since i was changing out the water in my loop.
Before
Stripped everything out and made a plan....sorta
Cut a few bit of the case off
Fabricated a PSU cover to hide all those pesky wires
Fabricated a new corner to get rid off any holes etc.. i didnt need, also got rid of the 200mm fan and opted for 2 140mm fans (still need to buy them), i think it looks better
Test fit
Decided to paint the armor on my Z97 sabertooth
And of course i had to paint the radiator to match the other one which was white too
And then the assembly process and new tube routing
Almost done, i want to get some sleeved cables, and i havent decided on any case fans yet, also ill probably get a pastel colour for the loop, dont know what colour, all in all i think just making up those 2 panels and running rigid tube has cleaned it up alot. im still going to make a panel for the holes in the left side just to finish it up. im pretty happy with it.........atleast for now.
-
sakthi reacted to PBaines in The Water Cooling Gallery
Here is my first WC rig I did when I was 15
This one I did when I was 16
About 6 months later, still 16 I did this one too
The most recent build here when I was 17.
-
sakthi reacted to d33g33 in The Water Cooling Gallery
Heres my R4
3770k
780Ti
show piece is the 120mm x 360mm in the roof and 180mm x 360mm in the front.
BUBBBLES!
http://youtu.be/Tc-Mo-Jvj1o?list=UUJPNkgeGkHCaD6C792pRsqA
-
sakthi reacted to Puma911 in The Water Cooling Gallery
1. Try to water cool.
2. Run out of money.
3. Try not to cry.
4. Cry a lot.
-
-
-
sakthi reacted to hitsu1 in [Unofficial LTT] NZXT H440 Owners Club
I built it a few weeks ago but never really got around to posting it.
Specifications
Chassis: NZXT H440 (Black/Green) Razer
CPU: Intel 5930k at 4.6 GHz
CPU Cooler: NZXT Kraken X61
RAM: 32 GB Kingston DDR4
Boot Drive: Samsung XP941 m.2 SSD
HDD: Samsung 850 Evo Pro 250 GB, WD Black 1 GB, WD Green 3 GB
GPU1: NVidia GTX 980
GPU2: NVidia GTX 980
GPU 3: NVidia GTX 980
Mobo: Asus x99 Deluxe
PSU: Corsair AXi 1200
The next step is going to be taking out the Kraken and adding a custom cooling loop though that will not happen for a little while.
-

-
-
sakthi reacted to n4v1ns in [Unofficial LTT] NZXT H440 Owners Club
Finished My build. It's got a Core i7 3770k cooled by kraken x41, asrock extreme6 mobo, 16gb ram, 2x gtx970 in sli (wanted the reference cards for the awesome glowing geforce logos hehe), 480gb sandisk ultra II, and 4 other HDD that I use for storage varying in size from 250gb to 1.5tb. I have the Nvidia glowing sli bridge but I am bummed because the spacing on my mobo does not allow me to use it!!! When i upgrade my mobo and cpu I will surely include it! Dark shot included!
-
sakthi reacted to B NEGATIVE in The correct method to leaktest and commision a loop before use.
This is a thread explaining a simple method of dry testing a loop or reassembled blocks to guarantee watertightness before filling.
The current accepted method of filling and crossing your fingers is,to my mind,unacceptable when for $20-£20 outlay you could have a professional leak tester with all the uncertainty taken out.
The parts list.
1 1/4" BSPP Equal Tee
1 Pressure gauge,1/4" BSPP thread,20PSI gauge limit is best as it will allow you to see very small pressure drops easily
1 Schrader valve,1/4" BSPP thread.
Assemble like so....
Use PTFE tape on all threads to make a good air seal.
Test the unit with a blanking plug fitted,pump it up to 20 PSI and leave it,any pressure loss means a leak,it HAS to be airtight before use.
I use a Bitspower d plug on the end as I can just screw on side on then push the unit into place rather than screwing the whole thing on.
Attach to your fillport or any port thats free.
Pump it up with a hand pump to around 10-12 PSI.
Any leaks will result in a pressure drop which the gauge will show.
To find those pesky leaks,use a qtip with dish soap or childrens bubble liquid around any suspect fittings,any leaks with blow bubbles allowing for a clean,simple fix rather than having to drain the loop and starting again.
For opened blocks,seal the other ports with blanking plugs and pump up,any pressure loss is indication of a leak.
There,a simple and nigh on fool proof leak test method.


