Search the Community
Showing results for tags 'lamp'.
Found 18 results
-
When hosting php pages it simply gives me the source text. So far I've installed apache2, php and mysql. Followed this tutorial: https://www.digitalocean.com/community/tutorials/how-to-install-linux-apache-mysql-php-lamp-stack-on-ubuntu-22-04 Oops. Someone pls move this to programming Any ideas on what I could try next?

-
 Hey guys, I had a though the other day and wondered if it’s possible to have more than one Raspberry Pi as a web server, and one or more "clones" with the exact same website as backup sites? You could have one Pi at home and another at work or at a friends house for example. So that in case of a fire or theft example and one of the Raspberry Pi’s are down, then the other Pi would automatically take over and keep the site up. Thanks for any ideas or tips:)
- 32 replies
-
- 1
-

-
- raspberry pi
- web server
- (and 4 more)
-
Amazon Alexa can plug into power outlet appliances and such, and turn them on and off. How is this done, and can I do this with my computer (perhaps through a USB port or a wireless protocol)? I have a lamp on my desk right next to my PC and it would be cool if I could keybind a function key to toggle it's luminescence. Thank you!
-
I am runinng a LAMP stack with Apache/2.4.18 (Ubuntu). I am hosting a very basic site. I don't have a .htaccsess set up and am using Vhost for everything. The site was working just fine then all of the sudden I get a 403 You don't have permission to access / on this server. I was messing around with the sites-enabled configuration files while trying to add a subdomain. (I was unsuccessful) I did not touch the Vhost for the main domain. In fact I have never touched that Vhost. Now though I get a 403 error. WHY?? Here is the config file I was talking about <VirtualHost *:80> # The ServerName directive sets the request scheme, hostname and port that # the server uses to identify itself. This is used when creating # redirection URLs. In the context of virtual hosts, the ServerName # specifies what hostname must appear in the request's Host: header to # match this virtual host. For the default virtual host (this file) this # value is not decisive as it is used as a last resort host regardless. # However, you must set it for any further virtual host explicitly. # www.christophersites.com ServerAdmin webmaster@localhost DocumentRoot /var/www/html ServerName christophersites.com # Available loglevels: trace8, ..., trace1, debug, info, notice, warn, # error, crit, alert, emerg. # It is also possible to configure the loglevel for particular # modules, e.g. #LogLevel info ssl:warn ErrorLog ${APACHE_LOG_DIR}/error.log CustomLog ${APACHE_LOG_DIR}/access.log combined # For most configuration files from conf-available/, which are # enabled or disabled at a global level, it is possible to # include a line for only one particular virtual host. For example the # following line enables the CGI configuration for this host only # after it has been globally disabled with "a2disconf". #Include conf-available/serve-cgi-bin.conf RewriteEngine on RewriteCond %{SERVER_NAME} =www.christophersites.com RewriteRule ^ https://%{SERVER_NAME}%{REQUEST_URI} [END,QSA,R=permanent] </VirtualHost>
-
I just finished my new pc build with an i7 7700k, 1080 ti, 16 ram, 8 tb hdd, 512 nvme ssd, and a few more specs on my profile. I also built my own desk with ikea alex drawers and ikea's karlby walnut countertop. I need an office lamp with lifx bulbs. Anyone know any good office lamps that I could use? I REALLY need one to finish this room make over.
-
Direct Link To Video BenQ ScreenBar Plus Product Link: https://www.benq.com/en-us/lighting/screenbar-lamp/screenbar-plus.html Price: ~$130-$150 Disclaimer: This product was sent to me by BenQ in exchange for my honest opinion in the form of the review above. Key Features: Screen mounted LED bar lamp Brightness dimmable | 2700K : 300lm ; 6500K : 320lm Color temperature adjustable | 2700~6500K High-quality control dial with an ambient light sensor. Pros: Increased desk real estate by removing lamp base Convenient location and tilt direction. Impressive mounting hardware While the control dial could be seen as a con, but, with the ambient sensor providing an important job and the alternative being a software controller, I think a high-quality control dial is preferred. Cons: Not cheap Incompatible with screen mounted webcam Unable to chain multiple lights to one control dial If your desktop is a considerable distance from your monitor this could be an issue (4+ feet) Hey everyone! My name is Kyle, and this is technically my first official tech review. This is the BenQ ScreenBar Plus e-Reading Task Lamp. What a mouthful. The screen bar is an aluminum (alloy) tube with a high-quality bi-color LED strip inside that can be controlled with the included control dial. The control dial enables adjustment of the brightness and color temperature of the lamp as well as automatically set brightness via the integrated ambient light sensor. The bar lamp attaches to your screen with an interesting weighted and spring loaded screen mount that clamps to the screen tightly. As opposed to a generic webcam which generally just uses some hinged plastic. I suspect this was done to support the more hefty lamp but it really is fairly light and with this grip it surely isn't going anywhere. An added benefit is this should accommodate most screens due to the "clamping" pressure. It even affixes to my mounted monitors, even though the arm mount is in the way. The light is focused out of the tube into an area on your desk but it's careful to ensure not to splash any light onto your screen inducing glare which is the real hidden key feature. The light can also be adjusted to light further away or closer to the screen to some degree. This is a bit of a niche product, not something you'd think to really search for on Amazon because it's a fairly unique product. I feel as though the concept of "book lights" or lights that lit your laptop keyboard were a concept some years ago that died off and as far as desk lighting has gone it has always required some kind of overhead lamp. This truly feels like the best solution to this problem. It would have been interesting to have the option to control the lamp via software to produce an f.lux like effect, color shifting over the day. The only major drawback for me is the price. At $130 it is actually fairly competitive in the market but it can seem like quite a chunk of change to many people understandably. I think what just justify the $100+ range is it's IEEE compliance ensuring there is No flicker, which could have easily killed this product for me if it wasn't perfectly flicker-free. As well as the high quality and accuracy color temperature settings. If this isn't quite in your budget but you are looking for a lighting solution I would keep an eye on this product or even recommend its older non-plus variant which lacks the control dial. With no direct comparison to really position this against it's hard to say for sure how it's priced but compared to what does exist out there I believe $130 is a fair price. Thanks everyone, please let me know what you thought of the review. I'd love to get into producing more content like this in the future and would love your feedback.
-
Hello, I have been trying to get a theme named Woffice to install and work properly on a new WordPress installation. However I have been fraught with 404 page issues. The problem is that this theme requires that you set the Permalink setting on WordPress to "Post name" or their other pages will give you 404 errors (mentioned on their documentation page here). The problem is that their theme is not the only one that is having this issue as any theme I try with the Permalink option set at "Post name" will undoubtedly have the 404 page error. The system I am running is a Ubuntu 18.04.1 LTS installation with a LAMP stack (Apache version 2.4.29 (Ubuntu) | MySQL version 5.7.25-0ubuntu0.18.04.2 | PHP version 7.2), and WordPress 5.0.3. I know that with Post name set that all the pages I try and reach from the homepage shows that the server is trying to reach a directory on the root of the webserver that does not exist. Is there a default location that I need to set for Post name to work? I unfortunately have little knowledge about the ins and outs of WordPress and any help would be greatly appreciated.
-

How to go internet with my my LAMP webserver ?
Subhasis posted a topic in Servers, NAS, and Home Lab
hello friends, I am running Ubuntu Server.On Ubuntu Server, I am running LAMP. Right now it is running on local LAN.I have my 2 domains. I want to go live on the internet with these 2 domains so that my clients can access my websites. I have an internet connection which gives 40 Mbps up and 40 Mbps down raw bandwidth. Could anybody assist me how should I configure so that my client can access my 2 domains from my server? thanks & regards, Subh -
Quick disclaimer - I'm quite new to server side web development and I've just recently started doing research so my apologies if anything I'm saying doesn't make any sense. I'm familiar with HTML, CSS, JavaScript, and Python for offline programming, but I'm finding that I'm way over my head making this confusing advance from client side to server side. So some time ago I decided I want to make a personal website with various features, like a place to host some of my coding projects , maybe a small blog or something, and a URL shortener. I've already made the decision between buying a server to run at home and purchasing from a provider, but now I'm looking at how I want to accomplish the features my website will have and how I want to build it. Specifically, I'm looking at which web server to use and which frameworks and server-side languages to use. I figured that since I already know Python, a framework like Django or Flask would be a good choice instead of having to learn PHP. But for some reason, the resources I'm finding online for Django and Flask (or really any alternative to a simple LAMP stack) are talking about dynamic web pages and REST apis and reverse proxies and all this complicated crap - do I need to learn all of these things if all I want to do is run the equivalent of a LAMP stack with Python in place of PHP? I'm completely over my head - I want to make a simple website, probably just a set of static pages with some scripts and a database to do the URL shortener thing. Is there maybe an Apache plugin for Python like there is for PHP? How do I set this up? I would ask on a site like StackOverflow for this, but I'm worried that it will get removed for being too opinion-based or for being a duplicate of an unhelpful question from 5 years ago. I find that the folks here are much less elitist when it comes to helping computer noobs. tl:dr; Looking for a way to run Python for a simple, static website without having to learn complicated web paradigms that appear to be geared towards much larger scale websites. Sorry if it didn't make any sense or the answer was obvious and I didn't do my research (didn't seem like that was the case to me).
-
I feel a bit embarrassed but somehow, no one explains how to do this: I have an old laptop that i installed ubuntu server and lamp on and i can access it on my lan (and wifi) network (with my local ip) but I can't find any explanation on how to connect to it from an external ip.
-
 Hello! I am having my own little project on my hands, I am studying IT and newly learned about how to create your own wordpress server/site. And I want to be able to access it from external networks or let other people do. How can I be able to do this, I would love some help with this project -Marcus Løkken
 -
I have a youtube channel, and I want to improve my lightning. I'm still studying with little cash, so I need a realllly cheap solution. (now I use 300w outdoor spotlights, which are so hot, I'm afraid it might start a fire xDDD). I have a Logitech c920 btw.
-
 I'm a linux noob and have bin setting up a lamp server with wordpress following the arch wiki and got this error
-
 After installing LAMP via tasksel, I'm able to access the "It works" test page at http://localhost/ however after creating phptest.php in var/www, I get a 404 when trying to access http://localhost/phptest.php. Any help would be appreciated. My www directory: bartosik@bartosik-ThinkPad-X131e:/$ cd var/www bartosik@bartosik-ThinkPad-X131e:/var/www$ ls -l total 12 drwxr-xr-x 2 root root 4096 Dec 13 20:34 html -rw-r--r-- 1 root root 22 Dec 13 20:45 phptest.php -rw-r--r-- 1 root root 22 Dec 13 20:36 phptest.php~ bartosik@bartosik-ThinkPad-X131e:/var/www$ The contents of phptest.php: <?php phpinfo(); ?>
 -
 Video Tutorial https://www.youtube.com/watch?v=dIA-jVY8mHo Text Tutorial Introduction LAMP stands for Linux, Apache, MySQL, PHP In this tutorial will teach you how to turn your fresh server install into a working website masterpiece. The steps in this tutorial require the user to be the root user on your server. Get $10 FREE Credit towards a VPS - DigitalOcean Step one - Installing Apache To install Apache, open your SSH client and enter the following commands: apt-get updateadduser USERapt-get install apache2 Step two - Installing MySQL To install MySQL, open your SSH client and enter the following commands: apt-get install mysql-server libapache2-mod-auth-mysql php5-mysql Once you have installed MySQL, we should activate it with this command: mysql_install_db Finish up by running the MySQL set up script: /usr/bin/mysql_secure_installation Enter your current root password, Then it will ask you if you want to change the root password. Go ahead and choose N and move on to the next steps. Now go ahead and say yes [Y] to all of the questions Remove anonymous users? [Y/n] yDisallow root login remotely? [Y/n] yRemove test database and access to it? [Y/n] yReload privilege tables now? [Y/n] y Step three - Installing PHP To install PHP, open your SSH client and enter the following commands: apt-get install php5 libapache2-mod-php5 php5-mcrypt After you install PHP, add index.php to the beginning of the directory index. nano /etc/apache2/mods-enabled/dir.conf It should look something like this. <IfModule mod_dir.c> DirectoryIndex index.php index.html index.cgi index.pl index.xhtml index.htm</IfModule> - PHP Modules PHP also has a variety of useful libraries and modules that you can add onto your server. apt-cache search php5- Terminal will then display the list of possible modules. Once you decide to install the module, type: apt-get install [module name] You can install multiple libraries at once by separating the name of each module with a space. Step four - Setting up Virtual Hosts In order to make Vhosts work we have to set the Apache directory. nano /etc/apache2/apache2.conf Near the bottom you will see a bunch of Directory's copy and paste this into there: <Directory /home/USER/public_html/> Options Indexes FollowSymLinks MultiViews AllowOverride All Require all granted</Directory> Now we need to make the site. nano /etc/apache2/sites-available/USER.conf Now enter the following: <VirtualHost *:80> ServerAdmin admin@[member='localhost'] ServerName name ServerAlias yourwebsite.com DocumentRoot /home/USER/public_html/ ErrorLog /home/USER/logs/error.log CustomLog /home/USER/logs/access.log combined</VirtualHost> Next we need to make the directories we are linking to. mkdir /home/USER/public_htmlmkdir /home/USER/logs After you have made the directories you can enable the sites: a2ensite USER.confservice apache2 reload Step five - Installing FTP To install FTP, open your SSH client and enter the following command: apt-get install vsftpd In order for you to be able to edit the files we need to give the user owner of it. chown USER:USER /home/USER/chown USER:USER /home/USER/*chown USER:USER /home/USER/public_html/ Configuring FTP is easy, to open the config file do: nano /etc/vsftpd.conf Change the following: anonymous_enable=NOlocal_enable=YESwrite_enable=YESlocal_umask=022ftpd_banner=Welcome to my FTP Server Restart FTP and Apache and you are good to go! service apache2 restartservice vsftpd restart Source: http://timcole.me/tutorials/how-to-install-lamp-and-ftp-on-an-ubuntu-server/
 -
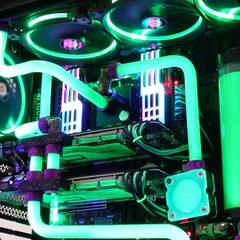
So a couple days ago I saw someone made this lamp (pic below) but he didn't say how he made it. It looks like he made it out of wood and added something behind the wood for the color. Now I want to make my own but just a little different: - I want to make it out of wood as well because I don't really see another option. - I'm planning on using a RGB lamp so I can make it any color I want it to be. - I will glue the pieces of wood together so that the wood won't split. - I'll paint the pieces of wood to match the pattern of the ore. Tips are very much appreciated. I would like some advice on what to put behind the wood (if there are no option I'll just leave the holes) maybe some kind of plastic that I can cut or something. Thanks in advance.
-
@LinusTech here are my plans for the lamp that i did while watching the WAN show. enjoy. all you need to do is get some short USB cables. UPDATE 1 Update 2 SketchUp Model
- 32 replies
-
- 8
-
-
- led
- night stand
- (and 5 more)
-
Hey there, i have already posted this on instructables.com, but i thought it would also be noteworthy to share with you. Because i always loved the Apple design and in particular their logo, i always thought of an way to express this. After i bought a new Laptop at the end of 2013, i had a spare laptop. I used the old 2009 MacBookPro as an hub for some of my bitcoinminers, until it completely broke down last year. So the time had come to build an awesome MacBook-Backpanel-Lamp. (and its RGB) After you gathered all the parts (well just the broken laptop and some tools and RGB LEDs) you can start removing unnecessary parts from the laptop back. If your laptop back is dirty as mine you can clean it with a little bit of acetone, so that it looks nice. Some of the unnecessary parts could be: sponge, some plastic parts, screws, and a lot more. So if everything unnecessary is removed, you can also clean the inside of the laptop back with acetone, incase there is any thing left. If there is a stamp with the date on it when the laptop back was assembled you can exchange the date with the date when you have built the lamp, to remember when you have built it. When every thing is cleaned you can draw guiding lines where you put the spacer blocks . Also mark the place where you have to place the power supply and the receiver for the remote control. Unfortunately, in my case i had to place the receiver visible on the upper left corner, because the signal was to weak. And do not forget to think about where you want to put the LED stripes, so that you have enough space to glue in the stripes. First you have to cut the spacer blocks. In my case, i had to cut six of them: four 10cm long ones and two other ones, for those the size doesn't matter because there only for hanging the lamp to the wall. When you have cut all the pieces you can, if you want, paint them white. Now while the paint is drying we move over to the electronics. First you glue in the power supply and decide where the LED strip will start, look at one of the pictures to know how i did it. Than you can also glue in the receiver for the remote control, but first test the signal strength of you remote so that you can decide where you have to stick the receiver. When thats done you can cut the LED stripes to length, measure out, that the strip goes all around the laptop case as shown in the picture. In my case i had to cut: two 3 section strips, two 2 section strips and five one section strips (four of these are for the apple logo). Then you can dry fit them, if the fit nicely and cover the area you want to fill with light, you can solder them together. If there is a silicone protection layer over the contact points remove it and than solder the contact points together. Always make sure you solder the correct pins together or that the solder joints do not touch each other. You can alway test the connections by plugging in the power and turning the LED stripes on. When you have soldered the contact points together make sure that no wire is sticking up, to make sure that doesn't happen glue everything in place. You can also isolate the contact points with hot glue. The more glue the better! Now we can move back to the spacers and glue them on. That done you can start soldering the remaining strips together and then glue them on to the spacer blocks as shown in a picture. Please note that you must leave a little bit of space for the cable management. One TIP: First make sure the last four strips work before sticking them on. Now the electrics are done. Remember the two spacer blocks ? Hope so, because now you have to add to them frame holders and glue the blocks on the same level on the laptop back as shown in the picture. Now you can hang it on the wall where ever you want it to hang. The last thing you want to do is, to glue some light defusing material over the logo, because it simply looks better than a normal plexi glas logo. In addition to that you can add some light reflecting material, like a CD or aluminium foil over the spacer blocks, so that the LEDs in that compartment only light up the logo. I hope you had fun building it and that it looks as cool as mine or maybe even better.