Search the Community
Showing results for tags 'case mod'.
-
~JETSTREAM~ A custom Powermac G5 case mod project. Back with another custom build case mod project (help, I can't stop! ). Shortly after finishing Project Stalker v2.0 I picked up a cheap Powermac G5 PC for $80. This is potentially going to replace the S340 of my main gaming rig - depending on how well this turns out. Have tons of ideas for this and still haven't finalized the internal layout yet (that will be revealed later on). All I can say at this point is that it will be quite different than what most people do with these G5's when they do a standard PC hardware conversions in them. The emphasis will be on air flow, low temps and low noise - all air-cooled. One thing is for sure; this is the most ambitious case mod/build I've taken on yet and it's going to take a long time to complete. There may be weeks/months between updates (though I hope not...). Jetstream (air currents in the atmosphere) is a working title for this project. Feeling pretty good about it, but other suggestions are welcome. Specs will be: *i7-4790 (can get one brand new for $300 CAD - which right now is basically = to 40% off) - Yet to be purchased. (Currently running an i5-4570) Cryorig H7 CPU cooler - Yet to be purchased. Asus Z97-E Kingston Hyper-X Black 2x4GB 1600 *Kingston Fury-X White 2x4GB 1600 - Yet to be puchased. Samsung 840 120GB SSD *2x 500GB SSD's or 1x 1TB SSD - Yet to be purchased (going all SSD's for this build as HDD's are a pain to deal with, take up too much space and are slow ). Asus Strix GTX 980 OC 4GB EVGA 850GS fully modular PSU Basically most of the parts listed are from my current main gaming rig, except for those parts not yet purchased (duh) lol. This will serve as a bit of an upgrade for this system, more or less. Thing is huge and weighs just shy of 40lbs as-is. Can't wait to grab the Dremel cutter, roll up my sleeves and get dirty again! First things first, have to gut this thing and get it all cleaned up - see what exactly I'll be working with. A few tags from those who followed the Stalker project: Next update coming soon. Thanks for looking.
-
Thermaltake Case Mod Invitational Build: http://community.thermaltake.com/index.php?/topic/43337-australia-corey-gregory/ Hello everyone and welcome to my build log. Firstly I would love to start by introducing myself. My Name is Corey Gregory and I go by the modding name 'Imfaceroll Gaming'. I am 22 years old from Australia. By day I work in the engineering fields of Surveying. My main hobby's are obviously PC Modding as well as Sports and Gaming. I like to think of myself as being an average Joe trying to achieve his goals. My PC Modding life started 18 months ago with my first pc being a desk pc. Since then I have gone on to build a number of builds for displays at events like PAX. My PC building grew into a passion and having no access to 3D printers, Lathe and CNC machines has really helped me develop skills which have all been self taught with basic hand tools. 'If you do not give it ago you will not achieve' I live by this philosophy, something may look difficult to do but I encourage people to have ago and strive to achieve. As you can see from the banner I am heading towards the SI-FI side of things and in particular Star Wars. I didn't want to revile too much to begin with so I feel a teaser banner is certainly fitting for this PC. Please feel free to have a guess =) It is a privilege to work along side these top modders and I thank Thermaltake and all Partners for making this event possible. I will be video logging Progress here: www.youtube.com/imfacerollpcgaming and posting photos on Facebook as well as this thread www.facebook.com/imfacerollgaming Specs: Asus ROG Maximus VIII Forumla Motherboard Intel Core i5 6600K Asus GeForce GTX 980 Strix x2 Samsung 950 Pro M.2 256gb Avexir Red Tesla 16gb 2666mhz Thermaltake Toughpower DPS RGB 1250w Thermaltake Liquid Cooling
-
I'm creating a new case mod with Cooler Master's Mastercase 5 / Pro Mid Tower. "Mastercase Racing" will be the catalyst for new bolt-on accessories and modifications for this case by Mnpctech. The custom paint finish will be inspired race by Steve McQueen's GULF PORSCHE 917 from his 1971 movie, "Le Mans." The MasterCase Mid Tower draws it's inspiration from Cooler Master's MasterConcept from 2016 CES. Cooler Master wants you to have absolute control over how your case looks and functions. You can adjust the exterior structure and it's look through a range of replacement panels and doors. Each choice changes the look of the exterior while giving you flexibility of the interior layout. Order a new Mastercase 5 or Pro from Newegg, HERE The legendary PORSCHE 917 is the inspiration for the custom paint on this case mod. The 917 only raced for three seasons. It placed 1st in fourteen of the twenty one races it entered 1969 through 1971. The only Gulf Porsche 917 to win the 24 Hours of Le Mans was the one driven in Steve McQueen's "Le Mans" movie. His 917 from the movie was chassis # 022 and purchased in 1970, from the Porsche by Steve McQueen's movie production company, Solar Productions. It was also the company that would bring the movie "Le Mans" to the big screen. This is the car that McQueen's character, Michael Delaney, starts the race in, and "crashes" late in the race, "writing the car off." The car that was crashed was really a Lola T-70, painted and rebodied, to look like a 917. Many innovations in cinematography, were first tried in this movie. They even went so far, as to weld brackets to the front frame work of the 917, so they could mount a camera to shoot Steve, and the other drivers, in the cockpit. I'm debating about replacing the #22 with #5 to represent the Mastercase 5. Display the hardware in your Cooler Master MasterCase Pro & 5 with the "Easy PC Mastercase Window Panel" It allows a full view inside your PC without any obstructions. "Easy PC Window Panel" is professionally laser cut from 1/8" thick 100% cast acrylic. It has embedded magnets to make installation and removal fast and easy. The window panel is the same size as the factory steel panel for the Cooler Master MasterCase Pro & 5. The Mastercase 5 chassis and exterior parts before prepping them with Red Scotchbrite for our custom paint finish. I will be utilizing House of Kolor and PPG products. Here is the hardware I'd like to use for the "Mastercase Racing" Gaming PC build, but my budget may have to be limited for another personal project. I'd love the INTEL Core i7-6700K 8M Skylake Quad-Core 4.0 GHz LGA 1151 91W processor to be our race car engine. My first choice of motherboard is GIGABYTE's GA-Z170X-SOC FORCE. It's touted as the ultimate Z170 "Super OverClock" solution from GIGABYTE. It also offers a vast array of user features that includes 22 phases of digital power, cool new OC Touch buttons, durable PCIe slots with metal trim. The SOC FORCE has a large heat sink layout with heat pipe dissipation system and water channel technology to incorporate hybrid cooling through air and liquid supply. This allows the VRMs and MOSFETs to stay cool under load when voltages are pushed high Brad is applying final coat of Gulf Racing Orange paint, this was custom mixed from specs for the 1970 Porsche 917 race car from Steve McQueen's movie, "Le Mans" We applied this paint to the EK radiator and misc Mastercase accessories I'll be utilizing "5" as race number to represent Cooler Master's Mastercase 5
- 161 replies
-
- 14
-

-

-
- mastercase window
- case mod
- (and 4 more)
-
"WD EXO" _________________________________________________________________________________________________________________________ Work Log _________________________________________________________________________________________________________________________ Hello all, This PC case is a personal project that's designed to be a replacement for my 900D, while being visually very different and designed for my components. (The back of the motherboard is another front due to a rendering flaw) The case was designed mostly around the materials I have left over from other projects, all being aluminium right angle lengths, 3mm and 5mm aluminium plate. Dimensions: 440mm x 440mm x 180mm (160mm excluding corner braces) Part List 4690K MSI B85 G43 GTX 690 (not finalized) Hyper X Fury 16GB DDR3 Corsair H100i GTX ThermalTake Riing 140 RGB Fans (Modular ~750W PSU) Intel 535 120GB SSD WD 1Tb HDD ______________________________________________________________________________________________________________________________________ Lets start... Drilling 4.2mm holes to tap M5 threads Spare 5mm plate of aluminium before clean-up Frame braces being filed to shape Measurements marked ready for drilling 4.2mm Pilot hole 6mm final hole size Happy that my measurements aligned right Orange is my favourite colour, and I got the same colour mixed up as my car. HDD Plate and frame support Frame marked for filing
-
Is is possible to have 3 led flash in a 1 then 2 then 3 pattern when you first turn the computer on. Then when its fully booted into windows they all light up? If this is possible any idea of a way to go about it? Thanks
-
This is my first case mod and it sounds a bit ambitious tbh but i feel like ill be able to do it. I am planning on hopefully starting this tomorrow but id like to hear ideas of what people think i could do as well as what i already have planned. i still haven't decided what hardware to use but it will probably be extremely low end for now because i do not have much money . im going to be doing it in white and blue using a Zalman Z3 case i used to have a rig in. i had the black one which means im going to have to paint it before i do anything. i plan on making fangrills, more for aesthetics than anything, a PSU shroud/cover and a few other little ideas. i guess before any of the parts get here tomorrow i should take a picture of the case without anything done to it, so here it is: and disassembled: i cant remove the 3.5 drive bays or 5.25 bays which might become a problem when painting but if it does ill cut them out, but i have got a use for the optical drive bay that im going to keep quiet for now. But the first thing ill do tomorrow is clean all the dust off case. please give feedback on what i should be doing, and what looks like isnt working or what is working and leave suggestions

-
Alienware has entered the case modding world big time with a case modding invite only contest featuring the Area 51 http://www.computerpoweruser.com/DigitalIssues/ComputerPowerUser/CP____1602__/files/49.html https://na.alienwarearena.com/contest/casemod-off
-
Hello.. I'm working on a case mod where there are som LED strips and som UV Led's.. Now the thing is that i want to turn them on and off by help of 2 push buttons in the front (one for LED strips and one for the UV led's). i alredy have the bottons and now the problem is the controller part. i have been searcing the internet for days whith no result and ask in a few stores here in DK but no luck. I have also been looking into using an Raspberry pi with a piface 2 but nothing to find on it... Is there any one here there have some ideas on how to make this work?
-
 Hey Guys I would like any help that i could get for upgrading my current setup to a wall mounted one. Any tips,tricks,lessons etc. Below is the Parts list. http://pcpartpicker.com/p/ZfvfXL
 -
would it be a wise idea to powder coat my powersupply casing to match the powder coated case that i have. would i break the power supply in any way or would it be ok
-

NZXT "Future Noir" Blade Runner Tribute PC by Mnpctech
Mnpctech posted a gallery image in Members Albums Category
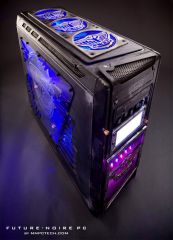
From the album: BLADE RUNNER PC by Mnpctech
"Future Noir" Blade Runner PC created for NZXT by Mnpctech -
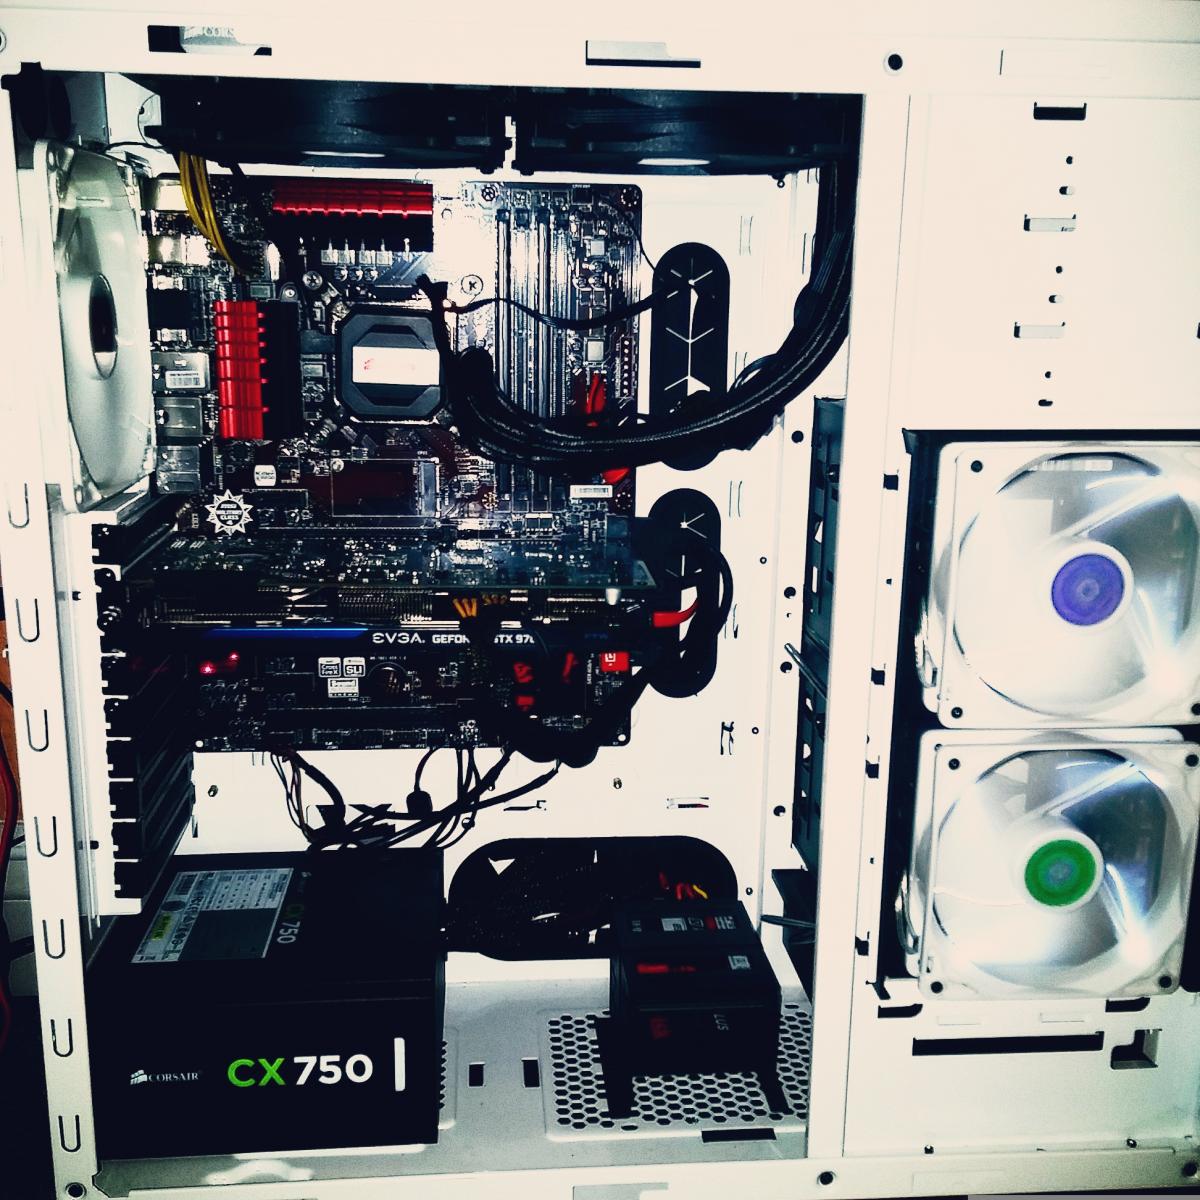
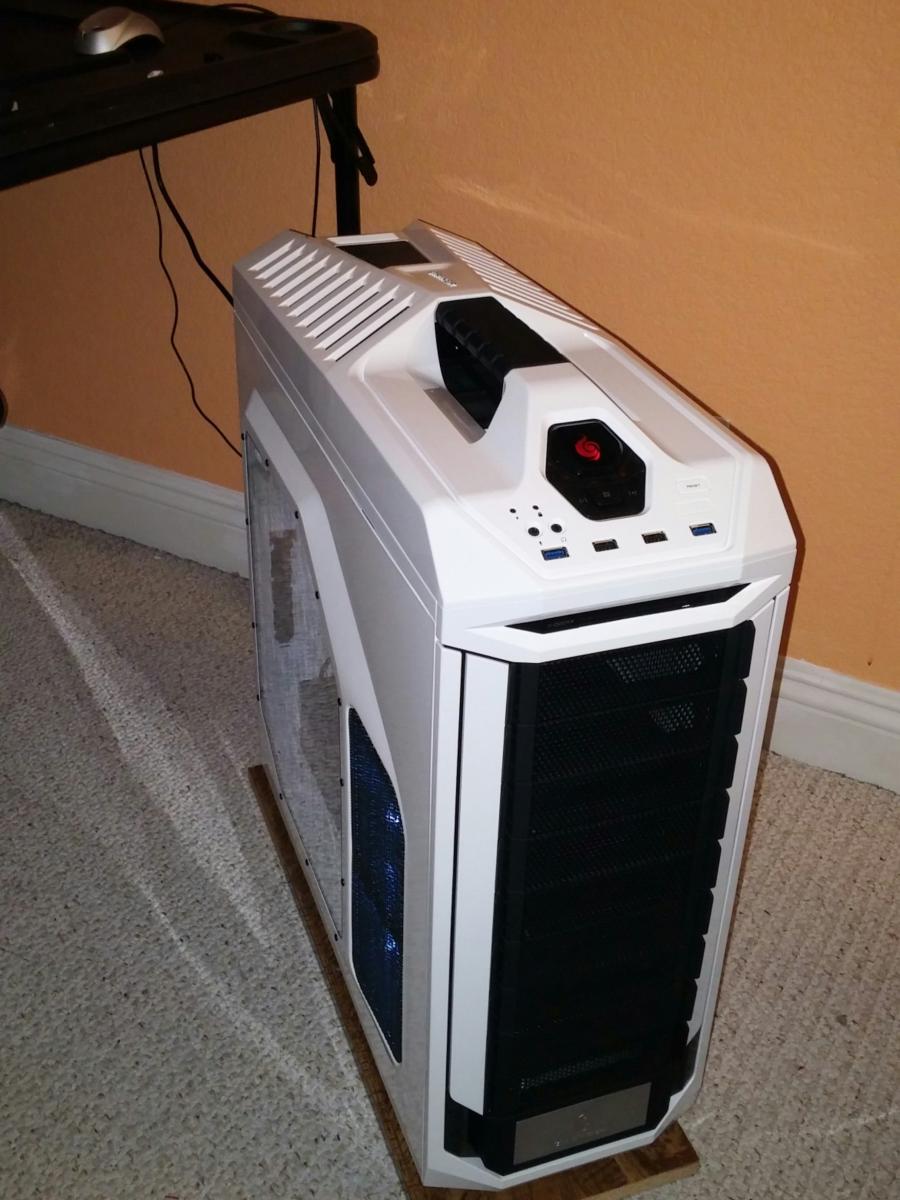
I am doing my first PC case mod and would love some help from the LTT community. I'm going to be attempting to mod my CM Storm Stryker (white) into a Star Wars themed case. I'm looking for suggestions and assistance planing my case. I am looking to build a custom water loop (hard line or soft, haven't decided yet), paint the case (spray painting a Stormtrooper helmet most likely), put in some LEDs, replace the fans, and my current PSU. I will paint anything in or outside; however, I would like to maintain the functionality of the case, so no cutting the case itself. I am open to any and all suggestion, nothing that falls within the theme and color scheme of "The Empire". I'm new to forum format (forumat?) so I messed up and accidentally made a blog, so i'm just going to turn that into a progress blog. Here is my set up.
-
I've been in the market for an affordable laser cutter for a while now. Especially after the last MOD24 event. The options available up to this point have been pretty lacklustre, and also somewhat unsafe and not user friendly... or extremely expensive. There is a new product (that I've just ordered) called Glowforge... it looks to be everything I've been looking for. This would be great for etching onto cases (anodised aluminium) as well as doing custom acrylic work, like making your own case windows, with your logo/artwork etched into them, with some wicked LED backlighting... Has anyone had any experience with other Laser etchers? (Including the uber expensive Epilog range) I was considered getting a cheap chinese option, but, with the pre-order sale going on at GlowForge (50% off for another 24 days), this was a no brainer for me as its about the same price as an unsupported, poor software compatible Chinese equivalent... Also, shameless plug, if you use this code: [removed] you can get $100 off the price (and so will I lol) First thing I'm gonna do is a "Vote 4 Turnip" acrylic window!
- 12 replies
-
- 2
-
-
- laser cutter
- case mod
- (and 4 more)
-
 Hey guys so I am relatively new to the forums. Been lurking around for the last few weeks checking out build logs n such. Little background on me, I have been building computers since I was roughly 7 y/o. I love building. For some people it is modding their car and adding turbos and body kits, etc, and for me its building my own PC. I have not ever taken the time to really make my PC a true masterpiece. In my last build I didn't even have time to properly cable manage it because I was in dire need of a computer. (Pictures not provided out of embarrassment). I have been watching PC modding for quite some time, but never had the money or time to do it. Fast forward to now, I am planning a new build that is yet to be named. It is going to be an X99 build. I am currently taking my CAD's that I put together (with no experience so they are decent I would say) with all the details to some companies to see if I can grab some sponsors before getting started. My current color scheme ideas are between White Red and Grey, or Green Yellow and White. I would love to get some votes on it. I can't say exactly when this build is going to start as I am still rounding out my fund building for it. I understand this is early in the process but hey that's what this section is for! I really hope that you guys will enjoy the ride with me as it narrows down and the build begins. My budget as of this moment is rougly $1600. This build will be used for Graphic/Web Design, Computer Mod Portfolio (heh), and gaming time to time (CS:GO, LoL, Hearthstone) Have 1 monitor as of now, but with the right price I will add some budget to grab a second one. It is running a simple 1920x1080. No need for peripherals and I am upgrading because I am tired of being on a laptop at home and my old PC as great as it is, is being sold to my brother-in-law because I want something new. "Hit the like button if you liked it, dislike button if you didn't, leave a comment if your feelings are more complicated, don't forget to subscribe and I'll see you at my next update!" I know it's probably been done plenty of times, but its my first real post guys cut me some slack.
 -
HEY GUYS! This is Austin! Pixel Perfect Here. First post here on the LTT forum, if I remember correctly. (I had to make an account...so unless I logged in with Twitter before, then I've never logged in) I'm looking at doing a case mod. A very severe one. BUT FIRST, SOME BACKGROUND! I've been swooning over the design of Apple products since I was about 5. I got an iPod Nano when they first (-sih) came out. I'm now 17 and starting my last year in high school (as well as starting dual enrollment). While I love the look of Macbook Pro's and the modern iMacs, they really don't impress me. (Okay...maybe the Macbook makes me a little envious, but I'd rather have a Blade 14 2015 or something, although not being able to write software for iOS on my current laptop is annoying. No I can't hackintosh it) There is ONE Apple device that I'm truly envious over. And I finally own one. There's a problem with it, though: It can't play GTA V. Yes, I'm aware it's a Mac, but that's not really the issue, now is it. No, but really, it's an iMac g4. It's from 2003. I finally have one (although it's not the size I wanted. Then again, 17" is decent, but 20" is still better.). Mind, this isn't my main machine. My main machine is an MSI cx61 2pc-499us (i5-4210M, 8GB RAM, Nvidia GT 820M 2GB) and I sometimes have access to my parent's PC (Custom i7-4790k + 16GB of RAM, No GPU) but that access gets lower and lower as I do more and more with college. Editing in After Effects isn't fun on either. Now, the idea! I want to gut it. I want to take every single little thing out of this shell and make it modern and open. I want to take a Mini-ITX board, SFX PSU and a small GPU with a riser card, and I want to attempt to make this a workstation. Cooling will probably be an issue. The design currently relies on negative pressure, as far as I can tell. It has a fan pushing out at the top and passively pulls in air at the bottom. High pressure fans WILL and water cooling WILL MAYBE be necessary. Also, replacing the display with a laptop display would be a nice touch. Although running wires through the neck is the biggest pain in the rear. My thoughts on hardware: It depends. I'm looking at the most modern hardware and how long it would take to save up for it all. My low end thoughts have something to do with an i5-5690k and a z97 itx board paired with an itx form 960/970. If I'm going balls to the wall, i'm looking at something like the 5960X and a R9 Nano or Fury X (Although I really like CUDA) Definitely going with 2.5" SSDs though for storage. There won't be enough room for 3.5" drives and cooling, and I want the drive position to be flexible. Even if it means I have to pay $350 for 1 single terabyte. I would really love your thoughts on hardware and cooling. Now, for the part that I don't really want to write, but want the feedback on. If this project was being crowd funded, would it be something you would contribute to? Not only would it be for the PC, but you would be funding the time for making a video series on the thing. I've already got the audio gear for the thing, and I could probably dig up better cameras than my cellphone. Even my work can't fix cell phone footage. (I might even make a stretch goal for renting/buying a decent camera as well) I don't want to make a crowd funding campaign if I would get an outstanding amount of backlash. I want to make it if you all want to see something like this sooner. TL;DR I want to cut open an iMac, and this isn't the first time.
-
So I've been wanting to purchase the NZXT Noctis 450 since it's launch, but the main reason I haven't jumped in yet is because of the LED Color. With my setup I'd like to go for a White/Red setup but the White version of the Noctis (The one I want) only comes with blue LED's. The black version wouldn't match my setup as well as I'd like it to even with the red LED's. So my question is, how would I go about replacing the blue LED's on the white version? Any information pointing me in the right direction is appreciated. Thanks in advanced
-
Hello, I wanted to show my case mod its not a big mod but i am pretty proud of it(not done yet i will show more picture soon) the first picture was before and one thing that suck in that case there's no cable management
-
 Original Article from goldfries.com : http://www.goldfries.com/hardware-reviews/cooler-master-mastercase-5-pro-5-modular-desktop-casing-review/ ----------------------------------- The MasterCase 5 and MasterCase Pro 5, the world’s first mid-sized modular towers with exterior expandability were first announced during Computex 2015 and the design drew quite some excitement. If you're a subscriber to my Youtube Channel, you probably have seen my coverage of the MasterCase 5 booth at Computex 2015. Here's the video if you haven't watch it. Cooler Master treated us attendees with a special session, to let us understand better the concept behind MasterCase 5. To put it simple, Cooler Master is going back to its roots and with that comes the tagline "Make It Yours". More details at the http://www.coolermaster.com/computex/mastercase/ So what's the MasterCase 5 like? Here's a walk-through, courtesy of Cooler Master. To sum it up, the Pro 5 variant gives you additional drive bays, fan, and a radiator bracket at the top. With the introduction done, let's have a look at the product. Starting from the top, the MasterCase 5 comes with a distinct angled front panel. The MasterCase 5's top comes with 2 handles and between the handle likes a removable panel that you are able to mount 120mm and 140mm fans. If someday you wish to upgrade to a closed-loop water cooling system then there's the Top Cover kit that comes with a mesh panel and a radiator bracket. Feel free to use one without the other, they're not dependent on one another. For those opting for The MasterCase Pro 5, the Top-cover kit is part of the package. The front cover is removable and you're able to add additional fans, up to a total of 3 fans as an additional fan bracket is provided in the accessory kit, that fan bracket is to be used on the 5.25" drive bays at the top. From the rear the Master Case 5 is no different from other casings, one thing to note is that it does not come with any cut-out for water cooling tubes. The fan mount with adjustable positioning supports both 120mm and 140mm fan. At the bottom is the PSU mount that comes with a mounting bracket. I encountered a slight hiccup when I mounted the PSU on the bracket and attempted to secure it to the case. After meddling with the installation for a few minutes, I finally figured out the problem was that the padding to support the PSU was very thick, thus leading to the imbalance that makes it near impossible to secure the screw. I figured out a workaround and that is to place the PSU into the casing WITHOUT mounting it on the plate. After that I secured the plate to chassis and finally, secure the PSU to the plate. As you can see, that quite defeats the purpose of the mounting plate. One thing I hope Cooler Master improves on is the nature of the mounting plate - the screws are so short it could barely secure the plate properly. Should the ridges of the screw be damaged, there's no way for the plate to be secure. At the bottom the MasterCase 5 comes with 4 reasonably long rubber feet for secure footing. Now for the interior - the MasterCase 5 is spacious, the interior is split into 2 areas and that's one for the key components while the lower section is for the PSU, cable management and additional drive bays. Rubber grommets are found on every cutout. Here's the upper corner, it comes with a 140mm fan pre-installed and the cut-out is huge. There's also sufficient room between the board and the top of the casing and that helps a lot when it comes to cable management. Towards the front of the interior are the drive cages, they are removable. Drive bays are also available at panel just above the PSU. At the back there's ample space for hiding cables. The cables from the front panel are neatly tied to the casing structure as seen in this photo. Here's what the interior looks like with a full-sized ATX board and the PSU in place. A view from the back for those interested, notice how the large cutout underneath the motherboard works great for practically any CPU socket location. We're coming to the end of the article and I think some of you might be concerned by the lack of window for the side-panel - Don't worry, the windowed side panel is available as an accessory. For those opting for The MasterCase Pro 5, the windowed side-panel is part of the package. What this means is that you modify the side panel and other components as much as you want - tired of the theme? Get a new side-panel and make it something else. The frame of the MasterCase 5 is such that it has minimal holes around, I've no avenue to place LED strips on the top and front panel area unless I punch some holes. User Experience The USER EXPERIENCE segment is often not part of my casing reviews but I feel like I can't end this casing review without it. You see, Cooler Master's theme for the Master Case 5 is "Make It Yours" and they promoted MODULAR SYSTEM and it would be a shame if I didn't experience that myself, after all I grew up with Cooler Master and have been a Cooler Master user for almost 20 years now and seeing how they mentioned "Going back to their roots" - well, I'd like to experience what I experienced back then. I still have my Centurion 2 casing, back then I didn't have much skills nor resource to modify it but I still spent a fair bit to hire a friend to cut that casing to it could have a fan on top and a side panel with 2x 120mm fans. Moving forward to 2015 - I decided to MAKE IT MINE with the Master Case components Cooler Master sent to me and here's the final outcome. It was a rewarding experience, I'm not an expert case modder myself but I am very happy with the results. The modular system of MasterCase 5 made it a lot easier for me to get the paint job done. The content is spacious that I've enough room to place lights and have custom made the GPU cover and also a base-plate for the system. Notice that the side panel is huge but bottom area of the side panel window is covered so you need not show the ugly side of the system. System Specs Processor : AMD FX-9590 Motherboard : ASRock Fatal1ty 990FX Killer RAM : AVEXIR Core Series DDR3 2x4GB RED Graphic Card : PowerColor R9 390 8GB PSU : Cooler Master V750 Cooler : Cooler Master Nepton 240M running 2x JetFlo 120mm White LED fan. SSD : Intel SSD 330 180GB Extender Cables : UnequalTech The Verdict Cooler Master MasterCase 5 retails at RM 479 (approx 120 USD) while the MasterCase Pro 5 at RM 599 (approx 150 USD). Both casings are great but I think the MasterCase Pro 5 would be a more attractive option if you intend to perform some case mod on it. Regardless which model you choose, they're both great for modding. I made the MasterCase Pro 5 mine, you should consider making one yours too! Short of funds? You could always settle for the MasterCase 5 first and upgrade with the available accessories much later. Side Window Kit : $24.99 Top Cover Kit : $16.99 3.5” HDD Bracket 3-Bay : $14.99 3.5” HDD Bracket 2-Bay : $12.99 2.5” SSD Bracket : $4.99 *Above price is in USD.
- 1 reply
-
- 3
-
-
- cooler master
- mastercase 5
- (and 8 more)
-
Corsair C70 Vengeance Gaming PC Case Mod Planetside 2 New Conglomerate
Mnpctech posted a gallery image in Members Albums Category
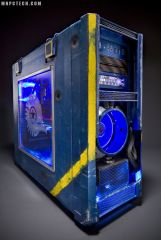
From the album: Corsair c70 Planetside 2 Case Mod
My PS2 NC Corsair C70 case mod I created for Matt Higby at Sony. You can see some of my other PC creations, HERE -
Is it worth it to buy a second hand NZXT Source 210 Case (modded)? or should I just buy another case? Original Price: $32 His price (for the modded): $55 (The ff pic is his, not mine)
-
Hello, and thanks for reading this already! I'm looking into some good Micro-ATX cases. I prefer Micro-ATX as a motherboard size because it still has 4 RAM slots, 2 PCI-E x16's, but is still portable. Now, I want to make a Micro-ATX case extra portable. I'm looking into the AIR 240, Fractal Design Node 804 and the Phanteks Enthoo Evolv. Is there a relative safe way to add a carrying handle too them? And what materials should I use? Yes, I am insane. Thanks in advance!
-
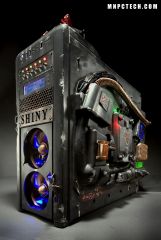
From the album: FIREFLY
My PC tribute for Firefly. My other Custom PC creations -
From the album: FIREFLY
My PC tribute for Firefly. My other Custom PC creations -

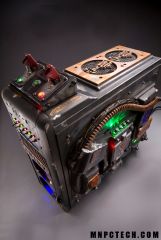
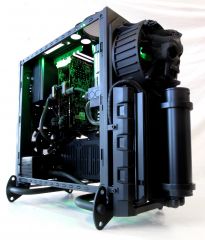
From the album: BIOMECHANICAL
HR GIGER Tribute PC build details, HERE -
From the album: BIOMECHANICAL
HR GIGER Tribute PC build details, HERE