


Zeuligan
-
Posts
148 -
Joined
-
Last visited
Reputation Activity
-

 Zeuligan got a reaction from KrZaj in [Sponsored] project Redrock - AMD Threadripper 1900x ASROCK Taichi X399 full EKWB Custom loop | by Zeuligan
It's always nice, but time consuming, when you reach the painting stage in a project. I thought about vinyl, but wanted to paint, to check that off my list of things to test and learn. It's also with the paint the accents and the project name will start to come together.
One last test fitting of the base part of the PSU shroud, here in base primer, before painting. The edge of the PSU Shroud floor and the PSU Shroud front edge is just due to not properly fastened.
Made a temporary spray tent in the basement storage and went to work. Two coatings of black and 3 coatings of red.
It's not hard to undertand why so many builds are done in red and black. It is two beautiful colors.
Very happy with the finish as it's just basic spray cans. The be quiet! Dark Base Pro 900 really looks great in red and black.
Front panel with door.
Can't leave the bottom unpainted can I
-
 Zeuligan reacted to Voxels-Box in [Sponsored] project Redrock - AMD Threadripper 1900x ASROCK Taichi X399 full EKWB Custom loop | by Zeuligan
Your paint job looks fantastic! Did you use any top coats or varnish?
-
 Zeuligan got a reaction from Voxels-Box in [Sponsored] project Redrock - AMD Threadripper 1900x ASROCK Taichi X399 full EKWB Custom loop | by Zeuligan
It's always nice, but time consuming, when you reach the painting stage in a project. I thought about vinyl, but wanted to paint, to check that off my list of things to test and learn. It's also with the paint the accents and the project name will start to come together.
One last test fitting of the base part of the PSU shroud, here in base primer, before painting. The edge of the PSU Shroud floor and the PSU Shroud front edge is just due to not properly fastened.
Made a temporary spray tent in the basement storage and went to work. Two coatings of black and 3 coatings of red.
It's not hard to undertand why so many builds are done in red and black. It is two beautiful colors.
Very happy with the finish as it's just basic spray cans. The be quiet! Dark Base Pro 900 really looks great in red and black.
Front panel with door.
Can't leave the bottom unpainted can I
-
Zeuligan reacted to Voxels-Box in [Sponsored] Angl3d Ti - Dual Custom Loop EKWB | ASUS ROG | be quiet! Dark Base Pro 900 | by Zeuligan
Happy to help!
-
Zeuligan got a reaction from Voxels-Box in [Sponsored] Angl3d Ti - Dual Custom Loop EKWB | ASUS ROG | be quiet! Dark Base Pro 900 | by Zeuligan
Ah, yeah, will def need to sort that. Thx m8
-
Zeuligan reacted to Voxels-Box in [Sponsored] Angl3d Ti - Dual Custom Loop EKWB | ASUS ROG | be quiet! Dark Base Pro 900 | by Zeuligan
Sorry, I shouldve attached an image. This is the area I was referring to. Im sure that could close up with the paint!
-
Zeuligan reacted to Voxels-Box in [Sponsored] Angl3d Ti - Dual Custom Loop EKWB | ASUS ROG | be quiet! Dark Base Pro 900 | by Zeuligan
Its definitely hard to spot the edges. If Im being super nit picky, there appears to be a thin sliver of a gap between the two pieces, at the back left (camera view) of the aluminum mount for the pumps. But that is a very minor thing, and wouldnt detract from the shroud overall!
-
Zeuligan reacted to Voxels-Box in [Sponsored] Angl3d Ti - Dual Custom Loop EKWB | ASUS ROG | be quiet! Dark Base Pro 900 | by Zeuligan
That's some serious dedication right there! The shroud looks incredible as is, I cant wait to see it painted!
-
Zeuligan reacted to stealth80 in [Sponsored] project Redrock - AMD Threadripper 1900x ASROCK Taichi X399 full EKWB Custom loop | by Zeuligan
Seen this done before with the sprockets, looked great then now reason why it wont now!
-
Zeuligan got a reaction from Voxels-Box in [Sponsored] project Redrock - AMD Threadripper 1900x ASROCK Taichi X399 full EKWB Custom loop | by Zeuligan
I'm exploring the possibility to integrate a hidden RGB LED strip behind a front case cover. Complete with accent sprockets to go with the ASROCK Taichi X399 motherboard.
Started with creating a 40mm wide (half of the Red backside bracket) angled piece in 3 mm acrylic.
I plan to use the existing mounting holes of the be quiet! Dark Base Pro 900. Drilled 2 holes with the Dremel drill press in the right location.
Tapped the holes...
Added a third hole for the tempered glass mounting screw and fastened the bracket to the case. Really snug fit and feels sturdy.
Created a quick template in Illustrator, printed and fastened with masking tape.
The Dremel Moto-Saw did the job. One large sprocket to be divided into angled pieces.
Had to create one more large sprocket to have enough pieces for my mod. Due to the rivets in the corners of the case, I had to add a small indent to the large main piece.
Something like this is the plan. Testing mounting positions and the overall look. Would be very interesting to hear what you all think about this solution. Got any suggestion?
The plan is to paint all the pieces black (or dark grey) as the Shroud and paint the edges the same red as the accents. Addressable RGB Led strip goes behind the large piece between the front angle and the radiator.
Got an opinion? Please share...
-
 Zeuligan got a reaction from LaserLion in [Sponsored] Angl3d Ti - Dual Custom Loop EKWB | ASUS ROG | be quiet! Dark Base Pro 900 | by Zeuligan
After over 100 hours of hand filing and acrylic focus the base shape of the PSU Shroud for project Angl3d Ti is finished. Managed to create it divided into two pieces without a visible edge.
One of the last pieces of the PSU Shroud mod. All 3 sides angled in opposite directions and created with a hand file. I just love working with acrylic. Such a beautiful and exciting material.
This is how I decided to solve the problem with the edge between the two pieces. A small counter-edge to force the upper piece to snap in place into the lower. Main challenge with this solution was to create a perfect fit, but turned out to work like a charm.
This is how it turned out. I'm as happy as my fingers hurt The white edges is where I filed and combined the pieces together. As I also plan to paint them glossy black, I didn't bother to keep the acrylic spotless. On the contrary. I added lot's of Acrifix 116 in on the backside on all joints and edges to make it as sturdy as possible.
Both pieces mounted in the case. The shape is so snug it just snaps in place without any mounting screws needed...
I plan to add a screw in the flat square piece in the upper left, fixating the shroud in the PSU mounting bracket.
The different angles of the triangles reflects light. Will work even better in glossy black.
A full time lapse of the PSU Shroud creation will be added once it's edited. I got 228gb of footage so almost have equal amount of work editing that as creating the shroud hehehehe...
Next step of the shroud is to sand down all angles individually and ensure that edge edge is super sharp and perfect. Expect that to take 10-20 hours. After that, it's ready for 2 coats of base primer before 3 coats of glossy black and 2 coats of clear varnish.
-
Zeuligan got a reaction from KrZaj in [Sponsored] project Redrock - AMD Threadripper 1900x ASROCK Taichi X399 full EKWB Custom loop | by Zeuligan
I'm exploring the possibility to integrate a hidden RGB LED strip behind a front case cover. Complete with accent sprockets to go with the ASROCK Taichi X399 motherboard.
Started with creating a 40mm wide (half of the Red backside bracket) angled piece in 3 mm acrylic.
I plan to use the existing mounting holes of the be quiet! Dark Base Pro 900. Drilled 2 holes with the Dremel drill press in the right location.
Tapped the holes...
Added a third hole for the tempered glass mounting screw and fastened the bracket to the case. Really snug fit and feels sturdy.
Created a quick template in Illustrator, printed and fastened with masking tape.
The Dremel Moto-Saw did the job. One large sprocket to be divided into angled pieces.
Had to create one more large sprocket to have enough pieces for my mod. Due to the rivets in the corners of the case, I had to add a small indent to the large main piece.
Something like this is the plan. Testing mounting positions and the overall look. Would be very interesting to hear what you all think about this solution. Got any suggestion?
The plan is to paint all the pieces black (or dark grey) as the Shroud and paint the edges the same red as the accents. Addressable RGB Led strip goes behind the large piece between the front angle and the radiator.
Got an opinion? Please share...
-
Zeuligan got a reaction from KrZaj in [Sponsored] project Redrock - AMD Threadripper 1900x ASROCK Taichi X399 full EKWB Custom loop | by Zeuligan
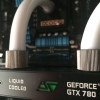
The main part of project Redrock is the custom PSU Shroud with an integrated L shaped beam in red color. Same red color as the exterior. It will be challenging to create a perfect fit of the 3 individual pieces as they are hand crafted.
I had to redo the entire floor of the PSU Shroud. Decided to do it in 5mm acrylic instead of previous 3mm. Sturdier and easier to keep snug with the front curved part.
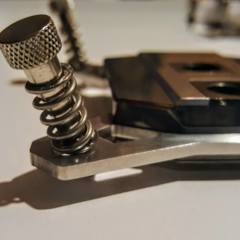
I had to create a custom pump bracket to be mounted under lower floor of the custom PSU Shroud.
All 3 individual pieces cut. It took almost 4 hours, as I didn't want to risk to cut the parts to small. So filed each part by hand gradually smaller and smaller until I had the perfect fit.
Used EKWBs pump template on top of a stand of plate to ensure proper location of the holes in the lower floor.
Made myself a spacer plate to go beneath the L-shape to make it "float" at the same time I will act as a sturdier mounting plate for the EKWB D5 Plexi pump.
The lower part of the L-plate with matching holes for the pump.
All parts created for the lower PSU floor and mounting bracket, L beam, custom pump bracket and standof plate. Hope they will fit
Used some Acrifix 116 to mount some thing acrylic parts 3mm inside the edge of the main floor of the PSU. This is to ensure that the floor aligns with the front part of the PSU Shroud.
It was worth all those hours filing and sanding. The fit is really good.
I'm really happy with that result. Looks even better than I imagined when I created the concept sketch in Fusion 360 a few weeks ago. Will be so exciting to put this together.
The round EKWB D5 Plexi top goes really well with the rounded corners of the PSU Shroud. I'm glad I made the decision to create the more complex shape rather than just a square box.
Cut the longer vertical part of the L shaped beam that will be part of the red accent. Made measurements for the EKWB Reservoir brackets and drilled 3 holes dead center.
Brackets mounted, on to next step.
Think the width harmonize really good with the size of the reservoir.
Two really sexy products in an even more prominent position mounted on the L bracket. Hopefully it will look amazing once painted Red.
The entire bracket is mounted 18mm away from the wall. That way I can fit custom addressable LED-strips behind if I want.
Not a bad result for a full days modding. I like the acrylic look, but feel comfortable that once I paint the parts black, grey and red it will looks even better.
-
 Zeuligan got a reaction from Anthony_95 in [Sponsored] Angl3d Ti - Dual Custom Loop EKWB | ASUS ROG | be quiet! Dark Base Pro 900 | by Zeuligan
After over 100 hours of hand filing and acrylic focus the base shape of the PSU Shroud for project Angl3d Ti is finished. Managed to create it divided into two pieces without a visible edge.
One of the last pieces of the PSU Shroud mod. All 3 sides angled in opposite directions and created with a hand file. I just love working with acrylic. Such a beautiful and exciting material.
This is how I decided to solve the problem with the edge between the two pieces. A small counter-edge to force the upper piece to snap in place into the lower. Main challenge with this solution was to create a perfect fit, but turned out to work like a charm.
This is how it turned out. I'm as happy as my fingers hurt The white edges is where I filed and combined the pieces together. As I also plan to paint them glossy black, I didn't bother to keep the acrylic spotless. On the contrary. I added lot's of Acrifix 116 in on the backside on all joints and edges to make it as sturdy as possible.
Both pieces mounted in the case. The shape is so snug it just snaps in place without any mounting screws needed...
I plan to add a screw in the flat square piece in the upper left, fixating the shroud in the PSU mounting bracket.
The different angles of the triangles reflects light. Will work even better in glossy black.
A full time lapse of the PSU Shroud creation will be added once it's edited. I got 228gb of footage so almost have equal amount of work editing that as creating the shroud hehehehe...
Next step of the shroud is to sand down all angles individually and ensure that edge edge is super sharp and perfect. Expect that to take 10-20 hours. After that, it's ready for 2 coats of base primer before 3 coats of glossy black and 2 coats of clear varnish.
-
Zeuligan reacted to Rosinbole in [Sponsored] Angl3d Ti - Dual Custom Loop EKWB | ASUS ROG | be quiet! Dark Base Pro 900 | by Zeuligan
Man... Painting them must be nerve wrecking! Good luck with the rest of the project! Looking forwsrd to that video
-
Zeuligan got a reaction from KrZaj in [Sponsored] Angl3d Ti - Dual Custom Loop EKWB | ASUS ROG | be quiet! Dark Base Pro 900 | by Zeuligan
After over 100 hours of hand filing and acrylic focus the base shape of the PSU Shroud for project Angl3d Ti is finished. Managed to create it divided into two pieces without a visible edge.
One of the last pieces of the PSU Shroud mod. All 3 sides angled in opposite directions and created with a hand file. I just love working with acrylic. Such a beautiful and exciting material.
This is how I decided to solve the problem with the edge between the two pieces. A small counter-edge to force the upper piece to snap in place into the lower. Main challenge with this solution was to create a perfect fit, but turned out to work like a charm.
This is how it turned out. I'm as happy as my fingers hurt The white edges is where I filed and combined the pieces together. As I also plan to paint them glossy black, I didn't bother to keep the acrylic spotless. On the contrary. I added lot's of Acrifix 116 in on the backside on all joints and edges to make it as sturdy as possible.
Both pieces mounted in the case. The shape is so snug it just snaps in place without any mounting screws needed...
I plan to add a screw in the flat square piece in the upper left, fixating the shroud in the PSU mounting bracket.
The different angles of the triangles reflects light. Will work even better in glossy black.
A full time lapse of the PSU Shroud creation will be added once it's edited. I got 228gb of footage so almost have equal amount of work editing that as creating the shroud hehehehe...
Next step of the shroud is to sand down all angles individually and ensure that edge edge is super sharp and perfect. Expect that to take 10-20 hours. After that, it's ready for 2 coats of base primer before 3 coats of glossy black and 2 coats of clear varnish.
-
 Zeuligan got a reaction from Rosinbole in [Sponsored] project Redrock - AMD Threadripper 1900x ASROCK Taichi X399 full EKWB Custom loop | by Zeuligan
I'm exploring the possibility to integrate a hidden RGB LED strip behind a front case cover. Complete with accent sprockets to go with the ASROCK Taichi X399 motherboard.
Started with creating a 40mm wide (half of the Red backside bracket) angled piece in 3 mm acrylic.
I plan to use the existing mounting holes of the be quiet! Dark Base Pro 900. Drilled 2 holes with the Dremel drill press in the right location.
Tapped the holes...
Added a third hole for the tempered glass mounting screw and fastened the bracket to the case. Really snug fit and feels sturdy.
Created a quick template in Illustrator, printed and fastened with masking tape.
The Dremel Moto-Saw did the job. One large sprocket to be divided into angled pieces.
Had to create one more large sprocket to have enough pieces for my mod. Due to the rivets in the corners of the case, I had to add a small indent to the large main piece.
Something like this is the plan. Testing mounting positions and the overall look. Would be very interesting to hear what you all think about this solution. Got any suggestion?
The plan is to paint all the pieces black (or dark grey) as the Shroud and paint the edges the same red as the accents. Addressable RGB Led strip goes behind the large piece between the front angle and the radiator.
Got an opinion? Please share...
-
Zeuligan reacted to Voxels-Box in Project Apocrypha Rebuild log
13 terabytes of HDD and a 500gb SSD for my working files
It’s a Phobya 4 way PWM splitter, I got mine from ModMyMods
-
Zeuligan reacted to Voxels-Box in Project Apocrypha Rebuild log
The top 360mm radiator is prepared with proper cable tie downs and I’ve test fitted where the AQC splitty9 will go. It’ll need to be on the PSU side of the case.
I also tested the 7 drive Sata power cable that I built for V1 but never used. Each connector delivered power to a test LED fan, so I’m hoping it’ll work with the six drives. I still need to shorten and sleeve the two fans on the cage.
Next up up is more acrylic work. I’ll have to wait for Tuesday or Wednesday to be able to paint, due to the cold and rain.
-
 Zeuligan got a reaction from Damascus in Project Apocrypha Rebuild log
That color is amazing. Love the build and it’s a sure follow. Can’t wait to see next update
-
Zeuligan got a reaction from Voxels-Box in Project Apocrypha Rebuild log
That color is amazing. Love the build and it’s a sure follow. Can’t wait to see next update
-
Zeuligan reacted to Voxels-Box in Project Apocrypha Rebuild log
Small update: I took apart the PC-O9 to prep the right side for paint. I’m in talks with a local artist to get a nice automotive paint on it. Thinking I might do a deep purple.
it’s so strange seeing just the right side of the case on its own.
I also prepped the top 360 rad for painting to repair some scuffs and scrapes on the original paint from EK. I like the bare aluminum, but I think I’ll paint it in silver and give it a clear coat.
Thoughts on these paint plans?
-
Zeuligan reacted to Voxels-Box in Project Apocrypha Rebuild log
The right side of the case is now painted! Way quicker than expected too! Im very happy with the job that Daneen at http://www.customairbrush.com/ did.
Ill be reassembling the case tonight. More photos to come.
-
Zeuligan reacted to Voxels-Box in Project Apocrypha Rebuild log
The case is put back together! The inline filter, power button, and USB Type C mods are all reinstalled, and everything is working as intended. Great news!
-
 Zeuligan got a reaction from stealth80 in [Sponsored] project Redrock - AMD Threadripper 1900x ASROCK Taichi X399 full EKWB Custom loop | by Zeuligan
I always wanted to do a build with a LCD, like your idea, but might save it for a future mod
Thx for stopping by and for your kind words. Hope I can keep you interested. I'm actually on a deadline, so expect a lot of updates the next 2 weeks so check back often


