
Windows 8.1 Boot Blinking

Very nice system by the way!
UEFI is a new system that replaces the good old BIOS. BIOS/UEFI is a type of firmware which manages the startup of the system and configuration.
BIOS is extremely old and dated. UEFI is way smarter and faster.
UEFI give you a nice interface for configuration your system passing from this:
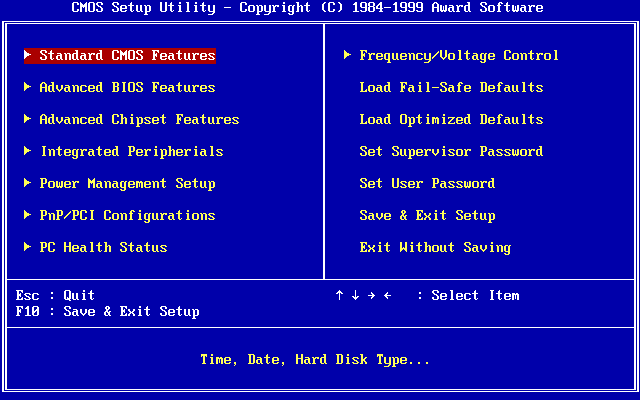
To this (in your case. If you click on "HD" option at the top right corner of your screen):

It has more features, more powerful as well.
In addition, it is smarter.
The way the BIOS works is that it scans and detected each hardware you have, one-by-one, once it does this and configures everything, it search the the OS boot process, and execute it, which starts your Operating System. In your case Windows 8. Then Windows starts and needs to re-detect everything from your system, to know which drivers to load, and all that good stuff.
UEFI works a bit differently. It goes "Ok guys, give me your specs" to everyone. No scanning needed per se. And it gets all that together and configures, knows where the boot process is, start the OS, and THEN send all the system specs it collected to the OS, Windows 8 in your case. The end result is that your system boots in no time. Your system can boot from the power button "click" sound when you press it, to your desktop in 6 sec from a system shutdown with Windows 8 (might be a bit longer due to the HDD).
To do this, you would need to re-install Windows sadly. Backup your stuff, if an before starting.
This is what you need to do:
-> Make sure you have the latest non-Beta UEFI/BIOS (remember that many people still calls it BIOS. So assume the same thing).
You can find this on the Gigabyte Download page of your motherboard.
Here: http://www.gigabyte.us/products/product-page.aspx?pid=4966&dl=1&RWD=0#bios
So you want to make sure you get version F5.
Once done and restart your sytem and everything seams good, now you can continue.
Go to your UEFI to set the following after inserting Windows 8 disk:
-> Disable CSM (Compatibility mode)
-> Disable all SATA Controllers not being used.
-> If you have in the BIOS, disable Serial port. (basically anything you don't have the connector for or don't use. You can enable them later at any time)
-> Make sure that Fast Boot is NOT enabled. Refer to your motherboard manual. (you'll enable it later)
-> Save and Exit
-> Now look for booting from the CD drive as UEFI mode (refer to the manual for the key to hit to boot from disk under such mode. It should be by default, but just in case. It's ok if can't find it, we will know in Windows setup if it is or not)
-> In Windows setup, when you get to the screen where to install Windows. Delete everything, You want only your SSD and HDD. Now select your SSD, and click on "New" to make a new partition. Windows should create 3 partition on your SSD. so you should see 4 items with your HDD. If you don't, then you didn't boot the disk in UEFI mode. If you do, good resume the installation process.
Once you are in Windows, install all your drivers, make sure that Device Manager shows no yellow "!" icon alert on anything. Then install "Fast Boot" utility. You can find it here: http://www.gigabyte.us/products/product-page.aspx?pid=4966&dl=1&RWD=0#utility
This utility will allow you to get back to the UEFI setup screen. Your system will boot so quickly that it hitting a key to get there is not an option to you. ![]()
Once installed, return back to your UEFI as we are not done yet. Now enable Fast Boot (if you have a faster mode option like "Ultra Fast" or something, pick it), if you have any option to ad a delay to the boot process make sure it is at 0. Save and Exit and you are ready to go.
If all fails and you want to return back how it was. Simply go to the UEFI, enable CSM back. Then, re-install Windows by booting in non-UEFI mode this time (if you passed that stage previously), delete every partition and click on "New" and now you should have only 3 items with your HDD (recovery, Windows, and your HDD). And you should be good to go.

-
Topics
-
 0
0 -
 1
1 -
.thumb.png.2f848c6abbce9391fad745d7e6383db6.png) 5
5 -
 0
0 -

kasdashd ·
Posted in Folding@home, Boinc, and Coin Mining0 -
 2
2 -
 6
6 -

Ishikudeska ·
Posted in New Builds and Planning2 -
 0
0 -

Xxu ·
Posted in Servers, NAS, and Home Lab1
-
-
play_circle_filled

Latest From ShortCircuit:
The coolest looking monitor. Period. - ASUS ROG display at Computex (Sponsored)
.thumb.png.2f848c6abbce9391fad745d7e6383db6.png)


Create an account or sign in to comment
You need to be a member in order to leave a comment
Create an account
Sign up for a new account in our community. It's easy!
Register a new accountSign in
Already have an account? Sign in here.
Sign In Now