Search the Community
Showing results for tags 'diy'.
-
I need a smaller computer so I can bring it to college so I'm looking at mATX (I would go mITX but I want those insane Microcenter deals). I've very disappointed in the selection of mATX cases, as many seem to waste a lot of space with hard drive bays or 5.25 bays. I use an SSD that I'm fine velcroing to the PSU. I plan on using acrylic and 3d printed parts to build the case. Have any of you made a case and have recommendations? I'll take any advice available except "don't." Thank you all so much EDIT: If you find a small tower mATX case let me know, I couldn't find one
-
I recently bought a graphic card "GIGABYTE AORUS GeForce GTX 1080 Ti DirectX 12 GV-N108TAORUS-11GD" with a VR HDMI port out of the back. I am aware that my case" DEEPCOOL GENOME II" does not support HDMI output on the front panel. So I intended to mod it to accept HDMI out. I am unable to find a cable that will connect to my graphic card, and secure to front panel, nor is there any youtube video on this type of mod. I would like a female adapter to be secured to my front panel, without having a cable stick out of the front. I would also like for it to look professional/manufacturer quality. At this time I am unable to find what I need or how to accomplish this. If anyone cant point me in the right direction. I would greatly appreciate it. Also I would love to see Linus, or team create a youtube video, for future people looking to do the same thing I want to do.

-
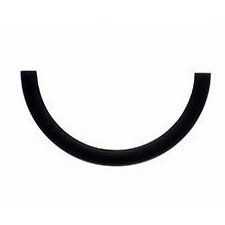
Things needed 1mm wire you can get your hands on which is sturdy and long enough to be looped Cable sheath, any old cable you can get yours hands (The one I used is from burned power strip, from which I chopped the cable off and extracted the sheath) These^^ I'll let the pictures do the explaining Loop^^ Wrap the straight pointed wire around the 2 wires going down to hold it in place Like that^^ You can add hot glue at both ends and call it a day or you can take it further and turn it into the horrendous thing coming up 4 equal pieces I took it as 3.5cm Apply hot glue to the ends And finally there you have it
-
Hi, I'm new to this forum so I don't know if this is the correct section to put this on, but here's my question: I have a backlit keyboard, and love how the transitioning colors look so I want to degrade the painting on my keys (WASD, to be especific) but I don't know how. If any of you know how, I'd appreciate your help :).
-
Hello community I have never been fond of forums and simply have not posted much, I'll make this short. I haven't introduced myself but I suppose a teaser to my upcoming build log might work. I am a repair shop owner from Bullhead Arizona. We tend to have a lot of older people coming in recycling their old computers at our shop, so for a while I have been collecting and planning out sleeper builds. I figured it's about time to show people the 90% finished product now that it is functioning under it's own power fully sealed. I will complete a formal Build-Log once I finish making the I/O passthrough panel to be placed where the stock I/O used to be. Build Name: iMac R5x CPU: AMD Ryzen R5 1500X GPU: Asus Nvidia GTX 1050Ti 4GB Memory: 8GB DDR4 (2400) Storage: 1Tb Western Digital Black Oh yeah, I will also try to dual boot or VM a Mac OS into her. Most likely gonna be a VM however.
-
 everyone post a photo of your DIY headphone holder warning: i held no responsibility if your eyes pop out of there sockets you have been warned i am sure i will win... vote with likes (up to 3). If you already voted and another one post a new one you can remove your vote from one of your 3 likes The most voted so far will be marked as best answer (when another one gets more votes it will be changed)
- 21 replies
-
- 1
-

-
- diy
- headphones
- (and 2 more)
-
Hi, I have both a Samsung A5 2016 and a Sony Xperia Z2. Both phones have their glass back cover broken. Does anyone know if it is possible to get a new back cover, that is just made from metal? I have searched around, but can't seem to find it. I hate the glass ones because they are so brittle. It would be a cool "mod" to do on my phone as well.
-
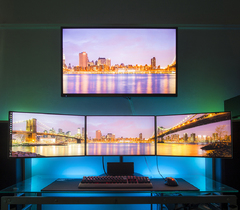 Hey there! I've recently moved house and as such, I'm looking to do a bit of an upgrade. I want to build a wall-to-wall glass desk into my room, and I want it to have as little visible support as possible, so that it looks like it's 'floating'. Attached is a draft for how I plan to do this; I'm planning on getting 95mm thick timber and using it to support the back and sides of the glass, which will be a custom-cut sheet of 12mm thick tempered glass. It's two meters wide and 725mm deep; do you think that a sheet of glass this wide can be safely supported using the back and side stretches of timber? I should point out that my monitors are going to be wall mounted, so the only weight on the desk should be the glass itself and the keyboard/mouse. Thankyou for any feedback!
-
Hey, So i want to replace my Router for intern networking, I have a PC with Some Gb network ports. Running on Linux, i did see some solutions like Pfsense and untangle im really new to this but from what i have read. It is not a software package but a whole OS. Why does it need a whole OS is it for safety or just for speed? Because its a really normal network i think it will be fine when some software runs beside linux. Hopefully someone has some advice.
-
Dear Gaming\Techie\PCmasterRACE community, I´m being triggered everyday by yall saying that gaming latpops (or laptops in general) are overpriced. I know you can build a better PC for less blah blah, but what you kids are forgetting is that with a laptop you have a screen, keyboard and touchpad included, which are crucial for using the damn thing. Don´t forget that all that is included in something the size of your damn monitor alone. So I was thinking if @LinusTech could use his DIY SKILLZ to try building a pc big enough to fit in a slightly bigger than average backpack. So it could go like this : Linus gets a gaming laptop that´s considered overpriced or something and he bases his build on it. So if the laptop has 17" 4K screen with G-Sync Linus has to put a Monitor with matching specs etc etc.Now I know that it would probably still have better value, so to even things up, we´re gonna count the time wasted too! How? We take the average hourly payment amount in the US (sorry for my English BTW, I´m having a hard time writing such cool stuff) and we add that x however many hours this $h!t storm takes. So average payment in US is $25 per hours, and if it takes 10 hours you add $250 to your build... OK that´s too much but you get the idea. Main point is you add the money you could've made if you worked instead of wasting time on this. I really wanna see this happen soo.. Please ,LMG? Thanks for reading this pile of garbage and if this doesn't become a thing or at least an interesting discussion I'm gonna be sad...
-
So I'm building a Custom PC from Scratch and I'm gonna make the case look like a Gameboy Advanced (indigo). I know where to put most of the parts but I don't know what to make the case out of or how to cool it. Any ideas? I was thinking Copper Heat Pipes like a laptop and the Nintendo switch for the cooling and Acrylic Sheets for the case (I was gonna us a mother board tray)
-
.thumb.png.8a57b50fa9c8274fc75097fe36e8cdbd.png)
Genuine Question for the Hive Mind: DIY Modem AND Router
CubisticWings4 posted a topic in Networking
I need the question the ask for the Networking Hive Mind. I am so sick of not getting promised speeds from my ISP's. I've often wondered whether it is purposefully throttled down by the ISP-provided modem/router combo or if I have incorrect settings coming from the modem to the router to the clients. Genuinely looking to see if it is possible to build my own OP modem and/or router. Looking forward to answer, feedback, and discussions. PS. When can we expect an app for this forum? Many Thanks! -
I hate this multi topic post but not much you can do about it. I am wanting to make external storage device, and I have a 4 drive cage from and old pc that I am gonna make an enclosure for, but before I do I was curious how would go about making a program to access that hard drives view either eithernet or usb? and how would I go about applying power to all the hard drive? I have a pico psu but as far as how to wire it with a button im lost.
-
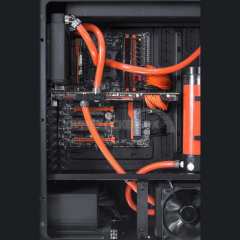
Do you have a favorite make or model of AIO liquid cooling solution for CPU or CPU and GPU? Do you have a favorite purveyor of DIY loop solutions? Who/what do you like and why? Why would you say they're better than the rest?
-
I need help I have been in the market for a good desk and I am trying it figure out if I could build a better more stable and better looking desk for less money. If anyone knows a good looking desk for under 200 USD thanks -brayton
-
Hello guys, I've flown small toy drones for a few years now and I think I'm ready for a bigger drone capable of capturing quality video. However, as the big boys such as the Phantom and, my dream, the Mavic are too expensive I've decided that I will build a Diy drone. I want to be able to capture smooth and stable footage without any jello effect. Though I have no clue from where to start. I live in Bulgaria and can't find any drone part shops. Therefore, I'll need to order from the uk or Germany. I think I have chosen a frame, the F450 from unmannedtech.co.uk (don't see any DJI marks on it, does it matter if It's a copy?), a S500 or the i550a, a copy of the f550 from dji, which is probably overkill. My payload is the next problem: I have a Sony As30v Action Cam, though it turns out there are no gimbals for it? So if there arent actually any gimbals I'm screwed and need to buy a new camera.. Next up, all of the other parts. So, motors. I'm kinda confused about what kind of motors I should buy and I do not have much choice, as most of the cheaper ones are for racing (high kv). Could I buy spare used motors from a Phantom and use them? Or what sort of motors should I be hunting? Next, flight controller. I'm completely lost here, so please help. Same with ESC's, gimbals, PDB's, transmitters, rc's, video transmission systems... I'm actually lost, so please, bear with me and give me some advice. P.S. I also have an unused Raspberry Pi.
-
Hello all! I just built an MATX computer, and it's power cycling. I've checked to make sure all of the connectors are connected, and it's not working.
-
 I am looking to create a NAS that can also run Plex and act as a family server for personal family files and documents. I want to run possibly unRaid or FreeNAS as the main OS with everything else running via VMs. Motherboard: GA-H97-D3H (rev 1.1) Processor: i-4460 3.20 ghz Memory: 16GB Corsair Vengeance DDR3-1600 Video: Onboard Hard Drives: no decision on this yet but I imagine an ssd for the main os and a couple of Seagate 2TB drives for storage Background: At most I can expect Plex to run about 4 streams at any given time at 1080p. Any assistance would be greatly appreciated. Thanks. -Zen
 -
Hey guys is there any way to map the screen brightness (+/-) settings onto keyboards on a desktop similar to laptops.
-
Hi, I have an HP Elitebook 840 G1 and i want to install an eGPU in it. I will use this. I want to know 1. if my computer can support an eGPU and 2 if there are multiple PCIE ports available. Thanks
-
 I thought I'd share a short tale today about fixing a dead graphics card! A few months ago, I bought a box of graphics card for the sole purpose of getting an EVGA GTX 295 for a display model (what can I say? It's a neat looking, beefy dual-GPU card and I thought it would be neat to display). Turns out that all four of the cards included in the box were dead. While I didn't really need any of them to work, it was kind of a bummer that I wouldn't get a conveniently usable GPU out of the deal... UNTIL TODAY! Yesterday I took another look at one of the dead GPUs, an XFX 8600GT 256MB, and I noticed that the a number of capacitors had blown. With the hope that the capacitors were the only issue, I scheduled a trip to a local electronic component store, Lee's Electronics in Vancouver, purchased a number of replacement capacitors and attempted to replace the bad ol' capacitors with some brand spankin' new ones. For the people who might be contemplating doing something like this, it's important to note two things about replacing capacitors, and the person replacing them: 1) Capacitors can be replaced with another capacitor as long as the capacitance (measured in micro-Farads or uF) is an identical amount, and the rated voltage of the new capacitor is equal to OR greater than the old capacitor. While people say you CAN use a higher capacitance in some cases, it depends on what the capacitor is being used for exactly, so for someone (like me) who is not sure, using an identical value is the safest option. 2) I am pretty amateur/bad at soldering, and even I managed to remove and replace the bad capacitors (though perhaps not... perfectly. More on that shortly.) While I initially struggled to get the first capacitor out of the spot it was soldered into, I eventually managed to get a technique down of heating up the solder that was holding the capacitor legs in place while holding and gently rocking the capacitor back and forth until the legs slid out of the holes they were pushed into. The first try must have taken me a whole 5-10 minutes just to take out the capacitor, not to mention another 5 minutes of trying to seat a new one in place. Eventually though, I figured out a solid methodology: 1) Heat up the solder attached to the legs from the backside of the graphics card 2) Grab the capacitor on the front side of the card and rock it back and forth, pulling gently on it to pull the legs through the holes on the PCB. 3) After pulling out the old capacitor, take the replacement one and trim the legs down to a more manageable size (I trimmed them down from 3-ish centimetres to about 0.5 centimetres) 4) If there's leftover solder in the holes where the old capacitor legs used to be, heat the solder up and push the legs of the new capacitor through (making sure the positive and negative ends of the capacitor are in the right spots). You may need to rock the capacitor back and forth as you push the legs through, heating the solder to make sure it doesn't cause the legs to stick. 5) Once you push the capacitors all the way through, apply flux to the metal legs sticking through the PCB. I used a flux pen that I also bought at Lee's Electronics. 6) Finally, apply some solder the capacitor legs to secure them to the graphics card PCB. Done! I have a bit of a confession to make. I mentioned earlier that I didn't quite perfectly perform the capacitor replacement, and that's because I accidentally burnt the tip of my finger when I brushed it against my very-hot soldering iron. That, uh, sucked. But! Did it work? Was there a point to spending $5 in capacitors, burning the tip of my finger and possibly inhaling some maybe-not-good-for-me-fumes because I'm not the smartest cookie in terms of workbench placement? The answer is Yes! The once-dead 8600GT has risen once again to deliver pixels anew, booting into the BIOS and Windows without breaking a sweat! So, that's it! Hope you enjoyed the brief story/guide of a dumb-ass electronics amateur fixing a graphics card with blown capacitors! Hopefully this is useful to others who might be thinking about trying this on one of their dead graphics cards, or at the very least they find it mildly amusing!
-
Get me this case and tell me an it fit a gtx 1060 strix card here is the link teachers and students gotta job https://www.newegg.com/Product/Product.aspx?Item=N82E16811353119&cm_re=DIY_PC-_-11-353-119-_-Product
-
Hey, guys! I decided to try making a PSU shroud for my Fractal Design Define R5 to give it a cleaner look. Now, since I don't have easy access to metal and metalworking stuff, I thought I'd try making it out of a cheaper and easier to use material. I ended up going with comic drawing board from my local craft shop. It's rigid enough to work, and only cost like 7$ CDN for an appropriately large sheet. As the pictures show, it turned out decently well! I'm just wondering if there's any sort of hazard or risk I'm not aware of, aside from the given that comic board is most likely flammable. I took all reasonable precautions, and made sure all nearby cables are well connected and undamaged. You know, reduce any risk of sparks. But I'm just looking for opinions: was this a good DIY idea, or am I putting my rig in unnecessary danger? No pressure! Thanks for your time!
- 5 replies
-
- 3
-
-
- diy
- psu shroud
- (and 1 more)
-
 Hi folks! I am new to LinusTechTips forums since I mainly watch them on YouTube so I apologise if this question has been asked already. Basically in the Easter break I am planning on making my own gaming "laptop". I use the term loosely since it is basically a small portable computer with a monitor and mouse/keyboard attached and an external Pico Power supply. Don't know how to get a battery in there. The specs will be an Intel Pentium G3420, 8gb ram, and a gtx 1050Ti. I have the measurements for everything and it will be mini-ITX. I wanted to use some aluminium sheets from Amazon like this: 3mm Black ACM Sheet A4 297 x 210 Dibond Aluminium Composite Sign Making Sheet. The size of the sheet is 297 x 210 and is 3mm in thickness. The holes will be 3 different sizes: 3.5mm, 6mm, and 5.5 to 5.8mm. Would it be possible to use a normal hand drill for this? My dad already has some tools and I was going to ask his help with the project or if I can borrow them. If not I would take it to a DIY shop and ask if I can pay to have it custom drilled for me. Not sure if that's possible but worth a try! That is for the base of the case. I am making a custom case for my components. I will be using a Pico PSU and an external laptop charger of 195 watts also from Amazon. My screen that I am using is Vesa-mountable so I will be using a vesa mount hinge to fasten it to the case or just a normal hinge with a custom made mount and paint the whole thing. I will be using some sheets of perforated anodised aluminium for the walls which will be screwed somehow to the lid of the case. The whole thing will use passive cooling and rely on stock coolers since they are low end components. I will then get a small wireless all in one keyboard/touchpad combo and use Velcro to fasten it to the top. I'm using a PCIe riser card to allow the GPU to sit on its side and there will be a hole at the bottom covered by a dust filter to allow ventilation along with a hole at the top to allow ventilation for the CPU which will use the stock Intel cooler. I may add in a slim line dvd drive as well if there is room. Storage will be an SSD and later on possibly an M.2 ssd if I can upgrade eventually. Basically I was wondering about the drill and if it is safe to drill through that amount of metal. I will get 2 sheets - one for the top and one for the bottom and use the perforated aluminium for the sides except for where the I/O is and so on. Many thanks in advance!
 -
So it's finally here! I've been planning/wanting to do this build for about a year, if not longer. Finally got my s*** together and started it. Build Rationale So I wanted a really good sounding pair of speakers. I couldn't afford any thing like the quality of speakers I wanted. Solution: Build my own! The theory is that these speakers should sound like they cost about £1000, but only cost around £300 each. The speakers I'm building are the "Seas Idunn." The plans can be found here: http://www.seas.no/index.php?option=com_content&view=article&id=380:idunn&catid=66&Itemid=365 Parts I have no wood working ability, so I bought the wood pre-fabricated, only requiring assembly. (From speaker-cabinet-kit.com). Drivers and crossover components are yet to be aquired (coming from a company called Falcon Acoustics, waiting for my next pay cheque!) Bass reflex tube and speaker terminals. Tools, sealer, glue, wiring, stuffing, paint and polish all bought off of Amazon. Amplifier is a Yamaha A-S501 (pay cheque after next, lol). The Build- Day 1 So I've never done this before and I'm just going off what I've read on the internet The first day was getting the first speaker glued together, ready to be sealed and painted. Day 2 will be doing the same on the second speaker. Hope you stick around and see whether they are as amazing as I'm planning them to be! I'm very excited to say the least! No doubt there'll be a few hickups on the way! EDIT: Finished on page 7 of this thread (Day 46)


.png.c7f27def168b217d995db276b00358c5.png)

.png)

.thumb.png.8a57b50fa9c8274fc75097fe36e8cdbd.png)