7th gen and 300 series mobo dont work. Use i5-8400 instead.
Then it;s hard to decide. Both are equally good at games. Upgrades of Ryzen favours multi core work while upgrades of Intel favour single core performance, which makes Intel better for gaming rigs. That said, Intel is likely to chop compatibility on mobo and CPU again, so no 9th gen without changing the mobo. On the other hand, AMD promised to launch 2 newer generations of CPU on AM4, which means a BIOS update is all it needs for a B350 mobo to work with newer CPUs.
I'd still recommend Ryzen because it's cheaper and the rest of your build needs some refresh as well.
I have this issue with GTA 5, after like a 3 months or so it starts back up. I have the same issue, Ram, CPU, GPU low temps and not working to full potential.
But it is very very laggy or it has lag spikes for a certain amount of time, but then a game like Rise of the Tomb Raider like 60fps.
This actually happened to me yesterday, but I have a SSD that just has GTAV on it but what I have to do is Optimize the SSD if you have a HDD then Defrag it and see if that works.
Hello there! I'm rather new into the case modding world but I feel I've been progressing quickly.
I've always been very interested in computers and as many others, more interested in the hardware and how a computer works more than the games that you can play.
I decided to make my own case mod, at first I did not have a name for it so it went under a build name called Project Blue Dream 2.0, but as the build progressed I started getting clearer visions of how I want the PC to look like when I was done.
The name that I decided on was Project Chernobyl, I'll tell you more about how I thought of the name later in the build log.
Well, Who am I?
My name is August Lindgren and I'm a soon to be 17 year old student, on my spare time I do quite a variety of things, I like to ride snowmobiles, dirtbikes, workout, play on my PC but mostly, build PCs. I started this project because I really wanted to achieve something, something good!
I apologize in advance for the image quality during the build but I assure you there will be better photos for my later builds!
now that you know who I am, let's get started with the build log!
here are some pictures of what the computer used to look like before I got started.
And here is my first vision of what I wanted the build to look like.
These renders were created in Google Sketchup 2015 and rendered in Visualizer.
So I got to work!
List of things to be done
Strip the case of all its panels and hardware
Get the fanrings painted yellow
Paint the front bezel yellow
remove heatsinks from RAM and Motherboard for respraying
I started prying of the heatsinks from the RAM sticks for repainting.
This is the front bezel, fan rings and the ram sticks painted.
I also painted the motherboard heatsink but I forgot to take a proper photo of it.
Massive pile of hardware here
these are the new fans that will be going into the system, also with yellow painted fan rings instead of the dull blue ones.
at first I thought this was just going to be a small little project but it ended up being so much more than just that.
as the project went on I got more and more ideas for it and started over again, and again, and again..
here are some pictures from after the first mod was done.
doing some test fitting.
First update!
I consider my first goals with this mod to be complete but I want to do a lot more.
I've just finished ordering a custom loop so I'm very excited about getting started.
to be honest I ordered quite a bit of stuff.. Here's a list!
EK-Coolstream PE 360
EK-CSQ 10/16mm G 1/4 Black
EK-Supreme LTX AMD Acetal CSQ
Laing DDC 12v
XSPC Reservoir
Primochill LRT Crystal clear 10/16
Feser one UV Yellow
Phobya UV Flexlight
Phobya TwinLED UV
Phobya Y cable 3 pin to 4x 3 pin
Alphacool universal pump mount
A third Acer G246hl 24" 1080p
AX 4200 Triple Monitor Stand
A1 Saga XXL Mousepad
I recieved some surprise income and decided to purchase all the things I've been wanting to get.
as most of my friends know I'm rather of an OCD case when it comes to cable management, I'm extremely particulour about how I want my cables to sit and look like, so redoing my actual setup is started to happen on a regular basis.
more mods on the way!
Going to go buy some acrylic sheets that will act as both a PSU cover, Midplate and some GPU backplates.
Second update!
All the acrylic is purchased and is sitting next to me, I also bought some primer and a few cans of black color.
as always, there are some cardboard models of how the acrylic will sit..
Because why not, right?
I measured out the acrylic and cut them to size, also got started on bending the sheet for the PSU cover.
I was walking around the house when I noticed an old external 2.5" drive, so I dismantled it and made a little SSD case for it!
Here are the acrylic sheets all done and painted.
Doing some test fits before fastening them properly
Third Update!
Unfortunately there has been some delays regarding the custom loop, I'm sorry to have kept you guys waiting!
Here are some pictures of the first layout.
Good news! no leaks, woohoo.
I found it extremely hard to actually bleed the loop with the tiny reservoir mounted in the bottom so for the bleeding part I placed it ontop of the case instead, found that was much easier!
I must say I am a bit disapointed on the fluid, but really depends on the lighting and from which direction you're looking at it.
I managed to get some pretty good shots of the loop while bleeding.
Here's a picture of the tiny reservoir I was talking about.
here is a perfect example of what I meant with the fluid switching colors!
it looks a lot more green in some places.
So I ordered some sleeving guys! I really thought the blue cables would suit better in the build but they appeared not to.
I ordered some yellow, black and gray sleeving, Which I found suits the build a lot better.
there's happen a few things now actually, I've done quite a lot of things.
Sleeved all the cables.
Mounted "Biohazard" fangrills, more coming soon!
Got the text "Chernobyl" printed on the side of the PSU cover and on the front panel.
Metal Biohazard logo on the front panel
and also got some white E22 decals on the fans, I really don't like the look of the corsair logos on the fans and especially not when they are spinning as they are not centered..
Pictures under the sleeving process! Jesus it makes your fingers hurt.
First wire done!
I actually ended up redoing the sata cables as I didn't like the look of all yellow.
I couldn't post the final pictures directly because I felt that I had to get a better camera for it as my one really isn't doing this build justice.
And here we go! I called my cousin who works with photography and she was able to bring her Canon EOS 7D Mark II over and help me get some really good photos!
Here are the final pictures guys, the moment we've all been waiting for!
Now, you might be wondering how I came up with the name Chernobyl?
Yes, it's actually a really simple story, I've always been interested in nuclear plants and especially Chernobyl, I don't know what it is but it just interests me.
and late one night while I was sitting just glaring at my computer I got the feeling of a nuclear plant looking at the fluid going through the tubing, that typical "green-ish" look.
in my opinion sort of looks radioactive, so I decided to call the computer Chernobyl!
Now before you say anything.
Yes, I know the reservoir is way too small and I am planning to change it as soon as money allows me to do so.
I will be moving on to a cylinder reservoir instead and also I will be changing out the fluid to Mayhems Pastel yellow at some point.
but that is for another time.
I really appreciate all you guys for reading this log and giving me all the feedback, it has really helped to help me make it through the project!
Thank you.
August Lindgren


 xRosana reacted to Agonizel in Upgrading PC

 xRosana got a reaction from zyntaxable in How to apply thermal paste ( FAIL ) and Discussion...
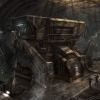 xRosana got a reaction from NinjaJc01 in How to apply thermal paste ( FAIL ) and Discussion...
 xRosana got a reaction from DigitalHermit in How to apply thermal paste ( FAIL ) and Discussion...

