Search the Community
Showing results for tags 'scratchbuild'.
Found 14 results
-
HYPERCASE DM-01 This build is pretty well under way, So i will post a few current work log pics and then play catch up Don't worry there's still a ton of modding left. First off a big thanks to Mwave for jumping on board and supporting this build with some much needed hardware. A quick back story. I wanted a specific case and when it became obvious that the extreme cost and getting it sent from OS was proving to be a big fail i decided to just make what i wanted myself. Hypercase will be scratch made from Plex. No CNC or LASER work or fancy CAD programs or drawings..... just whats in my head and my hands. I'm sure some of you can relate to that last part NO water cooling i'm having alot more fun nowadays with air coolers "it's still cool to air cool" ! Currently the mod is at the final stages So how did we get here ? It started with 4 basic parts.. A base section Just a single cut and bent piece of plex A matching top section. This was made from 3 parts , 2 x bent sides and a single flat top. Then reinforce with inner braces Next was to make the spine. This was made from much thicker plex and will be triple layered later to add more strength and design. The 4th part was the motherboard tray. This will be a suspended type and will be adjustable
- 19 replies
-
- 3
-

-

-
- scratchbuild
- aircooled
- (and 1 more)
-
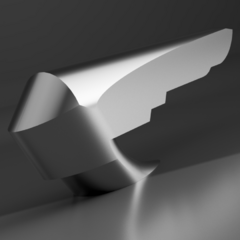
I'm new to modding forums and new to scratch building so hello fellow enthusiasts! Please offer any advice or ideas as I love new ideas. This build is for my father. He loves early automotive design and I was inspired when I saw a 1938 Spirit of Motion made by the late Graham-Paige company. The design and shape of this build is heavily inspired by the "sharknose" grill the Spirit of Motion has. Because of complexity and the number of parts I wanted to model the case first. Modeling also is helping me keep sense of the scale. I want this to be as small as possible as it will probably be displayed on a desk top and we all like space! I will also need the drawings/schematics for cutting metal parts out. I wanted it leaning forward but unlike the original car I also wanted it widening as it goes up in height to give the sense of moving onward and upward! Very "Spirit of Motion" of me I know. Next was the grill design itself and the "panels" (do i still call them panels?!). I chose a color scheme at this point with: candy apple (red), silver, and black. Started stuffing generic standard size components in and creating the needed mounts and fixtures for parts. Because this is a car grill it only seemed natural to put a 280mm radiator right in front where it belongs. The big kicker for this case will be how you access your components. This choice is also why the motherboard is inverted and mirrored and the GPU will be vertical mount. To keep the I/O below the hinge point. Next up is creating the 2D drawing files for waterjet cutting the raw aluminum grill pieces, lasercutting and bending of the sheetmetal for the rear I/O, aluminum frame, rad mounts, mobo mount, ect ect. Update coming real soon! Thank you to my sponsors! EVGA provided a fully modular SuperNOVA G5 power supply. NVIDIA provided a GeForce RTX 2080
-
 (the other post i made was a mistake i post it on the wrong topic so that one will be just a helping thread thanks ) project design is not yet final . . . . . Hello my name is Christian Dumdum from the Philippines this is my next project called Project F24 . i started working on this last 2016 the design of the project is not yet final . ill just change the front . Concept of the design will be a sports car and luxury car also The goal of this project is to be unique as i always will be i don't want copy designs and all i want to have is an unique build . The plans of this is to be fully done on December wanted my build to be featured in CES 2018 and Computex2018 always dreamed about it since 2014 well i hope someone will come and offer to me the chance of going there and win local Rig shows and more ! Parts of this build is still pending i am thinking about upgrading but no money is found LOL . so here is the parts that i have now old but still can kick any comments on my build ? do you love or not ? pls do tell me i can make room for improvements i like to hear you out and see what i could do Updated parts will use evga x79 , gskill trident x 4x8gb, dual 1050ti ( one will be physx because no budget for higher cards) corsair ax 1200i , water cooling parts will be bykski EVGA x79 dark Gskill trident X ddr3 2800 8x8gb Palit gtx 970 2x (maybe ill change this part for the waterblock) corsair ax1200i intel i7 3930k ssd or 3.5 hdd Water cooling parts still pending
- 95 replies
-
- 2
-

-
-
- scratchbuild
- philippines
- (and 1 more)
-
 Hi guys, I want to design my very own case and this is the first time I'm doing this, so I want to make sure if my design would work. For mid plate and rear plate it looks like this for mid plate, this is the detail this is the pci-e cutout and for the last, the i/o cutout If someone can re-confirm the dimensions is correct, please do Thank you guys!
-
Hey folks! I'm new on this forum so let me present myself: my name is Alessandro and I'm the modder from Explore Modding, ex St.Jimmy's PC Modding. You can find all my completed projects on my Facebook page but I'll consider posting them here as well in the future if you're interested. After a couple months of stop I'm finally back with a fresh new project, this time a mITX scratch build based on Oracle, a Persona 5 character. This project is brought to you by *me*: MSI Italy - Enermax Italy - Adata XPG Italy - PC Frog SRL Milano Let's start off with some hardware pics. These include: MSI GTX 1070Ti Gaming X, XPG Spectrix D80 and SX950U 500Gb, Enermax SFX Revolution 650W and LiqFusion 240 with T.B. RGB Fans, Ryzen 5 2400G. And now the real stuff. First thing to do is create a base structure from aluminum profiles of various type: flat, squared, L-shaped etc. And rivet everything together Doubled it Some preliminary test fitting Internal mounts for acrylic fan and radiator holders
- 7 replies
-
- 3
-
-
-
- scratchbuild
- msi
- (and 3 more)
-
Hello there, I wanted to share my new project build with you. Albedo (Latin: albedo, meaning 'whiteness') is the measure of the diffuse reflection of solar radiation out of the total solar radiation received by an astronomical body. I'm an PC enthusiast and IT specialist from southern Germany and quite new to this forum, nevertheless I'm a frequent viewer of ltt videos and that's why I also post this build here. I'd like to start with the overall specs, so you know what to expect: Hardware: Case: Watercooling: As you can see that's quite an overkill build, but also my money, but I'm not only gaming on this machine, as that would be quite wasteful. Now little Storytime: The idea of a new build came to my mind with the release of the AMD Ryzen 3000 series, I saw that sweet 16 core CPU and knew I needed it. Then a good friend of mine had the idea to make a little mod series for him, me and a few willing customers. That decided we designed a prototype case with Parvum Systems in an Evangelion Anime Style (Eva-01) and ordered it mid august'19. I received the case mid/end december with major defects, replacement parts still missing, and that's why I hit my frustration limit (can tell you more about that if wished). I found about PC Design foundry and ordered a new case there. Case is now in design and manufacturing starts today. The Evangelion Mini series is dead for now, prototype case will be used by said friend, when replacement parts arrive. I'm very eager to start with the build process soon, every part of the hardware and watercooling is already at home, and waiting to be used. Updates:
- 46 replies
-
- 4
-
-
-
- scratchbuild
- amd
- (and 4 more)
-
**Reaper PC** Intro I got the challenge from at friend to re-build his existing PC into a wallmounted build like no other. Challenge Accepted! Why Reaper? Reaper is death My friends case had to die to be rebuild into this It's also the name of some cables I ended up using, "Reaper Cables" The whole build is kept black/metal The machine is really quiet, quiet like death, most likely because it's now an open air design and heat don't gets trapped Some of you have maybe found other of my creations before, they are quite popular whenever I build something - I don't have the time anymore to go complete ham and build insane things, but that don't mean you don't get to see some of what I tinker with, like this one. I decided to make it somewhat a Christmas Calendar and release little by little until the 23rd of December. When I don't build PCs a lot of my spare time goes with the game "Sea of Thieves" - so come and say "Ahoy" if you see me: My pirate stories are also shared on Twitter, Clutch and Instagram so see if you can find me if you also have a little pirate in the stomach :cheers:
-
I am starting my journey of designing and building a case for myself. I have done so in the past, and also started a lot of projects that I was unable to finish. Now that I have a 3D printer, a Creality CR-10 Max, and have done some test prints to assure functionality and quality of the printer, I can actually easily finish projects. I am unhappy with other cases on the market, and I'm going to design one. This case will replace the one I currently own, and the overall build theme will be black and white, with the case being mostly or entirely black. This is what I'm thinking of for the first design prototype. The case will have the motherboard with the i/o facing the bottom. The radiator will be at the top at an angle to reduce case thickness. The graphics card will be mounted vertically with enough room to breathe, but a small extension cable will be needed to get the display output to the bottom of the case. There will be some intake fans at the front and rear. The case will be positive pressure. Other modifications will be replacing the motherboard to match the theme and get rid of the stupid X570 chipset fan. B550 is all I need anyways. I'll also be replacing my 360mm radiator with a 420mm. I may print a cover for the motherboard, similar to the old z77 ASUS Sabertooth boards and others from around then. I don't intend to add fans to it like the Sabertooth, but I will keep an eye on temperatures to make sure I'm not suffocating anything. Hopefully I'll be able to snag an RTX 3080 sooner rather than later. (I know RX 6000 series cards are right around the corner but I've had so many issues with Radeon cards, including two 5700XTs dying, that I'm avoiding them for some time). I am designing it in SketchUp if anyone asks in the future. I'm starting today and I'll work on it between classes and homework and life and such, so it may take some time to complete.
-
Hi everyone. Got my first handcrafted case build here nearly complete. Why would I build my own steel case from scratch? I don't like the Ikea furniture or Halo spacecraft style cases. Not my style. With fabrication being my hobby, I figured I could challenge myself with this. I have been fabricating out of my garage for the past 6 years. Mostly making aftermarket parts for off-road jeeps/trucks. Now with welding, a bit of a warning... Welding sheet metal is still somewhat new to me so this was definitely a learning process during the build. I am by no means an expert at this. I also had very little experience with computers before going into this build. A big thanks to the LTT group for putting out endless information on pretty much everything apart from scratch-building a case although the numerous modular/customizable cases gave me a few ideas. There are still a few things that need to be finished up. The PSU is acting up and I still need to design/cut a front grille for the radiator. Overclocking/benchmark will come later as well, I have already been messing with the CPU/GPU numbers. If enough people want a video I can make a walk-through video with some fabrication clips i took too. I will be posting plenty of manufacturing pictures as well. CPU: Intel i7 6700k 4.0GHz Motherboard: ASUS Maximus Hero Alpha VIII GPU: EVGA GeForce GTX 1080 FTW RAM: EVGA 32GB DDR4 3200 PSU: Corsair RM750 CPU Cooling: Corsair 100i v2 Fans: Noctua NF-F12 (4 intake/3 exhaust, Yeah I know, it's a bit excessive) Main Drive: Samsung 250GB SSD Storage Drive: Samsung 1TB HDD Case: Custom fabricated Keyboard: Logitech G610 MX Red Mouse: Logitech G700s Monitor: Dell 3440x1440 Curved 34" (U3415W) Inspiration: Fury, ZFG RX7, Mad Max, anti-dust/look-cool air filters (yes they are functional)... And I wanted to make it look robust. Like *airdropped out of a C130 and dragged though the desert* kind of robust. Preliminary designs: The setup, still no grille yet.
-
Im planning a $1500 to $1600 AUD gaming build, and are looking for some help as to component choose. Here's the PC Part Picker link: http://au.pcpartpicker.com/p/WjG9Bm I have no idea as to what Motherboard to chose. I need a Z97, MATX motherboard, and would really appreciate suggestions. As far as CPU cooling goes, I will be using the stock cooler until more money becomes available, then I will be purchasing a water cooler for harder overlocking, maybe even a custom loop to also cool GPUs (recommendations?). As for the case, I'm currently designing and building a custom scratch chassis out of aluminium, and yes, I know what I'm doing. Trust me. I'm an engineer. Anyways, constructive criticism/feedback would be appreciated. Case pics will be coming as they become available (I want to get this right first time), so stay alert for updates if you trust a novice like me to create a decent chassis. Thanks you for your help, GL HF! </F/>
-
So I've got a basic CAD for a completely wooden computer case (which I will make available once I'm done for free to download). The goals of this case are: 1) practice cadding 2) relatively cheap to manufacture (going for >100) 3) make a small atx case with good airflow/cable management and decent drive options 4) make a case where noctua fans aren't out of place (even though I can't afford them ATM) 5) achieve a spot on the livestr...WAN show What I ended up with (after 4 unused revisions...still not close to done yet) is a case which can accommodate up to 16 SSDs, a full length atx motherboard, 14.5in expansion cards, standard PSUs and a 165mm cpu cooler without skimping on airflow. It's not finished yet but I think i have enough to start showing it off now. 6 SSDs (green), 2 hdds (yellow). The 2 hdds can be swapped out for another layer of 6 SSDs if wanted. this is how i'll make it for myself (i use 2 SSDs and a single HDD but may expand) 8 SSDs. You can fit another row parallel to it for a total of 16 drives (but who would ever even be silly enough to use 8 ssds :rolleyes:). this is one of the best angles to see all the fan slots and the motherboard (red-has GPU installed) layout. 2 120mm on top (and PSU-blue) 3 120mm on the bottom. There is also one on the front and there will be one on the back. What do you think of the slots? They're big so that I minimize cutting (hopefully) without impacting the aesthetic much. They won't just be gaping holes in the final product either. I will be using relatively thick filter mesh to black out the holes as well as to filter the case from dust. I just haven't cadded them yet. A pic of the front. There will be venting running up the (nearly) entire front for the intake fan and PSU. General image to show the layout of the case (I know the I/O and expansion slots need to be finished), the cable management holes aren't nearly finalized, i just put them there for reference when choosing the drive layout. with side panels -I'm m not going to give mine a window but i can add it for anyone who wants it. A comparison with Corsairs 350d. My case is more than 2 inches smaller in length and height while only being less than 1/2in wider. I personally hate all of corsairs cases because they take up so much more space than they need to (despise the 900d). Same reason I hate the itx prodigy (can't wait for the matx version) and everything caselabs-but that's just my opinion. Just a picture of my case being swallowed by the 350d-I thought it was funny. For anyone doing a similar project: http://makezine.com/2012/04/13/cnc-panel-joinery-notebook/ this gave me a relatively clear description for how I wanted to make this project. Laser cutting is also relatively cheap if you have a local place for it (most cities do) at $1/min the cost is approximately $0.03/cm to cut 1/8in plywood (rounding up-80w laser at my local place here in Toronto). Yes, it can also cut acrylic. Once this is done i might make a case with a better liquid cooling emphasis if theres enough interest / if I have enough money to afford a custom loop. (I'd just make it a bit bigger in all dimensions to accommodate radiators) I'm really interested in criticism. Especially if you have any ideas for alternative ventilation holes, I'd love to see it (pictures appreciated). EDIT: work in progress not work log. guess i shouldn't be posting late at night.
-
I am planning to make a custom pc case from scratch and I was wondering what material should I use for it. I thought about acrylic since it easy to work with and bend, but whenever I search online to buy it, it is crazy expensive even though people say its cheap. (and how can you bend acrylic to a right angle or would it be better to attach the two sides together) I also thought about MDF since it was cheap and easy to work with and Ive seen some good cases made with it, but people say it doesnt resist moisture well (is that a problem for a pc case) I dont want to work with aluminum since it seems much harder to work with and expensive. I dont have access to many tools (basically only a dremel and and few other) Which one should I use and if none, what should I?
-
Edit: I RESTARTED THIS ENTIRE PROJECT. GO TO THE BOTTOM OF PAGE 2 AND START FROM THERE TO SEE THE GOOD PART. Hello world of Linus Tech Tips! I'm just messing around with some old parts I had lying around and it kind of turned into a build. I need some way to backup my main computers files and a few other computers around the house, plus I had some things I wanted to store on our network so I decided to turn it into a NAS. It's not the end of the world if anything breaks because their all parts that are almost eight years old. I don't have a case either so I'll be making a test bench type thing for it. I don't know how far this project is going to go but If I get to any of the cool ideas I have in my head, it will be awesome. While your looking this over keep in mind i'm 15 so don't scream in the comments, "YOUR DOING IT WRONG." I'm just trying to figure it out for myself. Without further ado, here it is:
-
After Project Shadow it is time for something new and to testing skills... I want to create my first Scratch-Build, maybe i can not post every day some updates but i try to update the project every week. The Project The project is a Terminal-PC what you know it from one of the Fallout games with some nice hardware and custom watercooling. The Terminal it self is made out of Wood and a bunch of 3D printed parts. The idea for this i found on a russian 3d-print page (]3dtoday.ru don´t worry it is safe ). The creator uplouded all files for the 3D printer and the wood stuff, he would be exited if some one fills with real Hardware and i thougt it is no problem and for the first Scratch Build not so a bad idea... The CAD model was a normal 2D so i decided to re do it in 3D to get a idea of the dimension. The Wood stuff is already at home and some test with the 3D-Printer are finished now i have to order the Filament and to print all the parts, maybe it will take 2 weeks for all the parts. Today i will take some pics and add it. The Hardware At the moment the hardware is the same as the Hardware of Project Shadow. PCPartPicker Part List CPU: Intel Core i5-8400 2.8 GHz 6-Core Processor ($199.89 @ OutletPC) CPU Cooler: RAIJINTEK PALLAS Black 56.55 CFM Sleeve Bearing CPU Cooler Motherboard: Asus ROG STRIX B360-I GAMING Mini ITX LGA1151 Motherboard Memory: G.Skill Trident Z RGB 32 GB (2 x 16 GB) DDR4-3000 Memory ($149.99 @ Newegg) Storage: Samsung 970 Evo 250 GB M.2-2280 NVME Solid State Drive ($114.48 @ Amazon) Video Card: Asus GeForce GTX 1060 6GB 6 GB ROG STRIX Video Card Power Supply: Corsair CX 600 W 80+ Bronze Certified Semi-modular ATX Power Supply ($149.89 @ OutletPC) Total: $614.25 Prices include shipping, taxes, and discounts when available Generated by PCPartPicker 2019-09-22 03:12 EDT-0400 The Cooling: CPU-Cooler: GPU-Cooler Radiator: Pump/AGB: Tube: Fittigs: Fans: At last i want to thank my Sponsors: Nuka Cola for fresh Drinks! Red Rocket for gas that i can drive with the car to go shopping... And RobCo for some nice and hated moments in front of the terminals in game...
- 31 replies
-
- 2
-
-
- scratchbuild
- asus
- (and 3 more)