Search the Community
Showing results for tags 'disassemble'.
Found 18 results
-
 I was trying to replace my NVME SSD on my Alienware 15 R2 the other day and I couldn't get the battery unplugged, does anyone have a detailed video or pictures as to how to do it. I went ahead and replaced my ssd without unplugging the battery, but in the future I would like to avoid doing that since, there is a change of hardware damage. My problem is that unlike desktops which have a prong you push in (like on an Ethernet cable) the alienware doesn't have that for any of it's connectors. I looked at ifixit and it wasnt' any help because pretty much all it said was "just pull the plug out". It seems to me the only way to get it unplugged would be to pull by the cord which would more than likely break it.
 -
 Hello After changing channel, the picture on my LG 49UH620V television started doing this flicker. I tried reseting the software to factory settings, then tried leaving it unplugged over night, and still no fix. The issue is here on this video Any suggestions on a fix? I found this fixing guide in which the guy had the same problem (from about 11 minutes, still image at 13:33). Does anyone have any suggestions? I'm really unfamiliar with most of the components of this TV so I'm not really sure where to draw the parallels. I've attached some pictures of my TV below. Thanks
-
Other owners of the Corsair 400c case with or without the window, I have a question. How often do you remove the front panel to clean your filer, and how easy to remove is your front panel? I have had bad experiences with clips and plastics before and I cringe when I try to remove my 400c's front panel. I resort to removing both side panels 99% of the time so I can push on the clips a little bit so they free up without such direct force from pulling on the panel. The time for another cleaning is evident by the circle of dust accumulating on the filter now, and I am apprehensive about broken clips. Thoughts? Suggestions? Experiences? Anyone break their clips yet on this case?
-
Hi, I intended to make this a few months ago after I finished my Oil build, but never go around to it. So I thought I'd make a summary of the experience so that anyone else who is planning on doing this can reference it. So about 7 months ago I decided to throw caution to the wind and purchase all the stuff for an Oil cooled PC, it's something I'd always wanted to do but had never had the time or money to do. So the first iteration worked extremely well for about 12 hours and then the fish tank that I'd used developed a crack and spilt oil everywhere (Note, washing up liquid is your friend). No worries, I went to the pet store a few days later and got myself a more expensive fish tank which I felt confident would be able to hold the oil. I then bought a cheap case to cut up so that I could use it as a motherboard tray and lid. I put the newly built PC in the oil and filled it up and it worked. I began testing and all seemed fine until about 1 hour of gaming had passed, at this point the oil had heated up to such an extent that the CPU and GPU were both pinned at 90C even whilst idling, the fish tank was radiating so much heat that it was uncomfortable to be in the same room as it and it burnt my hand to touch it. I began just using it as a media PC, which wasn't ideal as it made a lot of splashing noises.Eventually, I stopped using it all together and it started to gather dust, at this point the oil had splashed along the top and it meant that everything stuck to the PC so it was extremely dirty. So a few months passed and the place I worked decided that they needed to me to do some Video editing (Before working there I used to do a lot of free-lance content creation for companies), this was all well and good, so I drained the PC and hauled it to work, re-filled it and then it just went tits up. First, it wouldn't boot, then when it did the CPU was pinned at 40C and starting any task would overheat it. At this point I retired the PC and decided to put it back to an Aircooled one.I've not seen any documentation of this so I thought I'd give you guys a rundown of what I did. First, I took my system out of the tank and placed it in 5 bin bags and then a box to transport home, Once home I left it outside in my shed to drip dry for 2 days, after this I sat all day drying the system with a hair dryer on the cold setting and 2 rolls of kitchen roll. After a day and a lot of disassembly, everything was dry enough to put into a dry system (It's still got a fair bit of oil on it, but it's not coming off). One new PSU, Case and CPU cooler later it's still not working perfectly, but it's allowed me to type this on so it'll do for now. If you are going to do an Oil cooled PC build please for the love of God follow the below advice; - Don't buy cheap, you'll buy twice and it makes a mess - Washing up liquid is your friend, use it. - Be prepared to spend a good few days on maintenance - Don't expect it to work straight away - Never move it around - Keep it as clean as possible - Plan ahead. If you've got any questions let me know, I'm happy to answer anything regarding the subject. For reference, this is the System I had submerged - Intel i7 4770K Stock cooler MSI Gaming 3 Z97 Board 8GB AMD Gaming RAM Zotac GTX 970 Corsair CS650W PSU Sandisk 256GB SSD
-
Hi there, My laptop was being heated too much for quite a while. I thought its too old now and may be its just fine. Later I found that my laptop fan is not working. I decided to play Call of duty world at war at my Dell n3420 and as I had played black ops 1 and 2 on it comfortably, i though it would be a piece of cake but my laptop started shutting down again and again. I downloaded a few twearking softwares to find out that my laptop temperate is reaching to insane 86 degree Celsius. I found my system fan is not working at all, I download a few software that do not detect my laptop fan and CPU temperate keeps rising. So i tried to open my laptop but i just cannot remove the keyboard. I tried a lot and saw youtube videos but its just not happening. Please someone help me and give me some instructions as how I can open a laptop myself.
-
My 16 year old Samsung optical PS/2 mouse recently passed away. RIP mouse. It's health was poor in its later years, especially in its final three. From the tension in the clicker giving up repeatedly and me having to open up the switch and manually fix the tension in the spring and bring the click back, to the cable fraying, to the tracking failing and finally the circuit board failing; it went down fighting, like a Ma... mouse. I used it vigorously for gaming and I can say with very high certainty that it has easily been through at least 20 million clicks(literally!) on the left side and at least 10 million on the right. With heavy heart and a tear in my eye, I now need a new mouse. Ideally I'd like a new mouse's circuit board with a durable switch that would just fit into the chassis of my old mouse so I don't have to readjust to the new mouse's shape but nobody sells(AFAIK) mouse circuit board separately. Mouse Requirements- Mouse MUST be repairable. I should be able to open the chassis with a Philips head screw driver. Especially to fix the tension in the switch's spring which is bound to eventually reduce. Mouse MUST NOT have a braided cable. Mouse MUST NOT have any RGB lighting or any non functional coloured lights of any kind.*(EDIT) I'll take one where you can turn them off but I would really like it if it didn't come with LEDs to begin with as I like to pay only for things that I will use. *(/EDIT) Mouse MUST LAST me at least 10 years. I realise this an unreasonable request. But I don't mind paying for quality. I don't mind buying a 5/10 year old mouse model (not an actual 5 year old used mouse, mind you) if I'm convinced it's durable. Mainly Claw grip, sometimes Tip grip and rarely Palm grip. Things I don't really mind but I'd rather not have but please tell me nonetheless so I that I have more options- I don't mind cheap feeling mouse long as the insides are durable. But the scroll wheel should not be cheap feeling. I prefer the scroll wheel sturdy. I don't mind gaudy over the top looking mouse long as it's durable. But it prefer a simple looking design. Preferably an inexpensive mouse. But I don't mind a more expensive mouse long as it's durable. That Samsung mouse(RIP) that I mentioned probably not worth more than $6 but it lasted me 16 years. *(EDIT) Preferably a mouse without drivers.(/EDIT) I'll add more requirements to this later with an asterisk(*). A no joke sincere thanks and a long-as-you-want hug if you manage to find me a mouse.
-
 I recently was asked by my friend to take a look at his gaming laptop. After removing the laptop's fan, I feel as if I witnessed a murder scene. Anyone with experience please take a look at these pics and do a quick analysis on what happened here? From what I can tell, the laptop vents got clogged by dust which made the temps skyrocket. As a result, the thermal paste melted... Is this possible? Was there just too much thermal paste?
-
Hello everyone, as a future university student I was looking for a good laptop that could last for the whole 5 year course. I found the Dell Inpiron 15 7559. I was thinking about buying the base model with an SSHD of 1TB HDD + 8GB SSD. My question is: Is the SSHD only one component or is SSHD a separate hard drive and an m.2? That would help a lot, since I really want to upgrade the storage. Thank you all in advance PS: Here is the german link (in case it helps): http://www.dell.com/de/p/inspiron-15-7559-laptop/pd?oc=cn95701&model_id=inspiron-15-7559-laptop And here is the american link: http://www.dell.com/us/p/inspiron-15-7559-laptop/pd?oc=dncwpw5716h&model_id=inspiron-15-7559-laptop
-
I have a pair of Oakley Bottle Rocket sunglasses which are white, a color that I'm tired of always wearing. I want to paint them black so I can match more of what I wear. The only problem is I don't know how to remove the temple arms. I know that most Oakleys' arms come off pretty easily, but I can't find anything on the internet on how to take the thing apart. I really don't want to break them. Can anyone help? Is it even possible to remove the arms on this model?
-
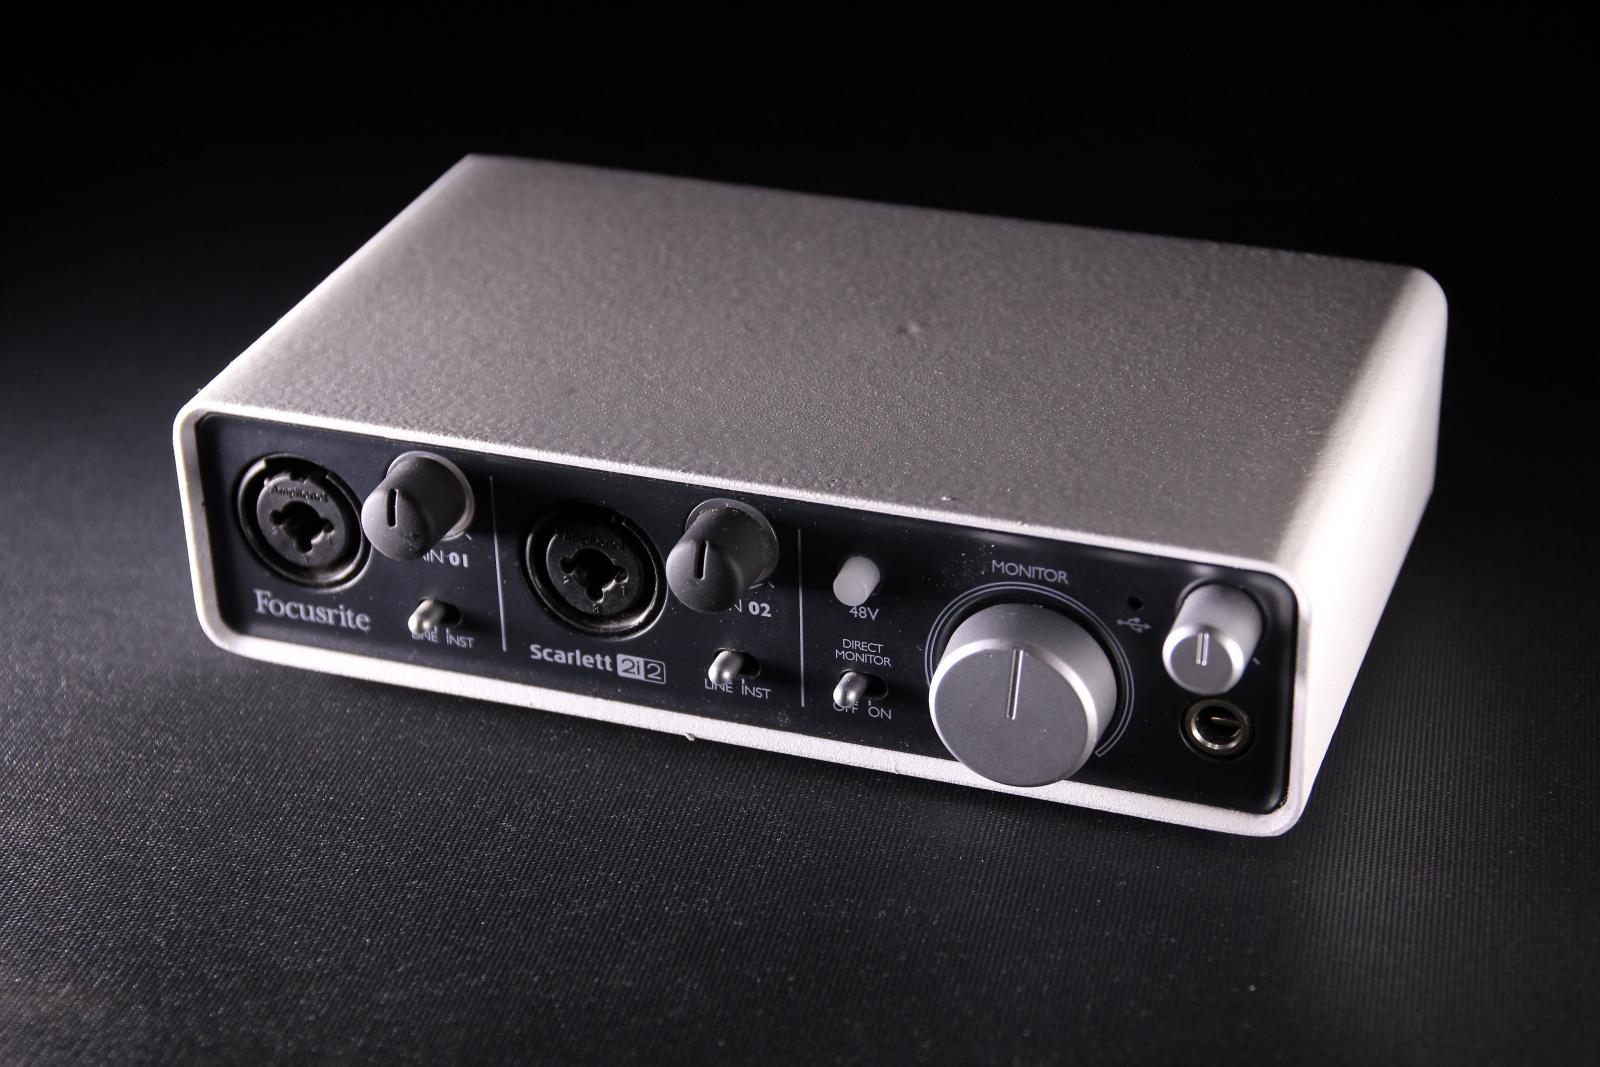
Hello Everyone! So I really have enjoyed using my Scarlett 2i2, and really have had very few complaints excpet for one thing. The colour. Not that it is bad, but it really didn't suit my setup colour, so I decided to do something about it. I decided to use Plastidip to paint my 2i2, so if it didn't turn out that well or I wanted to go back to the red on the brushed aluminium, then I could easily remove it, but I have to admit I am happy with the result. Here is my video tutorial of how to paint it, and I will also post a couple of pictures of how it turned out. Thanks for reading, and hope you learn from my mistakes if you decide to paint your own 2i2!
-
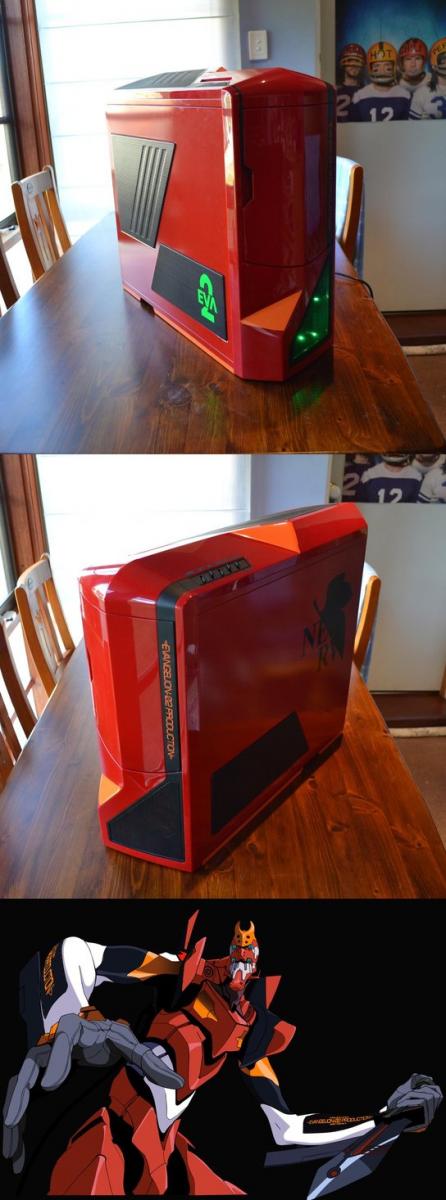
This is only the second time I have posted on this forum I believe(If ever). Although this is of course my first attempt for a case mod. I was planning a regular build in a few months. However, this was going to be a standard Micro-ATX build until I saw this case mod of a "NZXT Phantom". I am kinda an Evangelion geek but I don't expect anyone to indulge my obcestions here. I was thinking on doing a similar build of a diffrent mech from Evangelion and wanted to know if anyone had any expeince ripping apart a Prodigy M, and could tell me how difficult it would be to repaint. Sorry if this would of been better served if placed into the "Computer case and power Supplies" Forum
-
So, I have a Sapphire Reference R9 290X, and I finally got my Accelero Xtreme III to swap out for the stock fan and heatsink, and I can't take apart the damn thing. There is no back bracket, and I have already taken out all screws that are attached to it, but can't get to the inside. Completely lost on this. http://i.imgur.com/r9XDje1.jpg http://i.imgur.com/DR11QOg.jpg http://i.imgur.com/FMiGusG.jpg http://i.imgur.com/gJeudhz.jpg Any help? It really seems sealed up in certain parts around the middle section, but can't see with what.
-
In a nutshell: I disassembled my entire laptop in order to replace the thermal compound. Now when I try to start it up, only the keyboard LED's and touch control panel LED's light up and flash at regular 1~2 second intervals. The screen is completely blank. Any ideas what could have gone wrong? The laptop: http://h10025.www1.hp.com/ewfrf/wc/document?docname=c01550098&cc=us&dlc=en&lc=en
-
Hello Forum. I want to paint my Zalman ZM-F3 FDB fans. For that I'll need to disassemble them. They don't have the rubber grommet on the back. It was easy to disassemble my normal Cooler Master Stock fan, but the FDB fans seem to be difficult. It would be really nice if someone could send me a link to a video because I didn't find any. Thank you :)
-
I have H100i and when I shake the rad I can hear the water inside it move. That can only happen if there is air inside it, right ? Isin't that bad ? I know its a closed loop so theoretically there is no where for the fluids to go/vapor. but do I have to disassemble it and fill it again with proper fluids ? refilling and bleeding would be a pain in the ass but plausible. your thoughts ?
-
 Hi guys, I had promised to take apart my Blue Switch Mechanical Keyboard from Monoprice.com for $57 without taxes or shipping, at some point or another. I have been putting it off for a while but then decided to do it at work. That was (mostly) a success. TL;DR: It is a high quality keyboard (to an extent) with a metal plate that gives it weight and durability. It is very easy to disassemble. Anyway, on to the pictures. Remember guys, be responsible. Put pictures in spoilers if there are ever more than 1 and they are large (or any combination of either... wait, what? lol). Note that the resolution of these pictures is 2592x1944 but scaled down to Flickr's "large" size (1024xsomething or other). Forgive blurriness where it exists.
 -
Hi guys, [Title] The CELL and emotion engine processors are fricking huge compared to a 3570k (what I own). I'd say the surface area is like 40-60% bigger. How much thermal paste do I use? Does it matter? It will be squished between them anyway, but at the same time, I don't want to have it go over the side. I don't know how the PS3 will handle that (even though there was an obscene amount of white, cheap, thermal chalk on them before I cleaned them). Just curious. Thanks, Vitalius
-
 Background My friend contacted me as the mouse was having issue so i dug in and found the issue that is pretty common in all the computer gaming mice wheter they are gaming ones or normal. I am a bit disappointed by corsair as this mouse is pretty expensive yet we have this issue just like any other cheap mouse. Also right click was having a lil skipping problem that was fixed too. And as it was opened i cleaned all the buttons just to avoid another near surgery I loved its shape, appearance and smoothness. Build quality except the buttons was solid too. The bottom two screws are trox type. Why this happens to computer a mouse ? They have pure copper buttons ( i think so ) thats y they get oxidized real quick and that oxidation layer being less to no conductive arises such issues. Inside these buttons are very thin flexible copper plates and tiny discs kinda things thats what m talking about. Those tiny discs like structure like shown in the pic, get black and non conductive over time. Or may be its not the material but the tiny amount of current that passes on every click that causes those discs to become non conductive n black over time. Tools required 1> Torx screwdriver set 2> Phillips screwdriver set 3> A very thin flat head screw driver 4> WD-40 or body spray or petrol ( For cleaning the oxidation ) Step 1: How to Open Corsair M65 RGB ? With Love Unscrew the bottom 2 torx screws Pull back the upper part of chassis, it will lift a lil bit automatically. But lower part of the mouse will be still stuck. (Pic 1 for reference of upper and lower part) Use the thin flat head screw driver and put it between the metal and plastic part at the lower side of the mouse. And then push the screw driver's back downwards while the head still inserted in the gape mentioned. (Pic * for reference) Dont pull the two parts right away as they are 4 cables that have to be dismounted first For the ribbon cables (Pic 2) the connector head has a black plastic part that has to be lifted and then the cable can be pulled away For the other connectors (Pic 3) wiggle and pull the connector to remove. This is an optional step for ease of access. You can unscrew the top 2 screws to remove the upper PCB of the mouse. Spray some WD-40 or body spray or petrol ( For cleaning the oxidation ) on the mouse buttons and click them at least 10-20 times. After that assemble back the mouse and your mouse will work flawless. Keep in mind that surface will get oxidized again with use and you will have to open it again depending on the usage. Its how these mice are made. You can fix any mouse that skip clicks with this method.