


lowngcawt
-
Posts
10 -
Joined
-
Last visited
Content Type
Forums
Status Updates
Blogs
Events
Gallery
Downloads
Store Home
Everything posted by lowngcawt
-
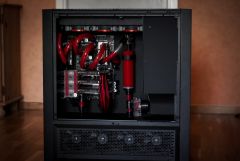
These are the final pictures of my last build "Project Aether". Its big, Its totaly overkill and its watercooled.
-
-
From the album: Project Aether
-

From the album: Project Aether
-
From the album: Project Aether
-
From the album: Project Aether
-
From the album: Project Aether
-
From the album: Project Aether
-
From the album: Project Aether
-

From the album: Project Aether
-
would be amazing to have this hooked up to a TV with a gamepad!
-
OOOH SHINY! Perfect as a HTPC
-
would be perfect for my wifes rig, she keeps whining about her's being slow (phenom II 965)
-
Favorite item is EDG750 PSU, love the looks of it and being quiet is a nice bonus too! Would be perfect for my upcomming Benchmarking/OC rig
-

1 Million Subscribers - Thank you all! And a giveaway!
lowngcawt replied to nicklmg's topic in LTT Releases
Thank you linus (and the rest of LMG) for your work you put in to the community and Gratz on hitting the 1M marker! -
Define XL Case Mod / Dream AMD Build Watercooled!
lowngcawt replied to lowngcawt's topic in Build Logs
Thanks Im not going to polish the blocks tho, i really like the frosted look with colored coolant! -
Define XL Case Mod / Dream AMD Build Watercooled!
lowngcawt replied to lowngcawt's topic in Build Logs
Thanks alot! Yes there is a WB for C5F-Z, but it was kindof hard to get my hands on one, had to wait almost 3 months for it to be made and shipped to me! (but that was in the middle of the r9 290 WB rush aswell so EK had alot to do) Good idea, i might do that! But using them as case fans, nooooo way! Thanks -
Define XL Case Mod / Dream AMD Build Watercooled!
lowngcawt replied to lowngcawt's topic in Build Logs
Thank you! Temps on the gpu's were max 65C in a 30C room after about 24/h mining, gaming rarely pushes them over 50c. CPU sits nicely at about 55C -
Define XL Case Mod / Dream AMD Build Watercooled!
lowngcawt replied to lowngcawt's topic in Build Logs
Thanks! -
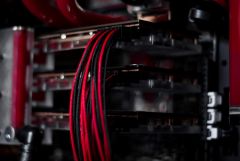
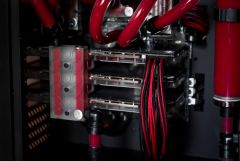
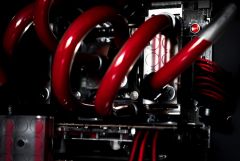
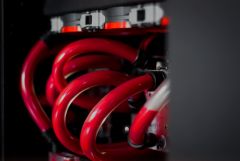
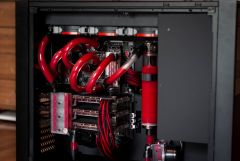
Hello! So this is my first case mod and my 2nd time watercooling (first time was only a CPU loop) It started out with me building a new rig for BF4; FX 8350 & 2x 7870 but then AMD released the R9 290 and i just had to buy it, I started getting into Litecoin mining and "accedentally" bought another R9 290, but after a few weeks of mining with those two jet engine-ref coolers i decided it was time to do something about it! The rig started out like this; I then got my hands on a used FD Define XL for free (3€) that i decided to mod! This is what i wanted to fit in the case: Mobo: ASUS Crosshair v formula-z CPU: AMD FX-8350 @ 4.8GHz GPU: 2x Sapphire Radeon R9 290 RAM: Corsair Vengeance 1600MHz 2x4GB PSU: AX1200i (yes it is RM750 on the pics, but i have changed it since!) SSD: Kingston V300 120GB Storage: Samsung 1TB Case: Fractal Design Define XL Titanium Grey CPU block: EK Supreme LTX AMD GPU block: EK-FC R9-290X Original CSQ Nickel Mobo block: EK-FB ASUS C5F-Z Acetal Radiator1: Black Ice GTS 240 Radiator2: Black Ice GTS 240 Radiator3: Alphacool NexXxoS ST30 FC 360 Fans: Corsair SP120 Quiet Edition x7 Pump: EK DCP 4.0 Res: Phobya Balancer 250 nickel black Coolant: EK Blood Red Since the old Define XL has basically no watercooling support at all some small mods had to be done so i could fit what i wanted; A 360 rad up top and two 240 rads in the bottom chamber, i knew it would be a tight fit but i was sure it would work! Started out with a window for the side panel (still have to cut out for the bottom rad fans!) With that done, it was time to make room for that 360 rad in the roof! I grabbed my friend the dremel and went nuts! Perfect! Now it was time to start the disassembly of my rig and draining the loop. Notice the colour of the EK Blood Red coolant, it had turned into a really, really, reaaaally dark purple (Anyone knows why this happens and how to prevent this?) Poor dusty fan Remember this kids; cats + no sidepanel is a bad combination! Both cards out! Hdd cage out, time to drain the loop and remove rads. There we go! Now it was time for some waterblock mounting Ready to remove the stock heatsink! All naked Much better! Next in line: R9 290's Tools needed for this install: multibit screwdriver and a scissor. Am i the only one that loves the looks of these coolers? if only they werent so loud! All naked and dirty, dont worry my love im going to clean you up and get you a new outfit! FYI, If you are impatient, please dont attempt this as you will probably rip all your hair out trying to remove the protective films from the pads, it is a real pain in the A** Looking Good! Let's tie you up with your twin and put you where you belong! Some Cabling started and top rad mounted! this is going to look so good... Tubing started, pump and one of the bottom rads mounted! All tubes done and the 2nd rad at the bottom mounted, just barely fit! PSU PoV, super tight but it works. Not looking forward to try and empty this loop, not a good placement of that T-fitting... Getting ready to fill her up for leaktest! (Was getting super late at this time, about 3 at night so i let her run while i went to sleep!) Good Morning and no leaks! Some more pics of her up and running: Gotta love the SP120's <3 First of all, sorry about the not so perfect image quality, photos taken with my Nexus 5! I am super happy with the results, what do you guys think? Feel free to ask any questions you might have!


