


jgperson
-
Posts
42 -
Joined
-
Last visited
Reputation Activity
-

 jgperson got a reaction from Lord_potato in The Water Cooling Gallery
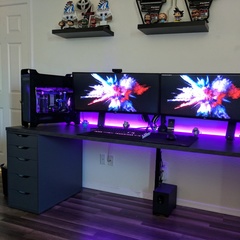
Both of my current water cooled rigs.
1.
Processor: Intel 4790K OC to 4.8 GHz
RAM: 32GB Corsair Vengeance 2400 MHz DDR3
MOBO: Asus Z97-A USB 3.1
Graphics Cards: 2x EVGA GTX 980 SC in SLI
PSU: Corsair AX1200i
Case: Corsair Air 540
2.
Processor: AMD Ryzen 7 1800X OC to 4.275 GHz
RAM: 32GB Corsair Dominator Platinum 3000MHz DDR4
MOBO: Asus Crosshair VI Hero
Graphics Cards: Zotac GTX 1080 TI
PSU: Corsair RM850x
Case: NZXT H440 White
-
.png "Funny")
-
 jgperson got a reaction from grimreeper132 in Watercooled RYZEN Hackintosh in a Powermac G5 Case
It's just really fun to paint OK! I CAN STOP WHEN I WANT TO!
-
jgperson reacted to grimreeper132 in Watercooled RYZEN Hackintosh in a Powermac G5 Case
Please don't tell me I will need to send another one to rehab over paint fumes.
-
jgperson reacted to grimreeper132 in Watercooled RYZEN Hackintosh in a Powermac G5 Case
Right let me finish this tube of glue then I will phone the rehab centre for you.
-
jgperson reacted to grimreeper132 in Watercooled RYZEN Hackintosh in a Powermac G5 Case
only the finest modeling paint, and as we all know if you are using it, you can't use it in a well ventilated space you need to do it in the smallest room in your house just to get the full enjoyment out of, well uuuum modeling yea modeling that's it, that's what I enjoy there
-
jgperson reacted to grimreeper132 in Watercooled RYZEN Hackintosh in a Powermac G5 Case
yes it is tastic, I mean you get really high of the enjoyment and fun that modeling offers in those tight spaces.
-
 jgperson reacted to Zando_ in Watercooled RYZEN Hackintosh in a Powermac G5 Case
Yeah. My main problem is putting too thick of a coat on and the humidity making it take forever to dry. the advantage of spray pain is that it's cheap and you can just sand it down till it's smooth and do another couple coats.
-
jgperson reacted to Zando_ in Watercooled RYZEN Hackintosh in a Powermac G5 Case
That's what garages are for! I can't work in the garage at my house, since a fridge, freezer, and my dad's car and tools are in there, thus why I paint outside. The wind can be a pain though, but not as bad as the fumes if I did it in a garage. And no matter how tricky it is, it always feels more awesome with every coat!
-
jgperson reacted to Zando_ in Watercooled RYZEN Hackintosh in a Powermac G5 Case
Tinkerers till we die! I love tinkering with stuff... I try and get mods for all my games, I love alternative OS'es (I used to test out all sorts of Linux distress for kicks and giggles) as well. Though Battlefront has been eating my computer time lately. And my tinkering time this weekend was all eaten up by lazing around and painting this:
-
 jgperson got a reaction from Zando_ in Watercooled RYZEN Hackintosh in a Powermac G5 Case
Yes to this!
-
jgperson reacted to Zando_ in Watercooled RYZEN Hackintosh in a Powermac G5 Case
Or run both computers as hackintoshes just for fun....
-
jgperson reacted to Zando_ in Watercooled RYZEN Hackintosh in a Powermac G5 Case
That is what the new Mac Pro needs to look like.
-
 jgperson got a reaction from Anthony_95 in Watercooled RYZEN Hackintosh in a Powermac G5 Case
Now for the final assembly. I test fit a bunch of different hardware placements but what I ended up settling on was the PSU at the bottom mounted with double sided foam tape. All of the cables were then run up the front side of the case along the motherboard mounting tray and grouped together using zip ties. It is also important to know at this point I bought a cable from Black CH mods to use the existing IO on the front of the case with an ATX motherboard. Radiator at the front with pump/res combo unit mounted to it using the EK uni bracket. I secured the radiator to the front with car grade double sided emblem tape. If you have ever used this stuff you know it is not going anywhere. I reused the existing hard drive cage from the case and secured it to the top also using emblem tape.
One of the most important steps in this process is the running of tubes (since it is watercooled and all). There are only 4 tubes in this build thanks to the plethora of fittings I have in the case. I don't know if I listed them all but any time you do a hardline watercooled build it is important to have a handful of rotary 90s and dual rotary 90s on hand. I tried to do it without them in my last version of this build using the NZXT H440 and couldn't get my tubing runs to look like I wanted.
Fill up the system, leak check, then hook up the power and you are good to go. I added in a RGB light strip and hooked it up to the ASUS aura sync header for a little bit more color. This process was a long time coming and took almost a month from idea phase to final assembly.
I spent a long time without a working home PC but man was it worth it! Thanks for reading.
-
 jgperson got a reaction from documnt in The Water Cooling Gallery
Check out my build log in this forum for my latest watercooled build!! Modded PowerMac G5 case dual boot hackintosh running macOS 10.12.6 and windows 10.
-
 jgperson got a reaction from namzug13 in Watercooled RYZEN Hackintosh in a Powermac G5 Case
Now for the final assembly. I test fit a bunch of different hardware placements but what I ended up settling on was the PSU at the bottom mounted with double sided foam tape. All of the cables were then run up the front side of the case along the motherboard mounting tray and grouped together using zip ties. It is also important to know at this point I bought a cable from Black CH mods to use the existing IO on the front of the case with an ATX motherboard. Radiator at the front with pump/res combo unit mounted to it using the EK uni bracket. I secured the radiator to the front with car grade double sided emblem tape. If you have ever used this stuff you know it is not going anywhere. I reused the existing hard drive cage from the case and secured it to the top also using emblem tape.
One of the most important steps in this process is the running of tubes (since it is watercooled and all). There are only 4 tubes in this build thanks to the plethora of fittings I have in the case. I don't know if I listed them all but any time you do a hardline watercooled build it is important to have a handful of rotary 90s and dual rotary 90s on hand. I tried to do it without them in my last version of this build using the NZXT H440 and couldn't get my tubing runs to look like I wanted.
Fill up the system, leak check, then hook up the power and you are good to go. I added in a RGB light strip and hooked it up to the ASUS aura sync header for a little bit more color. This process was a long time coming and took almost a month from idea phase to final assembly.
I spent a long time without a working home PC but man was it worth it! Thanks for reading.
-
jgperson reacted to Tech_Dreamer in Watercooled RYZEN Hackintosh in a Powermac G5 Case
it's as if two things that aren't supposed to be together and is from different origins are forced are made to be that way.
-
jgperson reacted to Tech_Dreamer in Watercooled RYZEN Hackintosh in a Powermac G5 Case
Builds logs like this reminds me of the Zerg Protos Hybrid story line from Starcraft2.
-
 jgperson got a reaction from Tech_Dreamer in Watercooled RYZEN Hackintosh in a Powermac G5 Case
Now for the final assembly. I test fit a bunch of different hardware placements but what I ended up settling on was the PSU at the bottom mounted with double sided foam tape. All of the cables were then run up the front side of the case along the motherboard mounting tray and grouped together using zip ties. It is also important to know at this point I bought a cable from Black CH mods to use the existing IO on the front of the case with an ATX motherboard. Radiator at the front with pump/res combo unit mounted to it using the EK uni bracket. I secured the radiator to the front with car grade double sided emblem tape. If you have ever used this stuff you know it is not going anywhere. I reused the existing hard drive cage from the case and secured it to the top also using emblem tape.
One of the most important steps in this process is the running of tubes (since it is watercooled and all). There are only 4 tubes in this build thanks to the plethora of fittings I have in the case. I don't know if I listed them all but any time you do a hardline watercooled build it is important to have a handful of rotary 90s and dual rotary 90s on hand. I tried to do it without them in my last version of this build using the NZXT H440 and couldn't get my tubing runs to look like I wanted.
Fill up the system, leak check, then hook up the power and you are good to go. I added in a RGB light strip and hooked it up to the ASUS aura sync header for a little bit more color. This process was a long time coming and took almost a month from idea phase to final assembly.
I spent a long time without a working home PC but man was it worth it! Thanks for reading.
-
 jgperson got a reaction from Glennieboyyy007 in Watercooled RYZEN Hackintosh in a Powermac G5 Case
Now for the final assembly. I test fit a bunch of different hardware placements but what I ended up settling on was the PSU at the bottom mounted with double sided foam tape. All of the cables were then run up the front side of the case along the motherboard mounting tray and grouped together using zip ties. It is also important to know at this point I bought a cable from Black CH mods to use the existing IO on the front of the case with an ATX motherboard. Radiator at the front with pump/res combo unit mounted to it using the EK uni bracket. I secured the radiator to the front with car grade double sided emblem tape. If you have ever used this stuff you know it is not going anywhere. I reused the existing hard drive cage from the case and secured it to the top also using emblem tape.
One of the most important steps in this process is the running of tubes (since it is watercooled and all). There are only 4 tubes in this build thanks to the plethora of fittings I have in the case. I don't know if I listed them all but any time you do a hardline watercooled build it is important to have a handful of rotary 90s and dual rotary 90s on hand. I tried to do it without them in my last version of this build using the NZXT H440 and couldn't get my tubing runs to look like I wanted.
Fill up the system, leak check, then hook up the power and you are good to go. I added in a RGB light strip and hooked it up to the ASUS aura sync header for a little bit more color. This process was a long time coming and took almost a month from idea phase to final assembly.
I spent a long time without a working home PC but man was it worth it! Thanks for reading.
-
 jgperson got a reaction from Limecat86 in The Water Cooling Gallery
Had a pump fail in the Ryzen build I posted earlier. Here is the new loop design with the new pump. Currently dealing with graphics card issues though and I cant figure out why...
-
jgperson got a reaction from Limecat86 in The Water Cooling Gallery
This build was my new idea of what I "needed". I am a PC gamer although I don't spend as much gaming as I'd like. Also there are a lot of days where I work from home, and I wanted something that could run VM's for the applications I use at work. This told me to get more cores, more threads, and more overall power. So I decided to go with Ryzen.
First thing, when I built the system, I used the standard air cooler that came with my GTX 1080 Ti FE, a Corsair H100i for the CPU. If you look at my old builds you know I have said like "I will never build a PC without a custom water cooling loop again". So obviously this setup wasn't going to cut it. I used the system in this configuration for about 2 weeks before I couldn't take it anymore.
Thats when I purchased all the water cooling parts you see on this list and built it up. The only thing is that the first Pump I ordered (an XSPC Photon D4 170) failed. I couldn't wait for the RMA process because I am impatient, so thats when I decided to order the EK-XRES Revo D5. and had to rerun my loop (which I was fine with because it was my first time using hard tubing and I wasn't very happy with it). Also I was originally using a pastel Green coolant but switched it out due to the fact that it wasn't EXACTLY what I wanted...
Fast forward after the new pump was installed. Something happened to my GPU. It wouldn't output to my monitor at all. Another 2 week RMA time period later, I get my replacement GPU and get it installed. Have been running the system for a few days now and I can say that I am still not 100% satisfied with my tubing runs, but I am completely fed up with taking it apart, so It is complete... For now.
https://pcpartpicker.com/list/tMD3JV
-
 jgperson got a reaction from For Science! in The Water Cooling Gallery
Thanks! I have tested the drain there as I had to RMA my gpu and a pump. It drains alright, but usually I put an air compressor into the top of my pump res combo to add a little pressure. It seems to work well like that.
-
jgperson got a reaction from For Science! in The Water Cooling Gallery
This build was my new idea of what I "needed". I am a PC gamer although I don't spend as much gaming as I'd like. Also there are a lot of days where I work from home, and I wanted something that could run VM's for the applications I use at work. This told me to get more cores, more threads, and more overall power. So I decided to go with Ryzen.
First thing, when I built the system, I used the standard air cooler that came with my GTX 1080 Ti FE, a Corsair H100i for the CPU. If you look at my old builds you know I have said like "I will never build a PC without a custom water cooling loop again". So obviously this setup wasn't going to cut it. I used the system in this configuration for about 2 weeks before I couldn't take it anymore.
Thats when I purchased all the water cooling parts you see on this list and built it up. The only thing is that the first Pump I ordered (an XSPC Photon D4 170) failed. I couldn't wait for the RMA process because I am impatient, so thats when I decided to order the EK-XRES Revo D5. and had to rerun my loop (which I was fine with because it was my first time using hard tubing and I wasn't very happy with it). Also I was originally using a pastel Green coolant but switched it out due to the fact that it wasn't EXACTLY what I wanted...
Fast forward after the new pump was installed. Something happened to my GPU. It wouldn't output to my monitor at all. Another 2 week RMA time period later, I get my replacement GPU and get it installed. Have been running the system for a few days now and I can say that I am still not 100% satisfied with my tubing runs, but I am completely fed up with taking it apart, so It is complete... For now.
https://pcpartpicker.com/list/tMD3JV
-
jgperson got a reaction from Zando_ in The Water Cooling Gallery
This build was my new idea of what I "needed". I am a PC gamer although I don't spend as much gaming as I'd like. Also there are a lot of days where I work from home, and I wanted something that could run VM's for the applications I use at work. This told me to get more cores, more threads, and more overall power. So I decided to go with Ryzen.
First thing, when I built the system, I used the standard air cooler that came with my GTX 1080 Ti FE, a Corsair H100i for the CPU. If you look at my old builds you know I have said like "I will never build a PC without a custom water cooling loop again". So obviously this setup wasn't going to cut it. I used the system in this configuration for about 2 weeks before I couldn't take it anymore.
Thats when I purchased all the water cooling parts you see on this list and built it up. The only thing is that the first Pump I ordered (an XSPC Photon D4 170) failed. I couldn't wait for the RMA process because I am impatient, so thats when I decided to order the EK-XRES Revo D5. and had to rerun my loop (which I was fine with because it was my first time using hard tubing and I wasn't very happy with it). Also I was originally using a pastel Green coolant but switched it out due to the fact that it wasn't EXACTLY what I wanted...
Fast forward after the new pump was installed. Something happened to my GPU. It wouldn't output to my monitor at all. Another 2 week RMA time period later, I get my replacement GPU and get it installed. Have been running the system for a few days now and I can say that I am still not 100% satisfied with my tubing runs, but I am completely fed up with taking it apart, so It is complete... For now.
https://pcpartpicker.com/list/tMD3JV


