


Problader
-
Posts
40 -
Joined
-
Last visited
1 Follower

Problader's Achievements
")
-
 yea the Purple VUE looks amazing it actually looks even better in person than on those pictures
 -
I used 90 Paracord for the internal cables. But I had to rewire and redo the connector because the 90 Paracord will not fit a DuPont connector without tearing it apart.
-
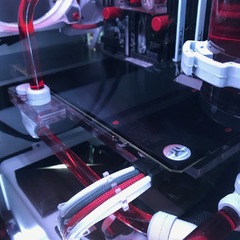
#12 Final steps. I finally received my VUE fluid from PrimoChill. Needless to say it looks incredible. Here are just some preview of the final product. I will be uploading a full photo shoot tomorrow when the lighting is better in my apartment. The tube bending for the 16mm PETG was actually a lot easier than I thought it would be. I felt like I had much more control over the bends than when I did my first build with 12mm tubing. Cable porn. Leak testing.

-
Still waiting on my VUE fluid. Bare with me I will post some more interesting pictures soon
-
#11 Old rig disassembly and CPU delid So I got down to the last few steps. Disassembling the old rig and delidding the 6700k. The True fluid wasn't what I wanted so I ordered the VUE candy purple. Also had to RMA the ITX mobo since one of the memory slot was broken. Build is on hold for now. Until next time!
-
#10 Coolant delivery from Primochill! So I just received my order from Primochill. I got a bottle of True which came with a bottle of SysPrep. But since I have been running red Mayhem Pastel for the last 4-5 months in my blocks I also decided to grab a bottle of System Reboot which hopefully will help me clean the blocks properly without having to take them appart. Here are the shots I took with my brand new Google Pixel 2. That portrait mode really rocks. I'm also receiving the rest of the components by Friday so I'll be building this weekend!! Until next time!
-
It really isnt that bad to do. If you want to take the time to do it properly. Just make sure you have the right pinout. Silverstone strider PSU are pretty much the easiest I would say. Only one double wire and most of the pinout are 1-1 so it is quite simple. Measure twice, cut once. You’ll be fine. Also personnaly i know some people have been saying that sleeving paracord is a pain in the ass. But just do it like I did. Crimp one side, pass the sleeving through than crimp the other side. Super simple and no need for extra tools. Cheers!!
-
#9 Quick update, received my Rockit88 + Liquid Pro Combo. Ready to delid very soon Well this update titles pretty much says it all. I received my delid and relid tool combo from Rockit Cool. I chose to go with Liquid Pro (ultra was out of stock at the time and from reviews it seemed like there was not much difference in both products, apart from the fact that the Liquid Ultra is supposed to be easier to apply) I also finished rewiring all of my front panel Power and HDD new UV Purple LED's, I just got some basic clear UV 3mm and 2x5mm LED's from eBay and got down to soldering everything back in place. Overall that part was probably the easiest wiring I've done so far in this build. Won't be able to see if they work until I swap the CPU in this new rig though ahah. Here are some shots of the goodies the mailman brought me today! And also I should be passing my last order straight from EK and finish this build in a week or two! Until next time!
-
Its their modmesh look, I did 100% of my sleeving in paracord so i’d rather keep the stock cable than to trow in a different type of sleeve. Thank you for the idea though.
-
#8 LED wiring This is for some reason the thing that was the most difficult to be so far. All that sleeving was time consuming but was not difficult in a way. The soldering of the LED strips were a lot more tough than I expected. I thought “hey i’ll be done in 20 minutes” 1 hour later they were done and worked!! This is defenatly not the cleanest job i’ve done so far in this build but the wiring will not be seen so I can live with it. Might end up going back to make it cleaner but that will be all for tonight. Here are some pictures (I did not take any of them on but you’ll have to take my word for it ahah) Sleeved the main wire than soldered the connections. Than went on to decide were to place the strips Finally I soldered everything togheter I was fun and the first connection defenatly was the most challenging. I also swapped the front panel LED for some UV purples. My phone was dead so I do not have any pictures of the process. Until next time!
-
So I have a bunch of fittings, as most people can allready see this build is inspired by the tubing run that Paul's Hardware did in Hotbox 2.0 I tryed and mimic the pump placement with the EK rad at the front but for some reason any combination of fittings I try always seems to be off. Did anyone did that exact same run in the past and could possibly tell me how they fixed the pump, buying extra fittings is not an issue I would tho like the fittings to be all black nickel.
-
Yeah I thought about getting one of those. But it would add a lot of cable bulk at the back of the case. I’m happy with how it turned out so far, once the tubing is in place you will barely see the connector anyway. I think I might have to make some cutout in the frame of the fans. My trident z are a couple millimeters too high for the max clearance of the case. I’ve seen some build that used them so i’ll make it work ahah.
-
#7 Motherboard, front i/o sleeving touch up, last batch of fans. So that motherboard from hardware swap checked out. Received it this morning. My current CPU is in my main rig so i basically just made some test fit finalized the front I/O cables than removed the board for future testing. The Strix z270i came with a front panel extension kit. So i sleeved part of the cables, then spliced the extension wire and solored them to the actual front I/O. It resulted in a very clean single sleeved, heatshrink less front panel connector cable job. My sata cables will then be mostly covered by the front panel cables therefore I do not really need to invest into some cable mods sleeved sata cables. That USB 3.0 cable well I just decided to live with has it is far beyond my skill set to get into sleeving that one. I also finished the paint job on the rings of my sp120. Still have some extension work to do with their cables, and I also need to sleeve them. Should be done tonight i’ll post an update for the final results. Until next time!
-
#6 Initial cable routing and PSU instalation. So my PSU came in this morning. Did a test run in my current system and everything checks out. So I went on to do some minor mods so that it would blend in nicely within the new build. Removed the stickers and painted the blue PCI-E connector black. I then moved on to do some initial cable routing and training. I still need to fix the 24 pin but the will happen when i get the motherboard. I found an Asus Strix z270i Gaming motherboard over on CanadianHardwareSwap if everything checks out I should be getting that one shortly and move on to the next step. Until next time!


