


mgrisoli
-
Posts
28 -
Joined
-
Last visited
Recent Profile Visitors
380 profile views


mgrisoli's Achievements
")
-
Hey guys, Here is where I am at: Some missing things before calling it done: 1. Need to sleeve MOBO and PCI Express cables. I ran out of sleeves, need to order - it will take some time to arrive. 2. Need to cut a window on the case lid for the GPU water block. I knew that would happen I just had to know the exact placement before cutting anything. It would be possible to add "stripes" of acrylic and make the sides taller, so the lid would sit higher than originally is, but to find the same material and match the holes and screws etc... just seems it will look better if I cut a rectangular hole on the lid to accomodate the tallest part of the water block I was thinking on putting something there to cover and prevent dust from coming in the case, but not sure if I will find the right ornament, it is the water box inferno so, if I could just find the right thing... 3. VRM water block Yeah, I got tipped off by that crack on the vrm water block. I can't find a replacement and I may try to fix it later... will see. Just by looking at the picture I realize that I should fix the long left tube that goes into the processor wb to match the height of the one in the right. I am ok with the looks so far, even though it may seem still a little messy, hopefully with the cables sleeved it will get better. In fact I had to remove and reassemble so many times that I don't feel like I was careful enough to hide and tuck the cable properly in the last time. I am really, really, really impressed with my temps. I mean, really, really, really... yeah you got it. This is based on 4790k haswell, which has been known to have very high temps. During stress test @4.6Ghz and cache @44x I got 60ºC. Actually, before this mod I couldn't even run the Aida 64 with FPU test @ stock speed without thermal throttling. So, I am happy with it! It is really quiet, I created my fan profiles so the rad on the right side would turn on @ 40º. At 50º the rad on the back would turn on and then at 60º the rad on the left would turn on, but that last one just happens sporadically and for a very short time during normal usage. I let you know when I am fully done. Any comments and thoughts are appreciated. Cheers! M

- 27 replies
-
- 1
-

-
- dangerden
- watercooling
- (and 2 more)
-
Hey folks! So, everything was more or less going as planned. I had to stop sleeving because I ran out of sleeves. But that's ok. I could sleeve the cables that are on the back of the case, and will be easy to replace the ones on the front after all. The looks (except for the non-sleeved cables e.g. MOBO and PCI Express) is just what I was aiming for. I put it all together, bended the tubes, filled the loop in and started the leak test. After half an hour everything looked stable and I booted up the rig. Amazing 27ºC on IDLE and no more than 60ºC on preliminar stress test. All of sudden the rig booted up by itself. Initially I thought it was because I pushed the stress test too far too soon. No visible leaks, all fittings were dry and the paper showing no marks. It got worse and started rebooting and giving me some error codes. I stopped everything and went for a leak hunt. I never, never suspected that EK waterblock that comes already installed in Formula VII would leak. I cannot describe how upsetting it was to see that. It seems like the seal is not doing its job, would that be because I ran that for one year without WC, just air cooling? I don't know. But I spent hours looking into the stuff I added to the rig. I checked all fitings and blocks pipes before I even think of looking into this block, again "of course" I wouldn't question quality of an EK+Asus partnership! And everything happened concealed under the black plastic plate that covers the MOBO. And the CPU socket was soaking wet! Well, after a couple hours cleaning it up and using a hair dryer to dry it up, I could boot up the mobo again. It seems it is alive. Now, I cannot look at this pictures without cursing. I am really thinking about giving up on this block and leaving the voltage regulators to do its work just air cooled. What do you guys think? Cheers! M
-
Hey crowd! So, after defining pump and res placement I started on cable sleeving. Yes, I have been scared with this for a while. I sleeved the pump cable for starters and coonected it directly to the power SATA out with the 6 pin connector. Then I sleeved the single wire for pump signal to CPU cooler connector. I think I did a decent job and I am satisfied with the end result. Having cables that measure exactly what they should pays off the effort. So, I felt ready for something more complex and decided to build the SATA power cable. After three hours here is the end result: Yeah, it may not be the best cable ever, but it is complex enough for me to make before the 24 pin MOBO cable and won't be too conspicuous in case I screw something up. The main goal here is really customize and reduce the amount of cable to hide, and make the cable pretty where it can't be hidden. When you think that the original cable connects just 4 devices, when I have 5. That forced me to have two of them. And the spacing between the connectors is much bigger than necessary, causing a lot of excessive cable to conceal between the storage units. To relax after sleeving, I mounted the water blocks... Cheers! M
-
Ok folks, I am back and I have been working on my rig.So, a couple days ago I defined the res and pump placement.Here is how it turned out. So played with them a lot before punching the holes on the bottom of the case. I experimented using the pump front inlet instead of the top one, but I would need to push the pump backward, then the outlet would have to have an additional bend when going up to the processor. I even thought of having the res horizontal instead of vertical but nah, that would look sort of akward. A couple things I learned: I don't quite like the options this res gives me. It has just only one hole on the bottom and it is excentric (not centralized). I also don't like that the two holes on the base of the res are not aligned with each other, they have like 45º angle between each other. The pump head also doesn't give you too many options for mounting. Two inlet options and one single outlet. Pretty limiting IMO. But, lucky me, I think I got the best visual I could from this arragement. Cheers! M
-
It is nickel plated cooper. It is heavy and sturdy.
-
Ok guys, there is no fun if there is no drama...The yellow "stains" were just oil.The seller brought to my attention that I should try to disassemble and clean it.Well, it worked and I am now happy with what I got. However, I get to travel tomorrow. It is going to be at least 20 days until I can do some real work in the rig.Cheers! M
-
Hey guys, one setback.I have been patiently waiting for my Bykski CPU block to clear customs. It finally arrived.I bought it on AliExpress...Here are the pictures, you can judge for yourself: So, that basically means that I got screwed.Luckily enough, I will be in US next week and I might order a decent EK block with no 3 months waiting for custom procedures.I thought I would be able to proceed on mounting the rig before my travel but if seems like I will need one month more to get everything I need.It is Ok! I knew the risk I was taking, it is more on the time that I had to wait than the money but I have some lessons learned here: you get what you paid for.At this point I can say: Barrow is ok but Bykski is not. Cheers!M
-
First time with rigid tubing. Have to mess up a couple times to get it right. Mess up #1 Mess up #2 Success! In place: Not sure if I won't replace this one later but need to be sure I will have enough tubes for the rest of the rig.
- 27 replies
-
- 1
-
-
- dangerden
- watercooling
- (and 2 more)
-
Fasten your seat belt and enjoy the ride, more to come!
-
Ok, we are almost there with all the parts arrived. Yes, believe me, it takes up to 3-4 months to get certain things here, so we really need to plan.I am just missing the CPU water block, which may arrive this week.Eveything else showed up.Need an idea here...I miss something in my case that is an audio front panel.I use my headphones a lot and I have been connecting it to my monitor, instead of the case.But my Audio card has some amazing features for headphones that I am not taking advantage of, so I would love to have a HD Audio front panel installed.I bought one but I felt very disappointed with the overall quality and when I realized the problems I will have to install it in this case I kinda gave up.I would need to carve out a 3 1/2" bay underneath the fan controller. Its currently not there...The panel I bought is very common, it has mic in, audio out and a couple USB 3.0 ports. I don't really need the USB ports, so I always wanted is really a couple audio jacks that I could punch a couple round holes in the acrylic and accomodate somewhere not too conspicuous...So far, I am failing on this mission, even if I take the audio jacks out of the panel I bought they would need to be soldered in a PCB. Then back to square one on this one.Yesterday and today I dedicated to fix the radiators into the planned position. I also did some cable management for SATA and the fans:
-
Do you have ASUS AI Suite? The profile in your AI Suite overrides the BIOS setup for your fan. You must set your pump header to work on DC mode with fixed max RPM. That would explain the variation of temperature during IDLE time, if your software is lowering the pump RPM when the CPU is cool it will just raise it again when it is hot. M
-
I use them. They have excellent build quality. The fittings look just like bitspower without their obnoxious logo everywhere. The finishing is good, plating is spotless. Look it up on youtube and you will see some reviews. Here are pictures of some of the parts I bought from them.
-
Sounds like a darn good idea.
-
 mgrisoli changed their profile photo
 -
Well, unfortunately Danger Den is out of the business, they no longer make these cases, but I believe there are some other companies out there that make acrylic cases.
- 27 replies
-
- 1
-

-
- dangerden
- watercooling
- (and 2 more)
-
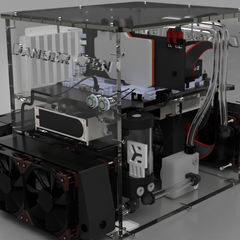
While I am waiting for the rest of the parts to arrive, here is a new render.


