

p0Pe
-
Posts
270 -
Joined
-
Last visited
Content Type
Forums
Status Updates
Blogs
Events
Gallery
Downloads
Store Home
Everything posted by p0Pe
-

Looking to upgrade to Custom watercooling
p0Pe replied to oer34's topic in Custom Loop and Exotic Cooling
From liquid to water? Water is liquid. I suppose you mean custom watercooling. In that case the best place I can provide is www.coolerkit.dk. In the odd chance that you are not from Denmark, please provide a location as that makes helping you a bit easier. Off the top of my head, brands I can recommend: EK Waterblocks AquaComputer Bitspower -
This update shows how I mounted the distro plate to the actual case, and also a lot of the cable work needed to make everything just perfect. No matter how well you plan, there will almost always be manual cutting work involved unless you get everything lasercut and painted elsewhere. This white piece of 3 mm acrylic has a few different uses. First off, it will make it so that the back of the case with all the cutouts are not visible trough the distro plate, but only white is visible. Secondly, it serves as a standoff for the screws holding the distro plate together, and the rear of the case. Mounted on top of the distro plate. The cables runs VERY tightly under the 6 mm plate on top of the distro plate. With fancy light. And covered by the last 3 mm plate. Another fancy pancy shot. This is why I refered to the white plexi as a distance piece. 24 pin for the motherboard routed to the board itself. I had to tighten each individual wire by pulling it from the "outgoing" end of the distro plate. This had to be done a tiny bit at a time to make all the cables fit nicely. GPU's mounted with the chrome backplate on. Next up is the GPU cables. I really wished this pc was built with 1080's as they only have 1x8 pin power connector, but sadly it was built before those came out. Putting the cable combs in place, and putting connectors on. And then routing the cable into place, and repeating the "cable pulling" step as also done to the 24 pin. all main cables done! Testing with rear and top radiator panel to see if everything was as it should be. Pumps also fits in quite nicely. Next up is making the PSU end of the cables. This will be the "messy" end, but also the least visible one. More coming up soon!
-
@Whaler_99 Can you please do something about this thread? I do not think it is fair that a "competition" is halfway started like this, and voting in 2 threads is a disaster. This has been up for more than 5 months, and are still stickied. Can it please either be "un-stickied" or officially ended?
-
haf stack Avalanche Casemod - Restarted - Frosted, 40 kilo, Ti Sli
p0Pe replied to NemoTheClown's topic in Build Logs
Hah, I had a look at this huge thing at NPF this weekend. I really like what you have done with the custom covers, and the sanding of the blocks. Where do you get your stuff cut, and do you make the drawings yourself? -
Haha yeah, I saw that video in your previous thread. The preview render time is quite impressive.
-
Alrighty. When I pushed my 4 x titan x with furmark they used 1400W. Octane might not use them so power intensively?
-
Will you be able to run all cards of one 1600W PSU, or will you be using dual PSU's?
-
Haha, I am looking forward to that! Let me know if you need any help with it
-
Custom case for 20 gpu's? You want to run 3 motherboards then, or use PCI-E Bifurcation?
-
Looking forward to it. I hope they server you well. Have you considdered making a massive external radiator / pump setup so that you do not need to put individual watercooling in each case you have? How many machines like this do you have running at a time?
-
Ohhhh I was considdering that display, but went for the acer preadator XB321hk as I wanted something with Gsync. Looking forward to see the build man. Did you ever finish the 7 x 980ti build?
-
Thanks! Hah, good thing it has not gotten caught in the filter then. Not really sure what you mean here. Almost all boards are using a 24 pin connector, and most boards uses a single 8 pin EPS connector. Them being in a different location than the ones on this board would not matter all that much. The cables would still be able to go in, and would still look great.
-
Regarding your power supply - I have had a system with a 5960x overclocked to 4.5 ghz, and four Titan x cards (the old ones) all overclocked. Under furmark, I was using 1400W from the socket. So 1600W for two cards is massively overkill. I do not know how hard your program uses your hardware, but invest in a watt-o-meter and give it a look. Check out the build here, and scroll to the bottom to see the watt results: http://www.hex-gear.com/hall-of-fame/rhino/
-
Only the p0Pe has them! It is super impractical, and hard to make, but this one is actually not that bad once made and put together. Swapping out hardware is super easy, and even more so if you switch to soft tubing. The graphic cards should just not have more that 2x8 pin power connectors, and then you can just upgrade away:D Not that I would advice anyone with upgrade thoughts to make something like this, but just saying it is not a complete disaster should one want to put in a new graphic card in a year or two.
-
Update time again! Time to get some cables into the distro plate, and get it all done. I got quite a few pictures of this progress as it took SO damn long! I also made a mistake in the 3D file for the distro plate that forced me into manually make a tiny tiny acrylic piece. Who needs a cnc or a laser cutte when you are desperate and low on time:D Some of the small parts that will help hold everything together. I went with classic black and red for this project. Normally I really like using the Fusion sleeving from Teleios, but I thought that this would look better trough the distro plate. This is the lasercut 6 mm plate that will hold all the fluid channels tight, and also keep the cables in place. Had to manually tap G1/4" holes in them to support standard fittings. Lots and lots of holes to keep the o-ring channels tight! Around 150 screws all in all. Glad that I did not have to tap all those holes manually! The pumps will be mounted directly to the distro plate, with a piece of 5 mm acrylic in between. The small piece you saw in the first picture holds the 8 pin power wires down so that they slide under the graphic card wires. There is actually 4 layers of cables, the first two is the 24 pin + 8 pin, and the next two is the graphic cards. The start of the nightmare! I only just made enough room for the cables to be in, so everything has to be squeezed into place! Graphic cards done. You can see that I made some small acrylic pieces to hold them down until I got the main plate on. Without these it would be impossible to keep the wires in the channels. Here you can better see how the graphic card cables goes over the 24 and 8 pin cables. So. Many. Wires! I am actually super glad that I did not go 4 way SLI on this build! To keep everything down on the top side I needed some help in the form of a couple of clamps. And here is when I noticed that I messed up... I made the arc in the acrylic bigger than it should have been, so there is a gab between the cables and the acrylic wall. Leaving it like this would make the cables loose, which I did not want. I could have gotten a new piece lasercut, but I was low on time, so I had to figure something out. Lots of sanding, dremeling, and cursing helped me make this thing. Cutting and sanding acrylic in itself is not really that hard, but when it is pieces this small, that has to be SO precise, it starts to become fun. A few hours later. Lots of time, but worth it! Like a glove! I had to take the connectors off the cables for the next step as there was not a lot of room to work with. Down goes the 6 mm plate, and now just to keep everything in place while securing this! This plate is going to tighten both the o-rings and the cables down, so quite a few things needed to be perfectly in place before putting it down. I could have made it out of multiple small plates, but what is the fun in that. Everything done! Now just to mount it on the case itself!
-
Glad to have you on board:D I am quite excited to be showing of the WIP of this build as I have mostly only showed the final pictures here and there.
-
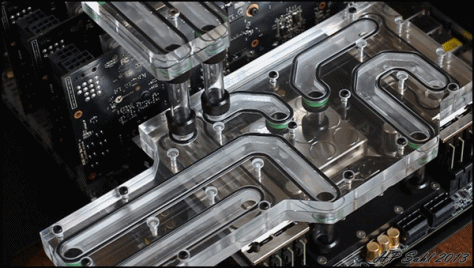
So lets get to the fun part! I wanted to make something like I did for the Engineering station, but I also wanted to incoorporate some cable manegement into the distro plate itself. The finished plate has around 150 screws to seal it all off! These pictures are taken straight after milling, so no polishing or anything yet. First off a few renders of how everything will be added together. This is not just a simple 2 plates bolted together, but a nightmare of different parts that all has to fit VERY tightly together. From right to left is: 25 mm milled plate - this is the main plate where all the channels for the wires, and the fluid has been milled into. The loop will be a dual loop, so two separate pumps sits and has each their channels. 6 mm lasercut clear acrylic - These small bits and pieces where "helping pieces" that gave me the option of securing some of the cables as I went along and put them into the main plate.The cables all sit incredibly tight, so without these, they would simply pop out the moment I let them go. These mounts before the main sealing plate, so that I could put in the cables before putting in o-rings, and covering the hole thing up. Putting in the cables and o-rings on the same time, and get everything to sit as tight as it does here would be near impossible. 6 mm lasercut clear acrylic - This is the main cover plate that holes all the fluid channels sealed. This mounts after all the cables has been put in, and helps a little with holding the cables tightly in place. 3 mm lasercut white acrylic - This plate is only there to act as a "distancer" between the main acrylic assembly and the case itself. The case has tiny captive nuts that sticks out of the panel a few mm, and the main acrylic plate has been put together with dome head bolts, so if I just bolted the two together, the bolts would scrape up against the case itself. This is also why there is so many somewhat big holes in the white plate. 5 mm lasercut red frosted acrylic - This piece is where the pumps are mounted, and again acts as a distancer between the pumps and the acrylic plate, so the pumps does not hit any of the dome head bolts. All in all a nightmare to put together, and it could have been done way smarter, but that would have meant that it would not have looked just as good. And this is the main plate. A lot of material was taken off this, and the channels are quite deep . Finished milling without polishing. And a test of how the cables would fit. As you can see there is basicly no extra space, so the cables are sitting incredibly tight in the milled slot. That is it for now, next up will be more cabling!
-
If you learn to draw in 3D yourself, it can be done somewhat cheap, and is certainly affordable if you prioritize it. But the money spent only really gives you looks, and a slight functionality boost, so for most people, it is not worth it. The last batch was sold out in a day or so. More will be available soon, but to get more specific info, try and send an email. Thanks man! I will try and get another update up tonight, and it will be an interesting one!
-
Glad to have you on board:D I did not have time to edit all the pictures I took of this build before I went off to Computex, so I will upload them here as I get them sorted and edited! Gonna be a quick worklog as the build is already done, but I know that most of you enjoy seeing the WIP of these builds as well! To start off, here is the motherboard and graphic card this entire build is based around. Unreleased at the time I got it, and a proper beast of a board! More to come soon!
-
Hey guys and girls! Welcome to another ATX worklog before I start do some smaller builds again (size wise) This will be a somewhat strange worklog, as this build is already complete. I am showing it now as I have not had time to put it up sooner. This build was a show-rig I did for the Gigabyte Suite at computex 2016, and some of you might already have seen it on facebook or youtube, but for the ones of you that has not, I will make a full worklog here. To give you a glimpse of what you are going to be seeing in this worklog, I have posted the final filling video here below: For this build I made a complete sidepanel with integrated cable routing and water routing channels. All cables beside the pump cables runs into this plate, and is neatly routed to the PSU. The side panel is made from a 25 mm thick acrylic plate that has been CNC machined to make room for the watercooilng and cables. Specs: Motherboard: Gigabyte GA-X99-ULTRA Gaming Graphic cards: Gigabyte 980TI G1 gaming CPU: Intel i7 6900K SSD: Intel 750 400 gb PCIe ssd RAM: 32 gb corsair Vengeance 3000 mhz PSU: Corsair HX1200i Case: Hex Gear R80 Watercooling: EK waterblocks Fittings: Bitspower Tubing: E22 solid tubing First update will come tonight, and they will then roll steadily over the next few weeks as I have time to put them up!
-
Thanks man! There is a lot of them in the post with final pics. The only pic where it is not on is the last one Example: http://i.imgur.com/HkEB7gY.jpg
-
That looks so insanely cool! Remember to test it with presurized air before filling. AC just released a tool for that that makes it very easy.
-
Haha yeah, it is hard to top that one! I will be starting a new log soon with a build I brought to Computex, and I think that one got close! Thanks man! I will not post benchmarks and game benchmarks. Not really any point as there is plenty of good reviews of quad sli out there that does it way better than I would do. Thanks man! The SLI bridge was actually changed for one of the E22 laser engraved bridges. We are working on PSU covers, but they are a bit low priority currently:) Hah I would guess a LOT. Took ages sleeving this thing! Thanks! Glad you like it:D I also finished the video of the watercooling! I hope you enjoy it:
-
Glad to see you got it working. Sounds like something software related, and definitly is if you got it working by making a windows restore.
-
Have you run the room setup again? Have you updated firmware? Do you have mirrors/reflective surfaces in the room? Are you using the stock HDMI cables? Have you upgraded your graphic card driver? Are your graphic card returning normal results on other games/benchmarks? Is the low FPS only in the start hub, or also when you play a game?
.png)
