After watching Luke's video build of the fallout pc case, I was like 'my mate would love that!' So I decided I would buold it for him.
If you haven't seen Luke's video watch it , it is the bases of my build (search youtube)
Before I continue, have to say a huge thank you to Luke @Slick , for the inspiration of this build.
Also, a little background of me, I have never built a pc in a normal case, let alone building a custom case. I don't have an arts and craft background or crafting knowledge. Most of this build was done in my kitchen and garden with predominately a rotary tool.
Hopefully showing what is possible, even without skill and tools!
I have taken most of Luke's ideas with a few tweeks and mods here and there.
Firstly the cylindrical extension. Now I didn't have access to a 3d printer and the cost online was prohibitive, getting quotes of £700, due to volume of the piece, not the physical material costs. Also, don't have a computer to make the template design to send to those companies. So I had to think of something else. I decided to use two thin sheets of plywood and glue them into the cylinder. I conceptualised a jig to hold the wood in the desired shape, while the glue set.
I then filled the gap in the joins and sanded it smooth
I added an inner ring of ply to create a lip, with grioves, which would slot into the plastic nuke base and top.
Airflow was a major consideration, given the experience that Luke had on his build. So I made sure I had large intakes and like Luke covered them in mash. I also added another finer dust filter behind later
To make sure that the intakes acted as intakes I used a fan, but unlike Luke's two 60mm (or were they 80?) Fans. I added a whopping 140mm! With a little 'help' from my rotary friend. Which msi has now 'copied' (ok, I only saw msi's design afterwards)
The next consideration for airflow was the gpu itself, in Luke's build, the gpu's fan was sandwich into the back of the motherboard, so struggled to get much air. Along with the ssd and the wifi antenna further restricting space. So I glued the antenna into the cone above the fan (no picture of that). Instead of an ssd I used a m.2 drive, a nice little luxury. Which allowed a lot more space for thr gpu. Lastly I used a longer pcie extender cable to orientate the fan into that space away from the motherboard. The cable also provides the insulation between the motherboard and the back of the gpu.
I glued some cross beams to suspend the motherboard and gpu from and to place the psu on top of.
Another major change, was the I/O. I didn't put any in! I thought that all that extra cabling and the trouble Luke had with it fitting of it, the soldering of thr psu plug etc... I decided on a different route, a simple slot, with a grommet (sorry don't have a picture of this), for the power supply plug to go in, the hdmi and a usb3 cable to come out. As it was going into a tv the sound will come through the hdmi and with usb3, there's enough to handle most peripherals through a 4port expansion. Obviously the downside is the lack of ease in swapping things in and out, but once you've got it set up, as you can add more connections ie ethernet and usbs etc... it will pretty much just sit there untouch for most of the time. Well that was my reasoning at least.
Even though I used a m.2 drive to save space I saw a reasonably price 2Tb hdd, which I had originally planned to place next to the psu, but it was getting awfully hot above the gpu. Luckily with the layout I had there was plenty of space on the motherboard side to makeshift a drive caddy.
Given the trouble Luke had with the base feet and then the concern with the added weight, I added additional support to the base. Again with grooves that allowed it to slot practically seamlessly into the base.
In the last picture you can kind of see the simplicity of the I/O cable coming out the base. Along with the air filters through the mesh.
I was going to carbon copy Luke's power switch. However I got an idea from DIY perks (youtube), about using led's and acrylic. With some more 'help' from my rotary friend, I came up with this
VID_20160408_204328.mp4
I used the led power jumper on the motherboard, but I did solder in a different led, smaller, but brighter.
Nearly finished I promise.
The final internal mod. The cables that came with the psu were quite stiff and a little too long, which made routing them awkward. As I had come this far I decided I may as well go all the way and make a complete custom sleeved set os psu cables! Now I have to give a shout out to the info given by WiSK and others over at overclockers.net. Helped me understand the pin out and enabling me to alter the wire configuration! Otherwise it wouldn't have been possible. As you can see I went with a 'nuclear' yellow and green theme (with a little black). Even though you don't see the cables, it rounds off the build beautifully for me. (ok im a little biased)
You can kind of see just how much space I have been able to give the gpu to 'breathe' especially compared with Luke's.
Last little touches:
Using yellow and green cable ties
Using a green sata cable
(Both can be seen in the second to last picture above)
Covered the top vent with steel mesh
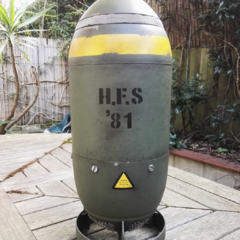
Had to completely repaint the mini nuke green, as I wasn't able to match the original colour. Along with the rusting effect. Thanks here goes to an awesome side at Dark Sphere, who spent a lot of time giving me advice for this
The completed build
With a suitably matching themed welcoming page (and background, but no picture of that)
Well done if you've made it this far! Thank you for taking the time.
Again big thank you to Luke, who's build paved the way for this. Even though it may seem I'm criticising his build, im not, just learnig from the obstacles that he encountered. I'm sure given another go and I'm assuming less time restraints, he would come up with an even more bad assary mod.
Another thanks is to youtubeand the many videos I've watched building up my confidence to do this, far too many mention them all, it a wealth of information for all the different facets of this build.
Wishing you much fun on your own builds
And yes my mate was blown away with it!
Unfizzy


")

 Unfizzy changed their profile photo


