


Markkedi
-
Posts
141 -
Joined
-
Last visited
Content Type
Forums
Status Updates
Blogs
Events
Gallery
Downloads
Store Home
Everything posted by Markkedi
-
 Quickie update! I ditched the red plastic from VRM to get more sexier look
 -
Today I got the package that I have been waiting for. ASRock Fatal1ty X99 Professional Gaming i7 motherboard arrived so I could test how everything would fit MB is perfect with it's color scheme and layout. Only thing that sticks to my eye is that weird plastic on top of VRM cooler that is different shade of red. Alphacool block fits like a glove to the build After small test fit it was obvious that the motherboard left even more room than I could ever use [/sarcasm] Luckily pump/reservoir combo left more room than that I expected Next update will follow within few days, just need to clarify couple plans before announcing anything Question time! What does this magnificent piece has to do with this project?
-
Started test fitting the WC stuff today as I decided to get XT45 instead of ST30 for top rad. Good thing I did that because front rad was about 2mm too high so top rad wouldn't fit on its place. Warning! Following pictures in this thread may seem like brutal handling of the chassis and components. Some components were harmed during the project. Only thing that was possible to do was removing the floor plate Also as the front rad configuration changed from push to pull, those sticking screws had to go too as rad was going to be mounted straight to chassis this time. And now everything is sitting on their own places like they should After confirming that rads fitted I headed for fan collar and slim fans I had this kind of mod planned last time but I didn't have time then. Plan is to disassemble the fans from their chassis and mount them directly to my fan collars Like this. It might be harder to do than i thought as the slim fans had different kind of mounting than i anticipated. So this will be a totally separate update This is it for now. But I still need to rant of my loan camera, Sony A350. It is probably the worst DSLR that I ever had on my hands and believe me, I've had older and cheaper ones. Focus is something from a amateur grade Ö horror movie and the lens is so dark that I had hands full of work to get them adjusted to even to this grade. Lastly a quick pic of my temporary workspot in my extra/storage room
-
Decided to stop looking for my old 3D model files and to make them again. Here are pictures of the current rough model. Better pictures of watercooling stuff and fitting of them are coming today or tomorrow
-
Awesome build! Do You happen to know Peter from Asrock? I'm getting the same board from Him
-
This is awesome! p.s. Nyt on komea pöytä
-
Well this is insanely well made and good looking project to follow! Congrats for the sponsor!
-
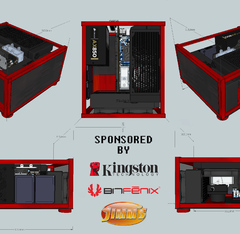
Hello again! It's time for new project, this time modding my previously made chassis from few years back and it can be found HERE. It seems that all metalwork pictures are broken in there but I will fix them in near future, but for now you can find all the pictures in here Picture gallery of Project [No Name] As I said the chassis will stay the same and here are pictures of the original plans with dimensions and the finished product. Plans for the current reboot build are fitting an ASRock X99 motherboard, two GPU's and full custom watercooling for GPU's and CPU. I have been planning this for few months now and I have managed to get ASRock, Aquatuning, Alphacool and Phobya to sponsor this project! ASRock is giving Fatal1ty X99 Professional Gaming i7 motherboard for this project! Aquatuning, Alphacool and Phobya sent their first care package later this week and this is what I got Sorry for low quality pictures, camera is broken so bare with me for little while Alphacool Eisdecke top and tank are so nice looking and just perfect size for this project with Alphacool VPP755 pump This is it for now PROJECT SPONSORED BY
-
Smallest ATX case with SLI and watercooling
Markkedi replied to Markkedi's topic in New Builds and Planning
I have decided to go full on impossible with this project. Motherboard will be full ATX! And first sponsor will be ASRock! MB is ASRock Fatal1ty X99 Professional Gaming i7! ATX board fits in without a millimeter of spare space in lenght -
Smallest ATX case with SLI and watercooling
Markkedi replied to Markkedi's topic in New Builds and Planning
Yeah Manufactures are just over protective, nothing bad has ever happened from keeping bare conductors etc. in plain sight -
Smallest ATX case with SLI and watercooling
Markkedi replied to Markkedi's topic in New Builds and Planning
SFX psu is an valid option but i'm planning on using normal sized as there is more to chose from and it gives me challenge I might just chop a normal psu if room gets too nifty -
Smallest ATX case with SLI and watercooling
Markkedi replied to Markkedi's topic in New Builds and Planning
I'm sorry as I wasn't clear enough. I'm not buying a case as I already have my DIY case that im going to use in this project, i was just wondering if someone has seen such a small case that has smaller or same dimensions as mine? Most matx cases that can fit those components are way bigger than what i'm talking about Here is a picture for reference of the scale that i'm talking about. -
Hello again! After few years I'm back with crazy plans! My last build Project [No Name] was successful in parts that I needed. This time I'm going to use the same chassis except ramping it up a notch. Plan is to get SLI, full custom loop watercooling with two 240mm rads, matx size motherboard into my case that is measured from outside W 315mm x L 389mm x H 168mm. Question is that has anyone seen this kind of configuration with these dimensions? If you have any questions, please ask and I will try to answer them UPDATE: matx MB has changed to full ATX board!
-
Well, just need to teach the kids not to push all the buttons they see
-
I got one Phobya Vandal switch yesterday and now I'm thinking of putting switches in the upper right corner on the front. And thanks for the motherload of internets, my family can now survive solely with internets through the winter
-
Thank you for the internets They'll come handy sometimes. I'll put up a picture of that kind tonight and thank you Yes it was but luckily got a new one
-
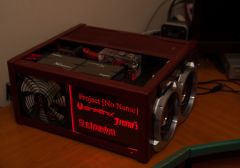
From the album: Project [NoName]
-
Latest updates
-
-
Thanks I'm allowed to do anything I want with them but I think they look better as stock than me fiddling with them They mix up nicely with other colours, not as light as fancollars but not so dark as the black parts, in the middle of those two.
-
Thank you for your long term support! How right you could be? I got it today in the mail and I just got it installed temporarily just to see how it fits. Also I didn't want it to just say projects name and I didn't have to think twice what to put there too So what do you think? I also installed some lights on the other side too. Thats it for now. I'll be installing that plexi in there whit screws on some day
-
I'm starting to like it like this too. I just have to use filler to the canopy because paint is going to highlight all the smallest warps and dents of the surface. If it happens to seem like the canopy looks like crap after paint, I might install last fancollar on top of this and feets to the bottom and see how it looks. But thanks for the compliment
-
You are seeing correct, it has been going for looong time, almost as long as the forum has been up. And since it is that old, there is zero views and couple hundred replies That cable set won't fit in my PSU as the connectors on my PSU are these weird little boxes. I'll be doing all the photography and PajaDesign is specialized on engraving etc. And thanks for stopping the rain dance, weather is getting better over here
-
Something of a small update now. Interiors are getting done, some small enhancements still needed, couple plexi covers and arranging wires here and there. But anyways, lets get some pictures out so we don't get bored, shall we? Flashback of the terrors from installing the PSU last time were kicking in. All those full length wires needed to be hidden and this time there were more extensions and it needed to be cleaner than last test fitting. After wires were installed in some manner, it was time to screw Recon in. That required removing rad installation bracket and mesh out of the way. Last but not least. Some shots all over this thing, including some from the engine room. Next time when I'm going to paint the exteriors, three things must comply. 1. Weather needs to be good. 2. There isn't too much hurry on articles that I'm writing. 3. Theres time to spare from the school I just started. Question for you guys. How does company called Paja Designs is going to be related to this project?
-
I could but it doesnt bother me in IRL and I'm pretty much getting things done. Wrapping it all together. Still lot to do, but we are getting there

