Jump to content

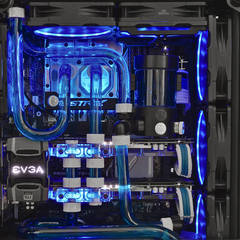
It's not about the size...Piccolo! [Full Custom Loop in Ncase M1 v5 Build]

1 hour ago, For Science! said:

since this case isn't windowed my intention is put another 120 mm radiator in front as well as a fan so that there is some air going to the board.


I obviously don't like making my life easy :o

20171121_213304.thumb.jpg.967d88c0a4424c8b5c3f827dfd751e1d.jpg

Ahh I wondered what you were going to do about the board cooling, you think you'll have enough airflow over the VRMs? or are you going to mod the block(s) to make the cooling more efficient if you can?

Please quote my post, or put @paddy-stone if you want me to respond to you.

Spoiler
  • PCs:- 
  • Main PC build  https://uk.pcpartpicker.com/list/2K6Q7X
  • ASUS x53e  - i7 2670QM / Sony BD writer x8 / Win 10, Elemetary OS, Ubuntu/ Samsung 830 SSD
  • Lenovo G50 - 8Gb RAM - Samsung 860 Evo 250GB SSD - DVD writer
  •  
  • Displays:-
  • Philips 55 OLED 754 model
  • Panasonic 55" 4k TV
  • LG 29" Ultrawide
  • Philips 24" 1080p monitor as backup
  •  
  • Storage/NAS/Servers:-
  • ESXI/test build  https://uk.pcpartpicker.com/list/4wyR9G
  • Main Server https://uk.pcpartpicker.com/list/3Qftyk
  • Backup server - HP Proliant Gen 8 4 bay NAS running FreeNAS ZFS striped 3x3TiB WD reds
  • HP ProLiant G6 Server SE316M1 Twin Hex Core Intel Xeon E5645 2.40GHz 48GB RAM
  •  
  • Gaming/Tablets etc:-
  • Xbox One S 500GB + 2TB HDD
  • PS4
  • Nvidia Shield TV
  • Xiaomi/Pocafone F2 pro 8GB/256GB
  • Xiaomi Redmi Note 4


  • Unused Hardware currently :-
  • 4670K MSI mobo 16GB ram
  • i7 6700K  b250 mobo
  • Zotac GTX 1060 6GB Amp! edition
  • Zotac GTX 1050 mini


Link to comment
Share on other sites

Link to post
Share on other sites

1 hour ago, paddy-stone said:

Ahh I wondered what you were going to do about the board cooling, you think you'll have enough airflow over the VRMs? or are you going to mod the block(s) to make the cooling more efficient if you can?

we'll see how this fan layout fairs. im not really chasing insane overclocks or anything like that so personally i would settle for easiest options.


maybe in the future I could upgrade to a monoblock.


Meanwhile tube bending has been smooth as usual (not). Man things are really tight 

20171122_005521.thumb.jpg.58eb2665dffd72d3d947ac57ed69d1d6.jpg


Link to comment
Share on other sites

Link to post
Share on other sites

Something in currently really bummed about is the my planned place for the drain port is completely packed so I had to put it in a place that' completely idiotic.


it's in front of the RAM sticks.

Link to comment
Share on other sites

Link to post
Share on other sites

the fill and leak test. amazing I actually finished in 1 evening, but there we go. more to come tomorrow!


20171122_013644.thumb.jpg.3df26337de8d0a7672ef076637778ebb.jpg


oh and did I say it was silver?

20171122_012316.thumb.jpg.cd0b2460cb049c2245e7633b00c58812.jpg

Link to comment
Share on other sites

Link to post
Share on other sites

I couldnt resist the urge to run some realbench to see how the loop copes.

Interestingly it would seem that a 8700K + 1080Ti is somewhat the limit of what a 360 mm radiator setup can take, despite it being a custom loop with relatively good parts.


You can see that after an healthy half hour of realbench or so, the CPU temperature is 75 degree (up 15 degrees when compared to an AIO!) whereas the GPU temperature is 54 degrees (down 12 degrees compared to a separate air cooler.


Now, can we rationalize this? - I would say yes we can. While it is disappointing somewhat that the CPU temperatures are worst than when compared to just an AIO, we were dissipating only the CPU load with a dedicated 240 mm radiator. Now we are dissipating both the 8700K and 1080Ti with just 120 mm extra.


We know that hybrid GPU coolers typically use 120 mm radiators and so this should be "okayish", but in a custom loop the heat from the power delivery is also dumped into the loop as well. This is my reasoning as to why the overall system temperature delta is +3 degrees when compared to having just an AIO + blower GPU. But nonetheless the system is much quieter without the high rpm fan from the GPU so for me personally as a silence chaser, it is worth it.


water_lm_auto.thumb.png.d12b3c559e04b07a9e87e6b4ac3dc66c.png

Link to comment
Share on other sites

Link to post
Share on other sites

I'd say anything where the CPU isn't hitting TJ max is OK anyway... it's silly to chase a lower number just for the sake of it, or bragging rights. Except when you're chasing that lower number to give yourself headroom for OCs of course.

Anyway, well done, seems like a nice setup and very good use of limited space.

Please quote my post, or put @paddy-stone if you want me to respond to you.

Spoiler
  • PCs:- 
  • Main PC build  https://uk.pcpartpicker.com/list/2K6Q7X
  • ASUS x53e  - i7 2670QM / Sony BD writer x8 / Win 10, Elemetary OS, Ubuntu/ Samsung 830 SSD
  • Lenovo G50 - 8Gb RAM - Samsung 860 Evo 250GB SSD - DVD writer
  •  
  • Displays:-
  • Philips 55 OLED 754 model
  • Panasonic 55" 4k TV
  • LG 29" Ultrawide
  • Philips 24" 1080p monitor as backup
  •  
  • Storage/NAS/Servers:-
  • ESXI/test build  https://uk.pcpartpicker.com/list/4wyR9G
  • Main Server https://uk.pcpartpicker.com/list/3Qftyk
  • Backup server - HP Proliant Gen 8 4 bay NAS running FreeNAS ZFS striped 3x3TiB WD reds
  • HP ProLiant G6 Server SE316M1 Twin Hex Core Intel Xeon E5645 2.40GHz 48GB RAM
  •  
  • Gaming/Tablets etc:-
  • Xbox One S 500GB + 2TB HDD
  • PS4
  • Nvidia Shield TV
  • Xiaomi/Pocafone F2 pro 8GB/256GB
  • Xiaomi Redmi Note 4


  • Unused Hardware currently :-
  • 4670K MSI mobo 16GB ram
  • i7 6700K  b250 mobo
  • Zotac GTX 1060 6GB Amp! edition
  • Zotac GTX 1050 mini


Link to comment
Share on other sites

Link to post
Share on other sites

cant remember if youve covered this so far or not (and I cant be bothered dereading this in its entirety right now), but have you considered delidding the 8700k? GN got a pretty decent temp drop from doing that.
Otherwise, Im extremely impressed! congrats! and as long as youre not throttling the CPU should be fine! :)

Link to comment
Share on other sites

Link to post
Share on other sites

23 minutes ago, KrMaH said:

cant remember if youve covered this so far or not (and I cant be bothered dereading this in its entirety right now), but have you considered delidding the 8700k? GN got a pretty decent temp drop from doing that.
Otherwise, Im extremely impressed! congrats! and as long as youre not throttling the CPU should be fine! :)

It's already been delidded.

Please quote my post, or put @paddy-stone if you want me to respond to you.

Spoiler
  • PCs:- 
  • Main PC build  https://uk.pcpartpicker.com/list/2K6Q7X
  • ASUS x53e  - i7 2670QM / Sony BD writer x8 / Win 10, Elemetary OS, Ubuntu/ Samsung 830 SSD
  • Lenovo G50 - 8Gb RAM - Samsung 860 Evo 250GB SSD - DVD writer
  •  
  • Displays:-
  • Philips 55 OLED 754 model
  • Panasonic 55" 4k TV
  • LG 29" Ultrawide
  • Philips 24" 1080p monitor as backup
  •  
  • Storage/NAS/Servers:-
  • ESXI/test build  https://uk.pcpartpicker.com/list/4wyR9G
  • Main Server https://uk.pcpartpicker.com/list/3Qftyk
  • Backup server - HP Proliant Gen 8 4 bay NAS running FreeNAS ZFS striped 3x3TiB WD reds
  • HP ProLiant G6 Server SE316M1 Twin Hex Core Intel Xeon E5645 2.40GHz 48GB RAM
  •  
  • Gaming/Tablets etc:-
  • Xbox One S 500GB + 2TB HDD
  • PS4
  • Nvidia Shield TV
  • Xiaomi/Pocafone F2 pro 8GB/256GB
  • Xiaomi Redmi Note 4


  • Unused Hardware currently :-
  • 4670K MSI mobo 16GB ram
  • i7 6700K  b250 mobo
  • Zotac GTX 1060 6GB Amp! edition
  • Zotac GTX 1050 mini


Link to comment
Share on other sites

Link to post
Share on other sites

2 hours ago, paddy-stone said:

-


5 hours ago, paddy-stone said:

-.


Yes already delidded, if just after good CPU temps, then an CPU only custom loop or an AIO is just fine. It would seem to me that a 240 mm rad space is necessary to truly keep the 1080Ti in check. Having said that I suppose it would be fairly rare for both the CPU and GPU to be under full load as is done in Realbench so for day-to-day tasks I am sure it will be fairly smooth sailing with good temperatures.


For example in cinebench I did see about 5 degrees improvement over the AIO.

Link to comment
Share on other sites

Link to post
Share on other sites

  • 2 weeks later...

ーDid I mention this also ticked the RGB box? :P


2017-11-30_22_56_20.gif.fe984e3885b8392cc8a9d0d9ce6400ce.gif


Playing with some overclocks now. it would seem stable at 5 GHz and now trying to dial back the voltage. The Vcore reads 1.28 V at the moment, which is more than what I've asked for adaptive voltage wise (something like 1.255V) but I'll try to see if I can dial it back further.

Link to comment
Share on other sites

Link to post
Share on other sites

Okay so probably really the final update this time.... I tried to drain the fluid and reconfirmed that the drain valve placement was really REALLY stupid. So I redesigned bits of the loop and rearranged the cables for a more optimal splution.


First I moved the excess SATA  and Molex power cables to the front.


20171205_180930.thumb.jpg.8287eb833e0250e7a5b0531f22c4ec07.jpg


This freed just enough space round the back to have the drain valve on the bottom radiator via a Tsplitter. Still not optimal since I have to leave the valve open to close the side panel. but I suppose the stop plug should be reliable enough.


20171205_180944.thumb.jpg.ac5cff714fce4bae71559eb483d809e1.jpg


so I redid the bend coming from the CPU block to the reservoir. had to use a dual 45 fitting to offset the path to match the minimum curve radius.


20171205_194046.thumb.jpg.4f73882e33832d41833ee33cdf85f79c.jpg


I also changed the bend going from the graphics card to the radiator to 2 90 degree fittings and a straight tube. looks a bit neater.


The position of the new t plittermeant that the connection from the bottom radiator to the front radiator will be done purely with fittings (dual rotary male to male) since the come up too close for a tube run.

20171205_194053.thumb.jpg.78677d9bace16e8ea4969116882ec947.jpg


Also redid the bend from the front radiator to the CPU block since it was a bit wonky previously. happy with the new version.


20171205_201310.thumb.jpg.7d6448fdd5b48cd708944038ec0429f4.jpg


Overall very happy with the new drain system. this was actually it' original intended location but I had too many cables in the back to allow for it the first time. just goes to show how important it is to manage them cables :)

Link to comment
Share on other sites

Link to post
Share on other sites

  • 3 weeks later...

Dude..... such a porno build and wow all of that into a tiny ass case. I'm slow clapping for you. Good show sir!

Link to comment
Share on other sites

Link to post
Share on other sites

  • 1 month later...

Glad to see you completed the build! Considering the temps you're getting, I would be pretty happy with what you've achieved! Nice build!

Purple Moose || NCASE M1 v5 SFF Custom Water Loop //

ASUS Strix Z270I / 7700K @ 4.5 / 32GB Dominator LP / EVGA GTX 1080Ti SC2 HydroCopper / SF600 // Samsung M.2 NVMe 250GB x2 @ Raid0 / Samsung 850 Evo 1TB x2 @ Raid0 // PrimoChill CRT SFF 80mm + D5 PWM / Nemesis GTS 240mm / Nemesis 92mm / PrimoChill True Opaque Candy Purple

Link to comment
Share on other sites

Link to post
Share on other sites

  • 2 years later...

So before this gets lost into oblivion, I did maintain this build to incoorporate dual-240 mm radiator with an unobstructed rear intake. I also changed out the feet of the original Ncase M1 so that the case can exhaust air through the bottom more effectively. Furthermore, I did also make custom cables for all the components so that there is significantly less clutter in the PSU area so that the drain port can be accessed better.


2 x Hardware Labs GTS 240 mm radiators. The bottom has 15 mm Noctua Fans, and are set in exhaust. I had to redo a lot of the tubing and also in the meantime ran out of black fittings, so you see the random nickel fitting on the left.

_MG_2515.thumb.JPG.a7b464b27545e300561b5cdba3c12e18.JPG


View of the rear side. While the custom length cables are easier in terms of being the right length, they are stiffer and so I had to resort to a bit of a janky routing behind the motherboard. However the cleanly available drain port is a huge plus

_MG_2513.thumb.JPG.d20a10de3ce927305603954c9cf26b5e.JPG


Equally clean front, with no excess SATA power. I guess if I wanted another one in future I would have to remake this cable, no biggie. You can also see my temperature probe on the left port as the other one I put in died shortly after moving.

_MG_2514.thumb.JPG.d5d556ea913b23a8521f89a4e2741991.JPG


Top view. The D5 pump and CPU block was replaced by a Eisbaer Solo LT. It really isn't powerful enough to be fully automonous in this kind of build. I in fact had to use a D5 pump/res to fill the system and then splice it out. Even after that there was a bit of air that you can see has accumulated in the top of this tubing. As this is a reservoir-less loop, I suppose that was to be expected. In future I could plumb in a smaller LT pump/res or just a T-valve up there so that I can remove this last bit of air.


Not immediately clear from the photo but I have a fan in the rear and intake just to balance some pressure and provide some minimal airflow to the board. Also I got a ARGB strip so that I could get rid of the bulky controller. Fans are also upgraded to Noctua A12x25 on exhaust. As an additional note, I had to move the power plug to the central position to clear the radiator and make space for the rear intake fan.

_MG_2511.thumb.JPG.520995c124537738e90c021efe4f6792.JPG

Link to comment
Share on other sites

Link to post
Share on other sites

Create an account or sign in to comment

You need to be a member in order to leave a comment

Create an account

Sign up for a new account in our community. It's easy!

Register a new account

Sign in

Already have an account? Sign in here.

Sign In Now

×