Jump to content

Project [NoName], watercooled Mini-ITX build

Markkedi
Wow, looks awesome, i want to build a rig like that, but atm I dont have the budget :(
I have two kids and a wife so my budget isn't that high either because family isn't cheap :D And If I'm honest, I don't have the budget for it either. I don't have a real job, I'm helping older people on how to use their computers and I don't even ask money from them, I only get what they think is fare (and of course cookies :) ). I also buy, repair & sell all kinds of computers so that's a nice way to get little extra. Materials, machinery and facilities are (probably) free because I helped the business that owns them, with their computers and once again didn't ask any money from them.

So what I'm trying to say is that you don't need a big budget if you are willing to do some good things for people, karma will pay you back some day :)

Link to comment
Share on other sites

Link to post
Share on other sites

looking forward to the temps and wiring, from the pics it looks like its going to be really crowded with all thosewires. any tricks up your sleeve? :)
Actually I have planned some wiring. I left ~2.5cm empty space under mb tray and I'm designing some wire holders in back there to minimalise the mess (I have a good idea for this one but I can't make any drawings of it). Also I'm changing original modular connectors of the PSU in to BitFenix wires and I'm thinking some way to shorten the solid wires, I was surprised that there was so many of them.
Link to comment
Share on other sites

Link to post
Share on other sites

Looking forward to this :) Love scratch builds.

CPU \\ i7-3770K@4.6GHz Motherboard \\ MSI MPower Z77 RAM \\ 16GB 1886 Patriot Viper 3 GPU \\ EVGA GTX 670 SC+ 4GB CASE \\ Corsair 600T SE White Storage \\ Western Digital Black 2TB PSU \\ Seasonic SS-760XP2 Cooling \\ H100i + 3 Swiftech Helix 120s 


Link to comment
Share on other sites

Link to post
Share on other sites

Made parts from scratch today from 2mm normal steel. Because I realized that I need to paint it and paint doesn't stick that well to the stainless steel.

I can't make progress every day because it's 53km from my home to workshop so I'm sorry if project is moving on too slowly :)

Link to comment
Share on other sites

Link to post
Share on other sites

Got some progress made today! And planning to get some tomorrow too :)

With trusty ol' Kemppi I got the cage made and it wasn't easy to make as it may seem :D I noticed that if any dimensions are off and you don't triple check them you are going to get troubles. Cage is little skewed but I will be able to fix it tomorrow :) And some pictures...

_full.jpg

_full.jpg

_full.jpg

_full.jpg

_full.jpg

No reason to polish it up yet because if something goes terribly wrong it would be polished for dumpster (knock on wood) :D

Link to comment
Share on other sites

Link to post
Share on other sites

Looks like a fun project, subscribed for future updates :D

Case: Corsair 400r

CPU: AMD Phenom ii x6 1055T 3.5GHz

CPU Cooler: Corsair H60 (2013 edition)

GPU: Saphire Toxic 6950 (OC'd to 6970)

GPU Cooler: Accelero Twin Turbo II

Link to comment
Share on other sites

Link to post
Share on other sites

Managed to get something done today as well.

IMG_6153.jpg?img=img1280

Had to weld some weird MacGyver patents to table so I could straighten the case.

IMG_6155.jpg?img=img1280

And that was it for this day. Had to wrestle with non-working electric appliances :(

P.S.

A little conundrum for you guys (and gals?). What are these parts for?

IMG_6156.jpg?img=img1280

Link to comment
Share on other sites

Link to post
Share on other sites

AMAZING!! your so inspirational :D *subbed*

Link to comment
Share on other sites

Link to post
Share on other sites

AMAZING!! your so inspirational :D *subbed*

Thank you!

Update coming tomorrow as I go to workshop again and I will be getting rads and some other stuff too! I'll also take picture of mockup as I have some parts (PSU, MB, HD5870 and 240rad. Any of these parts aren't going to be in final build, they are broken and I use them just for manufacturing purposes only.) in there so you guys can see how it really looks with some parts in it :) It is nice for me too to see how this dirty, little rusty piece of steel sheet transforms into something nice :)

Link to comment
Share on other sites

Link to post
Share on other sites

Hooray, I got some stuff done today and even had few ideas :D Mostly I just got so much figured out how to do some tricky places. I also welded motherboard tray holders successfully in place and made rear panel and supports for it. Didn’t have time to take photos of rear panel as time just flied by and I realized it was Valentine’s Day and clock was already 18:15. Well let ‘s just say my wife was not that happy about that.

Well any way, here is some photos that I managed to take.

IMG_6157.jpg?img=img1280

IMG_6159.jpg?img=img1280

IMG_6170.jpg?img=img1280

IMG_6173.jpg?img=img1280

BUT WAIT! There is more… When I got home I noticed that there is package for me :P It was from Jimm’s PC Store and I remembered that I ordered rad’s, tubing and some ATX/VGA male & female pins ïŠ Got few pictures of them too.

IMG_6174.jpg?img=img1280

IMG_6177.jpg?img=img1280

IMG_6196.jpg?img=img1280

IMG_6182.jpg?img=img1280

Link to comment
Share on other sites

Link to post
Share on other sites

Today was the day I was waiting for. UPS brought me a package today but it was smaller than what I was waiting for, later I found out that there was second package coming :)

But what was in it? Well RAM of course, 16GB HyperX Beast memory, KHX16C9T3K2/16X to be exact :) Pictures will follow later.

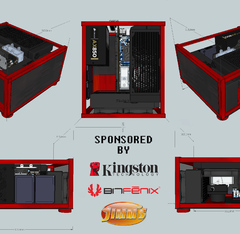
Thank you Kingston for sponsoring my build!!

_full.jpg

Link to comment
Share on other sites

Link to post
Share on other sites

Subbed! This is a fracking awesome build :)

export PS1='\[\033[1;30m\]┌╼ \[\033[1;32m\]\u@\h\[\033[1;30m\] ╾╼ \[\033[0;34m\]\w\[\033[0;36m\]\n\[\033[1;30m\]└╼ \[\033[1;37m\]'


"All your threads are belong to /dev/null"


| 80's Terminal Keyboard Conversion | $5 Graphics Card Silence Mod Tutorial | 485KH/s R9 270X | The Smallest Ethernet Cable | Ass Pennies | My Screenfetch |

Link to comment
Share on other sites

Link to post
Share on other sites

This is what I call custom made. I'm interested in seeing the final product!

Link to comment
Share on other sites

Link to post
Share on other sites

Create an account or sign in to comment

You need to be a member in order to leave a comment

Create an account

Sign up for a new account in our community. It's easy!

Register a new account

Sign in

Already have an account? Sign in here.

Sign In Now


×