Search the Community
Showing results for tags 'open broadcaster software'.
Found 6 results
-
Was recording some gameplay for my channel in OBS, as soon as I saw the drive drop to KBS I did the smart thing and disk cleaned up and began re recording, now I have and unopenable 86.7 GB file and an openable 946MB file, it's a shame if that file which is obviously the long playthrough MP4 is now trash basically.
-
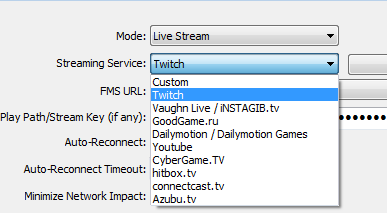
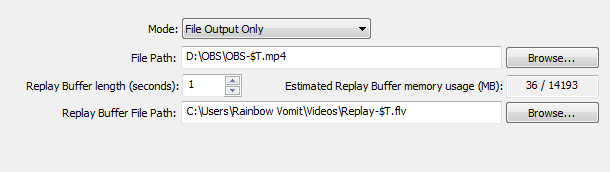
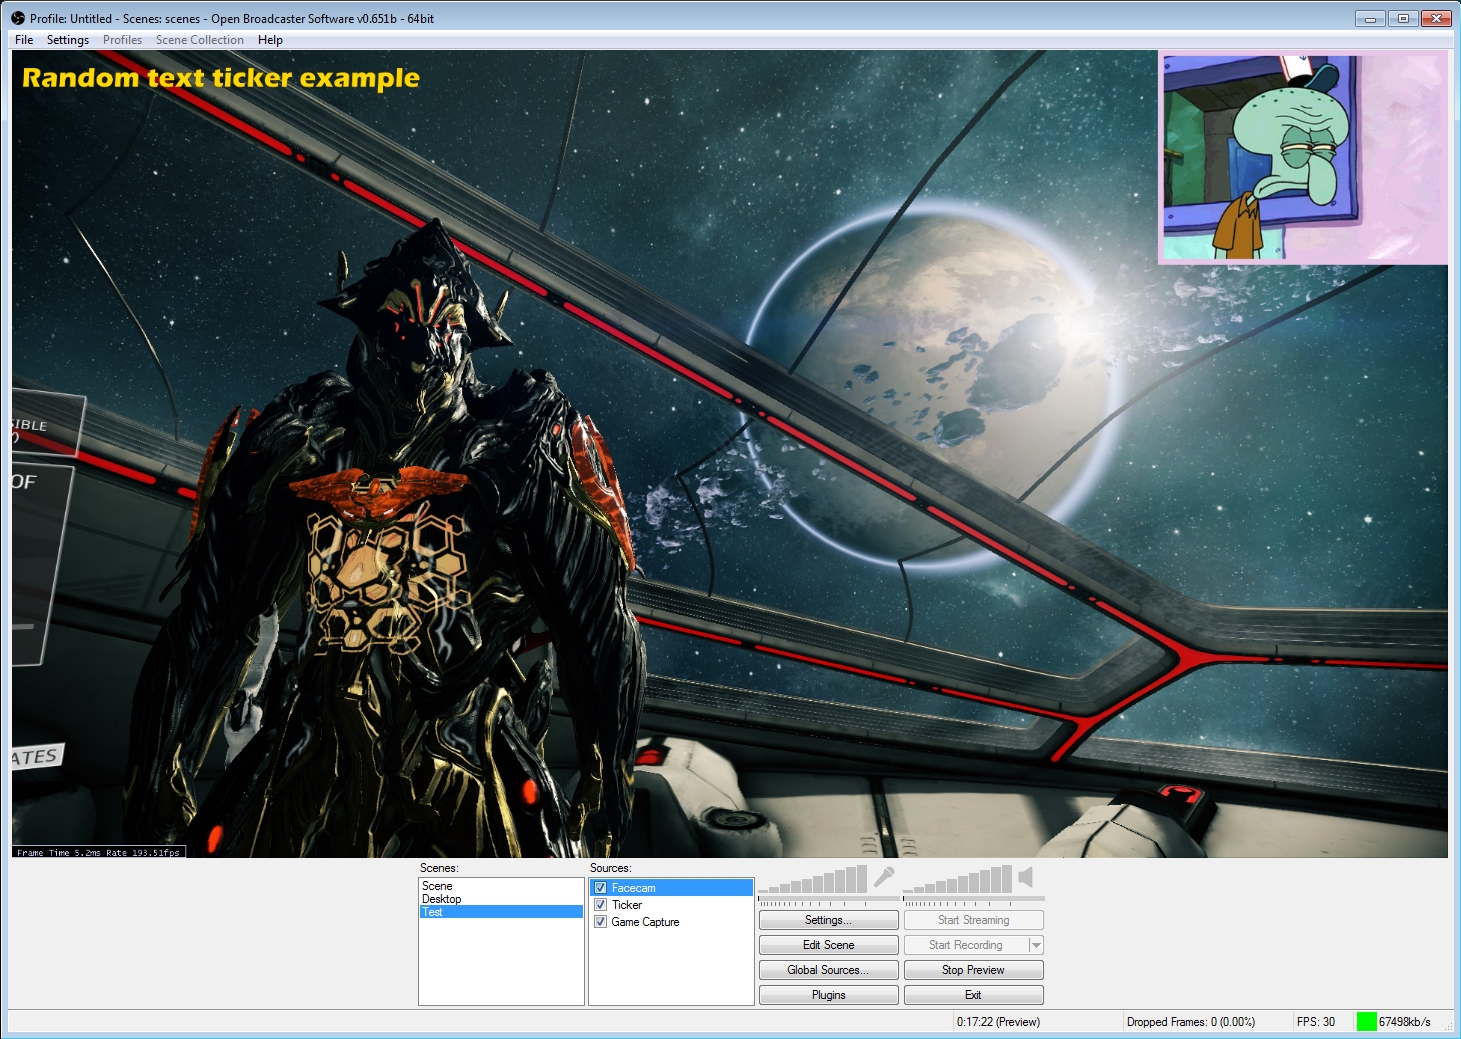
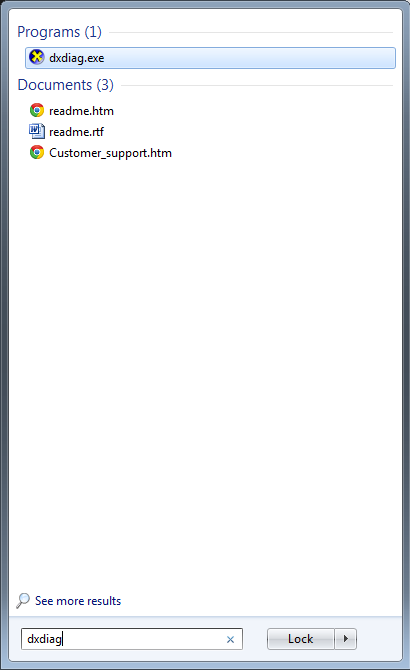
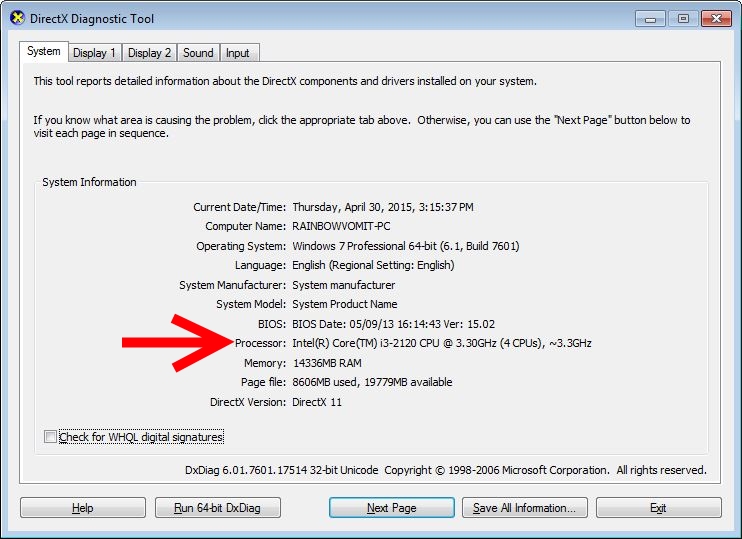
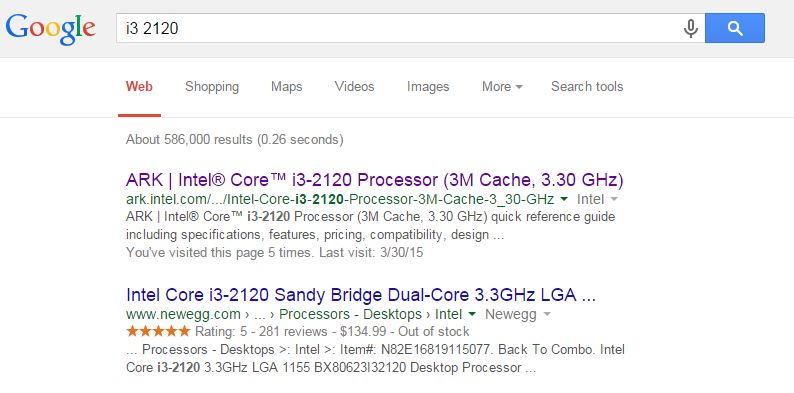
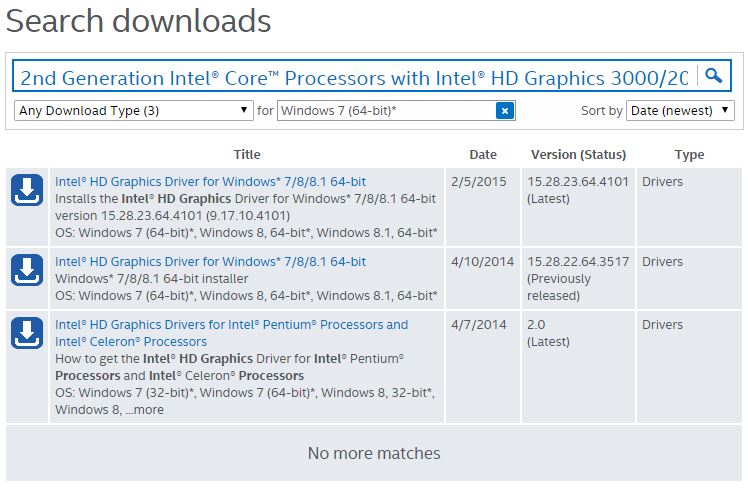
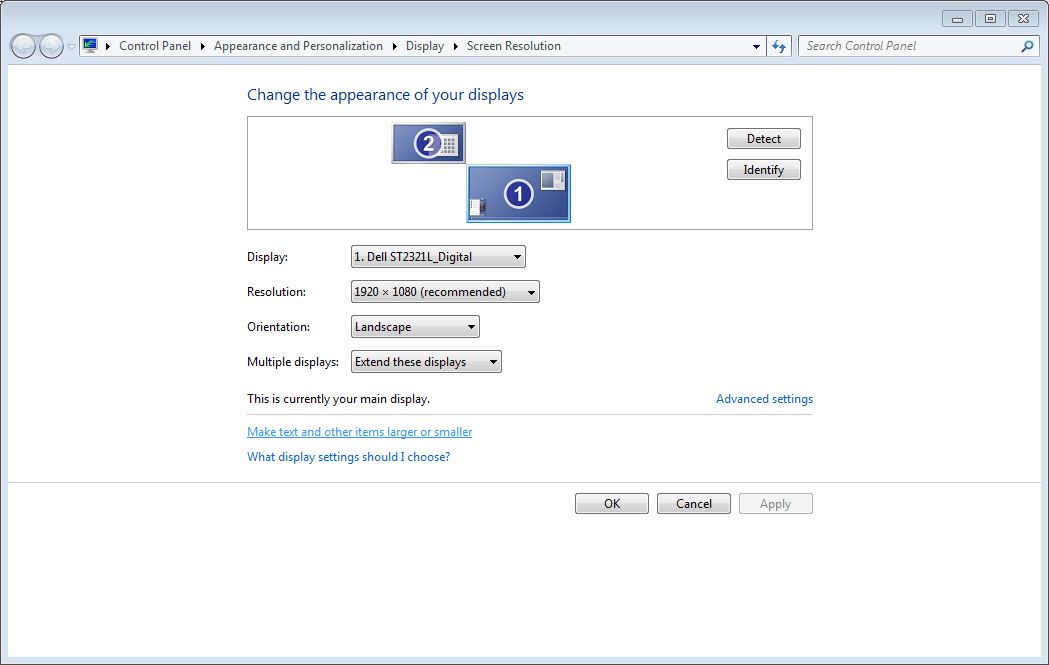
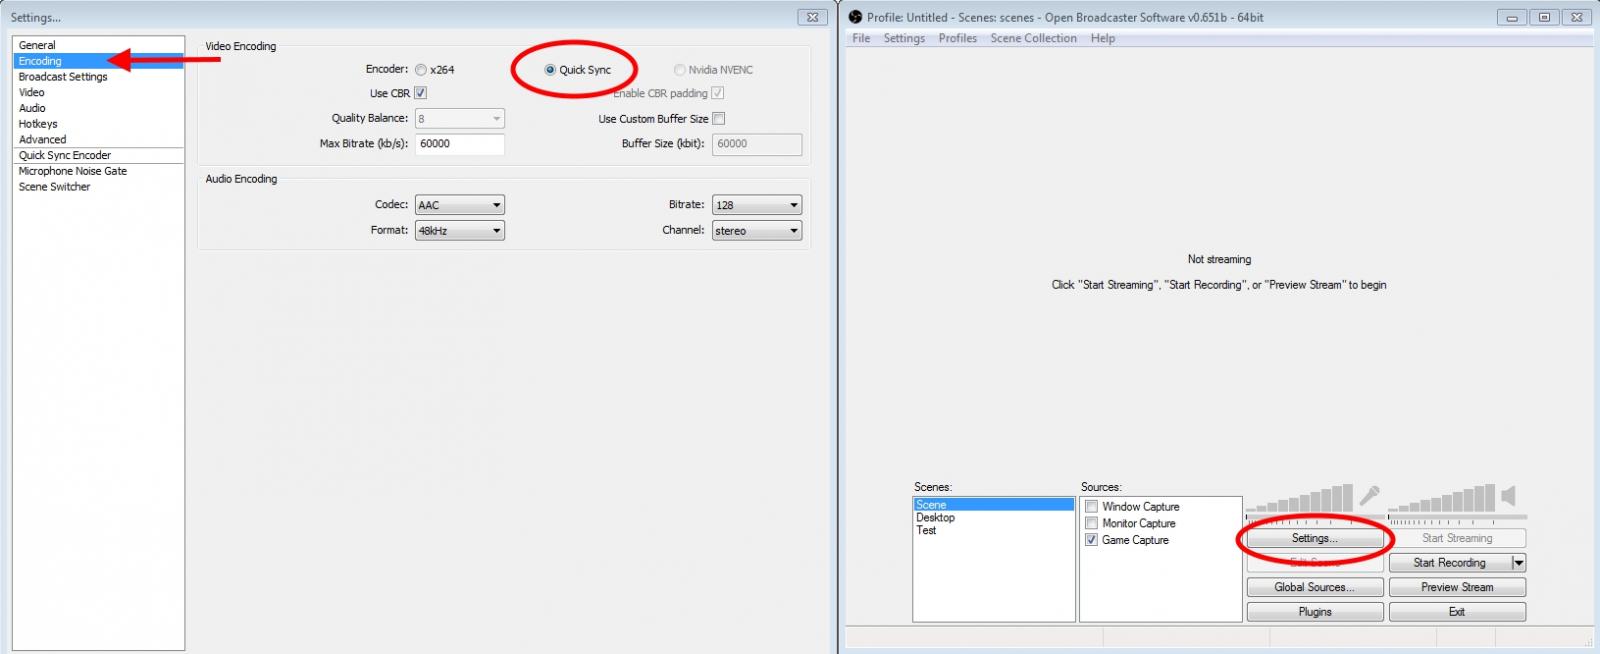
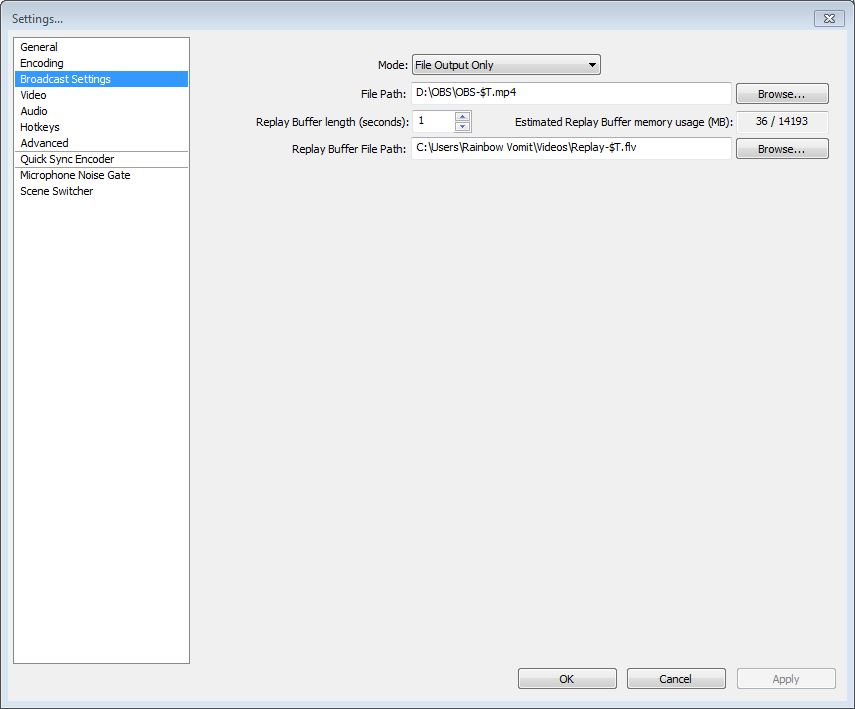
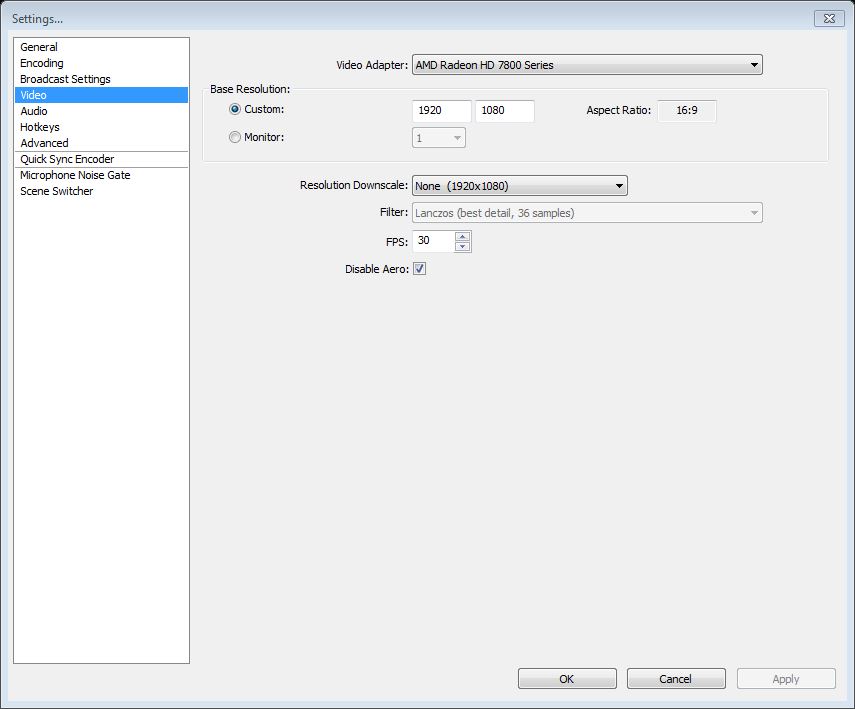
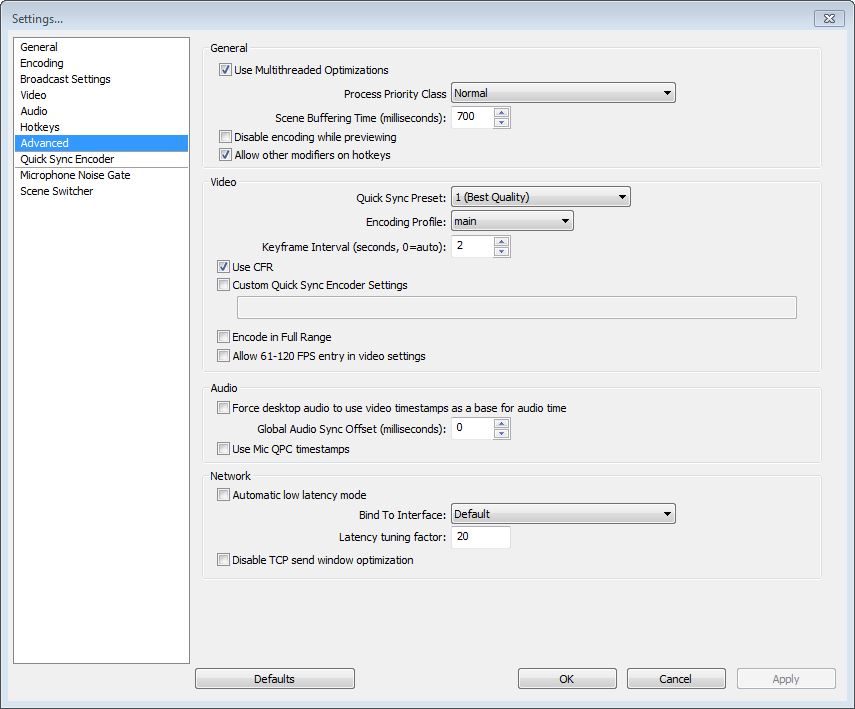
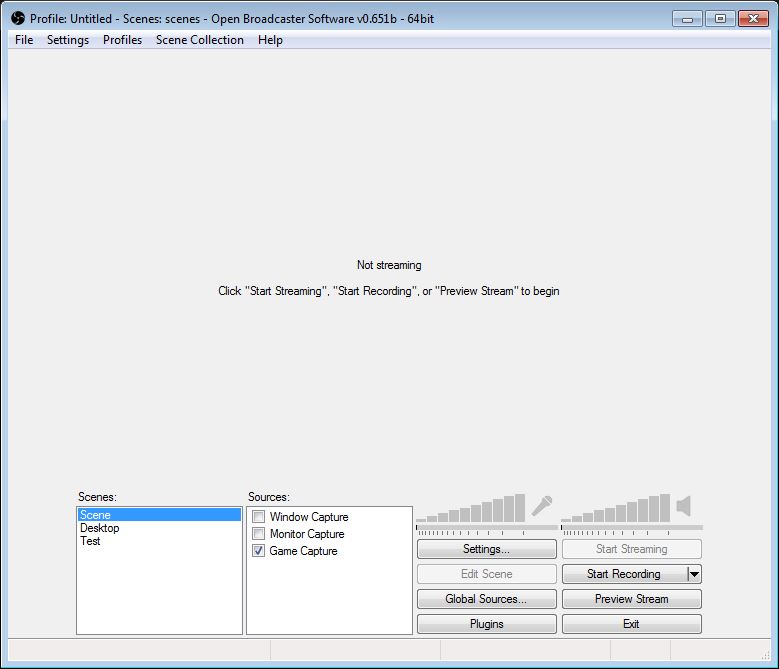
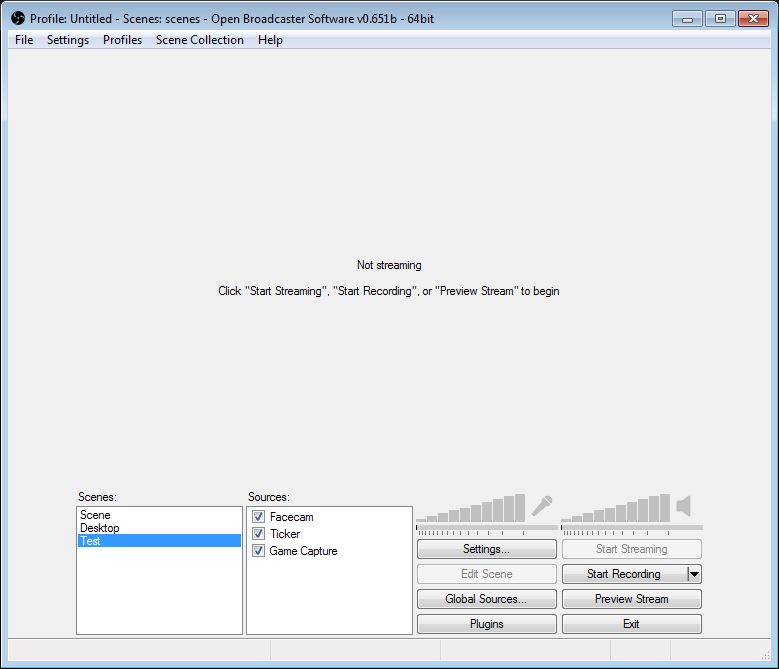
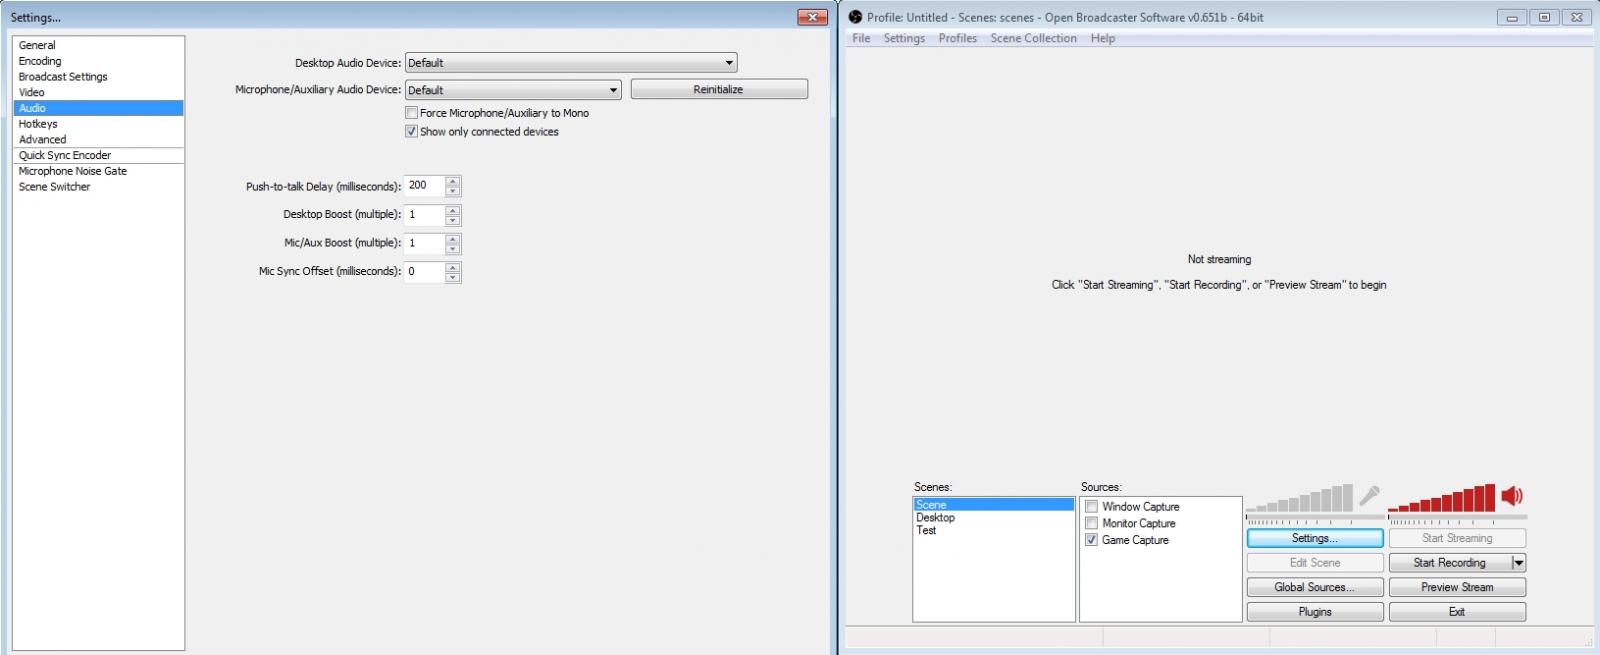
 Open Broadcaster Software (OBS for short) is one of my favorite pieces of free software. It's extremely versatile in function, allowing you to do many things that paid software can do without spending a dime. What is OBS? Plainly, it is a program that allows you to stream to many different sources as shown below, or record to local storage. It allows you to set up multiple video/image/text sources on your scene to add whatever you may need. Game? Obviously. Facecam? Can do, will do. Want to set up a ticker when someone subscribes or for relevant stream information? That's possible. What is QuickSync? QuickSync is a technology that Intel implemented in 2011 on the Sandy Bridge architecture of its CPUs. When enabled, your computer will do video transcoding using the integrated GPU on your processor instead of using your cores or a dedicated GPU. Other reading. Okay, why does it matter? Why use it compared to Raptor or ShadowPlay and FRAPS? Good question! A lot of this comes down to personal preference and is based around low level computer hardware in theory. Both Raptor and ShadowPlay still have an impact on performance, not much, but that little bit can make a difference between hitting smooth enough frame rates and starting to get annoying stutters and lag. In the case of FRAPS, as will be shown below, for a low end system that will not be the solution. Why deal with that when there's a zero-impact solution that does better? The main benefit of QuickSync is that your CPU and GPU have alleviated loads because there's no extra encoding done on them, allowing your tasks such as gaming to run at full speed unimpeded. Why not FRAPS? Everyone uses FRAPS! Fraps was useful when it released, it was one of a handful of good recording programs for games that wasn't watermarked and provided performance metrics that were useful. Downside? Your performance tanks if you want good quality. And you'll have a hard time of storing all your videos. 24 hour gameplay session you want to put on YouTube? I hope you have a large RAID array for all that footage. I've done a test, some variance between the runs but the point is made nonetheless. FRAPS will do worse for your framerate for the same, but I'd have to argue worse, quality. Here we have the test shown running with QuickSync, unfortunately I have no ability to point a camera at my monitor and run it without OBS recording, so you'll have to take my word that there's no performance impact. FRAPS? Good luck playing with that frame rate. And of course, the quality. The above was recorded in OBS (Again, OBS did not effect frame rate) but you'll want the raw footage to see for yourself. https://www.youtube.com/watch?v=s-Bo1Wno05c Remember the difference in file sizes I mentioned? FRAPS took up 4.22 GB for a shorter run, 106 MB using OBS for the same quality. You've convinced me, my computer is not the best, I don't have Linus' storinator, and I want to upload my gameplay to YouTube. Where do I begin? Congratulations on taking your first step to a better recording experience! To begin, we must verify that your CPU is even able to begin the task of QuickSync encoding. Now, I'm a lazy person, too much so to deal with Intel's website, so we'll use Google-fu. Open up Google and type in your CPU's name. But I don't know what it is?? It's just an Intel! Okay.. Back one step. Press your Windows key or click the start menu, we're about to search up in this bish. Type "dxdiag" with no quotes. Click dxdiag.exe. You'll get a window like this, you can find your processor shown with the red arrow. Okay! I've found out what I have! Excellent, back to Google-fu young grasshopper. Nine times out of ten if you put in your processor tier (i3/i5/i7) and SKU you'll get the first or second result from Intel's website. Click that link. Now you've found your way to Intel's spec-sheet page. There's a lot of interesting information here, but only one field that's necessary for our needs. Intel Quick Sync Video. If the circled field says "Yes" then you're in luck! You're able to do this! Click on "Software Downloads" now. Sort by your operating system, and change the relevance to "newest." Download the latest driver for your system, making sure it's not the Pentium/Celeron driver if that's not what you have. Install the driver. Now what? Well, first you need to go in your BIOS and enable the iGPU even when there's a dedicated one in the system. This varies by system, motherboard, etc. Make sure you have the latest BIOS version (hey this site is helpful to find out how to do that) and enable it. Now, I've followed the following video the first time I did this, but I think I can summarize it pretty well. Not using the LTT video because quite frankly it's...lacking... Right click your desktop and hit "Screen Resolution." Press the "Detect" button in the top right. So far in all of my testing and with various evidence you are going to need to have a secondary monitor plugged in to your motherboard in order to enable the iGPU so you can capture with OBS. As I've shown, it's easiest to just set it to the top left corner using a second input on your primary monitor and just ignore it. Top left because you will very rarely, if ever lose something up there. And if you do you can just use OBS to show the screen without having to change input settings on your monitor. Which is nice. Now, sometimes this is all you'd need to do for enabling QuickSync. But in my case, and probably yours, you'll have to plug in a monitor to the motherboard. Roll your eyes at this, I know. But it's a necessary requirement it seems. You can do what I did and plug your motherboard in to your current monitor for all intents and purposes. As you can see above, I have mine plugged in to my current monitor, set it to a low resolution and move it to the very top left. I'm not likely to accidentally lose a window or my cursor with it there, so that's how I use it. If you have a second monitor to use however, go right ahead and use it as you normally would. Done! How do I have fun in OBS now? Home stretch, we're almost there. Start OBS, click settings, and go to the encoding tab. This is where the magic starts. There'll be a radial button for QuickSync, click it. Now personally, I set my bit rate to 60,000 and enable CBR (constant bit-rate) for maximum quality no matter the scene, and it works well, as shown above. If you're streaming however, set it at most to 3,500, no higher. Set your output folder, and file name. Make sure when you're setting it that you switch from *.flv files to *.mp4 files. You might notice in the top file path box I have D:\OBS\OBS-$T.mp4, the file name is OBS.mph but the -$T is a sequence to add the full date and time that the file was recorded. Handy if you need to keep track of multiple files instead of renaming it constantly. Here are my video settings, I prefer recording at 1080p and 30fps because my system can't maintain 60 all the time. And it helps keep the file sizes even smaller. But this is all up to what you want to do. Next you'll want to make sure you QuickSync preset is set to 1 for best quality, enable CFR to make sure your frame rate doesn't fluctuate, change your encoding profile to main, and the keyframe interval to "2." Notice you are able to set OBS to allow recordings/streams up to 120 fps. Finally, set your audio options and whether you want the microphone/sound device muted in OBS on the main window (enabled shows red by clicking on the speaker/mic icons, gray is muted). After that you can set up your scene? Yup, this is the very last step. On the main OBS window you'll see two white boxes, the one on the left is your scenes and the one on the right are the sources for your different scenes. This is helpful for when you need different overlays on what you may be doing, but don't want to constantly create and recreate scenes. Now, there are orders to how sources is listed. Sources at the top will be overlayed on top of sources below them. In general you'll want a game to be the very bottom source so everything else is overlayed as shown in my example at the top of the post. To add a source to your scene just right click on the source box, mouse over "add," and click what you would like. Window Capture - This is for capturing a window you have open, say Chrome, Spotify's playlist, etc. Here you have options to select what you want to do with the window you've selected. Notable options are a sub-region, so you can select only a section of the window instead of the full window, and a color-key so you can make a window transparent except for certain colors inside (helpful for say a twitch chat). Monitor Capture - This is for adding a source showing your entire monitor, useful if you're wanting to record a guide shown on your desktop. Image - Adds a still image to your space, I personally can't find any uses for it except maybe a short FAQ or tip jar maybe? Choices are endless. Image slideshow - This is like the Image option, but allows you to select multiple images to rotate between showing. Text - Plain text can be added to the space. You can choose font, color, size, formatting, etc. Video Capture Device - This is for use with capture cards or webcams. Game Capture - And here we have the most important source, game capture. Open your game and alt tab, refresh on the preferences and use the drop-down menu to select your game. Resize or set it to stretch and even ignore aspect ratios to make it fit your space and you'll be up and running. Done? For realsies? Done. The only thing left is for you to set up your personal scene and get cracking on those videos. If you all have any questions don't hesitate to ask, I don't know everything but I can give it a good shot and will at least lead you in the right direction. Yay for a year overdone guide going up.
- 162 replies
-
- 42
-

-

-

-
I was wondering what the best screen capture software would be out of OBS, Fraps and Nvidia shadow play. I've heard that fraps has the best quality due to it's lossless capture and what not. But of course file sizes are massive and you can get massive frame drops with a bad set-up (one drive etc). With shadow play I've noticed the video and especially the audio quality are lower than fraps. But the advantage is that there is zero impact on game performance. And OBS (which i stream with) from what I know has two encoders both the standard x.264 as well as the option to use nvidia nvenc. I've never actually tried OBS for local recordings, i'm assuming the nvenc will be similar to that of shadow play with less quality but better performance overall. Apart from in OBS you have more options so the audio quality issue in shadow play can be eliminated in obs via the nvenc encoder. Also I was wondering what encoder does fraps use? I'm rendering my projects in Adobe premier pro using the h.264 codec setting and i would have thought matching the raw file with the rendering settings would give me the best results. So ideally using a program that encodes in h.264 like OBS might be best? What are your guys opinions? And which would you say gives the highest quality footage suitable for adobe premier pro and YouTube? Thanks, GR412
-
Hello forum! I have this problem with my mic. It's a Steelseries mic plugged in via USB. When talking in Teamspeak and/or Skype everythings fine. The mic works as it should, but once I try to record a video with either FRAPS or OBS, there's a strange popping noise in the audio. Why is this and why does it only show when I record? I've tried changing the bit-depth and sample rate but nothing fixes it. Thanks in advance! Halliom
-
Official Download/Thread: https://github.com/jp9000/obs-studio/releases <iframe width="560" height="315" src="//www.youtube.com/embed/8kCQUw3Zl8k?list=UUvx-9mk08Q-pdx7P79-Kakg" frameborder="0" allowfullscreen></iframe> Video About it: https://www.youtube.com/watch?v=8kCQUw3Zl8k&list=UUvx-9mk08Q-pdx7P79-Kakg Description Of the Video Download: https://github.com/jp9000/obs-studio/releases Thread: https://obsproject.com/forum/threads/obs-redux.7736/ VLC Player: http://www.videolan.org/vlc/index.html CAPTURING DESKTOP SOUND Wavtap: https://github.com/pje/WavTap Wavtap download: https://github.com/downloads/pje/WavTap/WavTap%200.2.0.pkg 'Soundflower' is also available to capture desktop sound on mac: Soundflower: http://code.google.com/p/soundflower/ Soundflower download: http://code.google.com/p/soundflower/downloads/list Music: YouTube music library: Lucky Day ⟶⟶⟶⟶⟶About Us⟵⟵⟵⟵⟵ YT: techthatinterest ➠ Subscribe: http://www.youtube.com/subscription_center?add_user=techthatinterest ➠ Web: http://techthatinterest.blogspot.com/ ➠ Follow: http://twitter.com/techthatinteres/
-
Tip: You should be logged in to view this post correctly. So... You want to know how to record high quality gameplay with OBS? or maybe you just stumbled upon this post because you're an avid forum user. Either way, I hope you learn something from this Guide, and hopefully I can help people that need a little bit of help. So, you may be wondering, why somebody would want to record gameplay with a tool that is meant for live streaming purposes. And the simple explanation for this is that OBS offers a much wider set of features that many other recording programs such a FRAPS, playclaw, and Dxtory (and all the others) are just missing. Some of these tools include text over video, PiP (Pincture in Picture) that lets you put your webcam (and literally any source over the top of the gameplay), and not only these, but OBS has an extremely wide variety of third-party expansions, so there's an endless amount of tools at your control. "Hey, buddy, why don't you just add all these things in post-production or editing?" - well, Buddy, not everyone has the time to do that sort of thing, and since people on the internet, mainly in the medium of online video, are fighting over who can produce lots of videos in a faster time-span, making videos without the need for post-production or editing means that making videos is more efficient: 100% of the time. And another point I would like to add is that most of the time YouTubers who post lots of videos don't really have a lot of editing in their videos. The main things that they use are intros, outros, and sometimes that have edited clips as well, which are ALL THINGS THAT DON'T HAVE TO BE ADDED IN POST PRODUCTION, but instead can be added live with the means of OBS... Well, enough of that short rant, I know you didn't come to this guide for that, so.... yeah. So. The Guide. Here goes nothing. So the fact-of-the-matter is that when you are solely recording gameplay it doesn't use as much processing power as if you were live streaming as well. for example, you don't need to use a buffer size to process the information, because you don't need the information to be encoded as much and sent to Twitch's server an the likes (which is what I assume happens when you are streaming). 1. Make sure you backup all your current settings that you may have for streaming. One way of doing this is going to: C:\Users\*YourUsername*\AppData\Roaming\OBS\profiles and then changing your profile name's filetype to something else. For the example, I added ".backup" to the end. Note: This doesn't save extension settings. The reason for this is so that OBS doesn't automatically use the previous settings. 2. Open up OBS and you will notice all the settings have reset to default and you have no profile. If you go settings on the general tab you will notice your old profile is gone, instead you have an "Untitled" Profile. Now you need to rename this profile to something you'll later identify as the profile you will use for recording gameplay. As you can see, for the example I used "Gameplay". This is memorable, and will help me remember that this is the recording profile. 3. Time to change some settings BABY! For a start we can change the encoding settings: As you can see, I disabled CBR, put the quality to 10, put the max bitrate to 1000kb/s, and like I mentioned before, I turned on "use custom buffer size", and set it to 0 kilobits because it disables VBV and allows x264 to change the bitrate itself. 4. Next up, the Audio settings. You can set this to whatever floats your boat if you have knowledge in this sort of stuff, or you can copy mine if you like (mine matches most music audio quality) Pretty simple stuff, but I'm obliged to talk you through it so you understand: AAC has higher quality than MP3 at the same file size, but has less compatibility, but this DOESN'T MATTER because it will be encoded differently when uploaded to YouTube, etc. 48kHz, because it's obviously faster. 128 - 160 bitrate, doesn't really matter I guess, but obviously higher = better. Aaaannndd last but not least, stereo... for 2 channel operation... because you have 2 ears. and nobody wants mono. Ever. 5. N-n-n-n-n-next up is the Broadcast Settings. Not much to change here, just make sure you have the "Mode" set to File output only. Lastly you will need to set the output destination. I made a new folder in my videos folder. You can also set the file type, with an impressive 2 file extensions to choose from, wow!!! mp4 and flv. The difference between the two isn't anything impressive, but I'd suggest mp4 because it is easier to edit, plus flv is rumored to have a 1.2% larger file size, which doesn't seem like that much but mp4 = 1GB:1.12GB = flv... so yeah :blush: To change the file type, just change the "Save as File Type" on the "Save As" Dialogue box. 6. The video settings are down to you. Base resolution needs to be set as the monitor that you will be recording, or customize it to the correct size; For me that is 1080p. I wouldn't recommend downscaling the resolution, but you may need to if you notice any lag below around 30FPS. If you are downscaling you can use a filter if you like, I recommend Bilinear or Bi-cubic since it doesn't make sense to Lanczos, which would most likely make your PC lag. FPS can be set to 60fps if you think your PC can handle it, pro-tip: it probably can. and lastly disable Aero if you like 7. Audio settings. Okay, you can literally use your own settings for this because it's different for every individual, but I will include my own so that this guide is complete. As you can see, I have set-up hotkeys, and customized the desktop boost, and the other stuff. 8. ADVANCED SETTINGS YAY! Warning: These settings are advanced... and to be honest I don't entirely understand them. So in the advanced options tab make sure you enable CFR to enable a constant frame rate. Next you need to check where it says "Use x264 Encoding Settings", and you need to type the following into the text field. crf=X "crf" = Constant Rate Factor in x264, and "x" = A Value for 1-20, representing the quality of the output file. (0 = Lossless) Serious Warning: START BY USING CRF=15-20 TO BEGIN WITH, AS A LOW CRF USES A HECK OF A LOT OF YOUR CPU. ALSO, DO NOT USE CRF IF YOU ARE GOING TO EDIT, AS IT USES A PROFILE CALLED HIGH 444, WHICH MOST EDITING SOFTWARES AND EVEN A FEW VIDEO PLAYERS CANNOT HANDLE. To read more about x264 parameters, and High 444, please visit: http://mewiki.project357.com/wiki/X264_Settings So your settings should look like this is you kept all the default ones other than the ones I told you to change: Now, start testing your recording settings in-game to make sure: 1. It doesn't lag too much when playing the game 2. The footage doesn't looks too laggy, and 3. Make sure the footage is sharp and non-pixely Once you test it a few times you can start changing the settings based on what is happening. Common Problem: My Game is lagging too much to play. How to fix: Try lowering the FPS, and see if that helps. If not, try changing the CRF (x264 parameter) and make it higher, or just try disabling it completely. Now, if that doesn't work it's probably your hardware, so try downscaling the resolution about and see if that even helps, and also try reducing the Max Bitrate in the Encoding tab by about 100 each test. If all else fails, try reducing the quality balance. THIS IS A LAST EFFORT and I highly discourage this. Common Problem: The gameplay is fine, but the footage is glitchy or has lag issues How to fix: If the footage is glitchy then you definitely need to disable the Custom x264 Settings. See if this helps (which it should) If this fails to work then I guess you could try changing the filetype. mp4 to flv, or flv to mp4. see if that helps at all. If that fails to work then I'm gonna say it's your hardware, so follow the hardware fix for the above problem. Any other common problems please send them my way
- 27 replies
-
- 17
-
-
-
- obs
- open broadcaster software
- (and 7 more)