Search the Community
Showing results for tags 'hardline'.
-
I have a hardline water cooled setup I just built my first time so sorry if this is a dumb question XD5 RGB paired with Thermaltake Pacific W6 for the Threadripper. I can’t seem to figure out what plugs into my CPU fan header at the top of my motherboard
-
 Question as heading. Is it possible to link my device needing steam remote to my Desktop Steam Client through the WIFI Router using a WIRED connection? Any interface / program / settings? Rocking an ASUS Router.
 -
So it appears my hardline cooling cracked while I was away for a week and started leaking/drawing in air. My motherboard will no longer post, so I am assuming the CPU is fried from overheating. There was luckily no coolant leakage onto the motherboard itself. The tricky thing here is that this is hardline tubing with compression fittings (Digital Storm was the builder). Short of brute force, I have no idea how to begin removing it to drain the line and remove the cooling block to check the CPU. This is out of warranty, so it's not worth the $ to send cross-country back to DS for repair. I should mention that DS unfortunately put no drain ports in the loop for this version of Aventum case. Thoughts?

-
Hello everyone. I have a few questions about hardline liquid cooling. I have built and torn down multiple computers in the past, both high end and low end. I have been in the pc spectrum for quite a few years now, and I think I am finally going to build a hardline liquid cooled pc next year since it seems that new cpus and gpus will not be available until then. Is Corsair's custom cooling any good? I have seen videos about them and some reviews, but I was wondering on how they compare to EK's cooling solutions. I also noticed that there are quite a few different sizes of fittings and tube size that can be used. What sizes would y'all recommend? My last question is which pump to use. Are there multiple types of Asatek pumps that work better in certain situations? The pc that I would be building would have a Ryzen 9 5900x and an rtx 3080 (or whatever Nvidia makes that replaces it if they do decide to). Thanks!
-
Will imperfections in a bend that i wouldnt really notice with the glass and lights on really do anything to the stability of the loop for normal petg tubing? (wrinkles/small bubbles) It will be my first time hard line bending so while i plan to give it a few trys here and there i dont wanna spend an obsceen amount of tubing per bend. If i can get away with slight errors in the second bend parts i might have to do i prob will.
-
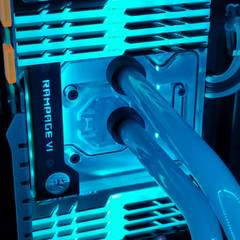
Now that the water cooling components have arrived, the building has really begun. First out of the boxes were the heat sinks. The CPU water block was the easiest I have installed to date, while the GPU predictably took some time. The overall GPU size shrank significantly, reveling the nice lower motherboard heat sink once again (Yay!). Next step was to build the custom cables and rework the wiring through the case. I think these white/blue accents add quite a bit of style to this build, and being able to customize the look makes the build a little more unique. Finally, the water cooling prep truly begun. Installing the last major components of the loop ran into a snag with the large radiator. The selected radiator has a built-in reservoir, which added to the length and could not be installed correctly along the top. Thankfully, I was able to move the radiator forward thanks to the NZXT case extra long screw mounts. I couldn't get all the screws in, but there should be enough to keep the fans from vibrating and causing noise. This did mean that one of the front case fans had to be permanently uninstalled. The pump and reservoir were purchased as a set and assembly was simple. They will be quite hidden from view. Before I started bending, I looked for a way to position the pump in a way that would minimize the number of bends in the case. This would make my job of bending the tubes easier and keep the look of the case as clean as possible. I found that mounting the pump on a drive tray, as originally planned, worked well and only needed to be raised about 7mm on washers. Installing the fittings also added that final bit of chrome, and the selected blue fittings brought in a little more of the color accent into the case. I believe this gave a fairly consistent look to the build. The tube bending took a considerable amount of time. Hardline tube bending is not a trivial matter and requires lots of measuring. Thankfully I purchased the complete bending kit from Monsoon, which came with measuring tools, but it took over an hour until I had enough confidence in the measurement to bend and trim my first tube. The process of measurement was tricky, but I believe that simply has to do with the awkwardness of making measurements in a confined 3D space where the rulers can't be secured to anything. As for the bending, it took a few tries until I was able to make bends with millimeter accuracy. I kept to the simple bends at first, making sure that the minor mistakes I was making wouldn't ruin the looks. I saved the most noticeable double bend for last and the result was more than acceptable. I would say that many who have worked around power tools and is a little patient would have about the same experience after bending and cutting only 5 tubes. I test fit the bent tubes before securing the ends of the tubes on. I went with Monsoon fittings, which require the extra step of attaching the ends of the tubes with adhesives before securing the ends of the tubes into the case. Once the ends of the tubes are on, there is no undoing the adhesive and getting the ends back. Same thing goes for the tube they are connected to. I would highly advise a full test-fit before gluing any ends onto a pipe. A dremel tool may also come in handy, as some of the ends might need to be sanded down and flattened to ensure the end caps adhere straight. Once the test fit was done, I followed the instructions on securing the end caps from YouTube videos published by Performance PCs ( https://www.youtube.com/channel/UCEHPVLaMY9zeDOynltKhgdA ). This is also about the time I noticed a good number of my fittings had parts where the blue paint had chipped off, revealing the chrome underneath. I had worked over a tile floor and had dropped two fitting, but somehow 5 of the fittings had significant chipping which must have mainly come from handling them. Oils from hands can be quite harsh to finishes, but the quality of these 'premium' hardline fittings was simply not up to my expectations. I placed the blemished fittings around the case in locations that would be less noticeable, but I wonder if this is the norm for Monsoon free center colored fittings or if this set of fittings skipped a step during manufacturing... Once the tube ends were cured to the tubes, I installed them and realized just how clean this particular build ended up. I managed to keep the water cooling loop toned down and simple, while still color coordinating it with the rest of the build. The water cooling loop still dominates the center of the case, but the Y created between the pump and the water blocks has symmetries and looks like the rather elegant configuration I was aiming for. This was my first time doing a custom water cooling at all, so a clean result was far from guaranteed. At this point I tried to pressure test the loop, but made a horrible rookie mistake in my eagerness to complete the system. I forgot to attach any thing to the bottom of the GPU water block... When my pressure test was inconclusive and I decided to proceed with the 'paper towel' method, a fair bit of water doused the SSD just below the GPU after turning on the pump for a quick second. I was using an external power brick to run the pump, so thankfully the power supply, which was also under the GPU, was not powered or plugged in. I quickly cleaned it up and found no water hit any crucial components. The water used is PrimoChill and is not conductive, but I will still be letting it dry out just in case. I continued filling the loop by filling the res and then running the pump for a second until there was enough water in the loop to keep the pump on. I was watching the bubbles flow through the loop and noticed a bit of water leaking from below one of the GPU's rotary fittings. Second rooky mistake, I didn't tighten the rotary fitting down to the block enough and I could clearly see space below the o-ring... Another reason to wait for the system to dry out, even though it looks like the water didn't touch any part of the GPU. I tightened the rotary fitting down, cleaned up the drops of water, and continued cycling the water. I ran the system like this for a little over an hour with no more signs of leaks anywhere. It looks like it may be a day or two before I try to boot again, but I am willing to be a little patient for this project. Overall, I am very happy with how this computer looks and would go so far as to say it might pass as a professional build. I'll post a summary when/if the computer is up and running.
-
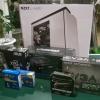
The computer parts have arrived, being picked up during a quick vacation to Southern California. You can probably guess from that alone where the purchase was made. All the water cooling components are in transit and should be here in the next day or two. The boxes of the computer components looked rather good themselves, so I couldn't resist taking a few glamour shots of them. There are very few components in this build, which will help keep the computer interior clean. I took this chance to also start building the computer and make sure it can post with air heat sinks. I won't do much more until the water cooling components get here as I don't even have a proper heat sink for the CPU. I will never recommend doing this, but I ended up installing a heat sink on the processor without any retention mechanism. This meant that the computer had to be on its side to post and couldn't be moved at all. This massive air cooler from a previous build also barely fit between the RAM modules. Putting the components in went very smooth, aside from some issues with the power cables being too snug. In the process I also realized the custom cabling will be a little different than I first anticipated. I ordered components to make extensions, not a custom braided cable going from PSU to the component. It won't effect the looks and it is likely the choice I would have made anyway. I do with I had done a little more research as I will now have some extremely long extensions... After piecing together what I have, I find the overall look of this computer rather pleasing already. Pictures may never do this computer justice, but it is all I can share so far. The best news of the day: It posts! I closely watched the CPU temps the entire time I set up the BIOS to make sure it wasn't at risk. This is as far as I care to go until a properly sized CPU cooler is installed. Once the water blocks arrive I'll post some shots of the build again.
-

Mnpctech Fractal Design "Define S" ASUS ROG Gaming PC
Mnpctech posted a gallery image in Members Albums Category

From the album: Fractal Design Define S ASUS ROG Gaming PC
ASUS ROG Ranger system with Clear PETG liquid tubing HERE -
Time for my rebuild. I tend to build one every 4-6 years depending on how fast tech is moving. After my huge disaster last august I had to purchase new hardware and this year I decided to do a whole new rebuild. This time around going back to a case and ditching the desk. I’m moving to do all glass tubing this time and trying to keep it super neat. Build Specs : CPU : 5950X Motherboard : Gigabyte Arorus Extreme X570 Ram : Gskill NEO 32gb 4000mhz DDR4 GPU : Strix Asus RTX3090 with active backplate Power Supply : EVGA 1600T Storage : 3x Samsung 980 Pro 1tb NVME Case : Lian Li 011D XL Cooling : EKWB Quantum CPU Block EKWB Quantum GPU block w/ Active Backplate EKWB reflection distribution block Moonsoon 14mm Glass Tubing Bitspower 14mm OD Premium Matte Black Fitting Hardware Labs GTR Nemesis 3x120mm x2 Pictures :
- 1 reply
-
- 2
-

-
- glass tubing
- hardline
- (and 2 more)
-
 I am not sure are the thermaltake rgb fittings asus aura compatible? if not is there any way to jury rig it, maybe?
 -
Hi, so I currently am planning to convert my pc to hardline watercooled. And am planning to use EKWB pastel red coolant But I wanted to ask, are pastel coolants actually safe? Ive seen so many horror stories of pastel coolant clogging up loops and causing them to have issues. Even Jayztwocents had his coolant clog up his 'skunkworks' system and the colour go to a diarrhoea brown. Ive read that actually its not the coolant, but the plasticiser on some tubing that causes it. But im planning to use EK hardline acrylic so this shouldnt be an issue. Is this coolant going to be ok? Or is it just going to clog up my system
-
So this is not a continuous build log but rather most of my build crammed in one, as I've been too busy to be posting all steps individually or even taking pictures of all of it. But I'd like to share my build and the process nevertheless. As with my previous builds I have reused most of the components and only added a new case (the primochill praxis wet bench) and a few bits and bobs needed to make it into a dual loop system. Originally I had my eyes on the Open bench table but I wanted the base tray to be angled to better show of the hardware which the Open Bench Table wouldn't do unless I did some significant mods to it (most likely out of my skill level anyways) and bought a SFF PSU. Instead I've used the PrimoChill Praxis Wet Bench and ghetto modded and additional 360 rad to the front of it. If anyone from praxis is watching... there is plenty of room for you guys to perhaps add it to the middle tray. But instead of boring you lets get on with the pictures. First things first... draining the old system Building the new case I did a lot of test fitting an measuring.. tedious task but important ones. Another "mod" I did to the case was bolting a 2.5 HDD cage from a Corsair Air 240 next to the PSU. Saved me the trouble of getting more custom sleeved cables and makes access to the drivers a lot easier. After the front rad has been mounted access to anything on the bottom and was not easy. Also found a spot for my Aquareo 5 LT fan controller. Turns out the somebody tailor made the distance between the cutouts above where the PSU will sit perfect. Couple of washers and MB screws and voila! Front rad Ghetto Mounted: It is by no means pretty - but it is on solid and doesn't botch More pics of fitting the pump/res unti and pass throughs Repainted a rad black again after I painted it white for a previous build Redid my radbox as I had extra fittings available this time Before After Flushing the ZMT tubing from EK.. Forgot that the very first time I used it... required me to take everything apart to clean all blocks and tubes... won't forget that again... (It is even clearly written on the front of the box it comes in... erhm @EK Luc Can you guys put stickers on the tubing itself with that info in the future so us numb nuts also get it? ) Ready for final assembly Bleeding Final shots Ended up being by far the most extensive modding I've been doing to a case.. well if I can call drilling holes modding... Hope you guys enjoyed it.. I know I did
- 22 replies
-
- 4
-
-
- hardline
- test bench
- (and 2 more)
-
Ive just brought an MSI GTX 980 Gaming 4G as an upgrade to my main PC as im going to move my 970 into a multimedia PC. My PC has a custom hardline watercooling loop in it already so i need a waterblock for the new 980 to add it too the loop. Ive been looking everywhere and found that EK does the EK-FC980 GTX TF5 but i can't find this block anywhere but was wandering whether i could use the Ti variant of this block (EK Water Blocks EK-FC980 GTX Ti TF5) on the normal 980 card that i own
-
 Hello Guys, Im planning a new buid and id like to ask if someone tried to do a hardline watercooling of GPU and CPU in a Corsair 460X Case. Technically a 360 front radiator and a 240 top radiator would fit. But theres not much space left for the reservoir and the Pump. Do you have any suggestions? Thanks in advance!
-
 Hello! It's time for a change! My current build has been a proper trooper, and served me well, but I've really been itching to do something a bit more compact. The Manta isn't the most compact mITX case on the market, but who am I to resist them curves? I wanted a small footprint, no blue color anywhere, shiny stuff and lots of oompfh. Here's a few key words and what I plan to cram into this adorable case (if it looks a bit bloated, it's because it's full of awesome stuff): #hardlinetubing #customcables #orangeness #dfive #shiny All the parts are in my possession, but are scattered around the house in a big jumble, so no fancy pictures of all the boxes just yet. I'll take the liberty to pass you off with a bland shot of the Manta for now. More to come, hope you stay tuned!
 -
 Hello LTT community, This is my first post so I've inevitably broken a bunch of rules and put this in the wrong place. Sorry about that. I started watching the youtube channel even though I'm not a gamer or even a PC user. I shouldn't have done that. It was a terrible mistake. Now I want to build a PC for fun and you should probably know the following things: I have never built a PC (although I've dug around in PCs in the past) I'm an adult human person with practical skills (read: I can build things and learn quickly) I would like to do a mini-ITX build in the Node-202 (which I've held in my hand x1) Custom cabling is something I want to practice (so a (fully) modular power supply would be nice) I am not going to use the PC I build (probably), but it has function enough to check everything's working read: components need to be modern enough that build skills transfer but only good enough to play NHL 2k6 I'd like to play with overclocking (if it doesn't add prohibitive $s) Other than the Node-202, I would like to spend as close to $0 as possible It seems like I have 2 options here: Find someone's old build log (something baller from 2007), track down the parts separately and stuff them in the 202 There is something appealing about building the sickest 2007 mini-ITX system 10 years later. Buy a number of old mini-ITX builds and scrounge the parts Any help at all would be appreciated. Also, if this is a terrible idea, you should say so. Thanks, this seems like a great community.
 -
This is my first watercooling loop! Specs: AMD - Ryzen 7 1700X 3.4GHz 8-Core Processor MSI - B350 TOMAHAWK ARCTIC ATX AM4 Motherboard Corsair - Vengeance LED 32GB (4 x 8GB) DDR4-3200 Memory Samsung - 850 EVO-Series 500GB 2.5" Solid State Drive (OS) Samsung - 850 EVO-Series 1TB 2.5" Solid State Drive (Storage, Steam library etc.) MSI - GeForce GTX 1080 Ti 11GB Founders Edition Video Card Corsair - Carbide Clear 600C ATX Full Tower Case Corsair - RM 650W 80+ Gold Certified Fully-Modular ATX Power Supply Watercooling: EK-XRES 140 Revo D5 PWM (incl. sleeved pump) 5x EK - Vardar F1-120 40.0 CFM 120mm Fan EK-CoolStream PE 240 (Dual) EK-CoolStream PE 360 (Triple) EK-FC1080 GTX Ti - Nickel EK-Supremacy EVO - Nickel EK-FC1080 GTX Ti Backplate - Black PETG tubing and nickel compression fittings Accessories: Silverstone sleeved extension cables Cool White LED strips Focusrite Scarlett 2i4 Usb Computer Audio Interface LG - 34UC88 34.0" 3440x1440 60Hz Monitor Vortex KBC poker 3 Keyboard Logitech - G602 Wireless Optical Mouse KORG nanoKEY2 Beyerdynamic DT770 Pro Headphones - 80 Ohm M-Audio - BX5 D2 140W 2ch Speakers WD MyBook Duo 6TB (Backups) Racksoy Bluetooth adapter Logitech C320 Webcam Because my PC is to the left of my desk, I chose the Corsair Carbide 600C which is an an inverted case with a window on the right. Temperature difference compared to right-way-up is a few degrees at most as confirmed by Hardware Canucks. My 1080Ti Founders Edition the stock cooler would quickly hit its thermal limit with and start throttling, even at stock clock speeds. My 1700X would also easily reach 80+°C even with a Corsair H80i GT all-in-one cooling loop, so I decided to spring for a cooling looped based on EKWB configurator's recommendation for a silent setup. Delivery took almost three weeks due to parts being out of stock. They were a long three weeks, during which I installed SketchUp and mocked up the entire build, reiterating until I had a sensible number of bends that looked tidy: Once all the parts arrived I discovered that my original plan to have the pump and reservior unit mounted upright to the front of the case would not work because the graphics card is too long to allow for it! My mockups went out the window and I had to resort to good old pen, paper and holding the reservior in various places while trying to decide which looked the best. Unfortunately I had to settle for blocking the view of the CPU block. Total setup took around seven hour including bending the pipes before leaving the loop to run overnight. I ordered some white 5V LED strips from Ebay and cut them to length for inside the top of the case, the underside of the GPU facing down, and the bottom of the case facing up, then soldered them to a molex connector with thin electrical wire. Combined with the white and grey motherboard, this helps the blue water dye and nickel fittings to stand out nicely! The RAM is rated for 3200MHz but Ryzen isn't quite ready for these profiles yet. Following a couple of BIOS updates I've managed to squeeze out 2667MHz with one of the motherboard's "Try It!" presets which seems to match the RAM's 3200MHz XMP timings but at the lower speed. With the pump set to minimum I'm seeing 20-30°C lower temperatures even with overclocks applied. Clocks: CPU: 3.9GHz at 1.3875V (up from 3.4GHz stock) GPU Clock: +150MHz GPU RAM: +450MHz Benchmarks: Cinebench All Cores: 1695 Geekbench 3 Single Core: 4296 Geekbench 3 All Cores: 33162 PCMARK 8 CREATIVE CONVENTIONAL 3.0 Fire Strike Extreme: 12,924 Time Spy: 9,615 To round out my setup, I attached some RGB strips to the back of my monitor which are controlled by a cheap knockoff Arduino Nano. This lets me control the colour, as well as match the colour of videos as they play: These photos were taken before my latest upgrades/watercooling which is why the PC looks different (and much bluer).
- 11 replies
-
- 3
-
-
- ryzen
- watercooling
- (and 4 more)
-
Hello My name is Hari and am about to plan out a water cooled PC and was wondering about the liquid. I am thinking of using some big brand coolant and I was wondering is tonic water would work because of the florescent aesthetic it gives of under UV light but i could not find any other build vlog or blog using tonic water to water cool a pc and was wondering is it an option. Thanks
-
Hi guys, Alex here back with another build log! I think it's been a while since I've been on the forums now, a lot of stuff has been happening! I'm very happy however to bring you guys another build log with the very exclusive IN WIN D-Frame 2.0 NVIDIA Edition chassis! I am super excited to be working on this build as I find this chassis absolutely stunning! I'm not sure if there are many NVIDIA edition versions of this case around at the moment, I definitely know that this is the only one in Australia which makes it a huge privilege so I hope I can do it justice with a nice build in it! The mods are not gonna be anything too crazy as I really don't want to change much on such a stunning case nor do I want to paint or drill into it! I will be creating some custom panels from acrylic and adding some nice vinyl effects as people that follow my work have come to expect from my builds! I'm calling this one IN WIN DUKE, simply because the frame resembles the inner chassis of a Ducati motorcycle so nice and easy with the name there! It's an honour again to be able to do this and have the opportunity to work with such amazing companies. The sponsors on this build are IN WIN, NVIDIA, ASUS, Western Digital, AVEXIR, Bitspower, CableMod and for the first time ever for one of my builds, INTEL, with a very unexpected package as you will from the specs below! You can find more information about the respective vendors in the links below and follow their channels if you wish: Intel - https://www.facebook.com/intelaustralia NVIDIA - https://www.facebook.com/NvidiaANZ ASUS - https://www.facebook.com/asusaustralia IN WIN - https://www.facebook.com/INWINANZ Western Digital - https://www.facebook.com/WDAustralia AVEXIR - https://www.facebook.com/AVEXIR Bitspower - https://www.facebook.com/Bitspower CableMod - https://www.facebook.com/CableMod Hope you guys enjoy this one! SPECS: Case – IN WIN D-Frame 2.0 NVIDIA Edition Motherboard – ASUS X99 Deluxe II CPU – Intel Core i7 6950X Memory – 8 x 4GB AVEXIR Core White & Green LED DDR4 GPU – 2x NVIDIA GTX 1080 Founders Edition SLI - NVIDIA 3-Slot High Bandwidth Bridge SSD – 120GB AVEXIR S100 Green LED HDD - 4TB Western Digital Red Pro PSU – In Win S-III 1065W Cables & LEDs - CableMod Radiators – 360mm Bitspower Leviathan Extreme, 2 x 120mm Bitspower Leviathan Slim Fans – 5 x In Win Aurora 120mm fans Pump – Bitspower DDC Plus with Bitspower Premium DDC Mod Top Reservoir – 2 x Bitspower Hexagon Reservoirs Fittings – Various Bitspower Black Sparkle Fittings Tubing – Bitspower Crystal Link 16mm PETG CPU/MB Block – Bitspower AIX99D Full Cover Water Block And without any further delays, here's a good look at the case and fans that arrived from IN WIN! Thanks for checking it out guys and stay tuned for more! Cheers, Alex
- 38 replies
-
- 4
-
-
- case mod
- water cooling
- (and 4 more)
-
So as the title says, how does one measure the distance from point A (Lets call point A the CPU Enter hole) and point B (Lets call point B the GPU Exit hole) I thought about using a length of string similar to how you used to use it to measure distances on a map (Long ass piece, you'd lay the string across the path and mark where bends and such are to get the full length as if you were to walk it and not just measure 'as the crow flies') However is there a better way to determine how long the length should be (I'm going to be bending the PETG tubing, not using fittings.) EDIT Inc answer! Anyone looking at this for help? Look at this video and this kit, it'll help you to measure exact differences!
-
Oh my god has this hardline loop taken longer than I predicted, I'm close to finishing (just need to make a drain) and I found that one of the tube paths have been looking loose. I tested the whole loop without putting in the o-rings, once I put them in will this problem resolve itself? Here's a crap video of me trying to show what's happening Mute.mp4
-
I have been reading and am wanting to say petg. But the low melting point scares me. Any advice.
-
So I was thinking of a new PC idea, and think Liquid cooling is really cool, especially Hardline Cooling. The only concern I have is for a person that is new to Liquid Cooling a PC, would it be better for me to go with an AIO that doesn't look as great, or go full out and try Hardline Tubing. Thank you if you can help me out some on this topic.
-
You who are experienced in hardline tubing. What ratio between different angles of fittings is common in your build? For example, 1/3 straight fittings, 1/3 45 degrees and 1/3 90 degree. Im asking because im looking into buying for the next build. Thanks
-
Hi, I'm trying to build an immersion cooling system, cooling a dielectric immersion tank using a 6mm custom copper coil. I am using john guest style 1/4" to 6mm (Outer Diameter) for the coil itself, but I want to use clear PETG for the the external parts of the cooling loop like from the coil to the reservoir/pump and to the radiator. I can only seem to find 10 or 12mm PETG and silicon inserts for bending. Any suppliers of 6mm (OD) PETG piping? Also, is there a reason why people use such think piping for liquid cooling generally? Tom