Search the Community
Showing results for tags 'scratch'.
-
Does anyone know of a way to touch up the paint on my new case? Got a scratch on it and I'd like to get it fixed. I did not know if anyone knew of a paint stick that can be used for touch-up or if there was a spray paint that could match (as close as possible) what case manufactures use. Thank you in advance.
-
Hello all, I'm starting a new work log on a update I've been planning to my titan build: Which you can find here, called COSMOS. The goal of this built was to: One, update some of my aging components, some where about four years old by the complete of titan, and two, update some of the features of the case I was either unable to complete during titans construction or had not though to incorporate. The case's cooling components are for the most part unchanged, except for the water-blocks that needed to be upgraded along with their hardware components. Below is a list of the upgraded and added hardware for the new Cosmos build: Upgraded: [CPU]: Intel i7 - 8700k [GPU]: Nvidia Geforce GTX 1080 Ti [MOBO]: Asus Strix Z370-G [RAM]: G.Skill TridentZ RGB 2x8 16GB -3000 Added: [NVMe]: Samsung 960 Evo 500GB The main of the updates of the case itself will be the inclusion of a vertical GPU mount. I have a quick Solid Works screenshot to demonstrate what I'm looking to at the bottom of this paragraph. I noticed that with titan there was a lot of empty room created by the graphic card and the tubes started to look awkwardly placed, so I started to work on a vertical mount solution. The problem here is that the weight of the card isn't supported by the bracket alone on the back panel so I've got a couple of ideas of how to mount it properly while still allowing me to move the case without worrying about the GPU coming loose. Besides the main update I'm looking to do two more things: First, find a better way to manage all the cables, and find some routing solutions for them. I'm thinking of upgrading the PSU to a smaller size and reorganizing the cables giving me more room on the bottom for cable management, but I will see what I'll do after the GPU is properly mounted. Second, find a very simple solution to enclosing the case. At the moment the case is open with no side panels. I do like the way the build looks without any side panels at all but the case was originally built with minimal air flow needed in the chassis as to prevent dust. So I would like to figure out a way to enclose the case while keeping the look of the case the same and integrating some kind of airflow for some of the passive components on the motherboard. While building this rig I've also decided to work on a battlestation to match it. The battlestation for COSMOS will have the same theme as the rig and will be designed after it so I'll be posting the worklog for the battlestation here along side it. I hope you guys enjoy the build, I'll be trying to provide updates as often as I can and try to keep everything organized at the bottom of this post if your just looking for updates: Thanks all. Table of Contents
-
I have most of the parts I need for a Photoshop CC/Lightroom PC. I only need storage. I know I want the OS, programs, a couple games, and scratch on SSD(s). I am looking at Samsung EVO 2.5" drives for SSD(s) and a WD Red drive for OS backup/system image and mass photo storage. Would I benefit from having scratch on a separate SSD or should I keep it on the OS/program drive? This will help me determine what size SSD(s) I plan to purchase (either 500GB OS/programs and 250GB scratch, or 1TB for everything). Sorry if this has already been posted somewhere else , but there is too much information to sift through. Thanks to anyone that can help me answer this question.
-

lightly scratched PCIE pin tip - anything to worry about?
just_dave posted a topic in Graphics Cards
Hi, i've been doing PC maintenance i do every few months and i noticed that one of my card's PCIE tips is very lightly scratched. The thicker part of the pin is like new, but the small tip is a bit scratched. I couldnt take a photo since i dont have anything that focuses on such small things. I included a generic photo presenting my situation. PC boots normally and works fine, just asking if its anything to worry about.
-
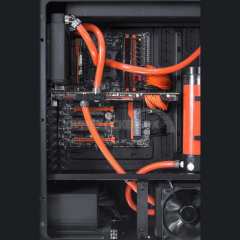
 Welcome To A project to rebuild my crappy old desk and replace it with a brand new desk with my new PC built into it. I took some inspiration from Linus's custom desk and some images I found online. I went through several designs to figure out the best way to build it and configure my hardware. If you have any recommendations please let me know - I've built many things before but never a desk to house a PC. Desk Construction : Legs : 4x4 secured with glue and Lag bolts Base : 2x4 beams securing both sides of the legs making a flat base for the top - can be separated to make moving easier' Top : 3/4 Maple Plywood with 2 good sides Glass : Custom Cut 1/4" Tempered Glass Components : CPU : AMD Thread Ripper 1950X Motherboard : Asus Zenith Extreme Ram : Corsair Vengence White RGB DDR4 128gb 3000mhz Storage : 6x Samsung 860 Evo 500gb SSD in Raid 0 - 1x Intel Nvme Boot drive 256gb Video Card : GIGABYTE AORUS GeForce GTX 1080 Ti in SLI Power Supply : Corsair 1200 Watt Platinum w/ Cablemod Cables Monitors : 2 Acer Predator 35" Ultrawide 1440p w/ Gsync\ Fans : Corsair ML120 RGB x18 w/ Corsair Link Water Cooling Components : Radiators : Alphacool NexXxoS UT60 480mm x2 - Alphacool NexXxoS UT60 360mm x2 Pumps : Alphacool D5 Pump x2 Reservoir : EKWB 400ml Clear x4 GPU Blocks : Phanteks Gigabyte Aorus x2 CPU Block : XSPC Raystorm Block Fittings : Monsoon Hard Line Fittings Tubing : Monsoon Hard line 5/8 inch Coolant : EK CyroFuel Navy Blue just over 2 gallons worth Concept Photos Renders Packages - The Good Stuff Would you like to see during Construction photos ? Whats your Thoughts on this project? Link To Current Update ------ > Lets Go!!!!
-
I made a small game on a Google Blockly-type website called scratch maybe you guys could check it out? and when you do, tell me what you think back here! https://scratch.mit.edu/projects/211534387/ thanks, oxnut
-
Hi, I finally received my refurbished iPhone 7 in the mail. And right out of the box I notice how scratched up the screen is! Some of these scratches are fairly deep too. I always use a screen protector (because I am hard on my stuff xD) so I find this infuriating. Typically, most phone repair shops in Canada will happily replace cracked screens for around $80, maybe less (iPhone screens are more common so they may cost less). Is there a cheaper alternative to fix scratches? Some kind of polish?
-
Hi there! Well, the thing follows like this: Not so long ago this little cuties arrived to home and they decided that their place to be would be just in front of the monitor. I have no problem with that whatsoever. My concern comes when they get friendlier with the monitor panel (which I believe is made of plastic) and put their claws on it. I've made a research and found little to nothing about if a cat can scratch a monitor panel. I know cat nails are made of keratin... but is the plastic of the panel harder than this material to avoid the scratch? That's my main concern. Any light thrown to the theme would be really appreciated
-
 Hello, While my pc was doing stuff, I wanted to change cpu fan orientation on my beQuiet Pure Rock heatsink. While releasing the fan holder things it kinda snapped off because it was tight and slightly forcefully landed on my motherboard, and i think it touched the back of the gpu too. The pc immediately shut off and it doesn't turn on anymore. It's typical fried symptoms : no leds, no response to power button, nothing. Upon inspection i saw that 4 motherboard traces were scratched enough too feel them with my nail. While desperately trying things to bring it back, my friend suggested I see if any chips get hot. And one did. It's an ITE chip, and it's connected directly to the tiniest scratched trace. I'd like to add that i tried the PSU 2 pin shorting thing and it turned on. Also when everything was alright and psu was on, the mobo had breathing leds. Now as i said no leds turned on but the ITE chip does get hot when power is connected, even if there's nothing installed (no gpu cpu ram just power cables. So i was thinking if there's anything i can do at all? Before i pack it? Thanks in advance.
 -
Scratched ASUS Prime B350 PLUS motherboard, potential fry
Doublei7 posted a topic in Troubleshooting
Hello, This is going to be kinda quick because it's late but I'll include as much as I can. While my pc was doing stuff, I wanted to change cpu fan orientation on my beQuiet Pure Rock heatsink. While releasing the fan holder things it kinda snapped off because it was tight and slightly forcefully landed on my motherboard, and i think it touched the back of the gpu too. The pc immediately shut off and it doesn't turn on anymore. It's typical fried symptoms : no leds, no response to power button, nothing. Upon inspection i saw that 4 motherboard traces were scratched enough too feel them with my nail(I'll include a pic). While desperately trying things to bring it back, my friend suggested I see if any chips get hot. And one did. It's an ITE chip, and it's connected directly to the tiniest scratched trace. So i was thinking if there's anything i can do at all? Before i pack it? Thanks in advance.
-
. So I have been going back and forth on what kind of desk to build. I wanted something thin and sleek but also wanted something that would house a watercooled build. I also wanted to do something with RGB lighting (seeing as this is the new craze). I have done some stuff with individually programmable LEDs in the past and wanted to incorporate this into my build using an arduino. I started a desk build a couple weeks ago, got about a quarter the way through it and decided I didn't like how it was coming. It was made of wood and once together and partially painted, did not look like I wanted it to. I then decided to do a render, plan everything exactly, and then build it. I wanted something that hadn't quite been done before. I wanted a shape, design, and setup that was different than everyone else. I believe with what I have planned, this will be so! I have done some custom builds in the past, including another desk, but nothing quite like this one. It is completely from scratch and all made by me. CPU - i7 7800X Motherboard - Aorus X299 Gaming 7 Ram - 3000Mhz RGB Trident Z MSI 1070 Seahawk EK - Will remove the dragon and replace with different design Custom mounted in the desk, not sure it's been done before 32gb RGB Ram - Trident Z RGB Zotac 480gb PCIe SSD - RGB lit, will be custom mounted 2x500gb SSD for games - Brand TBD (Maybe M2) 5tb WD media drive Alphacool 240mm UT60 Hardware Labs 360mm DDC with EK Plexitop EK Evo Supremacy - Nickel EK X3 250ml Res Barrow 12mm Multi Link Fittings Alphacool 90s RGB party lighting - Some cable mod RGB/UV and some adafruit fully programmable LEDs All watercooling and hardware black and nickel or plexi and nickel - No copper UV Coolant Nickel or clear rigid tubing - Maybe!? Spartans FTW! Tossing around ideas for custom mounted temp displays inside the desk. Please note that the plan is to sidemount the GPU and build a plexi shelf to mount it to. I tried making it in sketchup but it wouldnt come out right. This is only thing that will be different. The spartan head and the 3 lines will be all RGB lighting. The max thickness I plan on it being is about 6 1/2" tall.
-
Is it okay that I scratched motherboard or is normal and there is no damage to pcb outside this screw holes.
-
Unfortunately the first pic I'm uploading of my new PC isn't of anything good. After watching a Bitwit video of how to install the Wraith Spire cooler because the included instructions weren't specific enough regarding orientation. I realized that the AMD logo which IMO should be the top of the cooler is now overhanging the RAM. Optimistic, I tried removing the RAM to calm my nerves but sure enough it interferes. So I decided I'd simply unscrew the fan from the heatsink as I don't have any spare thermal paste & honestly don't have the money either to buy that anytime soon. The lower right screw's position forced me to insert the screwdriver at an angle & it slipped, making a small scratch between the CPU socket & the RAM. So in order for me to not worry myself to death in the coming days, weeks, months & years about unsure damage, I've got some questions to ask before carrying on with the build & overclocking log. 1: So far I've had it on & running fine for over an hour, even installed Windows 10. If that scratch caused any actual damage would I of noticed the effects by now? 2: Would the manufacturers warranty still cover replacement via RMA if the motherboard started to malfunction in the future because of this damage or something else? 3: Would they even notice something this small or should I just not mention it if I do need to RMA someday? 4: Can the Wraith Spires fan be rotated (I've tried seems pretty solid) so it can be re-positioned or what was I doing wrong? 5: I lost a little snip-it of a zip-tie somewhere in the case, maybe even PSU, is this anything to worry about?
-
 Hello again! It's time for new project, this time modding my previously made chassis from few years back and it can be found HERE. It seems that all metalwork pictures are broken in there but I will fix them in near future, but for now you can find all the pictures in here Picture gallery of Project [No Name] As I said the chassis will stay the same and here are pictures of the original plans with dimensions and the finished product. Plans for the current reboot build are fitting an ASRock X99 motherboard, two GPU's and full custom watercooling for GPU's and CPU. I have been planning this for few months now and I have managed to get ASRock, Aquatuning, Alphacool and Phobya to sponsor this project! ASRock is giving Fatal1ty X99 Professional Gaming i7 motherboard for this project! Aquatuning, Alphacool and Phobya sent their first care package later this week and this is what I got Sorry for low quality pictures, camera is broken so bare with me for little while Alphacool Eisdecke top and tank are so nice looking and just perfect size for this project with Alphacool VPP755 pump This is it for now PROJECT SPONSORED BY
 -
After looking around on the forum I finally got the time to post this buildlog. It is a build I did together with a friend for MSI, with the help of Corsair and Intel. This build is all focused around not having a too flashy system yet still have a great looking rig. So because this is 2017 and not 2016 more, RGB function still is nice but having a stealth pc is more our thing. The name of the project was thus made Black Matter. The parts of our project you will see later, but let’s start off with the renders:
-
Woohoo! Refund season, time for a new PC! For my upcoming (waiting for Ryzen) build I'll be doing a combination of photo editing, 4K video editing and graphic design in Adobe, as well as some gaming. For internal storage I'll be installing two 500GB m.2 NVME drives in RAID0 as my boot drive, a few 500GB SATA SSDs (also in RAID0) for games, and a 3TB HDD for photo/video mass storage. I'm also prepared to allocate as much as half of my boot volume as either a scratch volume for my programs or cache for my HDD–I don't really anticipate any projects larger than 300GB in total size, but I'd like to have a bit of headroom. If I'm not mistaken a scratch disk should be more consistent for fast reads within the designated programs, but a cache volume would (somewhat less consistently) speed up reads in a wider variety of uses. Is this an accurate summarization? Which configuration makes more sense for a video editing workflow? And does 500GB of total scratch/cache space sound reasonable, or way too much/too little? Some sage storage advice is greatly appreciated
-
As I really like seeing scratch builds myself I decided to post one of mine builds. The reasons this thing even exists is mostly me having parts lying around and the fact that I wanted to play 4 player coop games on my TV. It had to be exactly 30x50x21 centimeters to fit into my TV-rack. Coming to the speccs: I7 860@ 3,8 GHz - 29€ from "german craigslist" (ebay-kleinanzeigen) Asus P7D55D - 40€ from ebay Crucial BallistX Sport 8Gb Kit - 29€ offer on Otto.de Corsair CS 430W - 30€ on mindfactory.de (If I recall correctly) Sandisk SSD 240 GB for 49€ on Conrad.de Palit Geforce 770 GTX Jetstream for 69€ on ebay.de Fans ~ 30€ Caseking.de Fan Controller 15€ Caseking.de And about 20€ for some wood ________________________ That's about 310€ Here is a concept: Which didn't work out entirely, but it was a good point to start at. Front / Backside, holes for the fans. My patented drill connection kit, which was super ghetto and super dangerous. (It's a miracle I didn't cut myself doing this. The drillhead could actually fall out as it didn't have any connection to the drill itself.) The connector is by the way a part of a screwdriver connector with a dull bit hammered in. There is a testfit. I'm sorry I could not provide any more pictures of mounting the sides and the fans. Though if you're interested: The fans were mounted directly to the wood by drilling a large hole that could fit the screwhead. The hole wasn't drilled all the way through, the last part was done with a smaller drill that just fit the actual screw itself. Some people might notice that the parts for the testfit arent the ones described above. I had these lying around and mATX is mATX right?! (Yeah that did not work out in the end) Realizing I managed to put one fan in the wrong way. Drilling holes into the top because the CPU cooler was too large to fit into the case. And testfit. After some sanding and the first coat of paint. If you're wondering why the inside did not get painted is because I wanted the LEDs to get a better reflection surface. More or less finished painting, mounted the fans. Now with most of the parts installed. This is what it looked like from the inside before remounting all the hardware as the other mainboard was slightly larger and therefore needed to be turned around. And yes I needed to redo the holes in the top. Another perspective. The shelfspace in the back is where this needed to fit by the way. This is the PC today sitting there doing its buisness. I need to repaint the shelf though as it is a tight fight and I damaged the finish a bit :(. The finished product playing some DS3! I hope you liked my kind of low budget wooden PC box. I myself had a lot of fun building it. If you didn't manage to spot the "On-Switch": There is none. It starts via Wake on LAN. Though that once went horribly wrong as Windows 10 decided that my LAN driver was outdated and installed a new one that did not support WoL. Yay. By the way I got better over time working with wood, I made a case for my NAS which now looks like this:
- 7 replies
-
- 6
-

-

-
- scratch
- low budget
- (and 1 more)
-
Where to start? Preamble So I saw Linus' Mineral Oil Build Log when it came out and I thought it was amazing. When it came to doing my A2 Project for Graphics (UK) I was obsessed with Mineral Oil PC's. The only Problem being, I was a Graphics student not a Resistant Materials student. So without any thought on the matter I switched to fulfill my stupid fantasy of making a Mineral Oil PC from scratch. I have plenty of CNC experience but no wood or metal working skills to speak of. I have built a couple of PC's before which were quite high end, but have never water cooled let alone oil cooled. Concept I Initially wanted to copy the Puget Systems build idea as it would literally just involve me Laser Cutting and gluing Acrylic panels. This idea was superseded by imagination and ambition which got the better of me. I decided the easiest way to achieve a high grade in a subject I have not much experience in was to create a circular design... Anyway its use is as a media server for my Dad and the design must fit in with his house (Hardwood was everywhere). Airflow for the Rads is one 120mm outtake fan with a vent on the back, and a 5mm gap in the lid for the difference in air pressure to draw air in. I was banking on the system being low power enough for the 400l/h pump and thick rad to keep the oil cool. I know the spec isn't really server focused at all but I had to next to no funds to build this after buying materials. Spec List I know the spec isn't really server focused at all but I had to next to no funds to build this after buying materials. I had a Budget of £400, which I found later was not nearly enough as Mineral Oil is sooooo expenisve. I persuaded my school to give me a grant of £100 for the oil. The rest of the money was spent on the spec: - Phenom x4 965 - MSI Twin Frozr3 R7850 - 960GM-VGS3 FX - 128gb Non branded SSD - 1Tb HDD - 120mm Magicool Rad - Phobya 220 12v Pump - Blu Ray Slim drive - Windows 7 64bit - 8Gb DDR3 - 450W CoolerMaster PSU (I think I removed the sticker so can't quite remember now) Materials The only thing I had to buy pre-made was the acrylic tube for £60. The wood was sourced locally and is an eclectic mix of Hardwoods. I spent £30 on copper piping and fittings. Another £25 was spent on switches and wires. I had to perfectly laser cut a circular disc to fit perfectly inside the tube and then glue it in place. I also laser cut the hanging piece of acrylic and bend it to a right angle to mount everything. The upper section was Laminated together from wooden rings I cut out from the hardwood. I had a fair amount of help to build this due to my inexperience. Finale Well unfortunately not quite. I started the build in Jan 2016 after much planning. "Finished" in May 2016. I say finished because it was only finished to the level of allowing me to get a grade. Unfortunately the GPU artifacts horrendously after installing the drivers. After Messing about for hours before the deadline I found out the problem is the PCIe connection. I don't know whether or not the Motherboard or GPU is broken as wiggling the card around in its slot fixes it incredibly briefly. This is probably my fault as the I/O shield had to be scrapped to finish the build in time and as such the card is zip tied to the wood to stop it wobbling. Because the GPU is broken I didnt put the oil so I also don't know if the pump system works annoyingly. I believe this is what you call a 50ft mod. I am incredibly proud of how the PC turned out but when you look inside at the mounting system you can tell the rush and manic solutions I had to find to finish in time. Aftermath For those wondering my practical grade was a B due to the interior being very rushed, but my overall grade was an A. I have just got the computer back and intend on finishing it but just need to save up for a GPU and fix some fittings and pray to god the oil hasn't gone off or something. As well as the pump working and being fast enough to keep everything cool with only 1x 120mm rad (although it is very thick). I did test the tube for leaks with water, but I am slighlty worried about oil dissolving the glue or heating up with the system and leaking somehow (When i eventually put it in). Pictures below of water test, and system booted into a BIOS. So yeah hopefully I can fully finish it soon! Photos
- 8 replies
-
- 4
-
-
- mineral oil
- server
- (and 1 more)
-
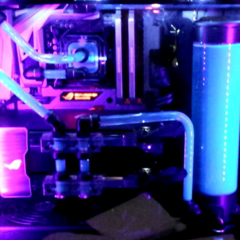
Hello and welcome to my first real build log! My project is a ultra small form factor but full desktop PC with PSU (modded TFX one) and a total volume of only arround 5,1 Liters. The overall project is inspired and maybe in some way designwise similar to the Zaber Sentry, but I couldn't wait for a offical release and I wanted to take the small form factor idea a bit further. (even though it limit me hardware wise) It will feature a highly modded to TFX PSU to be able to acomplish a total hight > 50-55 mm (similar to the original PS4). My very first scratch was only 45 mm in hight but I hat to leave some more headroom for bigger fans and a bit of diviation . The system will be packed with an R9 Nano and Haswell I7 CPU, admittedly a I7-4790T, because I don't want to spend 350€ for a more or less unnecessary CPU upgrade and could it later on if I want to) . The case is designed from scratch and will be made out of (probably 1-1,5 mm thick) steel. Wich will probably powder coated, with a bit luck even by myself. Only the cuts for the metal sheets and the 8 bents in total will be made by professionals and I'm DIYer at best without much experience yet for this kind of project. To cool the system I will pack it with a total of 6 case fans (5x 50mm , 1x 140 mm) , and maybe some costom made shrouds (or I separate GPU the GPU) to route the airflow for an indirect cooling design of myy TFX PSU. The case shouldn't block any cooling vent even in a horizontal position without big casefeets! That's the idea so far Part List Hardware: CPU: I7 - 4790T - already owned GPU: Saphire R9 Nano 4GB HBM - already owned MOBO: Gigabyte Z87N-Wifi - already owned RAM: 2x 4GB GeIL EVO Legara 2400 mhz - already owned (actually 8GB is enough for me most of the time, editing is a way of passing time at best and I had these laying around so.....) PSU: Seasonic TFX-350 350W - already owned (already disambled unused for some months and discharged, have to build some kind of new case and make a newadjusted cable lengths) Storage: 1x 500GB Crucial MX200 mPCIe Sata SSD (mPCIe SSD in a 2,5" Adapter) - already owned 1x 120GB Samsung 840 Evo SSD 2,5" - already owned (I might not ad this one at the beginning, I don't really need it I can deal with a small amount of starage and have a NAS for huge data) Cooler: Option 1: Thermaltake Engine 27 (yeah I mean this odd aluminum heatsink/fan thingy) - not owned yet, should had arrived on 11th of November .... it seems to arrive later (I maybe make an unboxing, benchmark compared to the Noctua NH-L9i with it ) (if 1 fails Option 2: Noctua NH-L9i Heatsink+ 140mm Noctua Casefan - already owned) Case Fans: 1x Cyorig XT140 140x140x13 mm Fan (a bit weak for my taste with only 1300RPM, maybe I figure out how qaulity build the brushless motor is and mod a little Fan Overvoltage for it) 5x Noiseblocker NB-BlackSilentFan XS2 50x50x10 Fans / GELID Silent 5 50x50x15 mm Fans - not owned yet (I don't really like the UV glow and the blue/purple color but the 50mm Fan market is kinda limited so I probably have to live with it or paint them ... even that isn't ideal, maybe the glow even looks nice who knows . The Gelid ones can only go in this rig when its safe that I have enough room for cables) Screws/Nuts: A bunch of Black anodized aluminum screws - already owned (they are hella expensive for some M2,M3, M5 and a Dome Nut ... almost 35€ for ≈ 25 tiny screws) Metal Parts: Design is still under developement, but nearly finilized, will be water jet/laser cuted... and I have to deal with a local buisness for professional bent and such The current design in SketchUP Note that colors aren't fixed at all (alright the power button and screws are fixed black ), I just don't wanted to work with plain white. I could safed some more space in the with maybe even enough to get 300m in width, too. But than I encounter problems to find a position on the back for the Power plug. The Back I would probalby had to use a different kind of plug but a small 2-Pin is out of question. I will go with it this way. As you can see I don't use any ventilation holes ad the back (sure the Nano has some) thats because I want to cool my PSU indirectly. No holes at the back to safe up as much preasure as I can. To get an quick idea how I want to organize it inside. Most of the cables will take their way under the Motherboard, thats one of the reasons I make a whole new wiring harness to get rid of the unnecessary cables. (and because mine is rainbowy as fu**) I will post in little updates here and there and will make bigger posts to show the current state from time to time.
-
This project has been stalled, I will not continue working on it! Technically I'm only building a part of a PC here, but I think it's complex enough to warrant it's own build log. (Mods, if this doesn't fit here, please move it!) So we all know vandal power buttons like these: They've been used in quite a few mods by now, and I'll use one in my next case, but they are a bit boring. So, what about having a switch like this, but with RGB LEDs that can be individually controlled? That's what I'm working on right now and the plan is as follows. The switch will fit into 16mm holes, have 12 RGB LEDs and a micro HDMI connector on the side that connects to the mainboard headers (PWR_BTN, HDD_LED and USB_2) with a modified micro HDMI to HDMI cable. Everything in the switch will have to be custom. The casing, the ring, the internals, the firmware, everything. I'll also make a small command-line tool for controlling it via USB. Short demo video: This is a short demo video of three effects on the current prototype. Try out the online Visualizer 0.2 here! Uses: This button might be used as a regular button that just lights up in exactly the colour I want it to, but it could also serve as a minimalist clock, as a spinning loading indicator when a webpage is loading or as an Xbox 360 style indicator of how many controllers are connected. The two header connections for the PWR_BTN and HDD_LED mainboard headers are multi-purpose, so if I used multiple of these buttons, I could either control an additional LED with either of them, or perform an action when the button is pressed. The possibilities are pretty vast.
-
 So as the titles suggests, should I used MDF or Plywood for a full custom PC case build ? Or take the other route of using an old used pc case and mod it ? -Using wood means I can do a 100% custom design, but require more effort of building and gathering material. - Using an old case means I can skip some building steps and material costs, but I won't get the exact design I want. So what should I chose ? and if it's wood then what is a better type ? (mostly 1 cm thickness)
 -
Hi guys, I'm not english so excuse my bad way to put words in place All right, I still dunno where to put this topic, but i think this is the right place, if it isn't I'll move it because I like too. Okay, puns aside, I'm trying to get a new pc case but everything I see on the market is not what I want, so I said to myself, why don't build it myself, plus i have a bunch of wood scraps which would be great for it. I did a little bit of search and I end up with an idea, think I'll got with aluminium too. I'll probably do something in the style of inwin's open air case. but i want to expose the components more and shape it to a wing form. Plus, I want to go with water cooling but I have no idea of what to pick for the fluid to match an OC Formula from Asrock. Wait a bit for a design preview, i'll do it tomorrow, cause now it's a bit late for me ^^. Thanks for the look, see you arround.
-
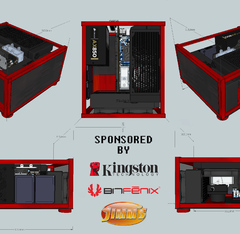
Hi everyone! I wanted to share with you a project that i've donne to CMWS 2016 Contest hosted by Cooler Master in the beginning of this year, hope you like it! At this moment I'm working on a new build, trying to make a new case for my Media Center and this is the concept. "Unnatural Project" For now you can follow some updates in my facebook page: https://www.facebook.com/tankiantheman/ Will probably make a topic here for it so stay tunned! Best Regards! --------------------------------------------------------------------------------------------------------------------------------------------------------------- ---------------------------------Dark Side Machine worklog--------------------------------- Day 1 Hello everyone. My name is Alberto and I'm from Portugal, its my second year at Case Mod World Series and I'm really motivated about it, I have learned so much last contest and I'm confident this year, good luck! First a little about my self and my history, I have been modding since the past 4 years in three different projects, and all three projects I evolve so much in all strands, facing a lot off problems some more hard than others but in the end I have solve all off them and that gave me a lot off knowledge. I always try to do the best with the tools I have. You can check my past projects in this links: 1- Project ATX Cube Homemade (winner off ThisIsMyPC contest by Sapphire) Worklog (in Portuguese): https://forum.zwame....tx-cube.859611/ 2- Project ATX Cube Style Worklog (in portuguese): https://forum.zwame....round-2.869996/ 3- Project tankian Worklog (in english): http://community.coo...ankian-project/ ------------------------------------------------------------------------------------------------------------------------------------------------------- Day 1 This worklog will be divided in days/parts, as the project progresses I will post when I got solid news to show you! Now lets talk about this new projec that have "born" because of "a need". My past project was really good for me, many problems solve and in the end I got more than I first expected, speaking only about the design, because in the pratical way I failled in some aspects, and I got that confirmation when I received a new motheboard from RMA that was bigger than my last problem showing a compatibility issue! The motherboard feeted but I didnt look cool as the old one, so I became really disapointed and decided to put the two possibilitys in mind, buy one or build one, of course building one was the first choice! At this point the Project will have a unnamed name, and the build will be based in this four concepts: - Simple - Pratical - Color - Funcional I have been doing the project in 3D SketchUp and i can tell you is really hard to make a compact case with ATX motheboards and at the same time it must be easy to set up components and to carry on for any place I want, and at the same time get low temperatures and air flow. So I started to study the best positions to make a solid and funcional structure and i ended up with this: Hope you guys like it and see you in the next day! Best Regards Alberto Soares aka tankian ------------------------------------------------------------------------------------------------------------------------------------------------------------------------------------------------------------------------------------------------------------ Day 2 Hello everyone is day 2 and I set all the base struture in place! I used iron square pipe 14x14mm and rivets to hold. The struture is really strong and at the end I really liked the final result. Hope you like it. See you next day! Best Regards, Alberto Soares aka tankian ------------------------------------------------------------------------------------------------------------------------------------------------------------------------------------------------------------------------------------------------------------ Day 3 Hi! I have some news, at this momment SilverStone is supporting this project! I'm really happy to count with them once again, its a pleasure, they are a great brand to look out when you are looking for parts! Next week I will share the materials that I will receive! http://silverstonetek.com/ And I got some other news to you about the project: I have finish the 2º part of the structure, this 2º part is made of aluminium andis basically the feet of the structure and the support rails for the side windows. I have donne all this at my girlfriend house and at my house, thats why you see diferent working tables We end in this step: New Stuff: Hope you guys like it, its getting really was I wanted Best Regards, Alberto Soares aka tankian ------------------------------------------------------------------------------------------------------------------------------------------------------------------------------------------------------------------------------------------------------------ Day 4 Hello everyone! I got some news about the project, I have receive some stuff from SilverStone that I thanks so much for their support to this project! Once again thanks so much for the support SilverStone! Now the project Update! At my home: Hope you guys like the update! Best Regards, Alberto Soares aka tankian ------------------------------------------------------------------------------------------------------------------------------------------------------------------------------------------------------------------------------------------------------------ Day 5 Hello everyone! I'm happy to announce that Cooler Master is supporting this project, it's the second time they sponsor one of my projects. This year I received a powerfull box! Lets check it out! I wanna thanks to Cooler Master Portugal, in particularly to Sofia Mota for being an awesome person! Now about the Case! So I have painted all the structure and inside covers and placed the USB 3.0 and the Power Button! Riser: First layer of black textured tint Hope you guys like it, and see you next update!! Best Regards, Alberto Soares aka tankian ------------------------------------------------------------------------------------------------------------------------------------------------------------------------------------------------------------------------------------------------------------ Day 6 Hi, thanks so much for the words mate hope to see some new stuff about your project! I got some really good news about the project, the light in the end of the tunel is getting realy closer! After thinking alot about the colors to paint the case I decided to use the following colors: -Black -White -Blue With the colors choosed I started to isolate what I wanted in white color, the blue color will be used in vinyl, I didnt decide what kinda graphics will use. I've donne the covers holes for the fans to. Hope you guys like it, next step will be getting the acrilics and all stuff mount to see how it looks Best Regards, Alberto Soares aka tankian ------------------------------------------------------------------------------------------------------------------------------------------------------------------------------------------------------------------------------------------------------------ Day 7 Hello everyone! I'm on the final details of the case, I decided to mount everything to make some tests! List to do: - Acrilics - Small details in paint - Vinyl stripes in blue - Cable combs in place For now what I can remenber is this Hope you like it, next update probably will be the "big final" Best Regards, Alberto Soares aka tankian ------------------------------------------------------------------------------------------------------------------------------------------------------------------------------------------------------------------------------------------------------------DAY 8 Hello everyone! I'm back after one month without giving news, I had some problems and that prevented me from continuing the project ... but I'm back now and full force to end this! So I decide to use Star Wars was the theme for the project, in the beginning it was my first choice, but I end up not calling it, but now I'm feelling more confident that is the right thing to use. I'm a new Star Wars fan thing and the better way I can prove how much I like it is giving this theme for this project. Let the Dark Side be with you! Well already have the cut acrylics, and tests to see if they need to do more holes or not, because the upper ventilation (air exit) Next step will be ilumination, vinils and paint details I hope you enjoy the result will not be long to complete the project and have some regret not having done already for some time, but not everything goes as we want the important thing is to finish! Best Regards. Alberto Soares ------------------------------------------------------------------------------------------------------------------------------------------------------------------------------------------------------------------------------------------------------------ Day 9 Hi, for today I'm only showing a little of the work that I've donne yesterday, more photos will come soon Hope you guys like it! (Missing some adjustments) Best Regards, Alberto Soares ------------------------------------------------------------------------------------------------------------------------------------------------------------------------------------------------------------------------------------------------------------ Day 10 Project Finished Hello everyone the project is finish and I'm really happy with the result, is true that the project could be finish sometime ago but sometimes stuff dont go was planned, in the end everything went donne and finish like I wanted. General Conclusion The project received a new name given to the subject I decided to opt already in the final part of the project now being named "Dark Side Machine". At the beginning I had the following ideas: simplicity, mobility, color and functionality. Simplicity - project through materials and tools available to all people. Mobility - project with identical dimensions and weight of an ATX tower, almost every weekend walk with her in the car and for now I didn't face any problem, 5 *. Color - red, white and black are the predominant colors in the project since i have followed the theme "Dark Side" of Star Wars. Functionality - allows excellent temperatures, cable management and easy access to inside components. Materials used for the project were essentially: - Square Aluminum Tube - Corner Aluminum pieces - Square Iron Tube - Plates Acrylic White - Plates Acrylic Transparent - Rivets and "L" corners - White and Black Paint - Vinyl Black In the end I used easy materials to find and use, was also one of the main points of the project, so you can bring other people motivated to create their own projects ate home, of course it is necessary to spend some money, but the satisfaction of doing something ours and overcome all of the dificultys you have is fantastic! I present to you the "Dark Side Machine" Day mode: Night Mode: (with special guests) I want to thank Cooler Master Portugal and SilverStone Technology for their support, without them the project would never have gotten to this point. I want to thank especially the Sofia Mota (Cooler Master) and Karin Lee (SilverStone) for being great people, my girlfriend Janete Lopes for the patience and help, to Hugo Matias for help in photo shootting, Steve Santos for patience in parts stores and all others who have followed and supported the project a big thank you! Best Regards, Alberto Soares aka tankian
-
I recently ordered a Cooler Master Silencio FP 120mm fan and upon opening it, I noticed the backs of the fan blades seemed scratched up (images attached). Is this normal?
-
I have more or less finished this build and entered it into the case mod competition at Quakecon. Here is my attempt at finally putting the pictures down with words and I will update as I tweak and improve the case more. Specs for the completed build: CPU: 4790k Mobo: Asus Impact VII Ram: 2x Corsair Vengeance 2400 8Gb GPU: 1080 gtx founders edition PSU: Silverstone 500w SFX-L Harddrives: 3x Adata sp550 512Gb in a RAID 5 (because 512Gb of SSD for 110 bucks?!? Sign me up three times!) Watercooling: All Barrow fittings (Highly recommend actually, I got mine from ModMyMods) All EK blocks (Monoblock, gpu, and ram) Radiators: EK 180mm single radiator (with EK 180 fan) Alphacool triple 50mm (with silverstone fans) Pump: Alphacool d5 Reservoir: Bitspower NZXT Hue+ for the lighting in the final build along with some 3 and 5mm leds Now for the real show! So I've been building some acrylic computer cases over the last year because my brother has a laser cutter (his company is CWE signs but we have a FB page for my cases (CWEcases)). But I've been thinking about incorporating my love of hardlines into a tiny little acrylic build I wanted something small... watercooled... powerful... quiet... and ideally wall mountable... I started off with with a mini-itx board and a 180mm radiator, playing around with some configurations I ended up with this layout... This would be the top that's visible And this would be the basement pulling in air from the bottom The 120mm fan would be an SFX-L powersupply that I didn't have at the time of planning... >.> And yes the 180mm radiator is larger than the mini-itx motherboard! I also came into the possession of a triple 50mm radiator because I saw it and thought that it was hilarious and decided to add it to the build....