Search the Community
Showing results for tags 'log'.
-
Hi everyone. First big post here. I've been in the PC building world for a little over a year now. I've build a very weak machine and my current rig which is much more powerful. I've recently moved into a new case (Corsair 350D from Corsair C70). I think I am now ready to put a custom loop in my system. With the 350D I originally planned to use a 5.25 bay res but have now decided to use an external res and pump. I think this is going to be the best option for me because I would like to run a thick radiator in the front of the case and then either a normal or slim radiator in the top. However I have been debating a much more difficult question with myself. Should I just watercool the current GPU I have (EVGA GTX 670 FTW 2GB) or upgrade to a GTX 780 3GB and watercool that? I want to get some thoughts on this. Here are some of the parts I have picked to use as of now: EK Supremacy CPU Block - Plexi EK D5 X-Res Top 100 D5 Vario Pump Alphacool Dual 120 Slim Radiator - Cooper Alphacool Dual 120 Thick Radiator - Cooper What parts might some veteran watercoolers suggest? And any info I can read about custom loops inside the 350D? I haven't been able to find any build logs at all. I appreciate any and all criticism. Thanks all! ~Dylan
-
hey guys so, basically my current set up is - z77x-ud3h - 8gb ram - his 7850 - i5 3570k so as far as upgrades im going to be building/heavily modding and old computer case used for mri machines (which was running windows 2000 on a core 2 i think :lol:), it was being thrown out at work so i took it home as a project (which currently has no name, so any suggestions?) its got an old school lay out with the psu at the top with a few floppy disk readers for good measure i plan to strip it down, mod it heavily at college, make a new front panel out of brushed aluminium with air force grade toggle switches, and a dew bays for multimedia clutter make a window, repaint (in black and white theme), and upgrade! upgrades consist of: - amd r9 290x, when available (but depends on pricing as unfortunately im not made of money ) - single fan cpu water cooler, sealed loop (haven't decided on what one, thats where you guys come in) - 16gb of ram - re sleeve cables - more fans than you could ever need what ive got to work with so far updates coming soon any sugestions, comments, about what i should/shouldn't do/buy any help appreciated -Fresh

-
BBR4 - Hackintosh By Tommy-b-10 So I only got into custom PC's at the start of 2013, and began this build around August. I started with the goal of building an all round computer that will last me for a few good years, whilst running both Windows and Mac OSX. The parts guide on the tonymacx86.com website were extremely handy in the planning. Parts Red is for unpurchased items Motherboard: Gigabyte GA-Z77X-UD5H This board was the best board I could find that supported the OSX platform, and didnt cost a butt tonne CPU: Intel i7 3770k @4.5GHz and 1.13V May as well spend and extra $100 and get the i7 than the i5. Even though I probably wont be doing any heavy editing or rendering, its nice to know I still have the options. Graphics Card: Gigabyte GTX 770 4GB 4GB will be needed to drive 1440p well. Storage: 1x Samsung Evo 250GB SSD 2x Seagate 1TB HDD I'm using the SSD partitioned into 2x 125GB partitions for the OS's, one 1TB for storage and the other as a backup drive Ram: 16GB 1600MHz GSkill Matches the colour scheme, and I find myself using the full 8GB on my current PC Case: Fractal Design R4 Black with Window Loved the front of it, and the build quality is outstanding. PSU: Silverstone Strider Plus 600W Perfect size and is fully modular CPU Cooler: Corsair H100i I wanted to be able to OC my CPU, and figured why not. The LED on the middle is perfect with the colour scheme. Also using Noctua NF-F12's to cool the rad as the H100i stock ones were too loud. Fans: 4x Corsair SP120 Quiet Edition Using as 3 intake and one exhaust. Sleeving: MDPC-X Black and Aquamarine Blue Beautiful and Cheap. Nil's does a really good job! Mouse: Func MS-3 Ever since Linus's ad for this, i have really wanted it. I like to Palm my mouse, and I have relatively large hands. Keyboard: Apple Numeric Keyboard I know people hate membrane keyboards, but I love the one on my MacBook Pro, and I prefer the numeric keyboard version. Monitor: Asus PB278Q I just love the look of the monitor. Its 27" 2560x1440 and looks amazing. Whilst its expensive, its one of the cheaper 1440p ones out there. (excluding korean) Photos Excuse the photos. Most of them are taken on a shocking old point and shoot, and the rest are iphone quality The place I purchased the case from only had the non windowed version, so I picked up a window online for $50 Package from PCCaseGear. Accidentally ordered 2 Fan twin packs. Turns out I needed them though so alls good All of the boxes for the first order Amazing case! w/o window w/ window. So much nicer. Insides SP120's installed in the front. More Soon!
-
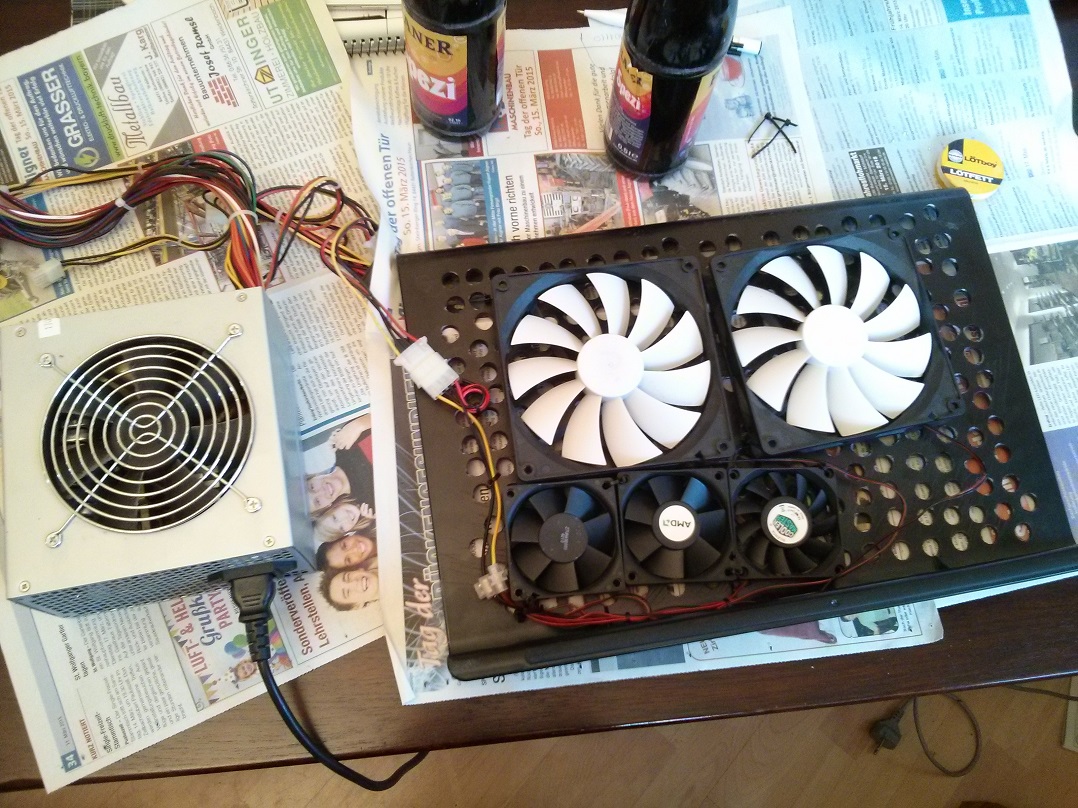
So i am at my parents house but forgot to take my laptop cooler with me. My laptop tends to overheat and shut down while gaming. But since i am staying for a few days i decided to build one my own and share it with you guys. What you need: - IKEA BRÄDA laptop holder - Fans - I used 2x140mm Fractal Design R2 - Drill with a big drill head (~1 cm diameter) - A file to remove ridges - A power source for the fans - Optionally a USB cable and soldering equipment to make your own power source. - Time - Creativity So here we go, this is the IKEA BRÄDA laptop holer which we are gonna use: Then I used the biggest and sharpest drill head that i could find Randomly drilled holes all over the place, with enough space in between so that the holer wouldn't get fragile Drilling was easy, the drill wen't through it like through butter; look at that mess! I had to use some force and the drill would've went into the ground so i used a wood plank as protection The drilling left some mediocrely sharp ridges So i just grabbed a file and took some time to remove them Eventually i got bored of it and just went crazy on it and quickly scratched over the entire surface. The first step is done! Yeehaaw! We successully prepared the laptop holder! On to the fans. Here you have to choose an appropriate way to power your fans. I sadly didn't find anything pleasing, or in the correct voltage range to power my fans, so i had to go with USB. The disadvantages is obviously that USB has only 5 V and i can't control the Volts either (but why would i, 5 V is slow as fuck). Anyways, here are the two big boys that i used, still untouched and looking good! I found a old USB 2.0 cable and in order to connect everything i had to do some soldering to get it to work. On to Something rather unpleasent, I had to cut the wires of my Fractal fans, get rid of the nice black sleeving, cut out the rpm wire and basically render them useless for other purposes. Nontheless i was ready to solder, here some glam footage of my dad's 40 y/o soldering grease This is how i connected the two fans to one wire, using that quick connect, so i could easily change the power source later, if i get my hands on something with more Volts! That's basically the assembly. Pretty simple should work..... ..... and a quick test confirms that everything is working fine YAY, that was step two of the mod! Now we just need to frankenstein our two pieces together and we should in theory have a laptop cooler! So first i am just laying them out on the laptop holer, according to where my laptop get's the hottest. Those zip ties sadly didn't fit through the fan's holes, so i had to use some wire to tighten them down, not the best way of mounting it, but it doesn't rattle. Here you can see that it is actually a tight fit, but when it fits, it sits. This is pretty much the end product, you can see the fans through the holes And there she is. Ignore the mess. In conclusion, i can say it does help with overheating and shutting down, but it doesn't actually cool the laptop. The CPU still get's to a toasty 85 °C, but that was to be expected. At least i can play now without having my laptop shut down all the time! Thanks for reading. UPDATE So as you can see i sourced a power supply. I also had some old AMD stock coolers lying around which i cannibalized aswell. What i did was first cut out the green and a black wire from the PSU's 24-pin and solder them together, which effectiveley is a permanent solution to bridging the two pins. Nowthe PSU will actually turn on when i flip the switch on the back. I arranged the fans so that the 3 small fans with a lot of static rpessure and high RPMs would sit under the hottest spots of the laptop. I zipp-tied everything into place. I cut off every fan heades and sorted the red wires and black wires together and sodlered them into two giant red and black cables, which i connected to a molex lead (which i cut off aswell). With a molex plug the yellow one has 12V, not the red one, so be careful with that. The results are pretty imrpessive. The notebook is cooled much better. The airflow is very high, but so is the noise level. I couldn't bear the nosie if i wouldn't wear headphones all the time. Next step would be to include a controllable resistor.
-
 So I've set up log rotate in an Ubuntu server with the following settings: # see "man logrotate" for details# rotate log files weeklyweekly# use the syslog group by default, since this is the owning group# of /var/log/syslog.su root syslog# keep 204 weeks worth of backlogs, AKA 4 weeks short of 4 years worth.rotate 204# create new (empty) log files after rotating old onescreate# comment this if you don't want your log files compressedcompress# comment this if you want your log files compressed when they are rotated, rather than on the rotation after they are rotated.delaycompress# packages drop log rotation information into this directoryinclude /etc/logrotate.d# no packages own wtmp, or btmp -- we'll rotate them here/var/log/wtmp {missingokmonthlycreate 0664 root utmprotate 1}/var/log/btmp {missingokmonthlycreate 0660 root utmprotate 1}# system-specific logs may be configured here/var/www/html/chatsystem/subfolder/*log* {compress# compresses the log filescreate 0660 root administrators# creates new empty log files with the owner being rooterrors people@[member=Domain16].com# sends errors to people@[member=Domain16].commail people@[member=Domain16].com# sends log files to people@[member=Domain16].comolddir /var/log# puts the rotated logs in /var/logpostrotate/sbin/service httpd reload > /dev/null 2>/dev/null || trueendscript# reloads apache after moving log filesrotate 204# rotates and keeps 204 log files (4 years)weekly# rotates weekly} /var/www/html/chatsystem/subfolder/*log* {
 -
Ok, this is my system! Granted, it is a little dated, but I have now finished everything I've needed to do since July of 2011. It is now worthy of Build Logs! Specifications: Corsair 800D ASUS ROG Rampage III Extreme X58 Motherboard Intel 990x Extreme Edition CPU @ 3.47GHz 24GB Corsair Dominator 1600MHz RAM EVGA GTX 560Ti 2GB in SLI Corsair AX1200 1200W Power Supply Intel 520 Series 240GB Drives RAID0 Western Digital WD Black 4TB Drives Corsair Force GT 120GB Western Digital 2.5in. Black 750GB SilverStone AP141s SilverStone AP121s Blu-Ray Burner Drive DVD-ROM Drive OR2200PFCRT2U 1350W UPS Blue Snowball Microphone Logitech X-530 5.1 (2.1) Speakers Corsair K90 Keyboard Corsair M95 Mouse Mionix Ensis 320 Mousepad Dell U2412M 1920x1200 IPS Monitor Dell 3130cn Color Laser Printer Cisco Linksys E4200v2 Asus Xonar DGX Soundcard Logitech G27 Racing Wheel Shure SM58 Vocal Microphone Intel Stock Cooler Motorola Surfboard 6121 Modem Download: 30Mbps Upload: 2Mbps Some of the Pics below are a little outdated with relation to the specs above. Went back to change a few things.
- 7 replies
-
- 1
-

-
- build log
- project fringe
- (and 8 more)
-
Trying to getting all my parts for a new Haswell system I hope to get. I'm sorta not really trustworthy of myself to go out and get everything that will suit the needs specifically. I want a good red and black themed build. Part List: CPU: Core i5-4670K (Haswell) CPU Cooler: Corsair H60 (rev. 2) Motherboard: Maximus VI Hero RAM: N/A (Preferably 8GB, red to match build theme) Storage: Samsung 840 Pro 128GB SSD, 1TB WD Black GPU: N/A (I want a 700 series card, but can't decide between the 780 and 770. I want EVGA's ACX cooler.) Case: Cooler Master HAF XM or Fractal Design R4 (Black Pearl w/ Window) PSU: N/A (I looked at a Cooler Master Silent Pro Hybrid 850W but I can't find it anywhere. I like Corsair AX series PSUs for the red and black scheme, but I'm not sure if the price and efficiency is worth it.) OS: Windows 8 Peripherals: Mouse: Logitech G700 Keyboard: Logitech G710+ Monitor: Acer H236HL Trying to keep the build around $1500-1600ish. I don't want to go overkill, but great performance for the price is what I'm trying to figure out. Love to hear your recommendations below. Cheers!
-
Hey guys I am modding A old 3 drawer desk thing I really don't know what it is called but I have had it for about 4 years and I would like to mount a Xbox 360 that I had found in my basement. The modding will include me repainting 3 drawer thing and putting a plexiglass window on the top of it plus allot more. I will be starting the project around 3pm central time USA on June 24 2013 I will post a picture of the drawer thing. I would like to know your guys feed back on what I'm doing. I know it's silly and for all the ps3 fanboys out there I do own a ps3 and I play it often and I will be doing a mod log on it within the next month but right now I am doing a Xbox mod due to the fact that I have a extra one
-
Hi, I m posting my first build here. First, I will give you a little bit of backstory to the build. I am currently 13 years old. Back in the fall of 2012, my mother told me that I should find a hobby. I knew that two of my neighbors worked for Intel and Corsair. Because of this, I decided to learn to build computers. I purchased two books about parts and the actual building, started watching internet videos about computers, and started ordering parts. Because I am young, I decided to build a budget gaming computer to replace my xbox (To become part of the glorious pc gaming master race.). However, since my neighbors work at Corsair and Intel, I was able to get a very large deal on parts, so my budget build has many high end parts in it. For kicks I will add the price I payed for my parts next to my parts so you can see how much of a discount I was able to receive. Other than that, feedback would be appreciated. I know my cable management sucks, but this is my first build, and I am still trying to get the hang of this. Parts: CPU: i7-3770k @4.5GHz (I know that the 3770k is overkill for gaming, but the 3570k was out of stock at the Intel employee store) Price: $100 Motherboard: Intel DZ77BH-55k Price: $100 Cooler: H100i Price: $65 PSU: TX 650M Price: $70 RAM: 16GB (4x4) Corsair Vengeance 1600 MHz Price: $70 GPU: Saphire 7850 1GB OC Price: Retail DVD Drive: Cheap DVD Drive Price: Retail Hard Drive: Western Digital 1TB Black Price: Retail Monitor: Dad's old 23" 1440x900 monitor Price: Free Keyboard/mouse: Cheap logitech keyboard and Xornet gaming mouse Price for both: $55 Photos:
-
This is my first time posting on the forum and I figured I would start out by posting the log for my new build. I took pictures of the build as it was in progress in case you were interested to see the various stages. Originally I wanted to do a custom water cooling loop but I changed my mind when I saw that the 780's were going to use the same reference cooler as the Titan. I like the look of it so much that I decided to just save some money with a prefilled liquid cooler and just keep the 780's on air. The specs of the rig are listed below. Core-i7 4770K (haven't overclocked it yet as I just finished the build late last night) Sabertooth z87 Motherboard EVGA GTX 780 (x2) 16 GB GSkill 2133 DDR3 Memory 256 GB Samsung 840 Pro SSD 240 GB OCZ 3 SSD 2 TB Seagate HDD Lamptron 4 channel Fan Controller Haf-x Blue Edition Case Swiftech H220 Liquid Cooler Corsair AX1200i PSU (I know it is overkill for this rig but I bought it when I had planned to do more) Corsair SP120 Quiet Edition Fans (x2) Corsair AF140 Quiet Edition Fan Second Cooler Master 230 mm Fan for top of the case Blu-ray Burner DVD-RW Burner I apologize in advance that these file sizes are a little large.
-
I am building a pc for a friend, it is gonna be intel and it is gonna be for gaming and slight editing, it has to be under $450, i put the part list together, just let me know if there is anything i should fix.https://pcpartpicker.com/list/MYxvcc
-
Hey Guys! This probably isnt a build log you are used to seeing since its not an uber liquid diamond cooled octo titan Xeon computer but It was a little day project i set out for myself and is a lead up of a better made product later. The Aim: a Raspberry Pi box that I will use for emulators, etc. So clearing out the house when I come over an old DVD player that has two external screens. The DVD play part was broken but the screens worked perfectly and had an AV plug, perfect for a Raspberry Pi! This log is my draft build, I have two of the screens so this first one is more of a test build, getting things in place, trying fitting things etc, the second build will be in the next few months and will include much cleaner wiring, holes, and a paint job for the screen! Hardware used: 256MB Raspberry Pi Model B Proline 7'' LCD Monitor (From DVDP270W) 8GB Sandisk Extreme SDHC The Screen: Proline 7'' LCD Monitor The Pi: Model B 256MB RAM Version Storage: Sandisk Extreme 8GB SDHC The Build: Step 1: Disassembling the Screen 8 screws holding the back on. Had to take elasticated strap off the back first. Proceeded with other screws. Back lifts straight off revealing the panel board behind the screen and the IO interface board in a separate section below. Botton IO interface: Panel board: 4 screws holding Panel board in place: unscrew to move the board and make room for Pi. Board slides to the right and stays with ease, no need for any adhesive to hold in place. Perfect fit for the Raspberry Pi! Again, No need for adhesive to hold in place. Step 2: Raspberry PIO Board out ready for Dremmeling. Dremmeling left side for Composite video. Clearance made Video fits through but 3.5mm jack for audio needs clearance also. More dremmeling done. 3.5mm jack now accessible. Out line for Network / USB ports, Dremmeling the clearance. Clearance made on inner wall. Both fit through well. Planned clearance for Video/audio on back. Clearance made, Wire fits through now. Clearance made for Network/USB on outer wall and Back Step 3: Reassembly Power into the Raspberry Pi (only just fits.) Back back on, Wires trail out. Final Result: There it is! The Pi Box Version 1. Stay tuned for Version 2.0.