Search the Community
Showing results for tags 'case mod'.
-
Hello LTT! You might know me from the CMWS 2017 and my participation into this competition, and since the Cooler Master forum is closed, i decided to re-create the entire worklog i had there in here! A little background of me My name is Sotiris, commonly known as SotosLg. I am a computer technician and a case modder from Greece. I've been doing case modding for fun since 2004 and since 2011 it hit me directly to the forehead. I've made through the years some projects just for me and my intention is to spread the word around Greece or even better, whoever knows So, enough of the pep-talk, let's jump into the worklog shall we?
-
hi i just came across this casemod that comepleatly blew my mind, and i thought i would share it with you guy's this mod will remake and old lcd panel into an see through case panel screen link to the creators youtube channel: https://www.youtube.com/watch?time_continue=664&v=nQCzIJzI2R8&feature=emb_logo link to the creators instructables guide: https://www.instructables.com/id/DIY-Transparent-Side-Panel-From-a-Recycled-Monitor/?utm_source=newsletter&utm_medium=email (i did not create any of this content, nor do i own the rights to it) i just thought this was an amazing mod :)

-
 So, I am officially crazy... I bought 26 Powermacs (G5) And I modded them ALL They are now ready for ATX and mATX Mainboards… But why 26? Did I mention I was crazy?! (And they were only sold together…) I modded G5 Cases before – They kind of became my passion. This time I wanted everything to be perfect: - Keep as much of the original design as possible - Cut as less as possible - Since it is impossible to find a G5 Case without dents and scratches, I wanted to paint them, freshly. I am done now and it is time to share my experiences: It was a rough 6 months from start to finish. The project kept me busy during all of the winter. I worked every weekend on it, till late. I need to apologize… …to my family for occupying their workshop, guest rooms and garages …to my friends for neglecting them during the last months …to the dogs and the cat for waking them up from their afternoon nap every now and then (because of the metalwork-noise). I hope to be able and show everybody that it was worth it - And that someone out there is appreciating the work, as well. Back me up, guys - Spread the love :-) I believe in Apples high quality and the unique design of Sir Jony Ive My mods include a preinstalled power supply (and even watercooling on some) Countless hours of work and high-quality components & tools were used Of course, you can come and have a look if you are near the South of Germany (or the North of Switzerland).
 -
 Good evening guys, first time poster here I've been entertaining the idea for a while, but since I'm now moving houses and will have extra space, I'm finally going ahead and building my station into a desk. Did some research, watched some videos (including the LTT ones, was an interesting one). I'm currently at the early "planning" stage of deciding the shape of the desk / placement of components, specifically ventillation. I can always juggle components around, but I'll have to have the round fan holes cut out from the start since I lack the tools to do it myself. I should note I'll be using a CPU AIO, but the GPU will will be aircooled for starters- I might watercool later on, but not in the near future. My current doubt with airflow is, how/how many fans do I use to have enough airflow? (and if possible positive pressure) I was going to go mostly with Riing fans - 2x 14cm at front for intake, possible one extra at the side. 3 at the front would be nice, but that'd make the desk too large. As for exhaust, I was going for 2 fans on the opposite side of the desk from the intake ones; plus the CPU AIO (size undecided yet) I made a little sad drawing as an example; planning to do something fancier on sketchup, but I wanted to hear some opinions first. Intakes are green, exhausts are red, general idea of component placement (subject to change). My questions are: 1)What do you guys think of the balance between intake/exhaust as far as positive/negative pressure goes? It seems exhaust-heavy to me, but I could use 12cm fans as exhaust to balance it out with 14cm intakes perhaps? Just trying to avoid dust as much as possible (plus I have dogs so.... hair.....) 2)The 3rd intake fan at the side. Any opinions on the location? My thought was, it'll blow cold air into the CPU radiator, while also directing hot air from the current going over the gpu, towards the exhausts on the left. Does that make sense, or am I gonna be creating some weird air currents in there? Oh, and the shape of the desk - I really wanted intake fans up front for looks - but at the same time i wanted a platform for mouse/keyboard, as opposed to having them on top of the glass (it'll have glass top naturally). And again, it's not completely proportionate, just a quick draw to ask for an opinion Any advice is very much appreciated, such as suggestions on shape, airflow, or part placement. I need it badly Thanks a lot guys!
-
Hi Im trying to do the snow blind to the Thermaltake The Tower 900 I dont know what the measurements to the glass and dont know how to find them please help
-
OK so here's the Project summaries and some script idea's to go with it Project Camper: Intro: With summer on the way and plant life in bloom the wild gamer peeks out it it's cave and away from the monitor to gaze at the real world for a time before swiftly returning to it's den, suddenly yanked from it's home and comfort zone of triple monitor setup and beautiful 4K noob pwning to engage in.. SUMMER ACTIVITIES (DUN DUN DUUUUH) with the hot sun and the lack of WIFI your average gamer goes into one of 2 states, 1:a broad sense of adventure and euphoria or 2: a deep sense of dread and anxiety at missing their favorite content, WELL what if I told you you can have it all for a mere, uh eh ummmm OK not that cheap BUT still awesome this is PROJECT CAMPER. (cue intro and adverts.) (I wrote it as close to the typical LTT script as I could) Concept: take a cheap camper and turn it into a mobile high end battle-station with a full 3-4 monitor setup with all the whistles and bell's you can add. Part list: 1.Any tow along camper 2.Bad ass full tower gaming setup 3.as many monitors as you can handle 4.RGB OUT THE A** 5.awesome recliner/non rolling gaming chair 6.signal enhancer for long range internet 7. full sized desk Bonus if possible: deploy-able outdoor VR setup. Budget: cost will be somewhere around 15000$ if you want to buy all new part's but with the stock you got and resources I'd guess around 8000$ ------------------------------------------------------------------------------------------------------------------------------------------------------------------------------------------------------------------------------------------------------- Project Kirby: Intro: we all remember the airflow test we did where we tested out which fan configuration would result in the least dust, but what if we made a computer with NO DUST!? well let's see if it's possible with PROJECT KIRBY, (cue intro and adverts) Concept: take a pc and place it into a near vacuum by forcing air out of it at a constant rate while water cooling it externally, will it run cooler or hotter? (probably hotter but what the hell) Part list: 1. custom hard line water loop 2. a case to be butchered in the process 3. large fan system for external water cooling (perhaps an air conditioner if you want to get crazy) 4. a lot of water sealing tape and epoxy 5. RGB!!! (cause why not) 6.Ear muff's since it's gonna be loud.... Budget: costs will somewhere around 2000$ ------------------------------------------------------------------------------------------------------------------------------------------------------------------------------------------------------------------------------------------------------- To: LTT If you guy's enjoy the concept please send me a direct message before creating either project, I would love to join you in the build and live within driving distance of the studio so if possible let me know if I can join in the project.
-
So i am looking for a blu ray player that is thinner than the 5.25' standard external bay and it must be shorter than 6.2' length wise, , must be sata, and also it must be motorized. why? for a ps2 pc conversion of course. i want to replace the original hard drive with a blu ray one (i will settle for dvd if no thin blu ray drives exist), however most drives are 5.25 in. and that is simply too big for the ps2. anyone know of a drive like this or know where to look? (other than newegg or amazon ofc)
-
Welcome! Thanks for checking out my tribute to Mad Max & his Interceptor build log. This is one of my Bucket list theme PC builds. My mother brought me to the premiere of The Road Warrior movie and I've been fan of this world ever since. This will be a modified desktop PC with liquid cooling. Inspired by visual elements of Max's Interceptor and the Mad Max World. ...and maybe Fury Road. There shall be rust and maybe even a Detonator attached to the PC? (lol). I'll be sharing highlights of it's progression stages, including video clip links as I move along in this thread. I have a basic idea of what PC hardware components will occupy this mad max inspired PC (motherboard, CPU, DDR, GPU, SSD, PSU) The case is an Enermax Equlilence they donated to me last year. If you've followed my past personal builds, I like to find good deals on hardware whenever possible I do plan to fabricate the liquid cooling lines from 361 marine grade stainless tubing. No idea what brand of CPU & GPU water blocks, radiators and fittings I'll use yet. The case is the Enermax Equilence I was given. I apologize in advance if you're expecting me to pose a Mad Max action figure inside the case (haha). The Interceptor's V8 feels more appropriate. The scale Ford engine I'm using is by LIBERTY Classics, http://www.libertyclassics.com/ I've added motorized shaft to spin the supercharger belt, you can watch it here, https://twitter.com/Mnpctech/status/992023385818492928 I've modified the supercharger pulleys with larger plates to keep the belt from rolling off. 90 degree 24 pin motherboard connector, https://mnpctech.com/case-mods-gaming-pc-liquid-modding-custom-computer-mnpctech-overclock-cooling-fan-grills/90-degree-angle-24-pin-atx-connector-for-motherboard-mainboard.html I will be fabricating a new engine scoop to emulate Max's Scott Injector Scoop and painting everything dark grey.
-
Hello Guys, i'm new here.. i've been watching LTT youtube for quite some times but decided to join the forum just now i wonder if you have a solution to make a mini display inside a PC case to display stats but without using HDMI i'm running a MSI B350 Tomahawk Arctic, Ryzen 1600, GTX 1060 multiple monitor setup so all my HDMI port is pretty much occupied.. so i need another way of connecting the screen to my pc.. i found this thread but the video inside that thread is using an HDMI which unavailable to me.. i've used all ports in my GPU for my monitors and the one in my motherboard cannot be used because Ryzen 1600 does not have iGP.. i've been thinking of the following 1. using a USB-C to HDMI 2. buy a used old GPU to attach to a vacant x16 pcie slot and use the HDMI to the screen 3. Using a wireless display. Do you have any other ideas in how can i add a screen? i'm also considering the budget.. so what do you think will be the cheapest but decent method? regards
-
I was wondering if someone had already done this and if they could offer some advice. I was thinking about using an old monitor, pulling out the backlight and then essentially gluing the display minus backlight to the tempered glass part of the case. There was a case at CES here that does exactly what I want to do. The monitor I could pull apart is 16:9 at 19 inches. Thanks
-
Overview Video - https://youtu.be/MEMdz2ulhlI It's a Ryzen 1950x on a Zenith Extreme x399 with two EVGA 1080ti Ftw3 liquidcooled hybrid cards and a third EVGA 1080ti FTW3 with 128 GB Ram in the system and 14+ TB of storage, full parts list here https://pcpartpicker.com/b/CrtgXL I built this PC for algorithmic 3D modeling, rendering, VR development, and machine learning. I started gathering parts in January '18 and at the time these were the best parts available for what I wanted. I plan on picking up one of the PG27UQ monitors or other 4k 144hz monitors about to hit the market. Case Mods I knew I wanted handles to pick the case up from and wheels so I could move it around easily, I used these Caster wheels and Powder Coated Aluminum Handles from McMaster Carr. I wired up illuminated toggle switches to control the second set of fans on the liquid cooled 1080ti's radiators and the two side intake fans and an industrial metal starter button for no good reason. There's a faux carbon fiber tailpipe connected to the bottom of the PC via some kind of metal hose for a gas oven I think, and some real carbon fiber panels against the PSU and HD bays.
- 10 replies
-
- 1
-

-
- ryzen 1950x
- ryzen
- (and 2 more)
-
I finally got all of the hardware for new wooden PC build...I have two builds going right now actually, I'll post the other one separately. I made this video of building the case a long time ago and it was on its way to Siggraph for the VEGA launch when UPS apparently drop kicked it. UPS killed the case, and now I need to fix it, and then build the system now that the partner VEGA cards FINALLY came out. Parts list below. Any tips? AMD Ryzen 1700x Gigabyte VEGA 64 Corsair H100i V2 Corsair DDR4 3200 LED 32GB Corsair M400 240 GB Corsair 1000 watt PSU Gigabytte x370 K5 Corsair and NZXT fans Build video and finished pics coming soon.
-

thermaltake 900 EKWB Vertical Mount in Thermaltake Tower 900
ilya2006 posted a topic in Power Supplies
Hello! I'm currently working on upgrading my rig from an AIO to a custom loop. I've run into a bit of a snafu. I'm building in the Thermaltake Tower 900, but I didn't want to use their Res + Pump combo since I've heard bad things about them in general. So instead I went with an EKWB EK-XRES 14 0 Revo D5 PWM (incl. pump) as well as a verticle mount from them. Unfortunately, the mounting is made for the Thermaltake stuff, which doesn't seem to line up with the EK mount. (No surprise there). I'd like to make some sort of mounting adapter where it basically extends the mounting points to two plates of metal or something, instead of drilling into the case. Has anyone else done anything like this? I'd like to hear what people think. Thanks! P.S. Link to all the parts of the build are in this link Minus the tubing and compression fittings. -
 So I'm still rocking my Air 540. I love this oversized cube and I want to keep improving it since I don't have any plans to migrate my system into a new case until I make a really major upgrade. I've already done quite a bit of modding to it to be able to mount the pump where I did. (see photo) I used a Dremel to cut out the drive sleds. (Don't need them. All my drives are M.2 in this machine.) I drilled holes to be able to securely screw in the pump/res combo. (It's an XSPC Photon 170 v1). I covered the base with a self-adhesive carbon fiber wrap just to hide away the remaining holes. You might have noticed that there's a PCI slow cover missing from this shot. This is because of where I had to drill the holes to secure the pump/res. If you're familiar with the Air 540, you'll know it has those big gaps in the bottom. This limited where I could actually drill and mount the pump/res, which ended up being just a bit too far back and I had to remove one of these slow covers for the cables to pass through. So what ideas are there to securely mount the pump a little further up? Any further away from where it is and I will only be able to use a single pair of screw, not all four, to secure the base of the pump/res to the chassis. The wrap is just for looks. It's a basically paper for all it will do to support the weight of the pump/res.
 -
Hi guys, I'm 8-Bit Builder. I've been doing this for about 10 years now and just starting up my newest build. I build cases in the an old pixelated style as you will see shortly :D. I've been wanting to build a Metroid computer case for about 7 years now but plastic was always too expensive ($1 a cube) compared to .08 cents a cube of wood which is what all my previous PC mods are made out of. Once I found out how accessible 3D printers were, I jumped head first and picked up a Maker Select. After a few months of non-stop printing it dawned on me that I could make the Metroid computer case I've been thinking about for such a long time. Normally I spend about 200-250$ in wood/paint but 3D printing plastic is really cheap in comparison, about $80 in plastic. I'm also planning on having a really cool light sequence on the inside of the case to get the red effect of the in game Metroid. Being my first foray into a 3D printed computer I'm sure I'll run into issues but look forward to overcoming them. This will also be my first time with programmable LED's so it will be a learning experience on that front also! I'm going with an ASUS STRIX for the Aura Sync capabilities since this case is going to have a big focus on lighting. The more advanced lighting will be done with the Tinkerboard. Expectations: A strong gaming pc 100s' of LEDs programmed inside for a light show 95% 3D printed Components: ASUS has sponsered/supplied me with components for this mod (Really appreciate it) and also in the past on my Airship PC Case seen here: https://www.youtube.com/watch?v=Cz5muWnFMmg ASUS ROG STRIX X370-I GAMING AM4 AMD X370 SATA 6Gb/s USB 3.1 Mini ITX AMD Motherboard ASUS GeForce GTX 1080 TURBO-GTX1080-8G 8GB 256-Bit GDDR5X PCI Express 3.0 16 GB of ram 1TB SSD Asus Tinkerboard with a few hundred LEDs programmed in a cool light show And heres some photos of my past work: Airship from Final Fantasy Link from Zelda And a 3D model I've printed, Calcifer from Howl's Moving Castle Ok on to the build! This is what I'm building (modeled in 123Design/Tinkercad): Metroid from ...Metroid! The modeled case My first idea of how the components will fit I started printing and doing test pieces to make sure I had it down pretty good and to test strength of the frame. Needless to say, it holds a LOT of weight (I weigh 185lbs) I've got the printer going in earnest on the final design now. The printer will be going non-stop for about 2-3 weeks to get all the pieces done. I'll be back soon though with photos of attaching sections together with glue and 3D pen welding! If you have any questions or ideas, feel free to ask
-
I have never completed a case MOD before for my very own PC. Being a budget gamer whenever i had a lil extra money i was putting it into performance upgrade. Now m pretty done with gaming so now it’s time to finally mod a case for myself. M not a professional Modder i mean i have limited experience and tools. But i love the process. Among all the cases i have ever seen or worked on i found the Dell XPS 710,730, 630 and 630i to be perfect for my taste appearance wise. These are not that expensive and are very very solid beasts. A lil hard to find and shipping costs a lot due to their weight. After years and years of searching in my local city i finally got it shipped from a different city.( Money was the main issue here :P) THE FINAL VIDEO 2 Sep 18 Present This video is just an overview of what we are starting with. Some minor scratches a few lil broken parts but no dents. Future Part 2 The tear down: Everything apart Part 3 The orientation: Making it right hand drive and non inverted. (I mean corrected the orientation, if i can of motherboard and stuff inside) Part 4 The electronics: Making the RGB work with my mobo or some other way. Maybe a custom fan controller too Part 5 The finalizing: Polishing and color theme. Now the part 2 is the real deal over here. Can’t move forward without it. The inverted MOBO and window on right side is a no go. You HELP required. Any idea how to install Alien FX lite on a non DELL/alien mobo. I have a gigabyte one. Its basically a software to control LEDs on the 630i. That i cant install it gives error that u need a del system Update 2/6/2018 Dell XPS 630i Case MOD P2 : Taking Everything apart Soooooooo many rivets & soooooooo many zip ties. But it was fun. The video is pretty detailed. So you might find it a bit boring but it will surely help in dismantling if u have one Dont forget to like and share your thoughts. Update 18 Feb 2018 Dell XPS 630i Case MOD P3-half Half of the work of part 3 is done. So sharing that on request Part 3 is all about correcting motherboard tray orientation. But its not as simple as it sounds. The next part of part 3 will be uploaded ASAP Update 24 JULY 2018 Dell XPS 630i Case MOD P4 well it took me just an eternity Still more to go P5 ( Updated 4 August 2018)
-
Greetings! ? I've once again been modding my NZXT h440 (my favorite case to date) and I thought I could do you all the favour of sharing the progress I've been making! Keep in mind that this is not finished and that I'll probably be modding it until way after christmas. Simplified parts list: Intel i7-6700k G.Skill Trident Z RGB 16 gb Asus Strix z270e Asus Strix Gtx 1080 NZXT hue+ lighting NZXT h440 (heavily modded) And a whole lot of carbon fiber vinyl If you want to see the previous mod I did on the h440, here is the link:
-
Hi, so I had a spare monitor and I wanted to do a custom DIY Project Snowblind (Samsung SyncMaster 191T) I have taken it apart up to the LCD screen and the main board. However, the LCD is not at all transparent, and I cannot see anything displaying on it once plugged in correctly (without backlight).
-
Hey folks, New PC builder here, I have a gigabyte z390 gaming x mobo, in an NZXT H510 case, I was hoping to use the usb c, 3.1, front header, but my motherboard doesn't have a header for the usb 3.1. can I replace it with a thunderbolt 3? Is that something that I can plug into the thb_c header on this mobo, or am I in a pipe dream Thanks
-
Hello. I have a Phanteks p300 case which has an RGB controller(for 4 pins) built into the case with a button that cycles through various colours and patterns. I have a generic RGB LED strip with 4 pins too. It has similar colors and patterns too . It connects easily and lights up too .But the case lights(power switch ,etc which the controller controls) and RGB strip lights are different . How do I sync them?? I understand there's a similar thread but that was about connection and not the controlling. Thanks in advance.
-
I am getting custom work done for my Corsair 760t case, what I am getting added is a psu shroud which is non existent on the case in the first place. I am just gonna place the measurements and the design I chose for it just in case if anyone had the same idea but does not have the time to work on measurements. Enjoy Modeled by me in Cinema 4D, it has a grommet added on the top for the front IO connectors as well. Goodluck modders
- 2 replies
-
- 1
-

-
- 760t psu shroud
- corsair 760t
- (and 4 more)
-
 Yep! I did it! Well? no... but I did it! And it looks ok! We used a circular hand saw to cut into the side panel and used car trim to round the edges, after that we took some clear acrylic and cut it to size and hot glued it. Any questions? Feel free to ask! for now BYE!
-
I'm creating a new case mod with Cooler Master's Mastercase 5 / Pro Mid Tower. "Mastercase Racing" will be the catalyst for new bolt-on accessories and modifications for this case by Mnpctech. The custom paint finish will be inspired race by Steve McQueen's GULF PORSCHE 917 from his 1971 movie, "Le Mans." The MasterCase Mid Tower draws it's inspiration from Cooler Master's MasterConcept from 2016 CES. Cooler Master wants you to have absolute control over how your case looks and functions. You can adjust the exterior structure and it's look through a range of replacement panels and doors. Each choice changes the look of the exterior while giving you flexibility of the interior layout. Order a new Mastercase 5 or Pro from Newegg, HERE The legendary PORSCHE 917 is the inspiration for the custom paint on this case mod. The 917 only raced for three seasons. It placed 1st in fourteen of the twenty one races it entered 1969 through 1971. The only Gulf Porsche 917 to win the 24 Hours of Le Mans was the one driven in Steve McQueen's "Le Mans" movie. His 917 from the movie was chassis # 022 and purchased in 1970, from the Porsche by Steve McQueen's movie production company, Solar Productions. It was also the company that would bring the movie "Le Mans" to the big screen. This is the car that McQueen's character, Michael Delaney, starts the race in, and "crashes" late in the race, "writing the car off." The car that was crashed was really a Lola T-70, painted and rebodied, to look like a 917. Many innovations in cinematography, were first tried in this movie. They even went so far, as to weld brackets to the front frame work of the 917, so they could mount a camera to shoot Steve, and the other drivers, in the cockpit. I'm debating about replacing the #22 with #5 to represent the Mastercase 5. Display the hardware in your Cooler Master MasterCase Pro & 5 with the "Easy PC Mastercase Window Panel" It allows a full view inside your PC without any obstructions. "Easy PC Window Panel" is professionally laser cut from 1/8" thick 100% cast acrylic. It has embedded magnets to make installation and removal fast and easy. The window panel is the same size as the factory steel panel for the Cooler Master MasterCase Pro & 5. The Mastercase 5 chassis and exterior parts before prepping them with Red Scotchbrite for our custom paint finish. I will be utilizing House of Kolor and PPG products. Here is the hardware I'd like to use for the "Mastercase Racing" Gaming PC build, but my budget may have to be limited for another personal project. I'd love the INTEL Core i7-6700K 8M Skylake Quad-Core 4.0 GHz LGA 1151 91W processor to be our race car engine. My first choice of motherboard is GIGABYTE's GA-Z170X-SOC FORCE. It's touted as the ultimate Z170 "Super OverClock" solution from GIGABYTE. It also offers a vast array of user features that includes 22 phases of digital power, cool new OC Touch buttons, durable PCIe slots with metal trim. The SOC FORCE has a large heat sink layout with heat pipe dissipation system and water channel technology to incorporate hybrid cooling through air and liquid supply. This allows the VRMs and MOSFETs to stay cool under load when voltages are pushed high Brad is applying final coat of Gulf Racing Orange paint, this was custom mixed from specs for the 1970 Porsche 917 race car from Steve McQueen's movie, "Le Mans" We applied this paint to the EK radiator and misc Mastercase accessories I'll be utilizing "5" as race number to represent Cooler Master's Mastercase 5
- 161 replies
-
- 14
-
-

-
- mastercase window
- case mod
- (and 4 more)
-
"WD EXO" _________________________________________________________________________________________________________________________ Work Log _________________________________________________________________________________________________________________________ Hello all, This PC case is a personal project that's designed to be a replacement for my 900D, while being visually very different and designed for my components. (The back of the motherboard is another front due to a rendering flaw) The case was designed mostly around the materials I have left over from other projects, all being aluminium right angle lengths, 3mm and 5mm aluminium plate. Dimensions: 440mm x 440mm x 180mm (160mm excluding corner braces) Part List 4690K MSI B85 G43 GTX 690 (not finalized) Hyper X Fury 16GB DDR3 Corsair H100i GTX ThermalTake Riing 140 RGB Fans (Modular ~750W PSU) Intel 535 120GB SSD WD 1Tb HDD ______________________________________________________________________________________________________________________________________ Lets start... Drilling 4.2mm holes to tap M5 threads Spare 5mm plate of aluminium before clean-up Frame braces being filed to shape Measurements marked ready for drilling 4.2mm Pilot hole 6mm final hole size Happy that my measurements aligned right Orange is my favourite colour, and I got the same colour mixed up as my car. HDD Plate and frame support Frame marked for filing
-
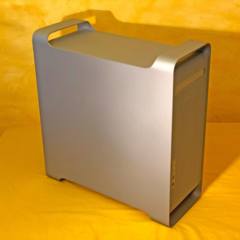
~JETSTREAM~ A custom Powermac G5 case mod project. Back with another custom build case mod project (help, I can't stop! ). Shortly after finishing Project Stalker v2.0 I picked up a cheap Powermac G5 PC for $80. This is potentially going to replace the S340 of my main gaming rig - depending on how well this turns out. Have tons of ideas for this and still haven't finalized the internal layout yet (that will be revealed later on). All I can say at this point is that it will be quite different than what most people do with these G5's when they do a standard PC hardware conversions in them. The emphasis will be on air flow, low temps and low noise - all air-cooled. One thing is for sure; this is the most ambitious case mod/build I've taken on yet and it's going to take a long time to complete. There may be weeks/months between updates (though I hope not...). Jetstream (air currents in the atmosphere) is a working title for this project. Feeling pretty good about it, but other suggestions are welcome. Specs will be: *i7-4790 (can get one brand new for $300 CAD - which right now is basically = to 40% off) - Yet to be purchased. (Currently running an i5-4570) Cryorig H7 CPU cooler - Yet to be purchased. Asus Z97-E Kingston Hyper-X Black 2x4GB 1600 *Kingston Fury-X White 2x4GB 1600 - Yet to be puchased. Samsung 840 120GB SSD *2x 500GB SSD's or 1x 1TB SSD - Yet to be purchased (going all SSD's for this build as HDD's are a pain to deal with, take up too much space and are slow ). Asus Strix GTX 980 OC 4GB EVGA 850GS fully modular PSU Basically most of the parts listed are from my current main gaming rig, except for those parts not yet purchased (duh) lol. This will serve as a bit of an upgrade for this system, more or less. Thing is huge and weighs just shy of 40lbs as-is. Can't wait to grab the Dremel cutter, roll up my sleeves and get dirty again! First things first, have to gut this thing and get it all cleaned up - see what exactly I'll be working with. A few tags from those who followed the Stalker project: Next update coming soon. Thanks for looking.


.png)


.jpg.16501bc7b69154b1fa09aa7f0bf7d390.jpg)
.jpg.24141837a9faca7fe5abe12cbe4653ce.jpg)
.jpg.836204bd5494741cc0dc837a69802479.jpg)