Search the Community
Showing results for tags 'case mod'.
-
 Greetings! My Antec VSK4000E is BLAND! Help me make it not by adding a window to the side of it. If anyone has instructions or tool / material preferences for the glass, please share with me! I want to see the guts of this PC. Thanks | Grant
 -

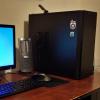
NZXT "Future Noir" Blade Runner Tribute PC by Mnpctech
Mnpctech posted a gallery image in Members Albums Category
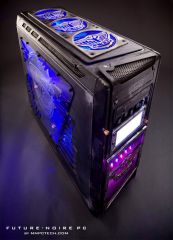
From the album: BLADE RUNNER PC by Mnpctech
"Future Noir" Blade Runner PC created for NZXT by Mnpctech -
From the album: FIREFLY
My PC tribute for Firefly. My other Custom PC creations -

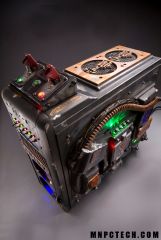
From the album: BIOMECHANICAL
HR GIGER Tribute PC build details, HERE -
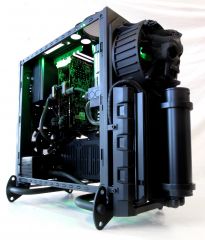
From the album: BIOMECHANICAL
HR GIGER Tribute PC build details, HERE -
Mnpctech Fractal Design "Define S" ASUS ROG Gaming PC
Mnpctech posted a gallery image in Members Albums Category
From the album: Fractal Design Define S ASUS ROG Gaming PC
-
Corsair C70 Vengeance Gaming PC Case Mod Planetside 2 New Conglomerate
Mnpctech posted a gallery image in Members Albums Category
From the album: Corsair c70 Planetside 2 Case Mod
My PS2 NC Corsair C70 case mod I created for Matt Higby at Sony. You can see some of my other PC creations, HERE -
From the album: FIREFLY
My PC tribute for Firefly. My other Custom PC creations -
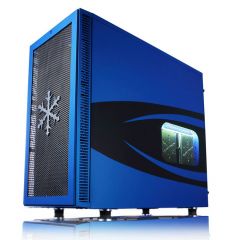
I am planning on modding an Aerocool Cylon case since while I like the case, it doesn't have much in the way of airflow in the front panel and the RGB is also not addressable. For the front panel, I plan on cutting a few holes then place air filters in order to increase the airflow while still preventing dust from coming in. As of now I have 2 layouts for it. I was wondering which one I should go for. The first does allow for more airflow but it does remove quite a lot of material. I am planning of reinforcing the panel in this case. It will also hit the PCB of the RGB of the front panel but I plan on removing it anyway to make the RGB addressable.

-
I really want my next pc to have a Vertical mounted GPU, I currently have a 4090, and I'm considering the Cougar MX 331-T it has almost every feature I want from a Case ONLY 1 5.25 inch Drive bay for my Blu ray player (and no, never ever will I go USB external drive it looks awful) Glass and is not open to dust Sadly, it is missing a vertical mount for the GPU, so does anyone have advice on how to achieve this? would I need to like dremel and cut the mesh or what can be done with this case? Alternatively, does anyone know of a case like this one that already has the vertical mount?
- 1 reply
-
- 1
-
.png)
-
- case mod
- cougar mx 331
- (and 1 more)
-
I'm having trouble finding good documentation on best practices for the LCD side panel case mod I've seen a lot, does anyone have recommendations on guides or resources?
-
 I think this is the right place rather than the “future build section” since I haven’t started on this. So I want to mod my case for extra cooling because I feel like my gpu gets hotter than I’m comfortable with. So I’ll start with my overall specs of the components in case there’s something on the components that you guys would recommend first Ryzen 5 2600x MSI gaming plus MoBo 16gb Corsair vengeance 3000mhz XFX RX 580 samsung 1tb 860 qvo ssd corsair cx550m psu cooler master q300l case Cooler master 120mm fan on the rear that came with the case 2 Noctua redux 1700rpm intake fans on the front I’ve read a lot of places saying the rx580 runs hot so I’ve recently replaced the subpar paste on the gpu with some Noctua paste and that knocked my peak temp down 5c but it still gets over 80c and my goal is to get it under that now I’ve come to the realization through some research that despite all the holes in the q300l, airflow still suffers in this case due to the size of those holes. so my plan so far is to drill each of the holes in front of the fans to be bigger to allow more airflow in the front of the case, and then to drill the same holes on the top of the case so that if I add fans up there I don’t have to do it again and also to aid in heat that’s trying to escape through the top. so my question is does anyone have any ideas about other ways to add airflow through the case to keep my gpu cooler? im considering drilling holes in the acrylic panel near the gpu but I’m not sure if unfiltered holes right there will cause a lot of extra dust build up and I added a pic of how it’s currently set up
-
Hey guys, so my current project is to 3d print a small form factor case. The goal of this project is to have a slim, open design that will not only be portable, but also aestheticaly pleasing and with good cooling. Here is the concept designed in blender. This is before mounting holes have been added. Also, my school's 3d printer only prints in 1 color and has a size of 210 x 210 x 250, so it will need to be split up. Parts I will be using will be from my current PC. - i5 8400 w/ noctua nh l9i - gigabyte rtx 3060 mini - ROG strix b360 - i (bought because of wifi and built in backplate) - 2 x 8gb corsair vengeance RGB Pro - 1tb wd blue ssd For the power supply I will be using an HD Plex 400w laptop adapter attatched to the back of the case.cables will be managed between the two panels (about 3cm of space.) i will be pairing this with a dell 330 w power brick.
-
Hey guys, I want to do some modifications on my aluminium PC case, so I bought a dremel since I know it can cut and make holes without needing more tools while being cheap. As the title say, I'm a total noob and have no experience with a dremel, but I do like a challenge. I watched YouTube videos about dremels, so I think I'll be able to do what I need, but I'm still a freaking noob that didn't used power tools since high school 20 years ago. So... I just want to make sure that I'm not missing anything... This is the case that I have. I knew it wasn't optimised for airflow and stuff would get hotter than my older ATX tower, but I really wanted something small because I was tired of having an ATX tower that were >50% empty space. The thing that I didn't consider is that my GPU is taller than the normal size and thus totally prevent air circulation in the case, causing heat built up. It took me a while to notice it because, I don't game a lot, so my GPU sit mostly idle. I got more fans, but now the poor design of the fan mounts (look at the stupid "abstract design" of the top fan...) make it impossible to have a normal fan noise without an annoying high-pitch whining. To be clear: I don't mind most fan noise, but I can't stand high-pitch whining, it's like nails on a blackboard to me. Sadly, I noticed this problem months after the purchase, so I can't return the case, and anyway, the case looks perfectly like I want (ignoring the top fan ugly design), so I want to keep it and just jerryrig a fix. It might not look pretty up close after the modifications, but it will still look nice sitting on my desk. My goal is to remove those lines on the top fan hole and use a basic fan filter instead and I will probably fully open the back and bottom fan mounts because those lines are way too much restrictive for the airflow and probably don't help the noise. This is the dremel that I got, the LCD display might be a gimmick, but I noticed that it is important to use the correct speed depending what you do and which accessory you use, so since the LCD show the actual rotation speed (36 = 36 000 rpm) it should help a lot. It's supposed to be a 200W motor, so it should be enough (many videos were recommending to avoid cordless dremels because it lacked power). I even bought Dremel branded cutting discs made for cutting metal, just to be sure of the quality (It was only few bucks and I guess Dremel is a good brand since people refer to rotary tools as dremel ¯\_(ツ)_/¯ ). I also have protection glasses, gloves and a mask for safety, obviously. So, as I said, I watched few videos (like this one), so I know what to do, the use of tape and how to hold the dremel, finish with filling tools etc. Since the case is all aluminum (1/8" or 3.2mm of thickness) instead of steel, it should be easy to cut as long I don't go too fast and make sure it doesn't melt. But, is there anything else that I might have missed or tips that I should know? --- my post was starting to be too long since I had nothing to do else while waiting for my pizza delivery, so I kept the fluff if you want to read more details and why I bought this case: I was once a PC enthusiast and gamer with a gamer overclocked PC (In the Athlon 64 days, I had a DFI LanParty mobo with UV bling bling), but now I'm a graphic designer who suffer from wrist pain (apparently not carpal tunnel syndrome says my doc everytime I ask him). So gaming is not a priority anymore and I built my new PC last year with that in mind, I wanted something that looks nice, but didn't want to care about overclocking and stuff. That's why I bought a i5 8500 (wasn't able to find a non-F 9400 and I wanted the iGPU since this PC will go in a slim PC case when I'll upgrade to a Ryzen sometime, hence the low profile cooler). I wanted something small because I was tired to have big ATX cases that had more empty and unused space than a bag of chips and I really wanted a mATX board because, I knew that I would require more than 16GB (and I did, I'm now at 32GB) so I opted for a Golden Field M3S which fit perfectly my style (a rebel graphic designer that live in a world dominated by Apple and a sea of rounded aluminium cases). Everything was going smoothly, despite having a case that lack cooling abilities, it did what I wanted: being silent in idle/productivity work. I don't really care about some noise when I game because I exclusively use headphones. However, because of the whole "global situation" right now, I end up playing games way more often that I was before, and since I play open-world / story driven games, I might play for long sessions. But despite never getting any thermal throttling so far, my PC does get freakingly hot - it's an aluminium case, so it literally get hot to the touch - when I game and I worry about shorting the life of my components due to the heat and with summer coming around, I might finally get some thermal throttling. I've bought more fans and changed the PWM curves, but the noise now hit a very annoying whining because of the way the case fan mounts are designed. So, I told myself that I could learn something different and buy a rotary tool to do some modifications... Edit: my full PC specs are on my profile, I thought that it would show on the side...
-
Hey everyone, I saw Linus's video of him upgrading his home theater pc and notice that Cerberus claims to be the world's smallest microATX case- which inspired me to create an account and show off my rare SFF case from the mid 2000's. Here my Vinster M@X: 11.5x5.5x11.5 inches of pure glory I cut out the window on the side of the case myself, normally that isn't there, but its an amazing exhaust hole for my 2060 super. Answering any questions I can,
-
I recently bought two USB 3.0 ports and power buttons for the front panel of my G5. I spliced together the power button according to this guide. I'm having a problem with adding the front USB ports, I used a file to enlarge the firewire port to the size of the USB port. The holes are a little too wide for the USBs and the ports don't stay in. I tried to secure it with JB Weld Metal Putty, it failed. So I have to make something that attaches to the backside of the front of the case that can withstand being plugged in somewhat forcefully. I was thinking about using this, which would give it support on the back. The trouble is that I need to permanently attach it to the front. I was thinking about using super glue, nails or screwing it in. Any ideas on how I can do this? I know I'm doing a terrible job of describing what I'm talking about so I attached photos. Feel free to ask questions! Also, I want to do the same with the headphone jack; I'm having trouble finding a 3.5mm combo jack to front panel audio header cable. Does anyone know about something like this. I don't want to spend much. I can do some soldering if I have to. Thanks, AidanOnEverything
-
I’m currently converting a Powermac G5 to ATX. Because of the curve on the top and bottom of the case, I’m having trouble fitting an ATX PSU. I need to be able to access the power switch and plug on the back of the case. Last night, I thought, “server PSUs are slim, one of those might fit well”. After looking on Ebay, I found out that server PSUs are cheaper, higher efficiency and higher wattage. I also found some breakout boards online which I think would make it plug-and-play Here are my questions though; 1. Will this function basically the same as an ATX desktop PSU? 2. Is there a higher risk of damaging my components? 3. Could this burn my house down? 4. Does it have the right plugs for my build? I need these: a. 1x 24pin or 20 + 4pin b. 4pin c. 2x 8 pin (or 1x 8 pin and 2x 6pin) d. ≥3x SATA Power 5. Which Server PSU and/or Breakout Board should I get? (I need at least 600W, I'm not looking to spend more than $60 and I'll only buy a NEW PSU) 6. Is there a better way? Is there a cheaper way? Thanks for reading my rant! Aidan
-
I have an old dell optiplex 360 I am currently looking for a vertical GPU mount mod that will work on the case for using semi full size gpus I want to move my current system into the case with minimal use of a saw and other not too fun to use by hand tools to mod this so anything helps im getting a new rtx 2060 oc soon it's a dual fan design so it'll fit just gotta find the right adapter thank you very much in advance
-
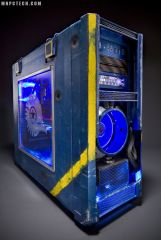
Hi guys, Welcome back to another one of my build logs. I'm pretty excited for this one It will be based on Darth Maul and incorporate some interesting ideas with the Corsair 600C case! I did a video covering the case, fully disassembling it as well as talking about the mods! Check it out below: SPECS: Case - Corsair 600C CPU - Intel Core i7 6700K or 7700K MB - ASUS MAXIMUS VIII Extreme RAM - 4 x 8GB Corsair Vengeance Red LED 2666MHz DDR4 GPUs - 2 x ASUS STRIX GTX 980Ti SSD - 3 x 240GB Corsair Neutron XTi HDD - 2 x Seagate TBC PSU - Corsair RM850X Custom cables and lighting - CableMod Water cooling - Bitspower Here are also some photos of the case to start off with Thanks for checking it out and stay tuned for more! Cheers, Alex
-
I recently bought a huge lot of computer parts on Craigslist, some of which were for a client build. Not mentioned in the ad, however, was an poor old abused Cooler Master Elite 110. It had dried superglue all over it, random holes drilled in it, at least three coats of different colored paint all over it, and a few missing parts. This is going to be the thread where I document my adventures resurrecting, modding, and building with this case, all with a budget of zero. Everything I put into this case is going to be scrap, and hopefully it turns out usable. The first two pictures are some pictures of the damage the case had, while the third is what the orbital sander revealed about its thoroughly painted history. I started the mod by sanding the outer panel of the case. This took a good half hour with the orbital sander, and left my hand unusable afterwards. It revealed that the seemingly black case had underneath it: Black, White, Red, Black, and then the metal of the case. I sanded the entire thing smooth, and applied a few coats of spray primer (Pic. 4). Next came the front panel. One of the previous owners had taken to it harshly with a drill bit (Pic. 5), and it had the same paint disaster, but with another layer of white on top. I decided I was going to create an acrylic front for the front panel, gluing it to the tapered edge. This means I only have to worry about the appearance of the edges of the front panel. As far as front I/O, I'll cross that bridge when I come to it. It got the same sand, primer, and wait treatment as the main panel. I went to my spray paint shelf to find that I have the colors black, white, red, blue, gray primer, and gold. I didn't want to do black or white, to avoid the colors that the case originally comes in. I decided against red, as that doesn't match my room. I decided for blue, as Gold is too tacky, and the gray primer is too matte. For the front panel, I chose a white enamel, and it turned out quite glossy and nice looking. Once assembled with the rest of the case, it looks good. My next mods are going to be a custom acrylic piece to cover the carnage of the front panel, a side panel window, white internal lighting, and a few internal mods I haven't quite figured out so I won't mention here just in case. That's all there is for now, I'll post updates as they happen.
-
 I'm planning on painting the interior of the EVOLV TG and the IO shroud and PCH heatsink on the Maximus IX Hero. I've seen people paint the whole interior of the Enthoo EVOLV on PCPartPicker but was wondering how to do it and if I would need to break the rivets and re-rivet the interior. In the motherboard's case, I don't want to paint any PCI-e or RAM slots (not gonna pull a Linus,) and I don't want to paint any of the metal on the heatsinks. Painting just a section of the PCH bridge may be a tad tricky, so I also wanted a few tips for that as well.
 -
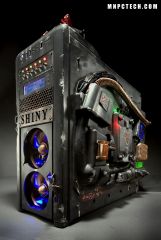
Hey guys, Welcome back to another one of my builds logs! I'm happy to announce my entry into the 2017 Cooler Master CaseMod World Series in the MasterCase Maker 5t. It's a stunning looking case and I'm excited to work on it. I have a few interesting things planned for it, including some layout changes on the inside and a more unique water cooling loop set-up. I am calling this one Tempest and it will be based on the Tempest spaceship from the new Mass Effect Andromeda game. I did an overview video of the case as well as talked a bit about the mods where you can get a better idea of what I'm going to do in this case. Check it out below: SPECS: Case - Cooler Master MasterCase Maker 5t CPU - Intel TBC MB - ASUS Rampage V Extreme RAM - 8 x 4GB Crucial Ballistix Elite 3000MHz DDR4 GPU - NVIDIA TBC SSD - 2 x 275GB Crucial MX300 HDD - Seagate TBC PSU - Cooler Master V1000 Custom cables & lighting - CableMod Water Cooling - Bitspower I'll start it off with some photos of the gorgeous case: Thanks for checking it out and stay tuned for more Cheers, Alex
- 14 replies
-
- 2
-

-
- simplemodz
- mass effect
- (and 4 more)
-
So ive decided to embark on a new mod. I wasnt going to modify this build, but my Crosshair VI Hero for my ryzen build is on backorder. My anxiousness to do this build inspired me to get creative. Also, my 800D is way outdated and needs to be brought up to modern standards. The plan is to put two 360 rads in the case. On up top, one in the front. Drive mounting relocated to the bottom where the psu is. Also, updating the front panel i/o to support usb type c.
-
Hey guys! I'm back with another sponsored project! EVGA was generous enough (as always) to send me some of their awesome hardware. This is another EVGA and Thermaltake sponsored project, and I named it "HoloView". Thermaltake was kind enough to send me their View 27 chassis and some of their water cooling components. This will be a quick (hopefully) and simple project but will add a special feature to it (hopefully I could pull it off properly). A huge shout out to the sponsors! Here's some of the components that will go in to this project. Yesterday I was able to test fit some components and tear the View 27 down to confirm some measurements and some possible radiator placements. The plan was to rotate the computer case 90 degree so the front panel will be the bottom of the case and the top will be the front panel. Here was my plan, either I will have the 360mm radiator in front and have the 240mm radiator at the bottom or the opposite way around. Originally, I thought I could use the area below the power supply for mounting a 240mm radiator but the power supply that I will be using is a bit long and will have some interference once the power cables are connected. So instead of doing that, I will mount a 140mm fan below the power supply as intake. Now that I have a rough idea of where and what components for water cooling are going to fit in, next will be taking measurements for the custom side panel, cutting out the 140mm fan mount on the back and making the custom front panel for the 240mm radiator. But that will be for the next update. That's it for this first update for the HoloView project. Thank you EVGA and Thermaltake, as always, for giving another opportunity to me for this project! See you in the next one! Ciao!
- 6 replies
-
- 2
-
-
- evga
- thermaltake
- (and 3 more)
-
Hi LTT! It's been a while since my last project! Having moved back to France after 10 wonderful years in Japan, it's time now to do another build. No scratchbuild this time like I did with the Hikari Project. My project will be based on the new Corsair case, the 570X RGB. Big thanks to all the sponsors of Black Diamond: Corsair, Aquacomputer, CableMod and Silicon Lottery. Here are the specs of this build: - CPU: i7 7700K binned and delidded by Silicon Lottery - Motherboard: TBA - RAM: Corsair Dominator Platinum DDR4 - PSU: Corsair AX1200i - GPU: Nvidia Titan X (Pascal) - SSD: 2x Corsair Neutron XTi - Case: Corsair 570X RGB - Sleeved cables by CableMod The CPU and GPU will be watercooled, thanks to Aquacomputer. This time again, I'm aiming for a simple but classy look. I hope you will enjoy the trip! Recently, I received some packages. Here is a little preview, more to come soon!


.png)