Search the Community
Showing results for tags 'alphacool'.
-
 Happened to have mine die the other day so I figured I'd make a quick post on how to swap it if anyone needs to or is thinking about swapping the pump instead of ordering another complete pump block. It's pretty easy except for removing the top plate as you'll see in the terrible photos. Part needed Alphacool DC-LT2 replacement pump Tools needed PH2 Screw driver Optional Heat gun and floss or metal wire H6 Allen key Remove pump block from the CPU Not necessary to remove fill plug. Remove Alphacool Eisbaer LT cover. Stuck on with a huge piece of double sided tape. If you want to reuse it you'll need to heat it with a heat gun (preferred} and some floss or metal wire. ^^^Note residue on the cover Unscrew the 4 Phillip screws on the corners. Remove top cover. Unscrew DC-LT2 pump. Reverse for reassembly. *****Careful not to over torque and strip plastic housing!***** Hopefully this helps out someone someday!
-
Got a used 3090 on ebay. It came with an alphacool eisblock es waterblock that the previous owner used it with. I looked at it after unboxing and it looks visibly bent at the edge especially, and I think it's because of this capacitor https://www.reddit.com/r/ZOTAC/comments/10r8e05/rtx_3090_trinity_pcb_question/ Doesn't go back to straight even after taking it off. I asked the seller and he said he used it like this for around a year with no issues. How bad is this on a scale of 1-10? I tried sanding it down but I think it wasn't enough. Can't really tell if doing more will fix it considering the kink is visible even on just the bare board. Should I sand it down more or leave it like this?
-
.thumb.jpg.99c9b447ad512ca9594927934f549e51.jpg) Hi guys is Eisblock Aurora Acryl GPX-A Radeon RX 6700XT compatible with the Radeon™ RX 6750 XT GAMING X TRIO 12G. Thanks Budget (including currency): Country: France Games, programs or workloads that it will be used for: Other details (existing parts lists, whether any peripherals are needed, what you're upgrading from, when you're going to buy, what resolution and refresh rate you want to play at, etc):
Hi guys is Eisblock Aurora Acryl GPX-A Radeon RX 6700XT compatible with the Radeon™ RX 6750 XT GAMING X TRIO 12G. Thanks Budget (including currency): Country: France Games, programs or workloads that it will be used for: Other details (existing parts lists, whether any peripherals are needed, what you're upgrading from, when you're going to buy, what resolution and refresh rate you want to play at, etc): -
From the album: Brazilianloser Water Adventures
-
 So as the title says, I'm trying to find parts for a custom water loop. But I have some fairly specific requirements as it's a rackmount case and it isn't possible to simply use an AIO. So I want to cool my CPU (Ryzen 9 3900X) and GPU (Zotac RTX 2080ti Gaming) on the same loop. I don't have any issues with GPU cooling, but running a Noctua NH-D9L on a 3900X doesn't lead to the most happy temps under load. The radiators I plan to use: 1x Alphacool NexXxoS XT45 Full Copper Dual Radiator (see here) 3x Alphacool NexXxoS XT45 Full Copper 120mm Radiator (see here) I chose these radiators as I need to have 3 sperate 120mm radiators (thanks to a central fan panel in the case with about a 2cm gap between each fan, so triple rad is a no go) and a dual 80mm radiator at the rear of the case, and I figured that high quality pure copper radiators would be a good idea, and I'm not looking to save money on this, I want to do it properly and I want a really high quality loop that will last a long time. However, There are a lot of things I don't know too much about. So I need some help finding a CPU block, GPU block, tubes, pump, and fittings. I am sort of hoping to get everything from Alphacool as I understand that they make really high quality parts and it would just be simpler to be able to get everything from one place. I'll add some photos below showing the layout of the case and why I need this weird combination of radiators, along with what I think would be the ideal flow path for this weird loop. Thanks for reading, and thanks for any help you can provide Forgot to label it, but in the photo, left is the front of the case. so Air flow moves left to right, and the blue squares are the fans, yes I plan to run Push/Pull on every radiator because noise is no issue for me, I just want the best thermals possible
-
Hi, Recently I saw on Jayztwocents channel that they used an alphacool Eisbaer AIO (see attached) that looks very different compare to any other Eisbaer AIOs available both on alphacool store or 3rd party. Has anyone seen this version somewhere else? I have a eiswolf gpu AIO that has exactly the same tubes and I can't find the ones that match.
-
Budget (including currency): €3000+ Country: Denmark Games, programs or workloads that it will be used for: python, excel and the occasional game Other details (existing parts lists, whether any peripherals are needed, what you're upgrading from, when you're going to buy, what resolution and refresh rate you want to play at, etc): Last time i build a pc it was an aircooled pentium in an Aopen tower, little more than 20 years ago when i was living with my parents, drinking beers and studying. Since then i have been crunching accounting spreadsheets for the man on corporate laptops for the past decades - don't know how this trip down "pc" memory lane started - but its been a hell of a lot more fun than building ikea furniture for my kids rooms, which i have done a lot of lately. In December (May now) i started ordering the first bit and pieces, initially i planned on making my own case with room for the massive 4 x 200mm radiator from alphacool - then later i fell in love with the master cooler gulf mod theme - but eventually thought it through, and i would have to build something that the wife woulnd't be "to" disgusted by (TO MUCH RGB WAS DEF A NO GO), and i couldn't really take out the (family) time to make something unique. so after intensive research i decided to go with a be quiet case Dark Base 700 - mainly because its supposedly silent, and about as stylish and clean as clumbsy consumer midtower cabinets comes. however inspired by the many youtube videos on watercooling i HAD to try it. its been fun doing research on the subject, and finding the bits and pieces that (hopefully) would fit. so here it is, almost done, of cause it will be placed on the floor out of sight ~ married. Under the hood its: Asus Strix 570Xe Asus 3060 12GB OC - i am not a big gamer and had ordered a 3070 in december, but had to buy this one just to get my hands on a graphics card. 4 x 32GB 3200Mzh G.Skill 1 x TB SSD m.2 WD (the fast one) 1200W Be quiet Straight Power 11 Platinum (would have settled for a 1000W - but due to stock shortage had to buy this one) Resevoir - EK-RES X3 150 - initially i would have gone for an alphacool, alas stock shortage and EK also makes nice quality i think Pump - Alphacool Eispumpe VPP755 - G1/4 inner thread including Eisdecke D5 - Acetal V.3 Top Rad Alphacool NexXxoS ST30 Full Copper 360mm radiator 3 x be quiet! Lüfter Silent Wings 3 - 120mm PWM H Front Rad Alphacool NexXxoS ST30 Full Copper 360mm radiator 3 x be quiet! Lüfter Silent Wings 3 - 140mm PWM H (had to squeeze the fans in, in the front a little bit - but very silent and works perfect) CPU block Alphacool NexXxoS XP³ Light - Acetal - Fittings Alphacool Eiszapfen 16/10mm compression fitting G1/4 - chrome sixpack I bought three packages + a Y connector and some other that i didnt end up using. Drain pipe Alphacool 2-way ball valve G1/4 - Chrome Tube Alphacool tube AlphaTube TPV 16/10 - Black Matte 3,3m (10ft) Retailbox for some reason the black tube wasn't as tight as the clear one, so for safety reasons i used the clear - which i luckally also ordered. Alphacool tubing AlphaTube HF 16/10 (3/8"ID) - Ultra Clear 1m (3,3ft) Retailbox Flowmeter Barrow SLFV1-RGB Acrylic Water Flow Meter LRC2.0(5v 3pin) Lighting System Multiple Blade Colors i also got a GPU block for the 3070 card that never became available, its just lying in my drawer laughing at me - and aparently watercooling a 3060 isnt a thing - i can't find a block anywhere ;o( Barrow 3070 GPU Water Cooling Block For ASUS RTX3070 Graphics Card , Full Cover A-RGB Cooler, BS-ASS3070-PA BS-ADS3070-PA
-
2020 Build thread for a new machine. Started at the beginning of the year with this and slow and gradually over a 12 month period i've upgraded numerous times and swapped out a stupendous amount of components, not to mention the money spent on all the parts. Here we are end of 2020 and we are still upgrading and still tinkering... let the build log begin... Q1 2020 Planning Parts used: My basket at Overclockers UK: 1 x EK Water Blocks EK-Quantum Kinetic FLT 240 D5 PWM D-RGB Pump / Reservoir Combo - Plexi= £169.99 1 x ThermalTake Riing 120mm LED RGB Fan Sync Edition - Triple Pack= £44.99 1 x XSPC TX360 Ultra Thin Copper Triple Black Radiator - 360mm= £52.99 1 x Corsair ML120 Pro LED White 120mm Premium Magnetic Levitation Fan= £19.99 1 x Corsair Hydro X Series XT 14mm Hardline Clear Tubing - 3 x 1m (CX-9059003-WW)= £17.99 1 x XSPC G1/4" to 14mm Rigid Tubing Triple Seal Fittings - (Black Chrome) - 8 Pack= £28.99 Everything else i've had previously so was reused in this build. One thing i learnt through this rebuild, the corsair hydro x tubing is much harder than the usual PETG stuff im use to. I didn't see this when i bought it and thought it was standard PETG but turns out its PMMA which is an acrylic/poly carbonate plastic so had to use a saw to cut it. You can imagine my face when i first tried to cut it with a new tube cutter lol! I do love this tubing way more though, its much more resistant to scratches and looks clearer. Would definitely be using this again over PETG. The EK Quantum Kinetic FLT 240 - First impressions... It's very solid, very good quality and weighty! The machining is top notch and the material itself is very scratch resistant as i found out when i dropped a few heavy fittings on it by accident! It comes with all the necessary mounting hardware and an allen key tool to remove the G1/4 plugs. I got the FLT version with the D5/DDC mount at the back. As standard, the ports on the face are plugged leaving 2 open ports at the bottom. I feel like the ports at the bottom should have been plugged instead, its very easy to miss and forget that there's actually ports down there.. just something to look out for. The block also comes with a built in LED strip which i have yet to test out but does fit on a standard 5v ARGB header. One thing i did notice and that i always do with EK blocks is testing how tight the screws are in. In this instance the screws were loose. If i was to fill this res block, it probably would have leaked eventually if not straight away as the vibration from the pump. I would 100% you check all your blocks from EK when you first get them to make sure they screws are in tight! As usual, a couple of pictures of the process and a short description. Getting the EK Quantum Kinetic mounted with the D5 pump mounted at the rear. Getting all this mounted together with the fan at the back for intake was an absolute ball ache to do! The standard screws that came with the kit is not long enough, i had to dig out some old screws i had to make this all work. Also note to remember to block off the bottom ports on the res block before you install it. Last thing you want is to fill it and have all the coolant fall out the bottom! New fans, Thermaltake Riing! Came with the controller which i strategically placed under the res for easy access. ML120's at the top, nice crisp but not over the top bright White led fans This bitspower EF Summit that i've had for a millennia now... GPU installed with the riser kit from Phanteks. There is no room underneath, the verti mount sits on the fans shroud... The first bend! Used a mixture of tools and free hand to get the bends right, took a few attempts but PMMA is quite easy to work with provided you get it hot enough. Minimizing those angled fittings and adding more complex bends, something my last build lacked. Finally getting the last of the piping in but need to cut some down to fit a flow meter inbetween. Also not 100% happy with the top bend, its slightly sacking downwards. OCD kicks in, will need to adjust it. More to come later! Another thing to note, i found PMMA tubing fits much tighter in XSPC 14mm fittings. Probably due to the fact that it was designed for PETG and not PMMA. They do fit but takes alot more force to get them in, really have to twist and wiggle them to get them past the orings even with a nice chamfer edge.
-
 I have a corsair hydro x loop for my cpu controlled by my commander pro and I would like to add my gpu to the loop, I have a Asus dual 3070 which has a waterblock available for it from alphacool. I have all the functional aspects of it sorted out but I need help with the rgb situation. I would like to control the rgb lights on the gpu block with my commander pro. I know that I can get an adapter to connect the gpu leds to the second open lighting channel on the commander pro but does anyone know if I can somehow tie the gpu rgb into the same channel as my pump and res? Also I think alphacool uses a non standard rgb connector but I can't find much info about it. I've looked at the adapters from piratedog tech on ebay but can't figure out exactly what adapters I need if I want to tie all the rgb leds into a single channel in icue. Any advice would be appreciated! Please enjoy this poorly drawn diagram of my current rgb setup.
-
From the album: Project "Acanthoscurria"
© eBiz Inc.
- 1 comment
-
- 1
-

-
- carbide air 540
- acrylic tubing
- (and 8 more)
-
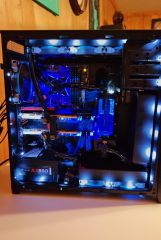
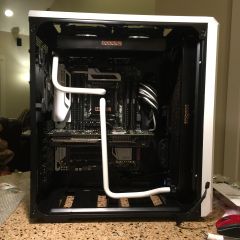
 Please rate my setup with constructive ideas to improve. Design was to allow for 100% usage of the CPU and GPU for crypto mining as well as small enough to take while traveling for work. Its a bit heavy at around 33.6 lbs but thermals are great (55C max while mining). Loud!! Thermaltake 100 case, Alphacool Monster 120mm rad + generic 120mm rad in back, i7-12700k, AMD 6800XT Sapphire Nitro+ with Alphacool waterblock, D5 Swiftech pump with Alphacool Block, EK CPU waterblock, ASUS Mini ITX Z690 motherboard, 32GB ddr4 Gskill RGB, and 5000RPM 120mm Server Fans for cooling. Custom temp gauge for water temps and PWM fan speed controller.
- 3 replies
-
- 1
-
-
- mini-itx
- thermaltake
- (and 3 more)
-
Hello everyone, I'm here to ask for your help regarding a future purchase. Currently inside my case (corsair carbide 275r) I have a radiator of a corsair h100i platinum 240mm mounted in the upper part with air flow that draws from the inside and throws it outside. For a "wrong" non-low profile ram purchase, I had to buy 2x120mm 15mm high noctua fans (Noctua NF-A12x15) to use on it (h100i) because the corsair standards provided were too high. After that .. In the future I would like to buy the product (linked below) to cool my rtx 2080. Alphacool eiswolf 240 gpx pro rtx What advice could you give me regarding the positioning of a second 240mm radiator? Inserting it on the front of the case would greatly increase the CPU temperatures? I hope you can help me or make me think in some way. Thanks so much (Sorry my english could be bad)
-
 Hi, I need help to choose my AIO for my new build. I will using a AMD Ryzen 9 3950X. I don't know which one to pick : Artic liquid Freezer II 240 Alphacool Eisbaer Extreme I would like your opinions/advices/experiences. Your help is much appreciate. Best Regards GenePatton
 -
 I want to add a noctua 200 to two 240 full copper radiators using custom mountings. Springs from each corner of the fan to the outer corners of the Radiators with suitable screws to fix it in place. My only concern is about the difference between a one 200 mm fan and four 120 mm fans regarding efficiency. Knowing that: 200mm has a 150 CFM, direct contact area is π x r² » π x 10 = 314 Sq cm 120mm has a 107 CFM, direct contact area of four fans is 4 x π x r² = 452 Sq cm I just multiplied the CFM by the area affected to determine the difference between both methods: 200mm ». 150 CFM x 314 Sq cm = 47100 4 x120mm »107 CFM x 452 Sq cm = 48364 I don't know what are the final numbers but i think that they determine the difference between two methods.. Are my calculations correct? If they were correct then there will be no difference regarding cooling performance. But way less noise with the big fan and probably a better performance in real life, plus the easier control with just one cable and less power consumption of course. Thank you for reading and answering Please see the image provided
-
Hi all. Project Sofia came to light one day when I was watching Sofia The First on tv with my 4 year old daughter. One of those grab a coffee and chill for 5 minute times. I was already in talks with Antec uk on a project,myself and my fiancée own a few antec cases.media centre and my personal build. Whilst watching the kids show with my daughter,the colour theme and build came to life. Something small,clean lines,elegant, like Sofia in the tv show,and it had to have a wow factor on the colour scheme. So I passed my plans on to Antec,and the green light was given. SPONSORS ANTEC UK :- http://www.antec.com/?lan=uk MSI UK :- https://uk.msi.com/ Team Memory :- http://www.teamgroupinc.com/en/product/T-Force%20Gaming Alphacool :- https://www.alphacool.com/ Watercool:- http://watercool.de/en/home SPECS:- CASE:- Antec Cube MOBO:- Msi Z270i Gaming Pro Carbon MITX CPU:- Intel i7-6700k MEM:- Team Dark DDR4 3000mhz in grey. PSU:- Antec High Current Pro 850 watt. GPU:- Sapphire RX480 8 gig. SSD:- 2 x Kingston Hyper X 3K 240 gig M.2:- Samsung SM961 256 NVME. FANS:- Antec Truequiet 120 UFO white. WATERCOOLING:- RADS:- 1 x Alphacool 240 mm Eisbrecher Pro XT45. /. 1 x Alphacool 120 mm Eisbrecher Pro XT45 CPU :- Watercool Heatkiller IV pro Gpu :- Watercool Heatkiller IV pro RX480 RES:- Alphacool Eisbrecher 250 FITTINGS:- Alphacool 13/10 Eiszapfan compression fittings TUBING:- Alphacool 13/10 Acrylic COOLANT:- Mayhems pastel purple. CASE:- Antec Cube [img]https://s26.postimg.org/gjp9n1ggp/IMG_2504.jpg[/img] CASE COLOURS:- EXTERIOR COLOUR:- House of Kolor fine Pavo Purple with metallic flake. INTERIOR COLOUR:- House of kolor Snow White pearl. MOTHERBOARD:- Msi Z270i Gaming Pro Carbon MITX [img]https://s26.postimg.org/45730gec9/IMG_2577.jpg[/img] PSU:- Antec High Current Pro 850 watt. That's it for now,more updates coming soon. Thanks
-
Hello all, my name is Ernest and this is my first topic in this forum. I have just completed first phase of my last project HyperionMod, so I decided it was the right moment to show you the current workflow. In this project I used Raidmax Hyperion case . I decided on it because the casing of this manufacturer actually do not appear in projects. Second thing is that Hyperion is a cube and this is my favorite type of computer cases. Hardware& Parts: Chassis: Raidmax Hyperion Motherboard: MSI Z170 Mortar Processor: i5 6600K 4,5 GHz Graphics Card: EVGA GTX 1070 SC Memory: 2x8gb DDR4 2400mhz PSU: Seasonic Prime 850W Storage: Kingston 2.5'' SSDNow V300 120GB,GOODRAM CX100 240 GB, GOODRAM C100 240 GB Liquid Cooling: …. Plans, nothing special ;): inverted layout, custom covers, custom LC connected with my desk At the beginning Hyperion looks like this If You are interested, my previous projects Elite V2 1, 2 MiniPC, Desk & inverted benchPC BiG TT NAS Step one,parts separation stay tuned
-
Hello! Im Joe Campbell, Owner of YouTube channel Gadget Joe and im a reviewer/videographer and modder from Grimsby, UK. My latest project build is Alter-Ego, a custom desk build (yes another desk build!) with a unique one of a kind twist! Work and play built into one unit with 2 systems and 2 different personalities! Sponsored by Alphacool/Aquatuning and Mayhems. Aquatuning and Alphacool sponsor all the liquid cooling components, radiators, tubing, blocks and more. Mayhems sponsor the maintenance of the loop and system in form of Blitz Kits. Specs: (main system) Mobo: Asus M5A97 LE R2.0 CPU: AMD FX 8350 RAM: Kingston 1600mhz 16gb (2x8) PSU: 500w GPU: Radeon RX480 8gb SSD: 120gb Hyper-X HDD: 500gb+320gb HDD (watercooling loop - Parts being provided by Alphacool/Aquatuning) Alphacool Eisbrecher Pro XT45 240mm Rad x2 Alphacool VPP655 Eisdecke D5 x2 Alphacool Eisbercher Lite 250mm Plexi x2 Alphacool Eisblock XPX CPU Chrome Alphacool NexXxosS GPX 480 Gpu Block Alphacool Susurro Fan 120mm x4 Multiple Alphacool chrome fittings 13/10 PETG and Soft tubing Alter-Ego is a 6ft long by 38" wide desk with main system built into a white gloss box that sits at 24"x32" sunk into left hand side housing main system with polished glass top, Test bench with AIO to the right of the desk in an 8" recessed white gloss box. Top is burnt and stained pine, rest is white with burnt pine accents and LED backlighting and RGB LED embedded around the build. Wall mounted triple monitor setup. Power switches from main to test bench with one button. 2x reservoirs with different shades of UV blue each powering GPU Block and CPU block respectively, Hard tubing on top, soft tubing in hidden void underneath. Acrylic detailing, sheeting and Gadget Joe and sponsor logos embedded throughout desk courtesy of Admodz Pine top, MDF treated Carcass, Chrome Legs, Acrylic panels, Safety glass and sealants. Main system will be white, blues and blacks. Test bench will be red, purple, black, orange. Special thanks to Admodz and Jo (BJPC) for continued support.
- 19 replies
-
- 2
-
-
- alphacool
- aquatuning
- (and 4 more)
-
Hi! I saw the diy desk pc on LTT and I was blown away of how good it looked, and wanted to build one my self. So now I am 2025 bucks (usd) poorer and have a couple of hundred left until it is done! And here is some pics! Feel free to add som tips or just join the journey!
-
Fellow Techies, I will be making the plunge into water-cooling this summer (if nothing else goes wrong). I was wondering what yall thought about alphacool and their gpu blocks? I have heard a couple of cons but I have seen some nice pros. I run one gpu and then the cpu will be cooled as well. Is there any reason not to use to them for everything else? My plan is to buy the rads (1x360mm passively cooled, 1x120mm rad as intake, 2x240mm rads as intakes) before the summer, and then buy the rest during the summer, that way I am not throwing cash out of a car going 70 mph.
-
I have just noticed that the coolant I use has changed color. The coolant I am using at the moment, is Alphacool CKC clear. I have not added anything to the coolant. No dyes, anti-corrosives, or anit-microbials. I know that things like this are not normal, but I put this loop together late October/early November. Is this corrosion? Chemical leeching of the tubing?
-
Hi Guy's, My name is Richard (AML Custom PC) this is my latest project, sponsored by Alphacool. The case I am using is the thermaltake x71, I have not seen many mods with a dual loop in this case. I am adding a new front tempered glass panel with custom fan grills. The colour of the build. Outside of the case - Matt grey inside of the case - White Loop one - Purple Loop two - Green. System Specs, CPU - unknown Motherboard - ASUS Strix Z270F Gaming Ram - 16gb Corairs vengeance RGB GPU - GTX 980Ti SSD - Kingston 240gb HDD - 1tb WD blue FANS - 6 x 120 thermaltake Riing plus, 4x 140 thermaltake Riing plus (all fans could be changed) PSU - Corsair 860 platinum Full Custom Cables from To the wire - custom sleeving Watercooling supplied by Alphacool, CPU Block - Eisblock XPX cpu mat black GPU Block - Nexxos 980ti RadS - 2x 360 Nexxos ST30 full copper Pumps - 2x Alphacool VPP655 D5 Pump top - 2x Esidecke D5 - Plexi V.3 Reservoirs - Alphacool Eisbecher 250mm acetal and Eisbecher 150mm acetal Fittings - Alphacool Eiszapfen 16mm hard tube compression black Alphacool HF 13/a0 compression fittings deep black Alphacool bulkhead connector deep black Alphacool Eiszapfen L - connector black Alphacool Eiszapfen extension 20mm black Alphacool Eiszapfen 2 way ball valve black Alphacool Eiszapfen double nippel deep black Tubing - AlphaTube HF 13/10 Alphacool Eisrohr 16/13 PETG hardtube Extra - Alphacool Eisbaer logo kit. Here are some photos of the products. The next up should be a big one with lots of case modding and hopefully Tempered front panel.
- 30 replies
-
- 4
-
-

-
- alphacool
- thermaltake
- (and 3 more)
-
 So basically I want your opinions about my setup and what I could improve/ have done better Its my first custom loop so yeha, we will see how you think about it... parts list: CPU: EK Surpremancy EVO Rad: Alphacool NexXxos 240mm X flow Res: Alphacool Eisbecher 150mm Tubing: Primoflex Primochill adevanced clear Pump: aqacomputer aqaflow XT Ultra (a Eheim 1046 with some sensors and a cool software to control it) colant: mayhems X1 Blood red Fittings: Alphacool Eiszapfen Fans: Noctua A14 2x industialPPC 2x Poop color and 1x LTT Edition (!!) 1x BeQuiet silent Wings 2 140mm GPU: yes it looks silly being still aircooled but I wanna upgrade when Vega comes out (and put an other rad in the front then) so I am waiting till then and use my 780 now for the last month with air. I don't wanna invest over 100€ in it when I am ditching it in a few months. and here is the loop: And yes cable management is not finished I have some CableMod stuf in the mail
-
Hi I'm Admodz Glacier came to light when Thermaltake launched the Core P3 snow edition case, I've seen many a core p3 and p5 mounted next to each other, but never stacked vertically on top of each other. So the design came to life and my vision became a reality. I would like to thank my sponsors on this project:- Alphacool :- Eddy Scan Computers Ltd :- Shelly Gigabyte Uk :- Andrew B To The Wire :- Michael Sheppard Maxwell Jones Studios Ltd:- Archie Greig OG Designs :- Oliver Gilbert Addon Customs :- Marcus Hawkins Glacier specs:- GLACIER SPECS:- Thermaltake Core P3 snow editions / Gigabyte Z170X-Gaming 7 / Intel i7-6700k / EVGA Supernova 850 watt / Alphacool watercooling / Samsung 950 pro 512gb / 3 x Kingston Hyperx 3K 480GB SSD 9 x Enermax Cluster Advance 120 mm fans / 2 x Nvidia GTX 1080 / Corsair Vengeance LED 64 Gig 3000mhz My design was to connect 3 core P3 snow chassis together vertically, and have 3 different coloured water loops going around the outside of each level. here's a few pictures of the watercooling hardware:- Warranty voided EVGA Supernova 850 watt psu.painted white. will update the post soon Designs :- Oliver Gilbert Addon Customs :- Marcus Hawkins.
- 40 replies
-
- 4
-
-

-
- alphacool
- scan computers
- (and 4 more)
-
Alphacool has just released an improved version of the popular D5 pump. Their old model was called VPP655, so this one is VPP755. The interesting part is that they claim to have redesigned even the internals of the pump, resulting in more power and less noise than the old one. Specificly they give examples of the old model pumping water to 3,7 meters as the new one will do 4,0 meters and it consuming 23W of power for the same water flow that the new one can produce with 14W. VPP755 has a new bearing that should make it more quiet and the pump's speed can be adjusted between 1700 - 4500 rpm. It has molex, 3-pin and 4-pin PWM connectors so that you can run the pump at constant speed but still monitor it through 3-pin fan connector or alternatively control it complitely with 4-pin PWM fan connector. When in PWM mode, you can still change the maximum speed that the pump will run with the switch in the pump. Additionally it looks better now with metal body, sleeved black cables etc. Interestingly the pump is also noticeably shorter, taking a bit less space. UPDATE 1: Oh, I forgot to mention the price. It seems to cost around the same as the old model. On Aquatuning.de the basic VPP655 is 64€ and VPP655 with PWM control is 72€. The new VPP755 fits right between them at 69€. UPDATE 2: Xtremerigs has already a review of the pump. I highly recommend reading it if you're interested but here are the main findings: - VPP755 has a slightly differing dimensions compared to a normal D5 and not all pump tops will fit! - The pump motor has no real PWM control but instead runs on one of five preset speeds depending on the PWM signal. The manual control on the pump uses also those five steps, so no linear control. - The pump actually is more powerful, silent and a lot more energy efficient than a regular D5. - The sleeving on the cable is not the prettiest that there are. But the housing is really nice and more color options of it should be available in the future. UPDATE 3: Taken from Thermalbench's review: Sources: - Xtremerig's review: http://www.xtremerigs.net/2016/10/31/alphacool-eispumpe-vpp755-pump-review/ - Thermalbench's review: http://thermalbench.com/2016/11/04/alphacool-eispumpe-vpp755-pump/ - Alphacool product video:
- 10 replies
-
- 1
-
-
- new d5
- improved d5
- (and 4 more)


.thumb.jpg.99c9b447ad512ca9594927934f549e51.jpg)