


HCP
-
Posts
159 -
Joined
-
Last visited
Reputation Activity
-

 HCP got a reaction from Tech_Dreamer in D-WAVE X2 Quantum computer - scratch build
You who seen me before know that i´m soft for supercomputers and have begun to do alot of scratchbuilds.
When i saw a article about D-Wave X2 i fell in love, how cool is this.
Instantly i started to gather information about the X2 and planning it out in Sketchup to get a grasp of what size is needed for my replica.
To be aesthetically appealing, i have made some changes.
- Racks in front of the chamber not in my replica
- Rear panels are moved to the front side, where the racks were.
Hardware
Gigabyte GA-Z97N ITX motherboard
Intel G3258 CPU
2x4gb Corsair Vengeance memory
Cooler Master 120V cooler
Samsung 840 120GB EVO OS-drive
3x4TB drives
All panels cut, gluing them to a 2mm acrylic piece to make up the walls.
Wanted to keep the glue from oozing out in the spacing between all small pieces, worked good. Looks awful - right now
Side and front panel cut and glued
See ya in the next update!
-
.thumb.gif.5f14f8fd8bb14aea47162a102d949bd5.gif) HCP got a reaction from TheRandomness in D-WAVE X2 Quantum computer - scratch build
HCP got a reaction from TheRandomness in D-WAVE X2 Quantum computer - scratch build
You who seen me before know that i´m soft for supercomputers and have begun to do alot of scratchbuilds.
When i saw a article about D-Wave X2 i fell in love, how cool is this.
Instantly i started to gather information about the X2 and planning it out in Sketchup to get a grasp of what size is needed for my replica.
To be aesthetically appealing, i have made some changes.
- Racks in front of the chamber not in my replica
- Rear panels are moved to the front side, where the racks were.
Hardware
Gigabyte GA-Z97N ITX motherboard
Intel G3258 CPU
2x4gb Corsair Vengeance memory
Cooler Master 120V cooler
Samsung 840 120GB EVO OS-drive
3x4TB drives
All panels cut, gluing them to a 2mm acrylic piece to make up the walls.
Wanted to keep the glue from oozing out in the spacing between all small pieces, worked good. Looks awful - right now
Side and front panel cut and glued
See ya in the next update!
-
 HCP got a reaction from enRodjavel in D-WAVE X2 Quantum computer - scratch build
hehe yeah i read that too somewhere when doing research, but the D-Wave is recognized by it, so it was easier to put in the info than explaining why its not.
And the G3258 cpu i´m using is a light year away from being close to running any Quantum algorithms.
I´m happy its a kind of super computer, and a cool looking one
-
 HCP got a reaction from Suika in D-WAVE X2 Quantum computer - scratch build
You who seen me before know that i´m soft for supercomputers and have begun to do alot of scratchbuilds.
When i saw a article about D-Wave X2 i fell in love, how cool is this.
Instantly i started to gather information about the X2 and planning it out in Sketchup to get a grasp of what size is needed for my replica.
To be aesthetically appealing, i have made some changes.
- Racks in front of the chamber not in my replica
- Rear panels are moved to the front side, where the racks were.
Hardware
Gigabyte GA-Z97N ITX motherboard
Intel G3258 CPU
2x4gb Corsair Vengeance memory
Cooler Master 120V cooler
Samsung 840 120GB EVO OS-drive
3x4TB drives
All panels cut, gluing them to a 2mm acrylic piece to make up the walls.
Wanted to keep the glue from oozing out in the spacing between all small pieces, worked good. Looks awful - right now
Side and front panel cut and glued
See ya in the next update!
-
 HCP got a reaction from Stefan1024 in D-WAVE X2 Quantum computer - scratch build
You who seen me before know that i´m soft for supercomputers and have begun to do alot of scratchbuilds.
When i saw a article about D-Wave X2 i fell in love, how cool is this.
Instantly i started to gather information about the X2 and planning it out in Sketchup to get a grasp of what size is needed for my replica.
To be aesthetically appealing, i have made some changes.
- Racks in front of the chamber not in my replica
- Rear panels are moved to the front side, where the racks were.
Hardware
Gigabyte GA-Z97N ITX motherboard
Intel G3258 CPU
2x4gb Corsair Vengeance memory
Cooler Master 120V cooler
Samsung 840 120GB EVO OS-drive
3x4TB drives
All panels cut, gluing them to a 2mm acrylic piece to make up the walls.
Wanted to keep the glue from oozing out in the spacing between all small pieces, worked good. Looks awful - right now
Side and front panel cut and glued
See ya in the next update!
-
HCP got a reaction from Stefan1024 in Casey Neistat themed casemod
What?
If you are into vlogging and Youtube you may already know Casey Neistat, one of the bigger Youtubers right now and growing fast.
He is a awsome film maker and DIY guy, check him out! -> https://www.youtube.com/user/caseyneistat
Casey got my attention a couple of month ago with his hacking, customizations and other
solutions to every day problems, in his style.
Why?
So, one day when i was thinking of a theme for my next mod i decided to do a Casey Neistat themed computer build, fetching some of his creations into the case.
Not sure why i´m doing this, just a fun thing and a complete opposite of what i normally do, where i seek to perfect and do everything as perfect as it can be.
Maybe a kind of a tribute? not sure, well, here it goes!
The hardware
Bitfenix NEOS case
Some drive cages from different other cases
3x3TB drives, 2x2TB drives, 1TB os-drive.
AMD 5800k APU
Asrock FM2A88X motherboard
8GB ram, Corsair Vengeance
The result!
And here it is, my Casey Neistat custom computer!
And, it´s not a build log without the pics.
The case - Bitfenix Neos Window
Casey have very custom glasses of his own, here i tried to replicate that effect he has on the glasses in the side window panel.
Made a window decal of the very same Casey, with his custom glasses on.
On his Boosted board, pictured in the top. He made a arrow to tell wich way is forward.
I took this detail into the front panel.
One other characteristic part of Casey is his "selfie-stick", he is using a Joby Gorillapod and holding his Canon 70D in one hand.
I had to snatch this detail too. Off to the store and bought a gorilla pod, removed 4 pieces of it and made it fit the case, as case feets
They had to be cut first
Turned out pretty good
In one of Caseys videos, he makes a custom carry-on bag with a custom holder for his Penny skateboard.
Skating is big in his movies, so i can´t leave this out.
Had to buy a Pennyboard just to get one, i can´t skate and i probably brake it if i tried standing on it
Here is first a picture of Caseys custom bag, and the following picture of my interpretation of it.
See his video here:
Made a fast-forward video of the works too.
-
 HCP got a reaction from The Cool n00B in Casey Neistat themed casemod
What?
If you are into vlogging and Youtube you may already know Casey Neistat, one of the bigger Youtubers right now and growing fast.
He is a awsome film maker and DIY guy, check him out! -> https://www.youtube.com/user/caseyneistat
Casey got my attention a couple of month ago with his hacking, customizations and other
solutions to every day problems, in his style.
Why?
So, one day when i was thinking of a theme for my next mod i decided to do a Casey Neistat themed computer build, fetching some of his creations into the case.
Not sure why i´m doing this, just a fun thing and a complete opposite of what i normally do, where i seek to perfect and do everything as perfect as it can be.
Maybe a kind of a tribute? not sure, well, here it goes!
The hardware
Bitfenix NEOS case
Some drive cages from different other cases
3x3TB drives, 2x2TB drives, 1TB os-drive.
AMD 5800k APU
Asrock FM2A88X motherboard
8GB ram, Corsair Vengeance
The result!
And here it is, my Casey Neistat custom computer!
And, it´s not a build log without the pics.
The case - Bitfenix Neos Window
Casey have very custom glasses of his own, here i tried to replicate that effect he has on the glasses in the side window panel.
Made a window decal of the very same Casey, with his custom glasses on.
On his Boosted board, pictured in the top. He made a arrow to tell wich way is forward.
I took this detail into the front panel.
One other characteristic part of Casey is his "selfie-stick", he is using a Joby Gorillapod and holding his Canon 70D in one hand.
I had to snatch this detail too. Off to the store and bought a gorilla pod, removed 4 pieces of it and made it fit the case, as case feets
They had to be cut first
Turned out pretty good
In one of Caseys videos, he makes a custom carry-on bag with a custom holder for his Penny skateboard.
Skating is big in his movies, so i can´t leave this out.
Had to buy a Pennyboard just to get one, i can´t skate and i probably brake it if i tried standing on it
Here is first a picture of Caseys custom bag, and the following picture of my interpretation of it.
See his video here:
Made a fast-forward video of the works too.
-
 HCP got a reaction from elecxonica in Casey Neistat themed casemod
What?
If you are into vlogging and Youtube you may already know Casey Neistat, one of the bigger Youtubers right now and growing fast.
He is a awsome film maker and DIY guy, check him out! -> https://www.youtube.com/user/caseyneistat
Casey got my attention a couple of month ago with his hacking, customizations and other
solutions to every day problems, in his style.
Why?
So, one day when i was thinking of a theme for my next mod i decided to do a Casey Neistat themed computer build, fetching some of his creations into the case.
Not sure why i´m doing this, just a fun thing and a complete opposite of what i normally do, where i seek to perfect and do everything as perfect as it can be.
Maybe a kind of a tribute? not sure, well, here it goes!
The hardware
Bitfenix NEOS case
Some drive cages from different other cases
3x3TB drives, 2x2TB drives, 1TB os-drive.
AMD 5800k APU
Asrock FM2A88X motherboard
8GB ram, Corsair Vengeance
The result!
And here it is, my Casey Neistat custom computer!
And, it´s not a build log without the pics.
The case - Bitfenix Neos Window
Casey have very custom glasses of his own, here i tried to replicate that effect he has on the glasses in the side window panel.
Made a window decal of the very same Casey, with his custom glasses on.
On his Boosted board, pictured in the top. He made a arrow to tell wich way is forward.
I took this detail into the front panel.
One other characteristic part of Casey is his "selfie-stick", he is using a Joby Gorillapod and holding his Canon 70D in one hand.
I had to snatch this detail too. Off to the store and bought a gorilla pod, removed 4 pieces of it and made it fit the case, as case feets
They had to be cut first
Turned out pretty good
In one of Caseys videos, he makes a custom carry-on bag with a custom holder for his Penny skateboard.
Skating is big in his movies, so i can´t leave this out.
Had to buy a Pennyboard just to get one, i can´t skate and i probably brake it if i tried standing on it
Here is first a picture of Caseys custom bag, and the following picture of my interpretation of it.
See his video here:
Made a fast-forward video of the works too.
-
HCP got a reaction from Tech_Dreamer in Quick mod of Phanteks Enthoo Evolv ITX
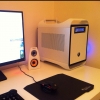
I bought one just to check the case out, and i got stuck.
(Some of you do know i work at Bitfenix, i use other brands too )
So i was thinking, i need a small workstation and this was perfect. Found a Gigabyte Z97n-wifi itx board from earlier projects and a 4690k CPU.
Other hardware includes a Corsair H100i, 8gb of Corsair Vengeance memory, 256gb Kingston SSD and 2x3TB regular 3,5" drives.
I can never buy a case, unbox it and start to use it. I need to make it mine, in a small or big way.
And i was roaming colors on the forums and found most cases are black, white, red or blue in general.
How about brown, anyone used brown? couldnt find many of them - so i ordered some Beluga Brown metallic (Audi colour).
Before it was violated, i shot some pics of the case.
And butt naked
After a couple coats of paint and clear.
Still in the loop
- Install everything in the case
- Some cable management
- New daylight pics, above was shot 2 AM
- Installation and maybe paint the monitors frames same colour.
-
 HCP reacted to CydiaDash in Quick mod of Phanteks Enthoo Evolv ITX
OOOO... interesting... followed.
Also.. *ahem*give me free bitfenix stuff*ahem*
-
HCP reacted to 0ld_Chicken in Quick mod of Phanteks Enthoo Evolv ITX
nice color choice! looks expensive
-
 HCP got a reaction from Guest in Quick mod of Phanteks Enthoo Evolv ITX
I bought one just to check the case out, and i got stuck.
(Some of you do know i work at Bitfenix, i use other brands too )
So i was thinking, i need a small workstation and this was perfect. Found a Gigabyte Z97n-wifi itx board from earlier projects and a 4690k CPU.
Other hardware includes a Corsair H100i, 8gb of Corsair Vengeance memory, 256gb Kingston SSD and 2x3TB regular 3,5" drives.
I can never buy a case, unbox it and start to use it. I need to make it mine, in a small or big way.
And i was roaming colors on the forums and found most cases are black, white, red or blue in general.
How about brown, anyone used brown? couldnt find many of them - so i ordered some Beluga Brown metallic (Audi colour).
Before it was violated, i shot some pics of the case.
And butt naked
After a couple coats of paint and clear.
Still in the loop
- Install everything in the case
- Some cable management
- New daylight pics, above was shot 2 AM
- Installation and maybe paint the monitors frames same colour.
-
 HCP got a reaction from TJStamp in Fractal Core 1000 front panel Mod
You can, but its alot of cutting the case structure. You are better off buying another case.
I solved my Core1000 NAS like this, 6 drives + ssd
3-bay hotswap in the top, 3bay internal bay from another case in the bottom with sticky tape - rock solid
More pics -> http://www.howi.se/projects-mods/fractal-design-core-1000/
-
HCP got a reaction from Tech_Dreamer in Getting Sponsored Having Built (only) One Custom Mod
I havent done any finished mods (all are in the build right now), but i have alot of construction knowledge, and tools for it and right now all my builds are sponsored.
(i do mostly scratch builds, or heavy mods)
The stuff i see as important when you look for sponsors is.
- Do something new, focus on what your build is different from whats out there.
- DO not ever, ever use your own low economy as excuse to seek out sponsors
- Focus on what this project can do for the company you talking to
- Have a plan for your project, making a personal computer for your own pleasure is not a good point
- Show what you have done earlier, doesnt need to be a computer. Just show that you can handle a saw, cut straight, sand nice, and have a talent for end finishing.
- Do not spend hundreds of hours in renderings and 3D pics, this will give a finish of the build you may not can acheive. Use simpler illustrations and explain in text.
(Everyone, almost, can do a nice rendering of something, it takes a ton of knowledge to really make whats been rendered)
- Just putting stuff into a case and sleeve the cables will NEVER ever in this earth get you sponsored, that time has ended! You need to fabricate or do something really unique.
And the last point, that i consider the most important.
- Start your project, get some stuff, show off your idea and go ahead with the specs and hardware as you go. Make the readers of the project you show it to see that you really can cut a straight edge with a jig saw, or have the talent to combine colors, shapes and design.
This last point is crucial, when i started my WOPR build i asked some companies, but no replies. Now when im half way into it, i have to say no to sponsors every week.
Same with my other builds, until i get started and really showed where the projects are going, how i do it and what it looks to end up is 100% better than showing a rendered picture.
As a side note, this is whats working for me, i can say this works for everyone. It depends on what you doing and with wich parts and stuff.
The latest stuff isnt the point of doing a great build, its what you do and how you do it! (The golden circle, What, How, WHY)
-
 HCP got a reaction from ReviewsByGarry in Bitfenix Pandora quick weekend modding - it went big...
Some pics after it was done.
Wish i spent more time on the GPU, its sagging a bit, but lifting the pipe the pipe started to sag instead.
Focus for this project was the reservoar solution to make it visible trough the window, instead of the SSD as original.
The top part with the copper/gold accent color.
The outsides, looks pretty much like the Pandora out of the box.
Exept for the reservoar
The insides
-
HCP got a reaction from ReviewsByGarry in Bitfenix Pandora quick weekend modding - it went big...
A quick mockup pic. before the last teardown. Some small stuff to fix still.
The sleeving for example, orange did not go well with this
Next up is leakcheck and final pics tomorrow i hope
-
HCP got a reaction from ReviewsByGarry in Bitfenix Pandora quick weekend modding - it went big...
Painted the rings of the fans... Then i noticed...
Sucking air OUT trough the rad and then Intake in the top.. not really happy with that one, as Pandora is really small and can cause heating troubles as it is...
Its pretty much done right now, just putting all parts together (and wrap the lower part), then its off for final photos.
Oh... forgot the sleeving, have to do that one tonight also
-
HCP got a reaction from ReviewsByGarry in Bitfenix Pandora quick weekend modding - it went big...
Ran out of pipes, so i got stuck.
Yesterday i got a message that the delivery will take alteast 10 more days...
So, i did some testing...
And, i´m just stuck again, i like the copper in some way, and the acrylic in another.
Acrylic or copper ?
-
HCP got a reaction from ReviewsByGarry in Scratch build: Akula Project
After 2 months of hard work without any modding, its time for a scratch build
Hardware
Intel i7 5960x
Still planning on other parts.
Cooling
Not sure if i will go full water or use a really good air cooler.
GPU is probably going to be watercooled.
I do not have a big window on the case, there is no nice hardlines or cooling to show, the goal will be 100% performance and silence.
Case
I´m pretty tired of cases with windows.
I want something thats looks really nice (in my opinion) and can stand on my desk without disturbing the work, no flashing lights, roaring fans or too much LED´s.
The insides is from a regular case, i have just built a shell around it.
I really began playing with the shape of the DeepCool TriStellar case, and it evolved to this - The Akula
Aaaand, here we go.
First 38 cuts - out of about 400
Here is what i started with, the shape of the DeepCool TriStellar.
I played with the shapes for a while and then took one chamber, stacked it on another one vertically and from that i created the Akula.
And here is the concept rendering. And no, its not a photo-rendering, just a quick one to get a idea of size and looks.
The blue in the front is a 16mm acrylic hardline, filled with water... More details about this one as the buildlog proceeds
Light gray areas in the front will be mesh for air intake.
Quick image of the sidepanel, as its not showing good in the rendering.
Consists of alot of plates to get some structure of the surface. The black area between top and bottom parts is either a mesh for air, or a really really small window, not decieded yet
Pieces cut into parts needed.
The bigger ones i only have 10 pcs of, 20 needed. Have to buy more acrylic
Front edges glued and sanded a bit to get the shape perfect.
It took me 3-4 re-glues to get the exact angles needed.
As all pieces are angled in the cuts, and i only have this little friend to make the cuts
I had to make special jigs to hold the pieces while cutting the sides.
And here is one of the jigs, 63,5° angle.
It slides on the side of the board and cuts the piece into a perfect angle
All rigged up for the first cut
Perfect!
I tried cutting with jigsaw and a bottom plate that could be angled, but never got good cuts.
This works awsome, its a bit fiddling around to mount every piece and measure where i need the cut, but its quicker than jigsaw + sanding all edges.
-
HCP got a reaction from ReviewsByGarry in Scratch build: Akula Project
A mini update. The first half is done, made a jig to glue all parts the same angles.
And, the parts are only glued, no finish work done! Now to the fun part, glue 63 more parts together + supports -
 HCP got a reaction from alpenwasser in Scratch build: Akula Project
After 2 months of hard work without any modding, its time for a scratch build
Hardware
Intel i7 5960x
Still planning on other parts.
Cooling
Not sure if i will go full water or use a really good air cooler.
GPU is probably going to be watercooled.
I do not have a big window on the case, there is no nice hardlines or cooling to show, the goal will be 100% performance and silence.
Case
I´m pretty tired of cases with windows.
I want something thats looks really nice (in my opinion) and can stand on my desk without disturbing the work, no flashing lights, roaring fans or too much LED´s.
The insides is from a regular case, i have just built a shell around it.
I really began playing with the shape of the DeepCool TriStellar case, and it evolved to this - The Akula
Aaaand, here we go.
First 38 cuts - out of about 400
Here is what i started with, the shape of the DeepCool TriStellar.
I played with the shapes for a while and then took one chamber, stacked it on another one vertically and from that i created the Akula.
And here is the concept rendering. And no, its not a photo-rendering, just a quick one to get a idea of size and looks.
The blue in the front is a 16mm acrylic hardline, filled with water... More details about this one as the buildlog proceeds
Light gray areas in the front will be mesh for air intake.
Quick image of the sidepanel, as its not showing good in the rendering.
Consists of alot of plates to get some structure of the surface. The black area between top and bottom parts is either a mesh for air, or a really really small window, not decieded yet
Pieces cut into parts needed.
The bigger ones i only have 10 pcs of, 20 needed. Have to buy more acrylic
Front edges glued and sanded a bit to get the shape perfect.
It took me 3-4 re-glues to get the exact angles needed.
As all pieces are angled in the cuts, and i only have this little friend to make the cuts
I had to make special jigs to hold the pieces while cutting the sides.
And here is one of the jigs, 63,5° angle.
It slides on the side of the board and cuts the piece into a perfect angle
All rigged up for the first cut
Perfect!
I tried cutting with jigsaw and a bottom plate that could be angled, but never got good cuts.
This works awsome, its a bit fiddling around to mount every piece and measure where i need the cut, but its quicker than jigsaw + sanding all edges.
-
 HCP got a reaction from Bouzoo in Scratch build: Akula Project
After 2 months of hard work without any modding, its time for a scratch build
Hardware
Intel i7 5960x
Still planning on other parts.
Cooling
Not sure if i will go full water or use a really good air cooler.
GPU is probably going to be watercooled.
I do not have a big window on the case, there is no nice hardlines or cooling to show, the goal will be 100% performance and silence.
Case
I´m pretty tired of cases with windows.
I want something thats looks really nice (in my opinion) and can stand on my desk without disturbing the work, no flashing lights, roaring fans or too much LED´s.
The insides is from a regular case, i have just built a shell around it.
I really began playing with the shape of the DeepCool TriStellar case, and it evolved to this - The Akula
Aaaand, here we go.
First 38 cuts - out of about 400
Here is what i started with, the shape of the DeepCool TriStellar.
I played with the shapes for a while and then took one chamber, stacked it on another one vertically and from that i created the Akula.
And here is the concept rendering. And no, its not a photo-rendering, just a quick one to get a idea of size and looks.
The blue in the front is a 16mm acrylic hardline, filled with water... More details about this one as the buildlog proceeds
Light gray areas in the front will be mesh for air intake.
Quick image of the sidepanel, as its not showing good in the rendering.
Consists of alot of plates to get some structure of the surface. The black area between top and bottom parts is either a mesh for air, or a really really small window, not decieded yet
Pieces cut into parts needed.
The bigger ones i only have 10 pcs of, 20 needed. Have to buy more acrylic
Front edges glued and sanded a bit to get the shape perfect.
It took me 3-4 re-glues to get the exact angles needed.
As all pieces are angled in the cuts, and i only have this little friend to make the cuts
I had to make special jigs to hold the pieces while cutting the sides.
And here is one of the jigs, 63,5° angle.
It slides on the side of the board and cuts the piece into a perfect angle
All rigged up for the first cut
Perfect!
I tried cutting with jigsaw and a bottom plate that could be angled, but never got good cuts.
This works awsome, its a bit fiddling around to mount every piece and measure where i need the cut, but its quicker than jigsaw + sanding all edges.
-
 HCP got a reaction from Sir Asvald in Scratch build: Akula Project
After 2 months of hard work without any modding, its time for a scratch build
Hardware
Intel i7 5960x
Still planning on other parts.
Cooling
Not sure if i will go full water or use a really good air cooler.
GPU is probably going to be watercooled.
I do not have a big window on the case, there is no nice hardlines or cooling to show, the goal will be 100% performance and silence.
Case
I´m pretty tired of cases with windows.
I want something thats looks really nice (in my opinion) and can stand on my desk without disturbing the work, no flashing lights, roaring fans or too much LED´s.
The insides is from a regular case, i have just built a shell around it.
I really began playing with the shape of the DeepCool TriStellar case, and it evolved to this - The Akula
Aaaand, here we go.
First 38 cuts - out of about 400
Here is what i started with, the shape of the DeepCool TriStellar.
I played with the shapes for a while and then took one chamber, stacked it on another one vertically and from that i created the Akula.
And here is the concept rendering. And no, its not a photo-rendering, just a quick one to get a idea of size and looks.
The blue in the front is a 16mm acrylic hardline, filled with water... More details about this one as the buildlog proceeds
Light gray areas in the front will be mesh for air intake.
Quick image of the sidepanel, as its not showing good in the rendering.
Consists of alot of plates to get some structure of the surface. The black area between top and bottom parts is either a mesh for air, or a really really small window, not decieded yet
Pieces cut into parts needed.
The bigger ones i only have 10 pcs of, 20 needed. Have to buy more acrylic
Front edges glued and sanded a bit to get the shape perfect.
It took me 3-4 re-glues to get the exact angles needed.
As all pieces are angled in the cuts, and i only have this little friend to make the cuts
I had to make special jigs to hold the pieces while cutting the sides.
And here is one of the jigs, 63,5° angle.
It slides on the side of the board and cuts the piece into a perfect angle
All rigged up for the first cut
Perfect!
I tried cutting with jigsaw and a bottom plate that could be angled, but never got good cuts.
This works awsome, its a bit fiddling around to mount every piece and measure where i need the cut, but its quicker than jigsaw + sanding all edges.
-
 HCP got a reaction from Slayerv121 in Bitfenix Pandora quick weekend modding - it went big...
Some pics after it was done.
Wish i spent more time on the GPU, its sagging a bit, but lifting the pipe the pipe started to sag instead.
Focus for this project was the reservoar solution to make it visible trough the window, instead of the SSD as original.
The top part with the copper/gold accent color.
The outsides, looks pretty much like the Pandora out of the box.
Exept for the reservoar
The insides
-
 HCP got a reaction from Antibull in Bitfenix Pandora quick weekend modding - it went big...
Some pics after it was done.
Wish i spent more time on the GPU, its sagging a bit, but lifting the pipe the pipe started to sag instead.
Focus for this project was the reservoar solution to make it visible trough the window, instead of the SSD as original.
The top part with the copper/gold accent color.
The outsides, looks pretty much like the Pandora out of the box.
Exept for the reservoar
The insides

.thumb.gif.5f14f8fd8bb14aea47162a102d949bd5.gif)


