


Khazzirh
-
Posts
76 -
Joined
-
Last visited
1 Follower

Recent Profile Visitors
1,139 profile views

Khazzirh's Achievements
")
-

<Poison Factory> Nano S, GTX 1080, Custom Hardline, X99 ITX
Khazzirh replied to Khazzirh's topic in Build Logs
Yeah, got it from Performance PCs, not sure what other options exist Not to worry, this is obviously only test-fitting the parts, would be a pain to install the waterblock and CPU with the motherboard in there like that -
New season, new build, and all that I have been using an Ncase M1 for a little while now, but I have found as ambient temps are rising, its gets too hot when overclocked, so I have actually turned back the overclock on it to stock. Still plenty of power to game on, but where is the fun in not overclocking? Check out the Ncase-build here if you are interested: So I'm doing another build, this time in the Nano S from Fractal. It has a lot more room so I can use regular sized fans, and double 240 rads, for a lot more cooling potential. Either gonna keep the Ncase M1 as is, install another rad into it, or possibly build the entire thing into a watercooled Node 202. The Nano S is gonna get some new stuff, including the ASRock X99 ITX-board, and the new GTX 1080. Planned parts below: Case: Fractal Nano S CPU: ? Mobo: ASRock X99 ITX PSU: ? GPU: GTX 1080 Memory: Corsair LPX 32 GB SSD 1: Samsung 950 Pro M.2 SSD 2: Samsung 850 EVO SSD 3: Samsung 850 EVO Rad 1: Darkside LP240 Rad 2: Darkside LP240 Fans: Darkside Gentle Typhoon Tubing: ? Res: Monsoon MMRS Modular Reservoir Pump: ? CPU Block: Bitspower ASRock X99 Full Cover Waterblock GPU Block: EK GTX 1080 Full Cover Waterblock Some parts are still undecided, but they are decided soon enough. On to the pictures Current state of the interior: The first option regarding pump: Second option: The part that makes it all special: Stay tuned, and let me know what you think
-
Very true I'm using the bottom as intake, and it's plenty sufficient so far I just painted the red parts with green, using some warhammer-paint I had nothing fancy really, but effective. Luckily there isn't much color on the motherboard to begin with, which is why I chose it.
-
Thanks But no, 15mm fans, from Phobya actually, not the ones I pictured above. They are running at a constant 900 RPM. That is a good idea Although I didn't feel that it was too bad to apply, with the applicator you get with it it's pretty straightforward. Yeah, you can mount a 240 on the side as well, albeit with a different pump/rad and no fan/rad in the back. For me it kills the aesthetics, so I opted out on that option
-
Alright, so the new version is now complete, except for some exterior. Still need feet, or mod the ones I have. Drilled some new holes in the bottom for the rad, so they don't fit by default anymore Also likely to put a window on the side to see the interior, but need to find someone that can do that nicely first, as I know my equipment won't suffice, or at least to an extent that I would be satisfied with. Also have not installed the Corsair PSU yet, not sure if it's going into this build, or the one I'm doing for my GF soon. That one is also gonna be a watercooled Ncase M1, similar to this one, so look out for that if you're interested On to the meat, here are the pictures Didn't actually drill any holes for the res/pump, just used some metal plates and screws to work with the existing holes in the front The view from the top is obviously gonna be a bit messy, but here is is anyways Currently it's running at 4,5 Ghz at 1,300V and 1,065 Mhz/530 Mhz. My Nano wasn't that good of an overclocker unfortunately, but still puts it at slightly above Fury X-levels. Could probably have pushed the CPU more, but 4,5 is fine with me Running idle at about 33-34C, and Aida64 shows an average of about 65-70C, so all within comfortable levels Current score for 3DMark is 14421, last I checked that was 8th place for systems with a single Nano with Valid results Let me know what you think
-
Actually gonna do a fair bit more work on this one Got some new parts in today, and expecting a few more soon enough. I felt that I wasn't utilizing the potential of the case as well as I could, so I'm gonna push it a bit further. I still won't be using a rad on the side, as I still want it to be visual, but I will be adding a 92mm rad in the back, with a slim Noctua, and I will be replacing the bottom rad and fans. The 22 FPI of the EK-rad aren't the best (in my opinion), and the package I'll be getting in a few days will reveal which rad that will be. The bottom fans will be SilverStone Slim 120 SST-FW121. They are PWM-fans, and seem sturdier and has a better static air pressure. Probably not all that different, but I'm curious enough to try. In addition I will be using Termal Grizzly Kryonaut instead. And the final little (in every sense of the word) surprise is this: The new SF600 from Corsair. The SilverStone SX600-G is fine, but it is making those twittering noises people are talking about. I so far haven't had a bad Corsair PSU, so I'm giving it a shot! A couple of shot of all the glory: The next parts are following shortly, probably in a few days
-
Alright, so this is turning a bit more into a buildlog than I thought it would. For anyone thinking about the Magicool DCP450, I wouldn't reccommend it, as mine was apparently leaking like a faucet (ofcourse from the side pointing in, so only reason I found out was because I could see the decrease in waterlevel in the res). Cheap as hell pump/res combo, and a good example that you get what you pay for... So switched it to the EK Revo D5, and redid some stuff to make it fit instead. Additionaly, and by coincidence, I found out that there are big differences in the color of the coolant in different batches. Ran out because I had to redo the loop a few times, and bought a new one, and it has a way better color, just look at these pictures: The left one is the one I had, and the right one is the new one: And her are some pictures of the loop as it stands now: Nothing new and spectacular, just better quality parts and some changes in the loop to reflect that
-
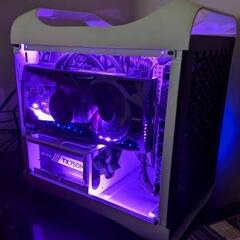
Added some light yesterday, kind of hard to get good pictures of the UV, but anyways: Red light on the motherboard is still gonna go, haven't gotten to it yet. Was glad to see I could turn of some other red lights on the motherboard through BIOS
-
No time for a log when it goes this fast, and its just that fun to build Yeah, was actaully a bit of a leftover from the last project, but works just as well in this one, creates more interesting contrasts Thanks ^^ Can't take credit for that, gotta give that to Ensourced, that guy really delivers fast and at reasonable prices, definitely a go-to guy for cables Such a cool small card (not in the literal sense, it can get pretty hot ), looks great in small builds Yeah, I liked the old one as well, I just preferred this one in the end. Both have great potential, and to see someone finish up the other case at some point would be cool. But, I gotta say, the Ncase is a hell of a lot more practical, as you can't really remove any of the sides (atleast not without extensive modding) on the Jonsbo, which makes thight builds a bit tough Additionally, here are the 3DMark-scores: And here are the general temps on idling, pretty well: Not bad at all
-
This one has unfortunately been cancelled, and is instead followed up in this build:
-
So this project actually started out as something else, it was actually a Jonsbo U2 that was modded to fit a 120 mm rad and a 240 mm rad. Unfortunately I was never pleased with the result, it just looked a bit messy, and alot of the details would disappear because of the size. It was never completed, but you can check out where the project halted here if you want: Specs are the same in this one obviously: Case: Ncase M1 CPU: i7-6700K Mobo: Asus Z170i Pro Gaming PSU: Silverstone Strider SX600-G GPU: R9 Nano Memory: Kingston HyperX Savage SSD 1: Samsung 950 Pro M.2 256 GB SSD 2: Samsung 850 EVO 250 GB SSD 3: Samsung 850 EVO 250 GB Rad: EK 240 SE Fans: Scythe slip Stream 120 Tubing: Monsoon 13/10 Res/Pump: Magicool DCP450 CPU Block: EK Supremacy Black GPU Block: EK Fury Nano Full Cover At the same time I had ordered an Ncase M1-case, and the moment I got it, it was obvious that this would become the project instead. It was just that nice, and it is equally as incredible to work in. The people behind this case has really taken everything into consideration, making proper use of every nook and cranny This all happened when the forums were down, and the build went so fast because I already had all the parts, and some of the modding (not that there was much needed) was completed in the other project. So this one isn't much of a build log, but more of a completed build. Some minor details are left, you can see a couple of wires down in the left corner for lighting, and there are some light on the motherboard I'm gonna get rid of. On to some pictures: The pump is alright now, but when I installed it the first time, I noticed that it was leaking from between the glass part and the pump housing. The o-ring probably was too small, and I generally can't recommend this pump other than for the footprint. Fortunately, my girlfriend works with nails, and has some experience with acrylics, so she filled the gap around the bottom with clear acrylic, and the result isn't too bad at all! you can see a minor circle around if you look closely at the pictures, and I don't think it something you would notice unless you knew it was there. All in all really happy about the result, so far my absolute favourite pc that I've built. Even did some tests with 3DMark and Prime95, and it was coping pretty well. CPU went up to a maximum of 86 degrees on Prime95, can post the 3DMark scores when I get back home, but was about 13000 on Firestrike at 1920 x1080.
- 19 replies
-
- 12
-

-
Yeah, would have been pretty good in black, I gotta agree. But I just love black and green, and after trying something else, I realized that what I really wanted is black and green So yeah, just a matter of preference as you say Oh, it's kind of an honor that you noticed and commented, as I have thoroughly read your build log before I started, and ended up in a very similar direction. Like you I planned on having a smaller pump in the bottom with a separate res somewhere else, but by far, mounting it to the radiator in the front is the best solution I found. Looks pretty good too, gives a great focus point smack in the middle Alright, some new parts, to the the project going again: These are the last parts I need to finish everything, so its just a matter of modding a little bit, and setting up the cooling and all that, and it should be good to go Started a little bit with the cpu-block as well: Couldn't have the cpu-block in any other direction, then it would interfere with the pump. Just one of the issues with small cases Not looking forward to hiding everything either, gonna be hell routing all the cables in the back when stuff is mounted.. Gonna be clever about the order in which the different components will be installed. Stay tuned, shouldn't be too long between upates now hopefully
-
Woho, actually got the cables yesterday as well, was so happy when I came home and saw the box! Here is a picture that don't do them justice at all: But you get the idea, black with green details, almost like they are glowing Had a bit of limited light yesterday, so that was the best I could do at the time. Gonna show of a few more when I get some more representative pictures, but the cables are really tight, and a much better length than the stock ones for this kind of build. Also started some work on the exterior: Just the piece that makes up the front and the top that will have the look of carbon fibre, in addition to some parts on the inside. Gives great contrast, and I like it so far
-
Throwing up another little "update" Have a lot of new parts, but they're not all in yet. Only need the CPU and the SSD's to complete the build now, in addition to the cables from Ensourced, they should be arriving here any time now. So psyched to see them! Installed some more fittings, and tried on some of the proper compression fittings for the hard tubing: They look just fantastic in my opinion, and adds alot to the visual impression. I was going to bend more tubes in the original plan, but as I tried the different angles, and what was possible, this just ended up looking alot more clean in my eyes I like having everything straight in the front, such an organized appearance (for a case that is getting pretty damn full soon..) Also got a set of the NZXT Hue+ for lighting, so excited to see how that will work out. Gonna be some UV-cathodes in there too, with a switch, so I can choose different styles. In total it is nearing completion, just gotta get the cables and the above-mentioned parts Gotta say, this is probably my favorite project to date! More following soon enough, stay tuned!
-
Yep, huge part of the challenge, but all part of the fun Haven't used soft tubing so far in any build, as the rigid tubing in my opinion just looks so much better that it is by far worth the effort B) Yeah, absolutely, it will be painted black like the case
