DeuS1
-
Posts
83 -
Joined
-
Last visited
Content Type
Forums
Status Updates
Blogs
Events
Gallery
Downloads
Store Home
Everything posted by DeuS1
-
keep it up with the feedback guys, much appreciated !
-
yeah, excately.. i think that if i had used black fittings and made black i/o cover, then it would be just too much black/blue when sleeving is also black/blue.. needed something to break up the look
-
Yeah, i actually wanted to use as little fittings as possible to begin with, but after some loop try outs i decided to use as many as possible instead, because of how beautifull they look .. and i went with the silver fittings instead of matt black, because there's allready so much black/blue going on in the case it self, so i wanted the fittings to match the nickel blocks instead .. i actually thought about making a matt black acrylic plate to go over the i/o, but again, the nickel look fits the fittings and blocks very neetly i think
-
Feel Free to share your thoughts on this build, would love some feedback !
-
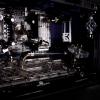
!!!! - FINAL SHOTS - !!!! IT'S DONE !! The Parvum|Beast is finally finished... Sorry it took me so long to finish, but with 100 hour work weeks on my regular job, it got kindda hard to find the time to work on the Beast.. BUT time to share the final images with you guys.. I am very happy with this build, put a lot of attention to details into this one, and also a lot of blood and tears ! .. I will make the sleeving video, EK Frosted Block polishing video, and some other stuff tomorrow, and hopefully get it out to you guys before thursday.. Thanks for all of you who have followed this build, and a BIG BIG BIG Thanks to: Coolerkit.com - EKWB.com - Mainframecustom.com For their support and help making this build more than just a dream ! <3 .. Now THE IMAGES !! Again thanks for following this build guys, and thanks for the humongus support on my facebook page "BeckModZ - Liquid Designs" I can't believe that this build gave me over 2000 followers on my facebookpage .. THANKS GUYS!!! ..
-
Done Routing cables, Trying out blue Mesh So i just finished the cable routing ! im pretty happy with the result when you think of how little room there actually was for this, cause of the size of the AX1200i .. Also, i have been trying to figure out what to do for rad covers to be shown on the outside.. And i found some mesh laing around, spray painted it blue, and tried to put it loose on top of the rads.. Actually think it's lokking kindda cool, color matches okay too now to find a more permanent solution with it What do you think guys ? looks pretty good right ? Also still trying to figure out what do do with the PSU to make it blend in the black/blue theme.. Going to install lighting very soon, so i think next images will be final images !!!!! : D
-
Cable routing, res change and M logo on GPU Okay, so after 14 days with 200 hours of work, i finally had the time to work on the beast again! I started doing the cable routing, and have done all the rest of the sleeving i needed to finish.. Still a long way to go with the cable routing tho, as i am awaiting new sata sleeving, hopefully be here monday ! I also finally got the last piece from parvum, that was originally going to be the SSD housing, but something went terribly wrong with the meassurements(prolly my side), so couldnt use it at all So instead i took the Monster logo inlay in blue acrylic, and put in on top op the Gpu instead, left the black vinyl beneth to give it a "drop shadow" like effect And i made some changes to the reservoir sleeve, had to cut off some of the black binyl on the back, to give it the effect i was looking for. I took a picture of it so you can see what i mean.. Pretty sure when i am done with installing the lighting in the case, then it's going to look awesome!.. Anyways here's some images, while i work on installing the lighting, also i am awaiting new uv leds, to arrive monday as well, so final images will be done mid next week.. Same with the Sleeving and EK block polishing guide videoes Hope you like it so far, really in love with the LC Teleios sleeving!. looks so good in this build!.
-
UPDATEEEEEEEE Just got home from 14 days with 200 hours work !!!.. so finally have time to finish this little Beast! .. I just finished the rest of the sleeving, and the cable routing .. Only thing left do to is installing the led strips, and then FINAL IMAGES !! Hopefully i will get the rest of the work done by thursday, so that i can use the weekend to do the editing of the final images, and the video tutorials Stay Tuned Guys - Final images will follow very soon !
-
Yep i actually ran into that problem on the buttom of the reservoir, and i had to replace it with the original ones hehe i AM sleeving everything i possible can
-
Finished Filling The Loop!!! UPDATEEEEEEE!!! .. I finally finished the leaktesting, and the loop is filled up and complete! I absolutely LOVE the color of the EKWB Ekoolant UV Blue !!! .. Loops amazing, espicially under the illumination of the led strips unfortunally one of the 2x45 degree fittings from GPU to Mosfett block has a minor leak, once every 3 hours it has gathered a tiny drop of fluid .. So thinking that maybe i need to change the O-ring, and while i'm at it, i might just remove it and maybe do something like 45 degree fitting - tubing - 45 degree fitting, instead, to show a little more tubing in that area.. but will deal with that tomorrow morning.. For now, here's some images of the loop with the iv blue liquid.. Enjoy! So what's left to do? Still need to figure out something neat with the SSD drives, also still need to do the 8pin cpu sleeving and cable management. And last but not least i need to install the lighting.. BUT the next 2 weeks i have alot of work to do, and no time what so ever to finish the build.. So unfortunally you guys will have to wait 2 weeks for the final images and updates.. <3
-
Some More Sleeving, 24pin, 2 x 8pin and more I Love Sleeving !!! So guys, i just finished the 24pin, 2 x 8pin pcie's some cathodes, the powerbutton and some more .. I had a a vote on my facebook page "BeckModZ - Liquid Designs" and other facebook groups, about the color combination for the 24pin, i actually started out with 33 different versions of it.. sick! but narrowed it down to 4 samples that people voted on. So the combination that won was my favorite too, but i changed out the middle wires for some black ones instead, there was alot of blue on the 24 pin originally, and i changed it with some more black sleeving instead, since there's allready so much blue goin on in the build. Anyways, here's some shots of the connectors and stuff. This post will be updated later on when i get the rest of the sleeving done. Will also make a image series or video turorial on sleeving, but will do that when the whole build has finished. Hope you like it peepz.. I really enjoy sleeving, and this LC Teleios sleeving looks so amazing, and is so easy to work with when going heatchrinkless style!.. the weaving just looks so beautifull!!.. ooh btw, i also leak tested and filled the beast with liquid.. images will follow sooooon.
-
Re-Sleeving the fans, and extra sleeving arrived So we all know how badly case fans are sleeved from the factory ! .. and if there's anything that kicks off my OCD its the red,yellow,black wires on the fan, when everything else is sleeved, and also the poorly made heatshrinks! SO obviously i HAD to redo the sleeving of them. I cut away some of the cable "holders" (the thing on the fan that holds the wires in place and helps route the cables) so that the new sleeving would have enough room to be placed nicely. Also i used superglue to hold the sleeving in place on the wires before shrinking the heatshrink.. Also that silver sticker had to go, and instead i used some matt black vinyl sticker ! AND Mainframecustom.com sent me some extra sleeving. the LC Teleios Fusion – Black/Blue, and the LC Teleios Fusion – Blue/Navy Blue which i am sure will look much better in the Beast then the lighter blue colored sleeving would Now here's some pics! REMEMBER kids, DO YOUR PINOUTS <3 The New sleeving from mainframecustom.com I was thinking about getting the heatshrink to cover most of the fan connector, because it simply looks better, but maybe i will do it later and buy some sata shrink for it Enjoy!
-
Thank you very much .. I too am excited to see how the GPU block looks with the water in it ! : D.. Can't wait !!! But still alot of work to do
-
Reservoir Vinyl Sleeve Allright, so i was going back and forward in my head with ideas on how to make the reservoir sleeve. I tried to cut out the Monster logo from the Blue energy can, and seriously i tried like 6 times and just couldnt get it to be pretty enough! Then i was thinking about some other options, first one was to cut out the logo in a alu tube, but my dremel was tired of living and decided to die Next was to find some Plastic tube, but couldnt fint it in the right thickness, so had to figure out something else. Thats when i came up with using some of my Matt Black Vinyl Sticker, and cutting the logo into the vinyl and then just stick it on the res. Actually i'm quite happy with the result, the matt black vinyl sticker thing actually matches the case acrylic to perfection. So anyways, here's some pics of the progress of the making. Hope you like it, i threw some light in it to give you a better idea of how it's going to look. Obviously a little different once the UV Blue liquid fills the reservoir, but i think it's going to look awesome, and fit the Monster Energy Lo-Carb build theme pretty good.. And YES i see there are some air bubbles that i have to get fixed, but that will be done later:)
-
Figuring out the Loop Okay, so this Update is all about the Loop. I took all my beloved fittings from EKWB and CoolerKit, and just went crazy with them At first i was going to use minimal amount of fittings and instead do alot more of Bending the tubing, But these fittings just look so awesome, that i decided to use as many of them as i could instead hehe .. I tried many different loop ideas, and after an hours work i am pretty sure that this one is how i think it looks the best, and cleanest Am pretty happy with how this could turn out!... Next up is probably tubing it, and making reservoir cover out of something. and then alot of sleeving later ! Hope you like it !!
-
The Fans, Silverstone AP121 Uv Blue Blades So the new fans just came in ! The Silverstone AP121 with Uv Blue Blades <3 .. Originally i was going for the other version with blue led and transparent blades, and silver housing. But after trying them out i disliked it alot.. NOT the fans themselves, but only the way it fit my color theeme.. So obviously i had to get the black housing ones with blue blades instead, and i am pretty sure it will look sweet with uv blue blades along with the uv blue liquid from ekwb Also i tried to mount them on the EK Radiators, as a temporarily solution.. just to see how it looks.. Will take them off again later when i re-sleeve the wires from them Love how it looks.. Tho i know i HAVE to re-sleeve the fan wires, looks okay from stock, but thats just not good enough for me Pictures of all sleeving progress will follow very soon guys !
-
UPDATE: The fans and the rest of the sleeving just arrived <3<3 .. Will take images of it monday where i will also try to cut out the monster energy drink can, and see if i can make it beautiful as reservoir sleeve, or if i have to try something else
-
Yeh excately ! .. have no understanding at all about why they dont "from fabric" flip the pcb so the fans are up : D but yes off cause its because something with dust staying on the pcb and stuff.. but still ! ..
-
yaay final piece for the build has been sent and should be here by the weekend ! and then alot more updates for you guys ! the build also got nominated for Mod of the month on bit-tech forums ! please vote
-
Still awaiting that last piece from parvum, should arrive here soon ! .. i think i will wait with the tubing untill its here, and see how i can implement it
-
yep it is crushed in the top, just cut it out quick and added some black tape, just to see how it could look .. NOT gonna use this one obviously, was just a test
-
Just had to try this since its a monster blue energy inspired build So i just finished my Moster Blue Energy Drink, and decided maybe i should cut it and try to fit it over the reservoir, as a reservoir sleeve .. And i have to say, i actually think it looks kindda awesome.. Maybe i should try do mod it a bit, and see if i can cut out the logo and make the "M" light up with the UV blue liquid in the res ? So what do you think guys ? ..worth doing, or just looks to lame ? .. Keep in mind i have monster logo on case also, and that this build is a monster tribute build to the blue energy drink that i love so much
-
Test Mounting of the Waterblocks, and modding the flipped GPU. Allright, got alot of work done last few days. Test mounted the blocks to see how it looked best, then flipped the gpu, bend some acrylic sheets to act like supporters for the gpu, and added some velcro tape to hold it in place. after that, it was time to figure out how i wanted the cut in the case and pci slot cover to be. Then after the cut i saw i cut too big of a hole, but still its okay I also was thinking alot about the pump placement, if i wanted it next to the 120mm rad, mounted in the back at the mobo tray, or where to put it for the best looks.. Then i thought maybe i could make another acrylic piece bended in the angle of the GPU, so that the Pump actually is tilted in same angle as the GPu, and i must say it's got the look i was hoping for .. Also cut out a hole for the LCD temperature display.. But still awaiting the final piece from Parvum, so maybe i will change it later or redo it, but for now it works out great i think I also drilled holes for the reservoir mount, and shot a few pics with everything in its place, and also with the window on to see how it looked So what do you think guys ? .. next up will probably be installing fittings and tubing and figuring out the loop
-
yeh you are right will see what i come up with once i get to that part of the build
-
ooh thats what you mean .. Well i also tried that out, but gave up as it was really hard to get it perfect.. i cut top and buttom off the blue monster energy drink that this is tributed to, and tried to cut out the logo and everything, but soooo hard : d.. but maybe i have up too easy