


iJarbus
-
Posts
164 -
Joined
-
Last visited
Reputation Activity
-

 iJarbus got a reaction from lukestechtips in Corsair 900D Hardline
Looks like it'd be a freaking sick build, I've had allot of success with EK blocks so I'd recommend paying the bit extra for them. I'm running a Phobya pump and I'd stay the hell away from it, the fittings stripped the plastic threads on the pump and I ended up having to glue fittings into the pump(somehow I'm a year on with no leaks).
For tubing I'd go with PETG over Acrylic, PETG is much less brittle and easier to cut and is equally as clear. I got a little tubing cutter from my local hardware store, it's meant for cutting copper pipes but it works really well for cutting plastic tubes to and gives a really smooth cut. Soapy water is your best friend for getting your silicon insert in the tubes for bending. Also, work out how much tubing you think you'll need and double it, bending the pipes is really tricky and for some of the more intricate bends will take several attempts since once you bent the tube you can't really do more than minor adjustments to it.
If you can add a drain point to your loop when you are building it, I ignored this advice the first time I did it and it made draining the loop a pain, only costs like $30 in parts and makes your life so much easier.
Last thing, make sure you set aside a heap of time to do it, took me three days to do mine(most of that time was spent trying to work out what I was doing lol)
-
 iJarbus got a reaction from Herolike in Can't clear CMOS - No POST - MSI 970 Gaming
Awesome, glad to hear you got it sorted.
-
iJarbus got a reaction from Herolike in Can't clear CMOS - No POST - MSI 970 Gaming
Have you tried using the clean CMOS buttons on the motherboard rather than playing with the battery, their should be something in your manual with how to it, it'll be something like a physical button or some pins to bridge.
-
 iJarbus reacted to Ghostay in How often do you guys do a clean install of your OS
Every 3 months or so I reinstall Windows, get rid of everything and start afresh.
-
iJarbus reacted to elkenrod in How often do you guys do a clean install of your OS
I reinstall when I break my system, which happened two days ago for me.
I expect this to happen from time to time, but I can get back up to the previous state within 20 minutes and no data lost.
-
iJarbus reacted to Herolike in Can't clear CMOS - No POST - MSI 970 Gaming
Also as I was taking the battery out, I tried to short it again. Except this time I saw really small spark between the pins, that is probably a good thing. Leaving the battery out for 10 mins now
-
iJarbus reacted to NinjaJc01 in Can't clear CMOS - No POST - MSI 970 Gaming
And when/if you remove the battery, leave it for 10mins
-
iJarbus reacted to Oshino Shinobu in How often do you guys do a clean install of your OS
Pretty much whenever something breaks, or when I switch to a new drive for my OS.
-
 iJarbus got a reaction from NinjaJc01 in Can't clear CMOS - No POST - MSI 970 Gaming
Have you tried using the clean CMOS buttons on the motherboard rather than playing with the battery, their should be something in your manual with how to it, it'll be something like a physical button or some pins to bridge.
-
 iJarbus got a reaction from SonicSoundVW in Flushing a rigid loop before building?
I've found have a couple of barb fittings and bit of flexible tubbing helpful for filling and draining but I wouldn't worry about compression fittings if it's only temporary, just my two cents though.
-
iJarbus reacted to theereal in Stories with people who claim they know everything about PC's?
I think you can download ram drive though, but not the same thing
-
iJarbus reacted to Raichuboy17 in Going to have a white and X color Enthoo Primo build
Basically, but it wouldn't be TOO expensive. probably under 500. my limit would be 600 for all the water cooling components (I won't use angled fittings because I A. Don't like how they look B. they are unnecessarily expensive and C. I have a heat gun anyway)
-
 iJarbus got a reaction from Raichuboy17 in Going to have a white and X color Enthoo Primo build
Maybe a nice sky blue or electric blue could look good?
-

-
 iJarbus got a reaction from C_Mike in Visualization of CPU vs GPU...using Paintballs?
To add to this as well, one time on Tested(a tech website/channel that Adam is a part of) Adam on a podcast told the story of how Jammie originally gave him his first job in special effects but eventually Adam left to go work for ILM partly because he couldn't stand working with Jammie. He then backed this up with the usual they don't really like each other as friends but work well together and have respect for each other.
-
iJarbus reacted to ProdigyzMined in Corsair K70 RGB w/ Cherry MX Brown Switches Review!
So, the time has come. I've been using this keyboard for just over a month, and I have to say it is quite the centerpiece of my desk. Coming from the rubber dome switches on my old Logitech G110, this was a huge improvement. But can I justify the $169.99 price tag? That depends on what you're looking for in a keyboard, and how much you care about some of the features the K70 boasts. Lets go over the pros and cons.
Pros:
Genuine Cherry MX Brown switches. Great for typing, good for gaming. We'll go over the switches in more detail later. Solid brushed aluminum build. Looks gorgeous, when it's not dirty. Comes with a 'rubberized' wrist rest. Nice inclusion. Adjustable feet at both the front and the back of the keyboard. Lighting is beautiful. The clear switches spread the light evenly between keys. Corsair Utility Engine (CUE) has come a long way. There are now basic settings for lighting like ripples, type lighting and a rainbow wave. Media controls. I refuse to use a keyboard without them after my Logitech G110, so this was a big one for me. Braided cable. Cons:
CUE is a long way from perfect. I can get it to work with Steam about 50% of the time, and the other half of the time it crashes and I'm stuck with a static rainbow wave. Only way to fix is to reconnect the keyboard or restart the computer. Custom lighting is still not very intuitive, and there is still a large learning curve. Stability is the largest issue that needs fixing, the crashes are extremely annoying as they also slow down the launch of many games. Braided cable is super thick and very stiff. Does not want to stay where you put it, even after bending. Brightness control and Windows lock buttons participate in foreground lighting, but remain white no matter what the background lighting color is set to. 'Rubberized' wrist rest is not very rubberized. I was expecting a very soft rubber, like you would find on a bike's handlebars. Instead, it is like a soft touch plastic. Bit disappointed here. As I'm sure you've heard, there really aren't 16.8 million colors per key. That is a con, but not a huge one. As long as the animations are relatively fast, you won't be able to notice any 'blocky' color change. Brown's are a lot louder than I thought they'd be. I'd like to talk about the MX Brown switches for a minute as well. Coming from rubber dome, there was a pretty steep learning curve just getting used to these switches. There is a lot more key travel than with the rubber dome, and they make a lot of noise. This is a definite downside. The actuation itself is very quiet, but the keys are extremely loud when they bottom out. Louder than I'd expected. Not a huge deal, but I record and do a lot of night gaming in a small house with a lot of sleeping people, so it can get in the way sometimes. They are very snappy though, never had a problem with a key registering my stroke, minus when I don't get above the actuation point. Happy with them overall.
Conclusion:
When I found this K70 in stock at Best Buy, I had no hesitation and jumped on it immediately. I'm very happy with this keyboard, though it has it's flaws. The RGB lighting is kickass, as is the beautiful brushed aluminum finish just makes this keyboard gorgeous. I'm sure a lot of you were expecting hate for the new Corsair logo, but I honestly don't dislike it enough to add it to the cons. It's really not that bad. It is unfortunate that CUE is in the state that it is, as it's the only major problem I have with the K70. As an owner of the Corsair M65 RGB (review) and the K70 RGB, CUE is pretty important. Hopefully Corsair can tidy it up and improve stability in the near future.
Final rating:
Build Quality: 9/10
Software: 6/10
Features: 9/10
OVERALL: 8/10
-
 iJarbus got a reaction from Captain Marshmellowz in Need Help: Which system would you spend your hard earned money on.
If it was me I would go for the i3 since at that budget it is the better choice, Since like you said your trying to sell it to people who don't know much about PC's and think all i5 are much better than all i3's (I still remember the days when this was me) I would say go with the i5, just to add as a selling point.
-
 iJarbus got a reaction from Lord_Karango17 in Project Endeavour - Water cooling
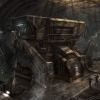
OK guys here we are the completed build, as requested I have a fair few photos, please pardon the quality of them since the only camera I have is my iPhone. This will be the full build log and in a few days when I have got my overclocks sorted and stable I'll be posting those and some bench marking scores. I'd also like to thank Linus Tech Tips and JayzTwoCents for both providing incredibly helpful guides and to my dad for helping me with the build and for sharing his knowledge and tricks on plumbing up radiator systems (he's an mechanic by trade).
Just some photos of my systems prior to the loop going in.
Well here we go, I have to say at this point I am wondering at this point what I have gotten my self into.
I started by removing my air cooler which was relatively painless, just a few screws and some methylated spirits to clean of the thermal paste. I've also taken out my GPU at this point.
OK this is where I'm realy starting to feel out of my depth, I've now started to remove the stock cooler and put on the waterblock and I can tell you that at this point I was fair old worried about killing my card. I successfully installed the water block though so in my mind the most worrying part was over.
Installing the CPU block was no more or less difficult than installing and other cooler, just put on the bracket, apply thermal compound, ect. Positioning the tubing was where things started to get interesting. I decided on a loop order which doesn't sound that logical but remember that there is only a 1-2 degree difference between the hottest and coldest part on the loop so I went for what was convenient and looked good. The order is Res -> pump -> Rad -> CPU -> GPU -> Res. I am lucky building in a case like the Entho Primo since it is very well thought out in terms of mounting points and it's shear size, I have been able to run tubing behind the drives.
Well it was bound to happen, I made a mistake when ordering some of the parts, just before I ordered my parts the tubing I was going to get ran out of stock so I had to go with a different size (3/4" to 5/8" tubing) I did change the compression fittings on the parts list but I forgot to change the barb fittings. This isn't a large mistake all things considered since I just heated up the tubing and put it on the barb. (sorry no photos on this one)
Pump mounting got a but creative, what happened is that when the pump was directing stuck on to the pump mount it passed on to many vibrations to that case becoming well to loud. What my dad and I decided on was using a cable tie to suspend the pump and using a massive twist tie to pull the pump out of the way so that is doesn't hit the side panel.
Well after all the work the system is finally up and running, the leak test went off without a hitch and is currently very quite and I still have some fan setting optimization to do. I can say the photos don't do it justice and so far I'm very happy. Thanks to everyone who's followed this far and I should have some benchmarks and temps up soon.
-
 iJarbus got a reaction from mikeeginger in Project Endeavour - Water cooling
OK guys here we are the completed build, as requested I have a fair few photos, please pardon the quality of them since the only camera I have is my iPhone. This will be the full build log and in a few days when I have got my overclocks sorted and stable I'll be posting those and some bench marking scores. I'd also like to thank Linus Tech Tips and JayzTwoCents for both providing incredibly helpful guides and to my dad for helping me with the build and for sharing his knowledge and tricks on plumbing up radiator systems (he's an mechanic by trade).
Just some photos of my systems prior to the loop going in.
Well here we go, I have to say at this point I am wondering at this point what I have gotten my self into.
I started by removing my air cooler which was relatively painless, just a few screws and some methylated spirits to clean of the thermal paste. I've also taken out my GPU at this point.
OK this is where I'm realy starting to feel out of my depth, I've now started to remove the stock cooler and put on the waterblock and I can tell you that at this point I was fair old worried about killing my card. I successfully installed the water block though so in my mind the most worrying part was over.
Installing the CPU block was no more or less difficult than installing and other cooler, just put on the bracket, apply thermal compound, ect. Positioning the tubing was where things started to get interesting. I decided on a loop order which doesn't sound that logical but remember that there is only a 1-2 degree difference between the hottest and coldest part on the loop so I went for what was convenient and looked good. The order is Res -> pump -> Rad -> CPU -> GPU -> Res. I am lucky building in a case like the Entho Primo since it is very well thought out in terms of mounting points and it's shear size, I have been able to run tubing behind the drives.
Well it was bound to happen, I made a mistake when ordering some of the parts, just before I ordered my parts the tubing I was going to get ran out of stock so I had to go with a different size (3/4" to 5/8" tubing) I did change the compression fittings on the parts list but I forgot to change the barb fittings. This isn't a large mistake all things considered since I just heated up the tubing and put it on the barb. (sorry no photos on this one)
Pump mounting got a but creative, what happened is that when the pump was directing stuck on to the pump mount it passed on to many vibrations to that case becoming well to loud. What my dad and I decided on was using a cable tie to suspend the pump and using a massive twist tie to pull the pump out of the way so that is doesn't hit the side panel.
Well after all the work the system is finally up and running, the leak test went off without a hitch and is currently very quite and I still have some fan setting optimization to do. I can say the photos don't do it justice and so far I'm very happy. Thanks to everyone who's followed this far and I should have some benchmarks and temps up soon.
-
 iJarbus got a reaction from perestrojka in Project Endeavour - Water cooling
OK guys here we are the completed build, as requested I have a fair few photos, please pardon the quality of them since the only camera I have is my iPhone. This will be the full build log and in a few days when I have got my overclocks sorted and stable I'll be posting those and some bench marking scores. I'd also like to thank Linus Tech Tips and JayzTwoCents for both providing incredibly helpful guides and to my dad for helping me with the build and for sharing his knowledge and tricks on plumbing up radiator systems (he's an mechanic by trade).
Just some photos of my systems prior to the loop going in.
Well here we go, I have to say at this point I am wondering at this point what I have gotten my self into.
I started by removing my air cooler which was relatively painless, just a few screws and some methylated spirits to clean of the thermal paste. I've also taken out my GPU at this point.
OK this is where I'm realy starting to feel out of my depth, I've now started to remove the stock cooler and put on the waterblock and I can tell you that at this point I was fair old worried about killing my card. I successfully installed the water block though so in my mind the most worrying part was over.
Installing the CPU block was no more or less difficult than installing and other cooler, just put on the bracket, apply thermal compound, ect. Positioning the tubing was where things started to get interesting. I decided on a loop order which doesn't sound that logical but remember that there is only a 1-2 degree difference between the hottest and coldest part on the loop so I went for what was convenient and looked good. The order is Res -> pump -> Rad -> CPU -> GPU -> Res. I am lucky building in a case like the Entho Primo since it is very well thought out in terms of mounting points and it's shear size, I have been able to run tubing behind the drives.
Well it was bound to happen, I made a mistake when ordering some of the parts, just before I ordered my parts the tubing I was going to get ran out of stock so I had to go with a different size (3/4" to 5/8" tubing) I did change the compression fittings on the parts list but I forgot to change the barb fittings. This isn't a large mistake all things considered since I just heated up the tubing and put it on the barb. (sorry no photos on this one)
Pump mounting got a but creative, what happened is that when the pump was directing stuck on to the pump mount it passed on to many vibrations to that case becoming well to loud. What my dad and I decided on was using a cable tie to suspend the pump and using a massive twist tie to pull the pump out of the way so that is doesn't hit the side panel.
Well after all the work the system is finally up and running, the leak test went off without a hitch and is currently very quite and I still have some fan setting optimization to do. I can say the photos don't do it justice and so far I'm very happy. Thanks to everyone who's followed this far and I should have some benchmarks and temps up soon.
-
iJarbus reacted to Badger906 in Should nvidia refund 970 users? [Straw poll]
wait you've got the point wrong. nvidia never lied about the ram or #ramgate. it still has 4gb ram so there's no comeback on that.
they "lied" about the specs specifically the number of Rops. and in their defence it wasn't a direct lie, the specs given to retailers and tester where the part that was wrong.
Now I'm not being a fan boy as I'm not and I think they did wrong either way.
but common how many people here bought a 970 because of its Rop count...? nobody everyone bought it because if how well it benchmarked! so everyone who's moaning has still got the card they bought based on review samples.
-
iJarbus reacted to simson0606 in Should nvidia refund 970 users? [Straw poll]
nope, i can understand why it happened, but for the people who generally buy them, it won't make any difference.
BUT!: they should change the packaging and advertisement, and be honest about what happened so new buyers know what's going on(even if it makes the card less attractive (IYKWIM ))
-
iJarbus got a reaction from Lord_Karango17 in Project Endeavour - Water cooling
Hello everyone, sorry for no update for a few days I've been crazy busy with school, work and this build. I'll put up all the photos and write a much more in depth build log. So far though the parts arrived Tuesday, and I strted the build then, unfortunately I didn't get it finished that night. Last night was the final night I got it finished and filled, it's currently still doing a lack test (so far so good) and I should be doing the first boot tonight. Thanks to everyone who has checked this out and I should have a much more complete build log tonight.
-
 iJarbus got a reaction from Aw27 in Project Endeavour - Water cooling
OK guys an update, the parts haven't arrived today and it's Friday night over here so looks like I will be waiting till next week to start the build, possibly later in the week depending how school goes.
-
 iJarbus got a reaction from AltexChris in Project Endeavour - Water cooling
Hello everyone, thought I' start a build log for my first dip into the water cooling world. So I Built my current rig about a month or two ago with the plan to do a full water cooling loop, I didn't do a build log of that mainly because I forgot to take pictures but this time I am going to be documenting everything. So first some specs of my current build.
CPU: i5 4690K
Motherboard: Asus Maximus VII Ranger RAM: 8GB Corsair Vengeance Pro GPU: MSI GeForce GTX 970 Gaming 4GB Case: Phanteks Enthoo Primo Storage: Samsung 840 EVO Series 120GB SSD, 500GB WD HDD PSU: Be Quiet! Straight Power 10 800W CM Power Supply Cooling: Cryorig H5 Universal CPU Cooler(for now) So now I have decided to install a full water cooling loop, I ordered all the parts yesterday and I should be doing the build this weekend, I'll be sure to keep this thread posted with updates as soon as I can.


