


Tim3Shift3r
-
Posts
62 -
Joined
-
Last visited
Reputation Activity
-

 Tim3Shift3r got a reaction from NinjaJc01 in Thread For Tech Quickie Video Suggestions
Does the cluster size of you storage drive affect your speed (?)
-

 Tim3Shift3r reacted to killtothis in Free game keys
Didn't see the point in making a separate thread, I have some Wildstar guest passes.
NVUKXV67IU9H4O4KUAF2
SGCZD363SWBZMDUWXUSG
16BIQ64RYPNWWVCON3A0
Their are some restrictions on these which can be viewed at the following link:
http://www.wildstar-online.com/uk/news/guest-passes/
-
 Tim3Shift3r got a reaction from razor767 in Free game keys
I bought the Humble Bundle E3 ticket bundle, but I am not interested in all of the games, so some of you are lucky, i will leave the keys down below.
Magicka Wizard Wars Exclusive Staff and Blade PV348-DF0K5-EQNJA
for this one you need Magicka game because its an add-on
Age of Empires II HD Edition: The Forgotten Expansion KW4ZZ-KITEV-6N9T9
Age of Empires II DLC, original game needed
Company of Heroes QB00Y-G7AHR-LYYD2
SMITE Loki Pack PCLK345D9E7E50602
SMITE Xbox One Closed Beta KRM4P-FHYKX-9GX27-VG2KC-VGVVZ
World of Tanks Invite Code RMSZD-XB46S-54NH2-2YHYC
World of Warships Closed Beta Key F93KM-Z36RY-AS5A4-M2PTN on the North American (NA) server only.
World of Warships Bonus Content M539B-FT4DV-NZBEP-X9CYP on the North American (NA) server only.
Warframe 7-day Credit and Affinity Booster Packs E1AE-3F85-5D3A-EED3
Twitch Turbo M288GCZDRNPZFFKD Code expires 7/1/2016.
WildStar Standard Edition GKDB0X2CU4G7QT3UM0VB This key expires on 12/31/2015.
I hope I can make some of you happy with one or more keys
Post a comment below if you used a key, this to make it easier for all of us.
-
 Tim3Shift3r got a reaction from Alef in Free game keys
I bought the Humble Bundle E3 ticket bundle, but I am not interested in all of the games, so some of you are lucky, i will leave the keys down below.
Magicka Wizard Wars Exclusive Staff and Blade PV348-DF0K5-EQNJA
for this one you need Magicka game because its an add-on
Age of Empires II HD Edition: The Forgotten Expansion KW4ZZ-KITEV-6N9T9
Age of Empires II DLC, original game needed
Company of Heroes QB00Y-G7AHR-LYYD2
SMITE Loki Pack PCLK345D9E7E50602
SMITE Xbox One Closed Beta KRM4P-FHYKX-9GX27-VG2KC-VGVVZ
World of Tanks Invite Code RMSZD-XB46S-54NH2-2YHYC
World of Warships Closed Beta Key F93KM-Z36RY-AS5A4-M2PTN on the North American (NA) server only.
World of Warships Bonus Content M539B-FT4DV-NZBEP-X9CYP on the North American (NA) server only.
Warframe 7-day Credit and Affinity Booster Packs E1AE-3F85-5D3A-EED3
Twitch Turbo M288GCZDRNPZFFKD Code expires 7/1/2016.
WildStar Standard Edition GKDB0X2CU4G7QT3UM0VB This key expires on 12/31/2015.
I hope I can make some of you happy with one or more keys
Post a comment below if you used a key, this to make it easier for all of us.
-
 Tim3Shift3r got a reaction from Sumsar in Free game keys
I bought the Humble Bundle E3 ticket bundle, but I am not interested in all of the games, so some of you are lucky, i will leave the keys down below.
Magicka Wizard Wars Exclusive Staff and Blade PV348-DF0K5-EQNJA
for this one you need Magicka game because its an add-on
Age of Empires II HD Edition: The Forgotten Expansion KW4ZZ-KITEV-6N9T9
Age of Empires II DLC, original game needed
Company of Heroes QB00Y-G7AHR-LYYD2
SMITE Loki Pack PCLK345D9E7E50602
SMITE Xbox One Closed Beta KRM4P-FHYKX-9GX27-VG2KC-VGVVZ
World of Tanks Invite Code RMSZD-XB46S-54NH2-2YHYC
World of Warships Closed Beta Key F93KM-Z36RY-AS5A4-M2PTN on the North American (NA) server only.
World of Warships Bonus Content M539B-FT4DV-NZBEP-X9CYP on the North American (NA) server only.
Warframe 7-day Credit and Affinity Booster Packs E1AE-3F85-5D3A-EED3
Twitch Turbo M288GCZDRNPZFFKD Code expires 7/1/2016.
WildStar Standard Edition GKDB0X2CU4G7QT3UM0VB This key expires on 12/31/2015.
I hope I can make some of you happy with one or more keys
Post a comment below if you used a key, this to make it easier for all of us.
-
 Tim3Shift3r got a reaction from minibois in Free game keys
I bought the Humble Bundle E3 ticket bundle, but I am not interested in all of the games, so some of you are lucky, i will leave the keys down below.
Magicka Wizard Wars Exclusive Staff and Blade PV348-DF0K5-EQNJA
for this one you need Magicka game because its an add-on
Age of Empires II HD Edition: The Forgotten Expansion KW4ZZ-KITEV-6N9T9
Age of Empires II DLC, original game needed
Company of Heroes QB00Y-G7AHR-LYYD2
SMITE Loki Pack PCLK345D9E7E50602
SMITE Xbox One Closed Beta KRM4P-FHYKX-9GX27-VG2KC-VGVVZ
World of Tanks Invite Code RMSZD-XB46S-54NH2-2YHYC
World of Warships Closed Beta Key F93KM-Z36RY-AS5A4-M2PTN on the North American (NA) server only.
World of Warships Bonus Content M539B-FT4DV-NZBEP-X9CYP on the North American (NA) server only.
Warframe 7-day Credit and Affinity Booster Packs E1AE-3F85-5D3A-EED3
Twitch Turbo M288GCZDRNPZFFKD Code expires 7/1/2016.
WildStar Standard Edition GKDB0X2CU4G7QT3UM0VB This key expires on 12/31/2015.
I hope I can make some of you happy with one or more keys
Post a comment below if you used a key, this to make it easier for all of us.
-
 Tim3Shift3r got a reaction from CornOnJacob in Pebble Watchface - WAN show
For people with a Pebble Smart watch that wants a bit more WAN show every week I made this, Pebble watchface:
http://www.watchface-generator.de/wf/20140630/wanshow_1/
I made this because I was searching for an easy way to make watchfaces for my pebble.
I found the page watchface-generator.de , don't worry its in English, and it is a nice an easy way to make it.
I made a Pebble watchface of the WAN show as example, go check it out, and make your own if you want
edit: with example picture down below.
-
 Tim3Shift3r got a reaction from Nineshadow in Pebble Watchface - WAN show
For people with a Pebble Smart watch that wants a bit more WAN show every week I made this, Pebble watchface:
http://www.watchface-generator.de/wf/20140630/wanshow_1/
I made this because I was searching for an easy way to make watchfaces for my pebble.
I found the page watchface-generator.de , don't worry its in English, and it is a nice an easy way to make it.
I made a Pebble watchface of the WAN show as example, go check it out, and make your own if you want
edit: with example picture down below.
-
Tim3Shift3r reacted to ToddK in Prj2 'Downtown' - [COMPLETED]
*** Update: Final specs:
Gigabyte GA-Z97X-SLI motherboard
Cooler Master Nepton 280L AIO cooler
Cooler Master v1200 PSU
2x140mm Cooler Master Jetflo fans
3x120mm Cooler Master white led Jetflo fans
2x12" white Darkside led strips
Intel i3-4130 CPU
120 Gb Adata M.2 SSD
Case: I don't know
Sapphire R9 270x GPU
8Gb HyperX Fury RAM
***
Hi all, just looking to share a project I started.
I've been watching a lot of case modding. I'm amazed with what's out there and what people have done. After some minor pimping of my own pc I got the idea for the following project.
Basically I'm looking to make a computer tower look like an architectural model. Googling that you can see what I'm thinking about.
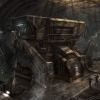
Being that the parts inside are older I got the idea to make the insides look like an old boiler room.
After working through a few sketches I came up with the following.
From there dug into this nasty old box.
I gutted the box.
And added some 'creative' cable management.
And created a template to hold some 120mm fans.
And got some fans installed. Still some room for a slim rad should I want to go that route.
Created frames for both sides of the box.
Including cutting a window for the left side panel.
Papered the back and grabbed some old cathodes for the 'light box'.
And with the acrylic window in place was ready for some testing.
The initial cardboard mock up was looking pretty good.
Picked up some crafter's foam and started refining the mock ups.
NOW I was starting to get somewhere.
Finished up the right panel.
Then started duplicating on the left.
The right side will be a simpler back-lit painted acrylic window. The left side allows a view into the 'boiler room'.
Still lots to do, but the concept is coming together.
Admittedly this is a bit of a budget build right now. Most of the budget is going into the esthetics rather than parts at this time. We'll see how things play out to see what gets upgraded inside.
-
 Tim3Shift3r got a reaction from Eyal in [Build Log] The Define Project (it's like the never ending story... c'mon inside!)
backgrounds and lighting looks good -
-
 Tim3Shift3r got a reaction from bootleggerzero in ** CLOSED ** HUGE Computex Giveaway Sponsored by WD and Steiger Dynamics
Good stuff, and ty WD
-
Tim3Shift3r reacted to F.A.T. in First Scratch Build - ECS MODMEN CONTEST
After this I went on with the polycarbonate plates. I wanted these to sink into the frame nicely so I had to cut away the edges. which meant..... One big mess ;) !
I cut away on every side of the plates 1mm of material so the frame (which is 1mm thick) will fit exactly.
Here you can see that I’m cutting the poly carbonate plates. I fixed them so I can easily cut away a straight line. you won’t see the suface when the plate is fit into the frame.
I gave both of the plates the same frosted texture. The light of the LED’s will spread nice and evenly because of this surface texture. It wil diffuse the light.
I used my diamantpowder tool to scratch the surface. It takes quite some time but I was really pleased with the results.
Difference in surface textures.
lots of work ;) ..
Takes a long time...
Also a small testplate of aluminium.
When I finished both of the plates I could glue them with 2 components glue.
On the backplate there will be the harddisk. This will be covered by another smaller plate. there will be a gap where the cables can enter and exit the harddisk. In this smaller plate I will also apply LED’s so it matches the design.
I made a harddisk holder from aluminium angled profile.
Meanwhile my kitchen table looked like this... ;)
Here you can see the harddisk plate with the LED’s.
In the frontplate I will add some LED’s this makes the build more exciting when the computer is turned on.
Here you can see 4 LED’s, soldered and (ofcourse) tested ;) !
These are the LED’s in the base of the Build.
I fixed the LED’s in the base with.... a lot !!! of glue.... Not so pretty but, it works ;).
Here you can see how I attached the adaptor to the base.
Anddd... its gone.
The poly carbonate front plate exists out of a lot of small pieces all put togeter. All of the key features on the motherboard have their own modified ‘sockets’.
Here you can see I disfigured a Pico PSU ;) . I wanted to make a case for the PSU and sleeve the cables with paracord to make it look really nice.
Here you can see where the cables are suppost to come out of.
This is the RAM- cooler I made. 2 small plates which cover up the RAM. The top is made of poly carbonate and I will add 2 LED’s there so the RAM will light up.
Finally the frontplate is coming together.
Ofcourse the Fan also had to go through a lot in this Build.
I took an old fan apart and made it shorter. Don’t worry... It will look nice in the end ;).
Taking the fan apart...
I made a small groove in the CPU cooler so the fan fits in perfectly.
Than finishing touches, spraypainting the fan.
This is the moment where I put all of the small components together to make the build complete.
Here you can see that the LED’s are in place and soldered.
First test run...
Luckily everything worked! Now I had to keep all of the cables in place because there is only limited space left on the sides of the case. (I used hot glue to secure some cables... I know.. not pretty ;) )
First time putting everyting together!!
Putting everything together with, glue ‘my-best-friend’ after this build ;). The cables haven’t got sleeves yet.
After fitting in the motherboard, I started building everything up.
Clicking everything together and sleeving the cables. I spraypainted the sata cable silver.
Here you can see the lack of space for the cabels ;). I was very happy that everything fitted !
The front and backplate of the build are attached to each other by 4 small screws. So the motherboard hangs in place in the build.
This build is especially very compact. It is 22cm high, and the case surrounding the motherboard is 19,5 x 19,5 cm and 2cm thick.
-
Tim3Shift3r reacted to alpenwasser in First Scratch Build - ECS MODMEN CONTEST
Modding is about creativity and workmanship above all else (at least in my book).
If there happens to be some awesome hardware in it, then great, if not, then it
doesn't really matter as long as the rest is up to par. You can never save a bad
mod with great hardware, whereas no uber-system is required to have a great mod.
-
 Tim3Shift3r got a reaction from F.A.T. in First Scratch Build - ECS MODMEN CONTEST
Nice dutch build, with more build log pictures than i saw on tweakers.net
-
Tim3Shift3r reacted to F.A.T. in First Scratch Build - ECS MODMEN CONTEST
Since being a goldsmith has not so much to do with making a computer, I have been busy making a piece of jewellery I could wear at the computex ;) . A silver keyboard ring with my initials on it. If you would like to see how I work as a goldsmith....again.... just scroll down ;) !
I made a wax ‘Ideal’ keyboard key and casted in brass. Then I made a rubber mould and made more wax keys.
These keys were casted in silver, so you can mass produce silver keys ;) !
Here you can see the casts.
This is what I want to engrave.
First finish the keys.
My logo.
I still had 3 tiny diamonds which I will set in the ring.
Here you can see different surface techniques.
I have enneald the silver so I can bend the material easily
Then bend the silver and solder it together.
To make the ring round you have to hammer it.
To make the backside of the ring more interesting I have stamped my initials in the silver plate.
First I started with drawing on my logo. I made a ‘light’ engraving with my milling tool (sort of dremel).
To cut away the logo I used a engraving tool.
These 2 elements will be the frame of the ring, I will have to solder them together.
A silver plate that goes across the gap so the keys will stay in place when I lay them on, and solder them.
After you solder the silver there are a lot of oxides, so I always use a chemical to clean the material. It makes the silver look snow white.
Cut away the extra material.
One of the diamonds, they are so tiny!
Soldering everything together.
I wanted the letters and my logo to stand out more, so I used a chemical which makes the silver go black. If you sand the material afterwards the lower parts will not be schratched so will stay black.
Now only finishing and than set the stones.
And the final result!!!!
Hope you like it!
I also made a few goodies with me to Taiwan to hand out to people there. It was a very interesting day ;) !
The lasercutter.
First a few testplates.
The real stuff ;) !
The lasercut goodies :)
Interesting day :D !
I’m very happy with how the build turned out! If I would have had more time and knowledge that I now have, I would have perfected it.
But I’m already thinking about my next project, so maybe soon there will be a new buildlog ;) !
-
Tim3Shift3r reacted to PBaines in Custom Water Cooled Desk - 56k warning. Lotsa Pictures! *Now with Table of Contents*
Firstly though, Big thank you to my sponsors
Performance PCS
http://www.performance-pcs.com/
Mayhems Coolant
http://www.mayhems.co.uk/front/
Computer Lounge
http://www.computerlounge.co.nz/
Table of Contents
Update One Here
Update Two Here
Update Three Here
Update Four Here
Update Five Here
Update Six Here
Update Seven Here
Update Eight Here
Update Nine Here
Update Ten Here
Update Eleven Here
Update Twelve Here
Update Thirteen Here
Update Fourteen Here
So it begins!!
For those who wish to have a look at the sketchup model for this desk,
I have uploaded it to here
https://dl.dropboxusercontent.com/u/97695353/desk%20final.skp
You can download Sketchup here if you do not have it
http://www.sketchup.com/download
Conceptual design
Here is what the timber looks like. Is native NZ Rimu. Please excuse the end one with the bird poo, that will be sanded off in due course. bloody sparrows in the shed >.<
Cut some of the pieces to length of 650, after everything has been glued together will refine the length to 600
Tools for the job. PVA glue, biscuits. annnd a... Biscuit cutter? (who cares about its real name biscuit cutter sounds cool)
As you can see, there is some light inbetween the boards, so a nice plane on areas will help close those gaps up
Some fellow putting the biscuits into their grooves after a nice layers of PVA Glue.
All clamped up, with some weights on the timber to stop it from setting wonky
This here is ONE side to the draw unit
Had to take the pieces to school and use the planer to make the edges all smooth, and to take any imperfections out
Here are the two horizontal supports for the desk, which the one on the left will be at the front as it has the toe bit on it. Sanded down with lovely wet and dry sandpaper to give it a baby smooth finish
This is what happens once you get a nice plane
drilling out the holes for the dowels to go in, 1mm larger then the dowel so that the glue sets better
Once all holes drilled its time to start gluing them in place, and setting everything up to be cramped together
Now she is cramped, the draw body is setting, and now it is time to make the draws them selves
Here are the draw fronts cut a little oversize just to be safe, not sanded or thicknessed or anything yet
My small wee thicknesser working its magic on the draw fronts, boy does this puppy make a mess!!
currently have two racks installed at the moment, start from the bottom and work your way up. Doing one at a time to make sure everything fits perfectly on the first time!
These are the draw sides, just some MDF which I will be painting matte black. Think it is somewhere around 12-13mm thick.
The box of which the draws will be just sitting there for a test fit, have to make sure that it sits on the sliders properly
And here are the sides and front/back for the two bottom draws going to school to get everything cut to length properly and use that lovely big planner (note to self, buy one of those big planners as they make life so much easier)
Bruce one of the pet lambs thought he would come up and see what's up. Was more interested in sticking his head in boxes around the shed though lol
Since the thicknesser I used at school had a few chips in the blade (GRRR) spent about an hour belt sanding the sides to make all the imperfections go away, belt was a 'used' 120 grit piece
Time to smoothen the sides up and then further make sure there are no ridges because you can certainly feel if there is anything wrong with a certain spot if the rest is smooth! This was I think around a 80 grit on a circular sander
After happy with the piece of timber, it was time to move to the 240 grit wet/dry. After 5 minutes of nice, slow and steady sanding. I can assure you that there was much pleasure in rubbing my hand around the timber... my GOD it is smooth.
So this is what it looked like before sanding
And this is what a few minutes of 240 grit wet/dry does
All the pieces have now been sanded down to get rid of all imperfections that I could
Sam and I discussing what to do next.
GOOD MAN SAM! That's right, have to have the aluminium rods for the 'files' to sit on
All cut to length and the ends filed down
All is well
both ends in, and the file fits. Looks like my measuring was correct
Sam now bored and reflecting on life as it is
Predrilling holes for the sides to be nailed to the Side of the FRONT/BACK
Both sides done
Add a line of glue for extra support
Straightened it up and nailed em all in!
Now to do the next side
Can't forget to add the rails in when putting the other side on!!
Predrilled the holes and put the nails in ready to smack em along the bottom.
Here is the draw unit in some decent light Still have to get the draw front on too.
Time to screw the rail sliders for the draw on. Firstly I pre drilled the hole with a very small drill bit, just to prevent any cracking of the MDF then in the screw goes!
Here is the bottom draw front, and after some 360 wet/dry. You can see the shiny'ness, it is so smooth
Since I cannot do any more draws till I get some more custom wood, thought I would be useful and get the other sides legs sorted. So found some nice pieces of more Rimu, which will be thicknessed down a bit, and will router the edges too
Ran them through the thicknesser, got hit in the face by a few flying chips. Lucky my safety glasses protected my eyes
So now both pieces are lovely and square/flat/straight
Time to clean up the mess made by thicknessing...
Clamping a bead across the front piece and the draw, to make sure that everything is lined up
All lined up, happy with it. Now let us screw it on!
The final result
Time to sort out the spacing between each draw, found the right packers.
Everything has been cut up to length and sanded down for the middle draw unit.
Let us commence the building!
Time to get the runners aligned and sorted too...
Getting the spacing sorted with the new packer, and then clamping and screwing again
Same as before of how to do the attach the front piece to the box
Only one left to do!
Here is my beast and the box of bits
Time to router the edges of the legs! Here are the two bits that I will be using (note: the big one is for the legs, the small one is for a bevel around the outside of the draws)
I hadn't used a router before, so got mum to show me how to do it,
We were left with a good result, nice smooth. lovely.
Now time to sand the edges down so that there isn't a "step" from the flat piece to the curve (above pic)
Routered the edge of the LEFT and RIGHT side of all the draws and the BOTTOM of the bottom draw.
Once I finished sanding the saw marks, the curve had kinda disappeared, no problems. Will re-router it again
The timber I am using is recycled stuff, so there are a few nail holes here and there. Clever trick, use the saw dust of the rimu that has been collected in the table saw bin and mix with PVA glue to make a nice formula that will fill in the holes, dry hard. and then be the most unnoticeable filler!
After the pva had dried, this is what we were left with
The chisel then got it off to a nice smooth finish that will get sanded down, it might not look perfect, but you can notice a hole in a timber from a mile away
Now it's time to get a piece of wood sorted for the side rail connecting the two legs together
Might as well get the back runner cut while I am here!
-
Tim3Shift3r reacted to PBaines in Custom Water Cooled Desk - 56k warning. Lotsa Pictures! *Now with Table of Contents*
what we first start off with is making some guideline holes so that we are able to do better cuts with the jigsaw allowing us to change angles easily.
Mid way cutting.
now time to lay it on, and all is good.
a wild cat appears! "hmmmm, can i fit through here?"
"Why yes! of course I can!"
marking out the other side, and repeating the process
both sides have been completed and look very nice. they are BOTH yet to be routered so that the grill sits in flush. but that is next days off job.
I quickly decided that I would do my 5.25" holes, one for a Blu Ray drive (basically just incase i need it for whatever case. And no, I couldn't be bothered getting a USB one), and also will be fitted with a Fan Controller too.
Here is the plan...
Holes done
all cut out
with a bit of extra little rasping (wood equivalent of a file) they fit nice and snug! Though like the rad grills. Will router a recess for them to sit flush in. If some may notice, the drives are sitting lower then centre, this is because I will probably put my power/reset buttons above the 5.25" area.
and ps, yes I know the middle piece between each 5.25" slot is weak as hell, and I understand that. If it breaks it breaks, if it doesn't it doesn't! it looks nicer with it though
Oh, and this is the glass installed
easy to remove to, simply put fingers between the two glass sheets and lift the top one up! the front bit is siliconed in place
Next update will be Wednesday of everything routered
and then theres only two holes left to do (PSU, I/O shield) and its time to d-d-d-d-d-drop the hardware in!!
Here is how I will be spacing my UP7 to the desk itself. just a few rubber spacers, that will be screwed into the desk, will have to go find some nice long thin srews while I think about it!
We start with the routering of the 480 grill rebate, so that the grill can sit nice and flush
The middle bits had to be done also, and were very difficult too as after a few cm's the router wasn't sitting flush anymore so would 'dip' as you can see in the picture where it dipped a little bit. but that's okay! it's not seen
Thinking about how I could find a packer to use that allowed an extra bit of width... duh, why not use the template to rest the router on!
Now, this is what it looked like! the rebate for the grill was done, and also i further rebated in a rectangle for the actual little hex-hole grills to sit in too
Then there was about a 2 week period where I did nothing in life but work/sleep. UNTIL my parts arrived! and I will also be getting another GTX 680 4GB too
After thinking and googling, I figured a way that I could mount my power supply tidily, by making a metal template I guess you'd call it. where you would screw the thin sheet steel to the desk so you could then be able to screw the psu in!
And then there she was. the template to cut out the... template :B
Mid way cutting it out, realised I shouldn't have cut the paper up so much as it was so hard to get the small rectangle square again!
And there it is. Not the tidiest and 100% most beautiful, but it will be painted, not seen. It will serve the purpose it was made to do _b
Time to mark out where the IO shield will be put, and also where my PSU hole will be too.
Time to do my preliminary guide holes for the jigsaw
And there it is, all nice and square!
The PSU Template works well too
Now, the one thing that bugged me the most... The PCI holes. How do do them? Do I rebate them? Do I cut out one big hole instead? I will do it individually instead and rebate me thinks..
I then proceeded to use the smallest router bit I had and rebate the groove for the PCI brackets to sit in.
Also, the top L piece of the bracket needed somewhere to sit in, so I marked the lowest point the bracket could sit, otherwise the card when in the motherboard will be on a lean and could have a dodgy connection to the PCI/E Lane
Making sure my depth was correct, I used a test bit of wood to make sure that when it came to the final piece, it was done properly.
A Perfect fit!
Just a FYI, to prevent any scratching this is how I lay the top down to do any cutting/routering etc
Now that the first PCI slots had been cut, it was time to finish the rest off
Here is how I measured the spacings for where the slots went, just an old case I chopped up!
All cuts done
Next, to square all the holes out I figured, what better way to do that, than with a Router! Least that's what I thought. The insertion of the bit went well, as soon as I itched it to the right BOOM. the middle piece of the PCI slots just snapped off.. I said a naughty word beginning with F. the next one began with C. hehe
It was time to resort to Plan B. Cut the whole damn thing out and chop the PCI bracket bit out of that old case that was in the pic above
it looks a lot tidier this way anyway, so while I am not happy the slot snapped out, I am happy with the result I guess!
So after cutting the PCI Bracket out, i gave it a quick sand and a quick paint with orange and will continue to polish it up over the next week but just wanted to test it out for the time being to make sure all was well... Guess I was just impatient and wanted to see if when everything was laid out in the desk it would all look pretty is more appropriate
PS- Hello Vita! (sheep)
After the day, I moved everything to it's little box. and covered it. Until tomorrow
-
Tim3Shift3r reacted to aortiz10 in CODE NAME LIQUID HELIX A COMPUTER DESK MOD
Decided to make a computer desk, it seems to be the up and coming style of case modding.
There are so many Rectangular desk out there i wanted to do something outside of the box.
Almost Completed Desk Build.
First I started with a idea of making a Hex sided desk in order to house my computer. After days of designing and researching what goes into a desk build created list of all that was needed inorder to make my idea become reality. The idea then evovled into much more. I then looked to Google Sketchup to design all the componets of the desk.
Used Google Sketchup to Plan out the build
Render Using Keyshot
A few days of Welding and a Plasma Cutter
http://www.youtube.com/embed/aY_94Qwx20I
Check out My Website for more Pics and Vids
http://Liquid-Helix.com
-
 Tim3Shift3r got a reaction from BigMike in Links on the forum automatically converted to affiliate links to participating retailers
Sell some cool shirts (?)
-
-
Tim3Shift3r reacted to MadMarc in Mad Marc's Rig
I didn't take any while I did the mod, here some pictures that you show how I've done it:
First you need to remove the plastic bezel from the drive:
Then I cut off the mounting clips from the aluminium cover plate:
After that you can use hot glue to glue it to the drive:
You can also try to glue a small piece of metal to the cover, so that it activates the small button (picture 1) when you press on it.
Finally you just need to make sure that it lines up with the other bay covers, some cases have multiple mounting hole to position the dvd drive
-
Tim3Shift3r reacted to MadMarc in Mad Marc's Rig
via "Computer" in the startmenu and then eject disc, but I hardly ever use it anyways
-
Tim3Shift3r reacted to Ymac in [Build Log] Ice White by Ymac
Thank you all!
just noticed I uploaded the wrong picture for the back of the case, I did the same one with a black SATA cable.
my plan is to MDPC sleeve it all! :)
but I'm stuck with an MDPC SATA data cable which is impossible to route without destroying the heatshrink.
also, I don't know if to go heatshrinkles or with heatshrink. because heatsrinkles is easier and cheaper, but the look of heatshrink (especially MDPC) make it more..professional.
any suggestions?
-
Tim3Shift3r reacted to FreyrGauti in My Fortress Build - Watercooled
Here's a "buildlog" of my Fortress, but more like a timeline from when I bought it to how it is now. I was upgrading from a Core2Duo 8400 on a Maximus Formula X38 board housed in a CM 690.
23 March 2011 New parts: Core i7 2600, Asus P8P67 Pro, 8GB Supertalent 1333Mhz memory. Reused from previous build: GTX 460 OC, Corsair HX620, Scythe Mugen 2, Mushkin Callisto Deluxe 40Gb SSD OS drive and various data drives.
29.6.2011 Here I've upgraded to a AX1200 PSU, another GTX 460 OC and a Crucial C300 SSD.
16.11.2012 Upgrade time, bought a MSI Z77 M-Power, i7 3770k, Corsair Dominator 2x8Gb 1600Mhz, Corsair H100 cooler and a GTX 680. I had also somewhere inbetween bought a seccond Crucial C300 128GB ssd and have them running in Raid 0.
14.4.2013 Bought a seccond GTX 680, installed individually sleeved psu cables from IceModz, sleeved my IO cables and the 120mm fan cable. Also tried painting the letters on the gpu's.
17.08.2013 - Installed a windowed side panel, build is now finished.
Silverstone Fortress FT02, MSI Z77 M-Power, i7 3770k, Corsair H100, 2x8Gb Corsair Dominators 1600Mhz, 2x GTX 680 in SLI, 2x 128Gb Crucial C300 in raid 0, 320Gb data drive, Corsair AX1200 PSU with individually sleeved cables.
Future plans/wishlist is a Crucial M500 960Gb SSD as the only drive in the machine and a custom watercooling loop using the Alphacool Nexxxos 540mm.
8.11.2013
Watercooling time...
New stuffs
Teardown time!
GPU teardown...
CPU Block installed
Hardware install...
Leaktest
Some cable"management"
Finished product
Specs now are
Silverstone Fortress FT02, MSI Z77 M-Power, i7 3770k, Corsair H100, 2x8Gb Corsair Dominators 1600Mhz, 2x GTX 680 in SLI, Crucial M500 960GB SSD, Corsair AX1200 PSU with individually sleeved cables.
Watercooling specs:
Alphacool Nexxxos 540mm Rad, 2x EK-FC680 GTX+ Acetal+Nickel GPU blocks, EK-Supremacy Acetal+Nickel CPU block, various EK 90° and 45° adaptors with EK compression fittings, Tygon E-1000 3/8" ID - 5/8" OD tubing, XSPC Dual Bay D5 Res with Swifttech variable pump, Mayhems Pastel Yellow coolant.
So...what do you think?


