

ivory2k19
-
Posts
39 -
Joined
-
Last visited
1 Follower
ivory2k19's Achievements
")
-
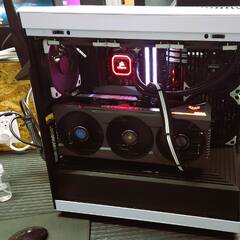
Last but not least, the font and assembly of the switch When everything was dry, it was time for the assembly and the final photos. Specs: Intel i5 8400 G.Skill 16gb Trident Z 3400 ram Samsung 970 EVO 1TB ASUS ROG Strix B360 I-Gaming Seasonic Focus SGX-750 Intel Arc 770 16gb Alphacool Eisbear Aurora Solo Alphacool Eiszapfen 16/10 Alphacool NexXxos XT55 Full Copper 140mm Alphacool 16/10 soft tube It's not an overkill setup but it's enough for MWIII... Feel free to leave me feedback, I want to improve and raise my work to a higher level than before, another project is planned but the worklog will not be added until 2024. Until then, thanks for reading!

-
Last update, sorry it took a bit longer but time was a bit tight. My first attempts with a resin printer are finally behind me. It was all plug and play but you could certainly improve the quality even further, but I have a little more time now. There is a very helpful tool from Alphacool, namely a laser fitting, so you can mark the holes and don't have to measure everything by hand. The hardware was fitted in CAD, but the test before the paint had to be done if it hadn't fitted in there I wouldn't have been ready in time for the release. I also have to show some hardware unfortunately not very up-to-date but enough. A big thank you goes out to Seasonic, Alphacool and Thermal Grizzly who supported me here. thanks guys!!!!! After all the cut-outs came the colour. I decided on a graffiti colour from the Kobra brand, which covers very well and doesn't cost too much. The colour is a little lighter than I thought, but I'm still working on it. The whole thing has already been sanded briefly with fine sandpaper and can be sprayed without primer. The box was just too clean, so I simply used black paint, a piece of fabric and some modelling paint.
-
Good evening, I have to say right away that the project is already finished, unfortunately there was no time to write the worklog for those who want to spoil themselves here are the links to my social media pages: https://www.facebook.com/profile.php?id=10006370629243 https://www.instagram.com/modlab_official/ https://www.reddit.com/user/modLab_official I would like to take this opportunity to thank my 3 sponsors: https://shop.alphacool.com/en/shop/ - https://seasonic.com - https://www.thermal-grizzly.com I had the idea of building a PC in the box some time ago, so I had already made a start by cutting 2x 80mm holes in the base to place fans and repainting the box black. As it was supposed to be an HTPC at the time, I didn't like the green colour as it didn't fit on my sideboard. To attach the GPU to the side, a bracket was needed, which was even left over from the HWLuxx Modding Contest from 2021 as it was a bit too small to hold the GPU properly at the time, but luckily I'm not one to throw everything in the bin straight away because "you can still use it" ... The box was therefore perforated further because the hoses had to come out somewhere, the radiator had to be attached to the box and also the bracket for the GPU, and there were also buttons and various holes for cables etc. Yes I know a countersink is not a tool to make the holes bigger but unfortunately there was nothing at hand to do the job.... xD Fortunately, the case was almost complete, the mainboard tray, a holder for the power supply and a box that illuminates the MWlll logo were still missing. This was simply made using 3D printing, very easy and quick without losing much time. The assembly of the 3D parts was very easy as it was not possible to drill more holes, so everything was fixed with small neodymium magnets to keep everything fixed and yet flexible, because you never know if you might have to move one or the other part. Anyone who knows these magnets knows that they are very strong and hold a lot. For the tray, 4 per stadium foot were planned, but 2 were completely sufficient. So-called M3 inserts were used to attach the mainboard; these are melted into the holes provided in the plastic using a soldering iron. Now that should be it once more updates follow. Have a nice evening and thanks for reading. @admin as always if the links are not allowed just let me know.
-
Good evening LTT It has been quiet around me for a long time now, but there are new ideas and plans to supply the scene of cultivated modding with new content. You know there is a new Call of Duty in the starting blocks and that is Modern Warfare 3. The series will be continued and from what I have seen everything will be a little different than before, including my career the last few months. I left my team to reinvent myself and to go new ways in terms of "content creation", as well as to be able to develop a bit and to plan my way as I want to entertain the readers and also the small but very nice community I have. To put it briefly, back to the roots and realise clean worklogs and unique projects again. But enough from me now to the actual topic. Now I'm 32, it's been some time since I actively played eSports.... But it all started back then with CoD 4 Prestige 10 and some hours of game time were on the account then. Towards the end I came by chance to a German clan called Modern Primitives from then on it really started EU far place 1 later then also in the MLG (Game Battles) far in front with it.... Ahhhh those were good times but unfortunately too early to become a pro because it was not as big as it is now. The story would go on but then my intro is getting too long so if you want me to reminisce a bit more let me know. That's why I had the idea to realise a project for the release that has accompanied me for a long time - a CoD tribute mod. There was actually a different concept that looked like this: Here, everything should actually sit on a 540mm radi and also be cooled by it. The mainboard sits in the box and the GPU as you can see outside, because unfortunately there is no room for a dual or triple fan GPU in the box. The power supply sits in the back to distribute the weight a little. An Alphacool Rise Flat Reservoir with D5 pump was planned as the AGP pump combo. But things always turn out a little different than expected, due to leaving the team I wanted to take a break until 2024, but a friend of mine said come on and do something for the release of CoD MW3. That's why I came up with this almost new idea: Now everything finds its place in and on the ammunition box. The whole thing is cooled by a Alphacool Eisbaer Aurora Solo and a 55mm 140mm Nexxos. The GPU unfortunately doesn't have room inside as it will be an Intel Arc A770 16GB that I'm currently using. Unfortunately I can't find a 4060 single fan GPU, so there would be room for one inside. The interior is designed in such a way that it sticks to the box with strong magnets, so it is also possible to place everything inside in a second moment. The power supply will be a Seasonic Focus SGX-750, this thing is so small it's amazing how much technology fits into so little space. The progress is already a bit further, but I didn't know if I should write the worklog before or after the release, but it makes more sense to document the progress bit by bit, so stay tuned, an update will follow soon. Until then, have a nice rest of the week. @Admin if the links are not allowed I will delete them.
-
Good morning, this worklog will be a little different than normal this time I want to start with the final photos. At this point a big thank you to my team the Italian Extreme Modders and the sponsors for the support: MSI - S3+ Technologys - Intel - Alphacool - Cooler Master - PC Hardware & Modding - Tifoo Galvanik The project was supposed to be finished for the CMWS22, but since we were in the middle of building a house, other priorities were set and now the project has come to an end. Unfortunately, there was not much time to write a worklog in between, but we will make up for it as best we can. Shortly to the concept, a Cooler Master SL600M was built, a very big and also very nice case! The hardware was rotated by 45° so that the connections point upwards and can also be routed beyond the lid. The GPU + 2.5" SSDs got their own place at the back of the case with their own window to not hide them. The case came with 2x 200mm fans in the bottom, these were moved to the back to cool a radiator, but the front got a cutout to mount the AGB and 3x 120 mm Cooler Master Master Fan SF120M. A custom loop with 2 X-Flow radiators cools the CPU and RAM, but the GPU is not integrated as there is no block for the MSI RTX 3060 GamingX 12G. The radiators as well as the connectors have been gold plated with Tifoo products, I have to say it was more difficult than it seemed at first but I have learned a lot and if something like this becomes an issue again then I would do things differently here. But now to the final photos of the project @admin if the links are not allowed just report them then they will be removed thanks.
-
Hi LTT it was a bit more stressful than I thought but now I can show you a small part of the project the rest will follow I just have to upload all the photos and find them in the right order.
-
Hello Community It was quiet for a long time but there is still a project for the CMWS22 at the end of the year... Since this championship has been suspended for the last year, it is even more difficult to deliver this year, because everyone is really keen on the event. This year we will compete with a tower mod, but I'm more into scatchbuilds, so I just don't have the time this year. As you can see from the title, the project is called n°79, some of you might know that the number 79 stands for the precious metal gold in the periodic table. The case is a Cooler Master MasterCase SL600M a really nice and spacious case, since I am already a bit more advanced in modifying the case I can only show you the first draft this was created about a month ago when the case arrived and the planning of the entire project started it showed that this can not really work so there were changes. The colour concept should correspond to the theme of gold, black and grey, it should not appear too overloaded, so the case retains its colour and is "only" modified and gets accents of gold. The concept with the PSU at the bottom of the case and the turned tray remains, but for reasons of space the tray is moved a little to the middle of the case and the GPU moves to the other side, so it can be longer and thicker because the sheet metal wall of the case is cut out at the back so that the GPU can breathe. In addition, the glass panel can remain and does not have to be redesigned. Since the case only supports 360mm radiators on the upper and lower side, my idea is to place them at the front and rear, since this way it is easy to get to the connections to connect all cables in the lid and thus they are not visible and can be led out at the top of the rear, but this requires a rough intervention in the entire case structure. There are 2 large 200mm fans included in the scope of delivery, which go into the rear and ventilate the radiator and hardware inside. I don't want to reveal too much, so here are some photos of the hardware. As already mentioned, the Cooler Master MasterCase SL600M in the grey version The whole thing is powered by a Cooler Master Masterwatt 650, although I'm not sure yet whether that will be enough and whether I won't stock up on this one, which was lying around at home and offered itself to me. The fans to be mounted in the front of the case are not RGB fans but still very high quality, namely the Cooler Master Masterfan SF120M. The mainboard used here is an MSI MPG Z690 Edge Wifi DDR4 Ram and SSD this time come from a Swiss company called S3+ The CPU here is an Intel® Core™ i5-12400 processor. At this point I would also like to thank all the sponsors MSI, Intel, Cooler Master, S3+ and of course my Tam the Italy Extreme Modders! More updates will follow soon stay tuned
-
Thanks!!! The voting of the CMWS is now online and if you think the project is good, I would be happy about your vote ... To the voting @ Admin if the spam or not wanted please delete thanks! Wish you a nice evening
- 31 replies
-
- 1
-

-
- scratchbuild
- asus
- (and 3 more)
-
Yes maybe... xD thx buddy for the feedback!
- 31 replies
-
- 2
-
-
- scratchbuild
- asus
- (and 3 more)
-
HI LTT All the bends are done, all the lights are installed and tested and I had a lot of trouble putting it in to the Terminal but now i am excited to show you the final results ... This are the final pics of my Projekt: +1 Hacking-Skill required Specs: Board: ASUS ROG STRIX B-360 I-GAMING CPU: Intel Core I5-8400 GPU: Gainward GeForce GTX 1650 Pegasus OC 4GB GDDR6 SSD: Samsung Evo 970 NVMe SSD Ram: G.Skill Trident Z RGB DDR4-3000 16 GB PSU: Cooler Master V750 Gold V2 , 80 Plus Gold Cooling: Block/Pump/: Alphacool Eisbaer Aurora Reservoir: Custom made glass bottle. Radiator: 2x EK-Coolstream PE 240 GPU-Block: EK-VGA Supremacy Fan: 4x Noctua Chromax Low profile Keyboard: DZ60 custom made with Cherry Mx blue switches. Mouse: USB-Touchpad Screen: SUNFOUNDER 10.1’’ IPS Monitor Everything is inside and works like a real PC. You can play games like Fallout with it or hack it like a real terminal, but only with Windows as the operating system... xD The specs are not the same as other mods or the best gaming rigs, I understand, but this is all about the terminal itself and manufacturing, the hardware is secondary here. Thank you for for taking the time to read my work log, i wish you a nice weekend.
- 31 replies
-
- 11
-
-
- scratchbuild
- asus
- (and 3 more)
-
Good evening LTT it has been quiet here for a long time but the time to maintain all worklogs was not there, the project is finished because the deadline of the CMWS20 was January 31, only the worklog in the Cooler Master Forum was maintained because of the competition but that is not to say this one remains unfinished ... Then let's start ... Do you still remember the GTX 1650, right? Otherwise take a closer look at this in the previous post because now my version comes ... Many know the fusion cores in the game to operate the power armor if not this is one: My GPU should pick up on this color theme a bit, as the GPU should also have a water block and there is no full block for such a card I decided to build a hybrid cooling solution. As you can see, a radial fan is used to direct the fresh air back through some pipes. In addition, color and light should not be missing... Since the VGA block is a bit older and is no longer produced, the frame didn't fit, but that wasn't a problem, it was simply designed so that it fits ... xD And so it looks almost finished now, some color accents are missing but they you can see later. So now there are a little more photos and small details unfortunately my Galaxy S7 died and some photos are missing but with what are there it should be understandable. As you can remember, a glass bottle is also used that has to be held by something that is this construction here. I designed it in AutoCAD, then printed it using 3D printing, sanded it, primed and then painted it red. Unfortunately this is the photo of a first draft, the bottle sat so tightly inside that the holder tore so I was allowed to print a holder that then fit. Well that can happen xD This is also the first draft on the cover, a Bitspower multi-link fitting glued using a bulkhead nipple nut.Unfortunately, it turned out that everything would be too high for the inside of the terminals, so a 90 ° angle adapter was installed. At the lower end, the hole was sanded here a T adapter was then glued using 2-component epoxy glue. There is also some light so that you can see the orange water well and 4 LEDs are built into the ground and 1 LED that flickers you know the atomic fallout ... The LEDs also come from model making and are actually for model railways, they are supplied with 5V from the power supply. Hmm, unfortunately I can't upload the video here, but you can also see it on my Instagram Acc, I link it here if that is not desired, please let me know... [url=https://www.instagram.com/p/CJjlMBSogp0/?utm_source=ig_web_copy_link]To the flickering video of the bottle[/url] The Vault-Tec logo also got its lighting, but without flickering that would have been a bit too much Now it was the turn of the keyboard, which shouldn't stay white but fit the overall concept. This effect was easy to create - you take some acrylic paint with a lot of water, mix it well and apply it with a brush, dab the rest with a cloth or piece of paper and the dirty look of the keyboard is done. The switches are sponsored by Cherry and on their Youtube channel they have a video series on how to build a custom keyboard yourself and from that I have the configuration tool that the keyboard works properly afterwards. The front of the terminal has a leather-like texture like in the game, but I'm very happy with my result. Prepare everything first, then draw where the frame of the screen is, then you can begin. Using a sponge and one component putty, I dabbed a nice texture on the front of the terminal, when everything was textured it was time for the first coat of paint. I'm very satisfied with the result. That was finally the last step at the terminal itself, now it was time to assemble the inside. As you can see on the fans are a bit rusted and have been adapted as well as the two radiators, you can't see that later but I know it's there ... xD In red the hinges for attaching the front with yellow painted cap nuts. Now it comes to the hardware, a Intel Core I5-8400 that sits on an ASUS ROG STRIX B-360 I-GAMING is cooled with an Alphacool Eisbaer Aurora. The design is the pump / block combination to which you can connect your custom loop, for the connection of the waterloop I decided to use the hard tubes because they take up less space and are rigid and cannot kink. You can see here for the first time how tight it all gets in the end ... xD The whole thing is fired up with a Cooler Master V750 Gold V2, since it was built for the CMWS20, a Cooler Master product must be visibly installed. Now there was only the function test in front of me and the last photo shoot, but I'll show you the pictures tomorrow ... Good evening and see you tomorrow ...
- 31 replies
-
- 4
-
-
- scratchbuild
- asus
- (and 3 more)
-
Hi LTT There is a big update as I finally take the time to keep writing. It's been a bit quiet here lately but that doesn't mean I haven't done anything ... Unfortunately, Covid-19 does not make my life easy for me I was in domestic isolation for 20 days, South Tyrol was also the red zone and there were curfews, so I was not allowed to leave my village, which means that nothing went ahead with the paint job because my buddy doesn't live in the same village. Well it doesn't matter then everything else was next like the keyboard, 3D printing etc. The first coat of primer revealed to me some bigger holes and scratches that couldn't stay, I will save you the whole process of sanding the parts that we had enough of it You know the frame of the keyboard was silver that didn't seem to fit me so it was painted black so it fits better now. The first draft of the keyboard case...... After 10 attempts, the desired result finally came from my printer ... Yes, my printer could use a little fine adjustment, but there is still time after the project ... Now all i have to do is glue and paint, then that's ready. When the case was ready it was time to solder the keys. No big deal with a little Youtube everything went smoothly Cherry made a DIY video on the subject of custom keyboard that I can only recommend. Since I was now at home, I found time to find a new GPU for the project, a Gainward GTX 1650 Pegasus which, as you can see, is much smaller and fits perfectly into the terminal because it doesn't cover everything like the Asus GTX 1060 Strix mine previous choice. I bought the GPU on Ebay for a good price and since no gaming monitor is controlled but a full HD display, the card is sufficient in every respect. The card should get a special cooling, since I still had a VGA block from EKWB at home i want to use it now. To do this, first disassemble the card into individual parts Now I noticed that the frame doesn't fit, that's a bit annoying, it has now been redrawn in the AutoCad and laser cut. What doesn't fit is made to fit ... More on the subject as soon as more images are available. The terminal should look used and be provided with rust and scratches. In game who knows it there is an apocalyptic mood and the atomic fallout is also affecting the objects, i was looking for the right techniques for a long time after a lot of searching on Google i came in the model making sector numerous tutorials later began the first attempts... I found the right colors around here in a toy shop that also sells different models, the colors are from the Revell brand and water-soluble, so perfect for me if something goes wrong you can wipe it off again. In addition, there were some coarse and fine brushes, toothpicks to mix and most importantly a sponge. Some paint is picked up with the coarse brush and wiped off on a piece of cardboard so that there is only very little paint on the brush then you can start working on the corners this technique is called dry brushing. A before and after comparison. Let everything dry once then the grate ... For this, the paint was diluted with water and the sponge was used to create an uneven layer with the small dabs and, importantly, again little paint, the result can be seen ... Of course, a healthy patina should not be missing on the Holotape. Like everything else, it was first sanded and primed, then applied with a brush the individual colors then wiped over with a cloth and heavily thinned black acrylic paint. The screws are still missing It then finally went on with the painting, unfortunately only the inside so that everything can be assembled and still gets its final painting on the outside that means filling and sanding.... Unfortunately we only noticed later that we could have thinned the paint a bit so there was a light orange peel but it could be straightened with bows (1500 grit). Sure, you could have painted it again to get a smooth and beautiful finish, but since the terminal isn't new, the rag and acrylic paint have all of the pieces worked over to make them look too dirty. So it doesn't matter if they have small holes or scratches The method with the rag and the large brush was also used for the mainboard tray. A little glimpse of what it looks like in assembly... I could have tidied the table, but I hope you will forgive me So there is more that I can show you but I'm too tired for that today... Let me know what you think of the project! Thanks for reading and see you soon
- 31 replies
-
- 2
-
-
- scratchbuild
- asus
- (and 3 more)
-
Hi LTT The first layer was painted blue, but when painting the parts it was noticed that the primer absorbs a little more paint than expected, so one layer unfortunately is not enough, it has to be painted twice so that the color is even and clean. The side parts have already been prepared with putty again, only I'm not sure whether we should prime the putty again or not, but that can only be tried next time. The time has come The parts for the keyboard were available ... Thanks to David from candyskeys.com for his patience. We wrote what felt like 1000 emails back and forth because many things were not available due to Corona. Luckily it worked now and I can finally get on with the keyboard. Unfortunately, I have to tell you some bad news due to the increasing number of cases here in South Tyrol (Italy), certain communities are now red zones, which means I can only move on my work and within my home community so there are unfortunately no further updates on Painting because that's not around the corner from me, unfortunately. But there are at least updates for the construction of the keyboard...
- 31 replies
-
- 3
-
-
- scratchbuild
- asus
- (and 3 more)
-
Hi LTT A little update on the project, unfortunately, just a bit boring, but it has to be. A lot of preparation like sinking the screws in the aluminum ... Another point is preparing the bracket for my GPU, it was planned to use my Asus 1060 Strix, but you can see that the GPU is too long and will later cover the glass bottle... An alternative would be a 1650, 1660 Mini ITX, if anyone wants to sell one please let me know, thanks. It was time to glue and prepare the first parts to start painting later, a lot of work and sanding is not my favorite job I noticed... an insight into how the front is connected to the terminal. The aluminum angles are glued to the front and then screwed to the terminal and glued. In the past few days everything was primed and some parts got some paint. A good friend has a paint booth and I can use it for free Next step, control all parts if there a no big scratches or holes to fill, if everything is okay i will begin with the final color. The problem with the fan is now solved... Noctua sends me 4 Chromax black low profile for this I would like to thank you very much!! And that's why I made my first unboxing video, more videos will follow. So if you want to follow my channel I would be happy Stay tuned...
- 31 replies
-
- 2
-
-
- scratchbuild
- asus
- (and 3 more)
-
 ivory2k19 changed their profile photo
 -
Hi LTT Today i will show you the next special thing of the project the new water tank It is a glass bottle in Nuka Cola style. The work goes on, but I am still missing some parts, many things are unfortunately not in stock, such as the keyboard, so I have to do everything else first. I've already made the hole for the connection below, just need to glue the tube for the fitting and the label then the tank should be ready More pictures soon, I've already taken more of my work, but I don't have the time to write the work log at the moment, so it is only a small update Now I need to print parts for the tank and find the rest of the hardware I need and decide what to do with my graphics card. I think it's too long for that build I wish you a nice Sunday, see you soon
- 31 replies
-
- 3
-
-
- scratchbuild
- asus
- (and 3 more)


.jpg.f233fae39a5322b7f0dac34f299e2e3e.jpg)


.jpg.9f49d3684ba79372ed208baa0c26db38.jpg)
.jpg.0152f9539302471cf767798c10b640c5.jpg)
.jpg.fcce30cd005828b3816c54a73b9e739c.jpg)
.jpg.cdd1c0beb9ec6ed690c4d92b35d010e6.jpg)
.jpg.225eae3357ca988f42786821fff6d324.jpg)
.jpg.4954478596fa1c3312341663411297a9.jpg)
.jpg.801886c583ca76b9beb65fd3523ecd9a.jpg)
.jpg.1dd1d47874d5211087bb789dfefb01f8.jpg)
.jpg.add01abed9284c0764c0bafd7525289d.jpg)


.jpg.9fd2e06736ea2928f82d2fce6994da19.jpg)
.jpg.c2c5798bc20136359b7de5b295b49a8e.jpg)


.jpg.f2bcab6143c0e187b628f21f5f5b21e6.jpg)
.jpg.a975a5430601ff56bc39c4a99a176662.jpg)
.jpg.43b43cab621e864598662b9e61259ff6.jpg)
.jpg.f32e122eaf0fddf516ff7ad2f5ef7096.jpg)
.jpg.2a13c956126e04262beea3b40f3d9b48.jpg)
.jpg.0407e1830ef44d23b116286783ca94b6.jpg)
.jpg.be27f0eb8d10f6fa5ad009d4096cf495.jpg)
.jpg.ee2f518a24688153d344a5165c798f7a.jpg)
.jpg.e681e1d789996b3937c0cd566dfdabe5.jpg)


.jpg.6af5e3b24247cf818115220476cc2309.jpg)

