


Cre8 Modding
-
Posts
127 -
Joined
-
Last visited
Reputation Activity
-

 Cre8 Modding got a reaction from A1200 in Water Cooled Y40
For 2023 I am kicking things off with a build in the new Hyte Y40, I've previously built in their Y60 and I thought it would be nice to follow that one up with something similar.
Hyte was kind enough to send over a white version of the case and on first impressions, it looks lovely! I will be throwing a full hardline system in this with the following;
MSI Z690 Carbon Wifi
Intel 13900K
32GB of TeamGroup Vulcan DDR5 5200
RTX 3080 Founders Edition
be quiet Dark Power Pro 1200W
Seagate FireCudas 520/530 approx 10TB total
I will get to those main components later as they are still mixed between other systems. The Alphacool parts are on their way, and again thank you to them for supporting this build, when they arrive I will throw some photos up. I'm quite excited as I will be putting in one of Alphacool's new Core distro plates to the side area of the Y40. I am a little concerned about how deep this is going to be though, a 30mm rad, fan, and then the distro in front of that so it will step out a lot from the rear of the case.
Until the water-cooling parts get here though, here's some shots of the Y40!
-
 Cre8 Modding got a reaction from RollinLower in Water Cooled Y40
For 2023 I am kicking things off with a build in the new Hyte Y40, I've previously built in their Y60 and I thought it would be nice to follow that one up with something similar.
Hyte was kind enough to send over a white version of the case and on first impressions, it looks lovely! I will be throwing a full hardline system in this with the following;
MSI Z690 Carbon Wifi
Intel 13900K
32GB of TeamGroup Vulcan DDR5 5200
RTX 3080 Founders Edition
be quiet Dark Power Pro 1200W
Seagate FireCudas 520/530 approx 10TB total
I will get to those main components later as they are still mixed between other systems. The Alphacool parts are on their way, and again thank you to them for supporting this build, when they arrive I will throw some photos up. I'm quite excited as I will be putting in one of Alphacool's new Core distro plates to the side area of the Y40. I am a little concerned about how deep this is going to be though, a 30mm rad, fan, and then the distro in front of that so it will step out a lot from the rear of the case.
Until the water-cooling parts get here though, here's some shots of the Y40!
-
Cre8 Modding got a reaction from A1200 in Silent Base 802 Build
So the screen is ready and I can move on to getting some of the other bits now installed. I'm actually rushing to get this one finished due to current work commitments. I am rather ahead of these images but I have been cracking on with the actual build over taking a load of photos so my apologies!
First the 45mm and 30mm radiators and be quiet! Light Wings fans, these are great with the included hubs, and it's easy to tie everything together for onboard lighting control.
Next is my graphics card an RTX 3080, with that Alphacool block it is going to look great in this build.
I'm hoping to have this finished by the end of next week in between shifts so I will update more as soon as I can!
-
 Cre8 Modding got a reaction from DJ46 in Silent Base 802 Build
So the screen is ready and I can move on to getting some of the other bits now installed. I'm actually rushing to get this one finished due to current work commitments. I am rather ahead of these images but I have been cracking on with the actual build over taking a load of photos so my apologies!
First the 45mm and 30mm radiators and be quiet! Light Wings fans, these are great with the included hubs, and it's easy to tie everything together for onboard lighting control.
Next is my graphics card an RTX 3080, with that Alphacool block it is going to look great in this build.
I'm hoping to have this finished by the end of next week in between shifts so I will update more as soon as I can!
-
Cre8 Modding got a reaction from DJ46 in Silent Base 802 Build
Ok so moving on quite quickly!
Time to strip down the Silent Base ready to install the screen before I get on with anything else. This involved cutting away the HDD drive bay mounts on the motherboard tray and it's really good to be able to remove this from the case in its entirety.
I didn't grab any photos during the process but the new Waveshare screen and 3D-printed mount are now in place and fit perfectly. The HDMI connector and USB power cables are also in ready to go.
I've also got the motherboard and power supply installed at this point. Next, it will be time to move on to all the water-cooling parts!
-
Cre8 Modding got a reaction from DJ46 in Silent Base 802 Build
Hey all, hope you are doing well!
It's time for another build to wrap up 2022 and so I am putting together a build in one of my favorite cases, the be quiet! Silent Base 802.
A huge thank you to be quiet! for sending over this case and a few other bits to get this one going. To start I have the Silent Base and a Dark Power Pro 1200W to throw into this system.
For this build I want to incorporate a display, in the same way I did for be quiets! 20th Anniversary build recently while I was at KitGuru and keep the theme again black and orange throughout, but a little darker than the Pure Base 500FX looked.
Moving on, the motherboard I will be using is the MSI Z690 Carbon Wifi, crammed with a 12900K and full of Seagate FireCuda 510s and 530s, for a total of 8TB of fast NVME storage, and as you can see I will be going with Alphacool as usual for my cooling on this build.
Again a huge thank you to Alphacool for sending over everything I am going to need for this build including an Apex VPP pump, a ST30, and an XT45 radiator, both at 360mm, a 30 Series GPU block, and all-black Eiszapfen fittings. There will be a mixture of hard and soft tubing here as the pump will be located in the spacious PSU shroud and have bulkhead pass-throughs to the GPU and radiators.
So il get some work done and be back with an update soon! -
Cre8 Modding got a reaction from A1200 in Pan Slim
Forgive me guys, I've been so busy and have been cracking on with this build without posting an update, so here's a quick one to bring us up to date.
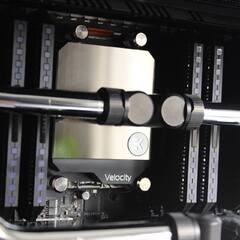
To shift some parts around to different builds I needed to get this at least functioning so I could use it while the build is still in progress. In order to do this meant that it has been tubed up, filled, and tested, and the EK coolant in this looks great. The CPU to res is annoying me as it's not perfectly straight so I might replace this with a slightly angled tube.
I've been using the stock PSU cables until the new custom ones arrive, just to get the system to a usable state. My last update, I was in the middle of painting the ASUS B550-I board, well that's now done to tie in with the rest of the white and overall I am really happy with the color scheme on this one.
With the powder coating done, the mods to the rear really blend in. I've still got to build a cover for the rear-mounted SSD that sits where the PSU originally was.
Back around the front, my new front panel has arrived. I designed this in my CNC software and sent it off to be laser cut. The mirror panel is a perfect fit and will be great for the smart display going in the front.
Space is getting a little tight. I've now got to design and print the third section of the panel mount that will hide the rear of the screen and cables. This will take a little while as I am still trying to find the HDMI and USB cables that will suit my needs. I'm after a 50CM HDMI female to male that I can loop around to the back of the case into the GPU. I will also need to sort the USB power, but I have some options for that. The power button is also located within the screen mount and fits really well. I just need to adjust the depth by half an mm with washers so that the button has enough pressure to activate when pressed.
So for now that's it, cables are being ordered today and CableMod has kindly decided to sponsor this build. Further, il get the 3D printing sorted and ready for a close to final update, and a lot of better images. I'm just trying to clear projects now, this and the Y60 are in the way and I need them done and ready for filming for KitGuru!
-
Cre8 Modding got a reaction from DJ46 in Pan Slim
Forgive me guys, I've been so busy and have been cracking on with this build without posting an update, so here's a quick one to bring us up to date.
To shift some parts around to different builds I needed to get this at least functioning so I could use it while the build is still in progress. In order to do this meant that it has been tubed up, filled, and tested, and the EK coolant in this looks great. The CPU to res is annoying me as it's not perfectly straight so I might replace this with a slightly angled tube.
I've been using the stock PSU cables until the new custom ones arrive, just to get the system to a usable state. My last update, I was in the middle of painting the ASUS B550-I board, well that's now done to tie in with the rest of the white and overall I am really happy with the color scheme on this one.
With the powder coating done, the mods to the rear really blend in. I've still got to build a cover for the rear-mounted SSD that sits where the PSU originally was.
Back around the front, my new front panel has arrived. I designed this in my CNC software and sent it off to be laser cut. The mirror panel is a perfect fit and will be great for the smart display going in the front.
Space is getting a little tight. I've now got to design and print the third section of the panel mount that will hide the rear of the screen and cables. This will take a little while as I am still trying to find the HDMI and USB cables that will suit my needs. I'm after a 50CM HDMI female to male that I can loop around to the back of the case into the GPU. I will also need to sort the USB power, but I have some options for that. The power button is also located within the screen mount and fits really well. I just need to adjust the depth by half an mm with washers so that the button has enough pressure to activate when pressed.
So for now that's it, cables are being ordered today and CableMod has kindly decided to sponsor this build. Further, il get the 3D printing sorted and ready for a close to final update, and a lot of better images. I'm just trying to clear projects now, this and the Y60 are in the way and I need them done and ready for filming for KitGuru!
-
Cre8 Modding got a reaction from DJ46 in Pan Slim
Well, we finally have the inner part of the case back from the powder coaters and it looks amazing!
The blue is exactly what I was looking for and it really makes the case pop. There's a slight issue with one part, the modified I/O plate for the GPU was painted white instead of blue so it's going back and will hold things up just a little longer sadly.
The power supply mount and GPU backplate are also ready for installing, I just need to 3D print some small standoffs for the PSU cage to make it sit evenly. Our Alphacool pump is also looking quite fine with its new white legs!
While I am waiting for the powder coating to be sorted, I have got the radiators in, the rear SSD mount and have also started stripping down the motherboard for the paint to the I/O cover. This includes the metal fan vent so this has had the paint stripped to match the silver theme.
I also have the measurements for the acrylic front panel now, so that's been drawn up with the DXF sent off to the supplier who are going to cut it for me.
So, hopefully, it won't be long before I can start putting it all together. At this point, I am torn on the top panel. As much as a large window would look good, I kind of like this as a bit of a sleeper build too, with a hint on the outside that is got something a little different on the inside,
-
Cre8 Modding got a reaction from DJ46 in Hyte Y60 Build
A small update, the GPU is now ready to be water-cooled!
Our PowerColor 5700XT Red Devil may not be the latest and greatest, buts it's a card that performs well and will not leave this system short. This system will be running 1440P comfortably, on reasonable settings for many a moon to come.
There might be a slight change to the theme though, see, this system will be used by my 13 year old son and originally he wanted a Marvel theme, but he recently saw the Timmy Parker Helios Apex Legends build and is having a change of heart. He plays a lot of Apex and so it might be the more fitting theme, we will see what he decides!
-
Cre8 Modding got a reaction from DJ46 in Hyte Y60 Build
Some progress shots then
The build has been coming along rather well over the past 24 hours or so. The first job was to strip out the Y60 as far as possible, removing the pre-installed fans, the glass, and storage bays. Removing all that glass gives us so much room to work in, airy af!
With space created, it's time to get the Dark Hero fed, with the AMD 5900X, Seagate FireCuda drives and an Alphacool XPX block to keep the CPU nice and cool. With the board ready to go, I've added the TeamGroup XCalibur RAM. and once installed, it all looks great in the Y60!
Next up were fans and radiators, I'm not sure where the radiator pictures went though
I've gone with an Alphacool NexXxos 30mm in the top and one of their XT 45 45mm for the side panel. It helps to really fill out the space and these will be provided coolant via the Eisbecher Aurora. The glass res is a chunky beast that is mounted to the be quiet! Light Wings on the 240mm radiator. I've 3D printed some little spacers for the brackets, the RGB wiring that exits the rear of the pump housing would be rubbing on the fan if these were not put in place. More fans have been added to the top, rear, and bottom compartment to completely outfit this case with 8 fans total, it's a good thing be quiet! include an RGB controller with each 3 pack, so that they can all be connected and tucked out the way in the rear of the case.
Finally to the rear, I've installed the Pure Power 11 FM to gauge how much room I will have for cable management, and to be fair there's loads of room. The fan RGB hubs will be attached to the storage sleds once I start tidying up the back end. My next job though is to get the PowerColor Red Devil 5700XT stripped down and the ALphacool block installed.
-
 Cre8 Modding got a reaction from IAmNik in Pan Slim
Time to make some headway into this build then. I've spent the day figuring out some of the things I want to do with this build so lets start making our way around some of the progress I have made. First up, let's talk a little more about the Pan Slim, its an ITX based case, but as mentioned before, could easily accommodate an ATX sized board. The case comes with two hard drive mounts but we won't be needing them and so they have been removed, next, I whipped off the top brace bar for a little easier access. The front of the Pan Slim includes 2x USB 3.0 and one Type C. Given I won't be using a lot of USB devices, this, paired with the ASUS ITX board should easily cover all my needs. I mentioned in the first post some issues with the Pan Slim, so let's cover them. By no means are these detrimental, but should a V.2 appear I would love to see some small changes made to the rear. To the right, we have our PSU mount for an SFX unit and it would be great to see this expanded to an ATX, with an SFX adapter plate included in the box. There's enough room to do this so I think it would be a great addition to the Pan Slim. Next up is probably my biggest "why" moment, the GPU mount is positioned so that the card is fitted with the backplate facing up, there's plenty of ventilation cut into the bottom of the case and so I can see why this was done. Here it would be nice to have a removable plate that can be flipped and screwed back into the case so that we have the option on which way up our card is displayed. The case can also easily accommodate ATX boards, so why not just include standoffs out of the box, it is again a small thing but would bring the Pan Slim to so many more potential customers. One nice touch is the inclusion of a riser cable for the GPU and this, a handy little box for keeping everything in its place during a build! With the minor imperfections out the way, let's dig into what's going in this build. First I have pretty much decided to go with the ASUS B550-I Gaming over an ATX for a couple of reasons, first, it makes the build a little easier and gives me more room to work with, and second because its more than adequate. Paired with the AMD 5900X and down the road, some decent cooling, it's a system that will perform so well without needing much more. Our motherboard gets all onboard storage with Seagate FireCuda NVME drives, a 530 Gen 4 1TB for Windows and a 2TB 510 for Steam. I love these drives, they perform well and being NVME means that precious space isn't wasted on bulky 2.5 solutions. The next piece of this puzzle is the PSu and I have gone for the Cooler master V850 SFX in black. I have used Cooler Master PSUs for years and along with be quiet! units, I trust them to deliver whats needed for my systems. Once everything is installed I will be going for some custom cables to keep everything nice and tidy. OK, so let's see how it's looking, the motherboard and PSU are in to give an idea of what room is left to work with. The left-hand side is getting a 240mm radiator at either 45 or 60mm thickness. There is scope to add another to the right, moving the PSU above the motherboard but then that means I have to find somewhere else to add the pump. The GPU and CPU will both be water cooled so I need to maximise the amount of cooling potential going into this, a standard thickness radiator wont cut it so the more surface area I have, the better. Now onto the more nitty-gritty parts of this. I mentioned before that the GPU is to be flipped over. The card I am potentially going to use, unless I can get my hands on a 30XX series, will be the MSI RTX 2080S Gaming Trio X. This has literally just come out of the Moto GP build and I have a new block for it so excuse the sight of it, for now, it's only being used to measure up the spacing. If I had decided to go with the standard layout, we do run into an issue, the PSU prevents the GPU from fitting properly due to the ports on the card. Going back to adding ATX PSU support, I still stand by that but maybe the Pan Slim could be made around 30-40mm wider, just to accommodate these sometimes overlooked issues we builders run into! How to flip the card then, well that's easy enough to some extent. I keep old case parts for days just like this, and sure enough, I will be able to flip it without too many issues. I have cut up an old PCIe backplate, it still needs some work but once it is filed and riveted into place, I can then cut out the rear of the case for the new one to look like it has always been there. Remember this is going to be powder coated too, so it won't look out of place with the new colours I am going for. A test fit shows just how well this will work out, but then that throws up another issue on spacing towards the motherboard. With the card sitting where I need it to be, space is tight for memory to be installed, I might have to go low profile on this one. The other reason for wanting to go for a 30XX series card is that the Alphacool blocks offer horizontal terminal options, so routing tubes will be a lot easier than with the 2080S That's where I am at for today then, next up will be planning for the front screen, cutting and modifying the case ready for powder coating. The powder coating is around a 3-week job due to how busy the guys are so then there will be a bit of a lull while I wait for it to come back. A huge thank you to AMD, ASUS, MSI, Alphacool, be quiet!, Cooler Master, and Seagate for being on board for this one! -
Cre8 Modding got a reaction from IAmNik in Pan Slim
OK, slight change of plan because this happened More soon, I promise!
-
Cre8 Modding got a reaction from IAmNik in Pan Slim
OK update time on the new IO for the Pan Slim!
So to recap, the original GPU IO had the backplate facing up, not the look I want for this build and so I had to mod the casing to what was needed. Cue donor parts from an old be quiet! Dark Base 700. I had originally used the standard set of 7 PCIe slots for this but it stepped out the slots into the case, and I wasn't happy about that. So a rethink brought me to use the vertical mount from the 700. With a little cutting, I detached the mount from the rear panel and started to clean up all the bends and edges. Compared with the original mod, this is a lot cleaner and slimmer, giving me more room to work with internally.
Then it was time to start cutting up the Pan Slim itself, removing the brackets completely ready to accept our new panel. A quick mock-up showed that a little more refining was needed to fit the new part to the case. Some more Dremel action and finally it takes shape, fitting perfectly to the case. Once this is powder coated, it won't be a noticeable modification and will blend in really well to the original case. Its glued for now and its solid, but I will be adding some rivets too.
The case is now coming along nicely. With the new slots installed you can see how I am planning to lay this one out. The Alphacool 240mm radiators are on their way but it's starting to take shape. Next up is to complete the rest of the case modifications, including the second radiator mount, the new power cable mount, the new PSU bracket, SSD mount and, a new front screen mount!
-
Cre8 Modding got a reaction from IAmNik in Pan Slim
Sorry for the delay, but time for a quick update. I'm struggling for time at the moment and this week I picked up a new role at KitGuru, so I need to get cracking on!
Right so, the Pan Slim tray is ready for powder coating, lets catch up with what happened inside it. The screen I will be using for this mod is the Waveshare 7.9 inch display and it will be housed to the front of the case. A huge shout to Alphacool for sending over a new Dremel to make this take a whole lot easier! The screen was measured up and the front panel has been cut, between the mounting holes. This is so I can 3D print the housing for the screen and use these mounts to secure it to the inner tray. The original front panel, as you may notice has gone, this is being replaced with a 2-way mirror to give a Smart Mirror effect with the screen. The power button shall remain, but I have done away with the front IO for a cleaner aesthetic
To the rear, in situ of the PSU original mounting point, I have added a 2.5 SSD cage that was not being used in a Lian Li Q58, it will allow me to add an extra Seagate BarraCuda 120 1TB SSD. The wiring for this will tuck nicely under the GPU and given the space would have just been blanked off, it makes use of this area really well. I just need to3D Print a rear blanking panel for the casing. The SSD itself will also be getting powder coated to match the theme.
Relocating the power supply for fitting an additional 240mm radiator made a lot of sense, but the original plan was to use it with an RTX 2080S, a long old card. Being able to get my hands on a 3080 FE, meant that I could move the PSU over from in front of the motherboard, to the end of the GPU, it's tight but it fits!
With the relocation, again a mod is required, more leftover parts stripped from a Q58 meant that I could use the internal power cord extension and PSU mount in this case. The mount is another part going for powder coating. There is still a little edge clean up to do on the tray, the Dremel once again came out for fitting the PSU power cable, but I have made it slightly bigger in case the powder coating is too thick and would prevent installation.
With all internal mods now done, it was time for a test fit of everything. A huge thank you to Alphacool for sending over a load of parts for this build, sadly I haven't had time to take pictures of everything but here is the build in its final mock-up state.
We have all Alphacool chrome fittings, 2x XT45 white edition radiators, 3080FE block, VPP655 Ice pump and finally...a Corsair CPU block. Yes, I'm an Alphacool guy and I did request a block from them for this build, then, I went to grab some parts and remembered I had a Corsair block that I won in a competition, and it just fits the theme so well and so I had to use it (Sorry Alphacool)
The PSU is being changed for a white version, so it's now time to make some final clean up to some edges and get it off to powder coat. Il be saving the top and bottom covers for a later date, I just need to have this part done and back so I can get it hard-lined and in use!
-
Cre8 Modding got a reaction from IAmNik in Pan Slim
A quick update while the case is still away at the powder coaters.
The RAM has come in this week, 32GB of TeamGroup Xtreem DDR4 3200. It's a beautiful kit that will fit the build theme really well and I cant wait to get it all installed! A huge thank you to TeamGroup for sending this over for me.
I've also been busy working at home creating a new studio, I recently picked up a new role at KitGuru so that has been taking up a lot of my time to get things sorted, and so there are the first shots coming out of there! a new background will be used for all future builds and videos, excited to get started
-
Cre8 Modding got a reaction from DJ46 in Pan Slim
Sorry for the delay, but time for a quick update. I'm struggling for time at the moment and this week I picked up a new role at KitGuru, so I need to get cracking on!
Right so, the Pan Slim tray is ready for powder coating, lets catch up with what happened inside it. The screen I will be using for this mod is the Waveshare 7.9 inch display and it will be housed to the front of the case. A huge shout to Alphacool for sending over a new Dremel to make this take a whole lot easier! The screen was measured up and the front panel has been cut, between the mounting holes. This is so I can 3D print the housing for the screen and use these mounts to secure it to the inner tray. The original front panel, as you may notice has gone, this is being replaced with a 2-way mirror to give a Smart Mirror effect with the screen. The power button shall remain, but I have done away with the front IO for a cleaner aesthetic
To the rear, in situ of the PSU original mounting point, I have added a 2.5 SSD cage that was not being used in a Lian Li Q58, it will allow me to add an extra Seagate BarraCuda 120 1TB SSD. The wiring for this will tuck nicely under the GPU and given the space would have just been blanked off, it makes use of this area really well. I just need to3D Print a rear blanking panel for the casing. The SSD itself will also be getting powder coated to match the theme.
Relocating the power supply for fitting an additional 240mm radiator made a lot of sense, but the original plan was to use it with an RTX 2080S, a long old card. Being able to get my hands on a 3080 FE, meant that I could move the PSU over from in front of the motherboard, to the end of the GPU, it's tight but it fits!
With the relocation, again a mod is required, more leftover parts stripped from a Q58 meant that I could use the internal power cord extension and PSU mount in this case. The mount is another part going for powder coating. There is still a little edge clean up to do on the tray, the Dremel once again came out for fitting the PSU power cable, but I have made it slightly bigger in case the powder coating is too thick and would prevent installation.
With all internal mods now done, it was time for a test fit of everything. A huge thank you to Alphacool for sending over a load of parts for this build, sadly I haven't had time to take pictures of everything but here is the build in its final mock-up state.
We have all Alphacool chrome fittings, 2x XT45 white edition radiators, 3080FE block, VPP655 Ice pump and finally...a Corsair CPU block. Yes, I'm an Alphacool guy and I did request a block from them for this build, then, I went to grab some parts and remembered I had a Corsair block that I won in a competition, and it just fits the theme so well and so I had to use it (Sorry Alphacool)
The PSU is being changed for a white version, so it's now time to make some final clean up to some edges and get it off to powder coat. Il be saving the top and bottom covers for a later date, I just need to have this part done and back so I can get it hard-lined and in use!
-
Cre8 Modding got a reaction from DJ46 in Pan Slim
Time to make some headway into this build then. I've spent the day figuring out some of the things I want to do with this build so lets start making our way around some of the progress I have made. First up, let's talk a little more about the Pan Slim, its an ITX based case, but as mentioned before, could easily accommodate an ATX sized board. The case comes with two hard drive mounts but we won't be needing them and so they have been removed, next, I whipped off the top brace bar for a little easier access. The front of the Pan Slim includes 2x USB 3.0 and one Type C. Given I won't be using a lot of USB devices, this, paired with the ASUS ITX board should easily cover all my needs. I mentioned in the first post some issues with the Pan Slim, so let's cover them. By no means are these detrimental, but should a V.2 appear I would love to see some small changes made to the rear. To the right, we have our PSU mount for an SFX unit and it would be great to see this expanded to an ATX, with an SFX adapter plate included in the box. There's enough room to do this so I think it would be a great addition to the Pan Slim. Next up is probably my biggest "why" moment, the GPU mount is positioned so that the card is fitted with the backplate facing up, there's plenty of ventilation cut into the bottom of the case and so I can see why this was done. Here it would be nice to have a removable plate that can be flipped and screwed back into the case so that we have the option on which way up our card is displayed. The case can also easily accommodate ATX boards, so why not just include standoffs out of the box, it is again a small thing but would bring the Pan Slim to so many more potential customers. One nice touch is the inclusion of a riser cable for the GPU and this, a handy little box for keeping everything in its place during a build! With the minor imperfections out the way, let's dig into what's going in this build. First I have pretty much decided to go with the ASUS B550-I Gaming over an ATX for a couple of reasons, first, it makes the build a little easier and gives me more room to work with, and second because its more than adequate. Paired with the AMD 5900X and down the road, some decent cooling, it's a system that will perform so well without needing much more. Our motherboard gets all onboard storage with Seagate FireCuda NVME drives, a 530 Gen 4 1TB for Windows and a 2TB 510 for Steam. I love these drives, they perform well and being NVME means that precious space isn't wasted on bulky 2.5 solutions. The next piece of this puzzle is the PSu and I have gone for the Cooler master V850 SFX in black. I have used Cooler Master PSUs for years and along with be quiet! units, I trust them to deliver whats needed for my systems. Once everything is installed I will be going for some custom cables to keep everything nice and tidy. OK, so let's see how it's looking, the motherboard and PSU are in to give an idea of what room is left to work with. The left-hand side is getting a 240mm radiator at either 45 or 60mm thickness. There is scope to add another to the right, moving the PSU above the motherboard but then that means I have to find somewhere else to add the pump. The GPU and CPU will both be water cooled so I need to maximise the amount of cooling potential going into this, a standard thickness radiator wont cut it so the more surface area I have, the better. Now onto the more nitty-gritty parts of this. I mentioned before that the GPU is to be flipped over. The card I am potentially going to use, unless I can get my hands on a 30XX series, will be the MSI RTX 2080S Gaming Trio X. This has literally just come out of the Moto GP build and I have a new block for it so excuse the sight of it, for now, it's only being used to measure up the spacing. If I had decided to go with the standard layout, we do run into an issue, the PSU prevents the GPU from fitting properly due to the ports on the card. Going back to adding ATX PSU support, I still stand by that but maybe the Pan Slim could be made around 30-40mm wider, just to accommodate these sometimes overlooked issues we builders run into! How to flip the card then, well that's easy enough to some extent. I keep old case parts for days just like this, and sure enough, I will be able to flip it without too many issues. I have cut up an old PCIe backplate, it still needs some work but once it is filed and riveted into place, I can then cut out the rear of the case for the new one to look like it has always been there. Remember this is going to be powder coated too, so it won't look out of place with the new colours I am going for. A test fit shows just how well this will work out, but then that throws up another issue on spacing towards the motherboard. With the card sitting where I need it to be, space is tight for memory to be installed, I might have to go low profile on this one. The other reason for wanting to go for a 30XX series card is that the Alphacool blocks offer horizontal terminal options, so routing tubes will be a lot easier than with the 2080S That's where I am at for today then, next up will be planning for the front screen, cutting and modifying the case ready for powder coating. The powder coating is around a 3-week job due to how busy the guys are so then there will be a bit of a lull while I wait for it to come back. A huge thank you to AMD, ASUS, MSI, Alphacool, be quiet!, Cooler Master, and Seagate for being on board for this one! -
Cre8 Modding got a reaction from DJ46 in Rossi - Moto GP Build
Well, here it is guys, finally done! Im so pleased with how this one turned out in the end, sure there were some problems along the way, and it's truly been a long old ride on this one! Full Spec: Case - Antec Torque Motherboard - ASUS X299 Prime Deluxe II CPU - Intel 10920X Memory - TeamGroup Delta DDR4 RGB Storage - Seagate FireCuda 510 NVME 2x 2TB GPU - MSI RTX 2080 Super Gaming X Trio Cable - Custom TTW PSU - Cooler Master V850 White Fans - Cooler Master MF120 Halo White Cooling - Custom Alphacool loop Custom powder coating 3D printed custom exhaust bracket 3D printed custom replacement front display panel featuring Valentino Rossi "46" Custom decals X299 OLED display custom animation Hope you like it, let me know! -
Cre8 Modding got a reaction from DJ46 in Pan Slim
Well, time to kick off another build!
This time out I am super excited to have Raijintek on board, kindly sending over their beautiful Pan Slim chassis. After working with Intel on the Gamer Days build, a project that used the Raijintek Enyo, I knew I wanted to try out another one of their cases. The design and craftsmanship in the Pan Slim are superb, however, it's not without its flaws, something I will come on to in a later post when we take a closer look at the case.
For now, I don't even have a project name for this, so for now it will simply be known as the Pan Slim build. I do have some ideas that I know will feature; powder coating, water cooling, a vented clear top panel, and a new look front panel incorporating a compact screen for easy access to certain programs and features.
Kicking off the build I have a few of the components already lined up, again thanks to all my partners for making this one possible! Now some of these may change and I still have the memory to sort out, there's also a temptation to throw in an ATX board in the form of the ASUS Dark Hero 8, something @orbitalwalsh did with his Pan Slim build.
For now I have the following lined up:
ASUS B550-I Gaming ITX Motherboard
Cooler Master V850 SFX PSU
Be Quiet! Light Wings 120mm
MSI RTX 2080 Super Gaming X Trio
Seagate FireCuda 510 2TB and 530 1TB NVME
Cooling as always will be from Alphacool, my go-to for all my builds
So that outlines this build to an extent, next up I will cover opening up the Pan Slim and seeing what we have to work with and start planning out some aspect of this build.
-
 Cre8 Modding got a reaction from OhioYJ in Rossi - Moto GP Build
It's done...finally!
Time for a quick teaser, more images to follow very soon!
-
Cre8 Modding got a reaction from DJ46 in Rossi - Moto GP Build
It's done...finally!
Time for a quick teaser, more images to follow very soon!
-
Cre8 Modding got a reaction from OhioYJ in Rossi - Moto GP Build
Well, the builds is sort of coming along, most of the decals are now applied, here's another teaser! Now, some things arent going well, the motherboard has decided it doesn't want to play and so ASUS are currently sorting a replacement to finish off the build. As soon as it lands il get another update out! -
 Cre8 Modding got a reaction from zogthegreat in Rossi - Moto GP Build
Well, it's been a while eh? The Moto GP build has been put on hold for a number of reasons, but it's finally time to come back to it and get moving. 2021 was a manic year for me and with other commissions and builds, this one got pushed to the side, so much so that Rossi has now even retired. With 2022 fresh, it's time I caught up with some of my personal builds but this one needed to go right back to the beginning.
My paintwork is, well, ok, ish. But after having the Intel Gamer Days build powder-coated, I decided to treat this build to the same full paint job. The whole system was covered in dust and needed stripping right down so I could send the case parts away, and now they are back ready to get cracking! The finish is beautiful on this and the RAL colour match is perfect for the theme of the build, being the 2010 M1 Yamaha.
With all the parts back, it's time to get the case built back up, and the difference the powder coating makes is beyond amazing.
There are some slight changes coming along the way from the original build, first up is a change of CPU block going with the Alphacool XPX Auroura Pro. It's a better-looking block than the black solid one in the second part of the build log.
The Monsta rads didn't fit first time round, and so Alphacool were kind enough to send over 2 45mm versions, however, for the rebuild I have managed to cram one of the Monstas in with a 45 to the front of the case.
The cables for this are from my good friend Michael Sheppard, To The Wire Mods, they are amazing and given they have spent the best part of a year in the box, its finally time to start threading them into this beast of a case, and they are perfect for the build!
So I am pretty much back to the point where the build was at a year ago, albeit with some improvements to the overall system. There's still a whole load of things I want to change but for now, at least, this system is getting the love it deserves!
-
Cre8 Modding got a reaction from DJ46 in Rossi - Moto GP Build
Well, it's been a while eh? The Moto GP build has been put on hold for a number of reasons, but it's finally time to come back to it and get moving. 2021 was a manic year for me and with other commissions and builds, this one got pushed to the side, so much so that Rossi has now even retired. With 2022 fresh, it's time I caught up with some of my personal builds but this one needed to go right back to the beginning.
My paintwork is, well, ok, ish. But after having the Intel Gamer Days build powder-coated, I decided to treat this build to the same full paint job. The whole system was covered in dust and needed stripping right down so I could send the case parts away, and now they are back ready to get cracking! The finish is beautiful on this and the RAL colour match is perfect for the theme of the build, being the 2010 M1 Yamaha.
With all the parts back, it's time to get the case built back up, and the difference the powder coating makes is beyond amazing.
There are some slight changes coming along the way from the original build, first up is a change of CPU block going with the Alphacool XPX Auroura Pro. It's a better-looking block than the black solid one in the second part of the build log.
The Monsta rads didn't fit first time round, and so Alphacool were kind enough to send over 2 45mm versions, however, for the rebuild I have managed to cram one of the Monstas in with a 45 to the front of the case.
The cables for this are from my good friend Michael Sheppard, To The Wire Mods, they are amazing and given they have spent the best part of a year in the box, its finally time to start threading them into this beast of a case, and they are perfect for the build!
So I am pretty much back to the point where the build was at a year ago, albeit with some improvements to the overall system. There's still a whole load of things I want to change but for now, at least, this system is getting the love it deserves!


