


Ross Siggers
-
Posts
866 -
Joined
-
Last visited
Reputation Activity
-

 Ross Siggers got a reaction from Psittac in Upgrading bad laptop speakers
If you really want to do it DIY, you could probably find aftermarket speakers that fitted the same space. But with limitations on power draw and diaphram size....you probably wouldn't see a huge improvement in audio. I reckon it's just a compromise made when designing the machine.
I use a Sony SRS-X2 bluetooth speaker with my laptop when I'm at home. It more than does the job, they're not too expensive. But you can go even cheaper and probably still get a better audio experience than you seem to be now.
-

 Ross Siggers reacted to colonel_mortis in 10 Years of the LTT Forum
The LTT Forum is now 10 years old! What started out as an experiment hosted in Linus's garage has now become a thriving community of tech enthusiasts, with some pretty impressive numbers, thanks in no small part to all of you!
The forum has come a long way from the incredibly unstable VBulletin 5 beta that we started out with in 2013, and I hope you will agree that it looks far better today than it did back then:
The forum exists because of its awesome community. As a small way of giving back, we're going to give away some 1 year Gold Contributor memberships, which give you Floatplane access, based on recent activity on the forum. The giveaway criteria are:
5 will be randomly assigned to the authors of posts made in the past 3 months (so your chance of winning is proportional to the number of posts you have made in the past 3 months), to give something back to everyone that makes this community awesome. Posts removed by a moderator, and posts in Test Posts, do not qualify. 10 will be randomly assigned to members who joined the forum in or before 2015 and have made at least one post on the forum in the past 3 months, to thank our most loyal members. 5 will be given to the members with the most posts that were marked as the best answer in the past 3 months, to say thanks to the members that give the most back to the community. Posts where a member marked their own post as best answer are excluded. Winners will be drawn later this week, and notified via PM by me. The full list of winners will be published here once all winners have accepted their prize.
All winners have now been contacted and received their prize
Ts&Cs:
Max one prize per user If a winner already has a Gold Contributor subscription, they will get 1 year free starting from their next billing period Current moderators and administrators, and employees of LMG or its subsidiaries, are not eligible The giveaways will be drawn in the order listed. If an ineligible user is drawn (per points 1 and 3 above), an additional winner will be drawn. Winners will have 7 days from being notified via PM to accept the prize (by replying to the PM), otherwise their prize will be redrawn under the same rules. No cash value, non-transferrable, run at our own discretion, etc. Please don't get mad if you don't win. "Past 3 months" means between 00:00 on 01 October 2022 and 23:59 on 31 December 2022 inclusive, all UTC (so it's too late to try and game the system now). "In or before 2015" means the "Joined" field on the account is before 00:00 UTC on 01 January 2016. -
.png "Funny")
 Ross Siggers got a reaction from GDRRiley in I have a Dream...The Dreamcast SFF build!
Playstation 2 build thread:
"Am I a joke to you"
👀
-
Ross Siggers got a reaction from GDRRiley in I have a Dream...The Dreamcast SFF build!
It would be less than half the time if I kept working on it consistently 😅 I mean it was complete....I just can't help tinkering and improving...
Further updates with the 3D printing;
I replaced the old mounting hardware for the GPU. They were bits of leftover Dreamcast plastic, with standoffs trimmed down and attached with epoxy resin. Ugly but functional. At least... until the heat made the epoxy go funny, and they started coming apart.
ENTER THE 3D PRINTER. Shaped blocks printed at 100% infill, so I could press brass knurled studs into them. Very similarly to how I mount the motherboard to the Dreamcast shell itself.
Much better. And sturdier.
The other thing I've printed is a more refined I take for the underside. I saw more refined, it's hard to be worse than a gaping, jagged hole 🤷🏻♂️ It funnels the air to the fan only, and blocks off and chance of air recirculating. A little tidying up on the join and it'll look smart as anything.
At ambient of around 16* degrees, I ran prime 95 for about fifteen minutes, and the CPU peaked at 78* with the lid ON, no GPU load. That's better than even I was expecting. I've also tweaked the fan curve to be less erratic at normal temps, so overall the CPU performance is very satisfactory right now.
Finally, I'm starting work on a GPU shroud to integrate with the vent from the previous post. Early stages of prototyping right now, but it's wider than the gtx750 shroud I'm using. Hopefully that will choke out the sides of the cooler less. No hard data but I can only imagine these two things bringing down the GPU temps nicely.
-
 Ross Siggers got a reaction from DJ46 in I have a Dream...The Dreamcast SFF build!
It would be less than half the time if I kept working on it consistently 😅 I mean it was complete....I just can't help tinkering and improving...
Further updates with the 3D printing;
I replaced the old mounting hardware for the GPU. They were bits of leftover Dreamcast plastic, with standoffs trimmed down and attached with epoxy resin. Ugly but functional. At least... until the heat made the epoxy go funny, and they started coming apart.
ENTER THE 3D PRINTER. Shaped blocks printed at 100% infill, so I could press brass knurled studs into them. Very similarly to how I mount the motherboard to the Dreamcast shell itself.
Much better. And sturdier.
The other thing I've printed is a more refined I take for the underside. I saw more refined, it's hard to be worse than a gaping, jagged hole 🤷🏻♂️ It funnels the air to the fan only, and blocks off and chance of air recirculating. A little tidying up on the join and it'll look smart as anything.
At ambient of around 16* degrees, I ran prime 95 for about fifteen minutes, and the CPU peaked at 78* with the lid ON, no GPU load. That's better than even I was expecting. I've also tweaked the fan curve to be less erratic at normal temps, so overall the CPU performance is very satisfactory right now.
Finally, I'm starting work on a GPU shroud to integrate with the vent from the previous post. Early stages of prototyping right now, but it's wider than the gtx750 shroud I'm using. Hopefully that will choke out the sides of the cooler less. No hard data but I can only imagine these two things bringing down the GPU temps nicely.
-
 Ross Siggers got a reaction from Hairless Monkey Boy in I have a Dream...The Dreamcast SFF build!
It would be less than half the time if I kept working on it consistently 😅 I mean it was complete....I just can't help tinkering and improving...
Further updates with the 3D printing;
I replaced the old mounting hardware for the GPU. They were bits of leftover Dreamcast plastic, with standoffs trimmed down and attached with epoxy resin. Ugly but functional. At least... until the heat made the epoxy go funny, and they started coming apart.
ENTER THE 3D PRINTER. Shaped blocks printed at 100% infill, so I could press brass knurled studs into them. Very similarly to how I mount the motherboard to the Dreamcast shell itself.
Much better. And sturdier.
The other thing I've printed is a more refined I take for the underside. I saw more refined, it's hard to be worse than a gaping, jagged hole 🤷🏻♂️ It funnels the air to the fan only, and blocks off and chance of air recirculating. A little tidying up on the join and it'll look smart as anything.
At ambient of around 16* degrees, I ran prime 95 for about fifteen minutes, and the CPU peaked at 78* with the lid ON, no GPU load. That's better than even I was expecting. I've also tweaked the fan curve to be less erratic at normal temps, so overall the CPU performance is very satisfactory right now.
Finally, I'm starting work on a GPU shroud to integrate with the vent from the previous post. Early stages of prototyping right now, but it's wider than the gtx750 shroud I'm using. Hopefully that will choke out the sides of the cooler less. No hard data but I can only imagine these two things bringing down the GPU temps nicely.
-
Ross Siggers reacted to TheCamba in I have a Dream...The Dreamcast SFF build!
I think this is the longest project I have followed.
-
 Ross Siggers got a reaction from TheCamba in I have a Dream...The Dreamcast SFF build!
Things are happening.
Only 3 prototypes down so far, but it's clear after only a couple of trial runs that it's super effective. The amount of heat coming out the controller ports when stress testing, is impressive. I can imagine that swirling around inside the case...eugh.
Modifications so far include making sure the ports are accessible, and also widening it by about 10mm, to line up with a planned new shroud for the rest of the GPU. The fins at the sides of the cooler are really choked ATM so hopefully I can open them up just a tiny bit.
But I'm kind of stalling on the first test for that shroud... because it's a 9 hour print 💀💀💀
-
 Ross Siggers got a reaction from ccRicers in I have a Dream...The Dreamcast SFF build!
Things are happening.
Only 3 prototypes down so far, but it's clear after only a couple of trial runs that it's super effective. The amount of heat coming out the controller ports when stress testing, is impressive. I can imagine that swirling around inside the case...eugh.
Modifications so far include making sure the ports are accessible, and also widening it by about 10mm, to line up with a planned new shroud for the rest of the GPU. The fins at the sides of the cooler are really choked ATM so hopefully I can open them up just a tiny bit.
But I'm kind of stalling on the first test for that shroud... because it's a 9 hour print 💀💀💀
-
Ross Siggers got a reaction from GDRRiley in I have a Dream...The Dreamcast SFF build!
Things are happening.
Only 3 prototypes down so far, but it's clear after only a couple of trial runs that it's super effective. The amount of heat coming out the controller ports when stress testing, is impressive. I can imagine that swirling around inside the case...eugh.
Modifications so far include making sure the ports are accessible, and also widening it by about 10mm, to line up with a planned new shroud for the rest of the GPU. The fins at the sides of the cooler are really choked ATM so hopefully I can open them up just a tiny bit.
But I'm kind of stalling on the first test for that shroud... because it's a 9 hour print 💀💀💀
-
 Ross Siggers got a reaction from Origami Cactus in Post Linus Memes Here! << -Original thread has returned
I don't get it, you made a thread just to comment on the fact he isn't smiling? Honestly...so what 💁♂️
-
Ross Siggers reacted to RollinLower in SFF2: Electric Bugaloo... The PlayStation 2 build!
no hardline build is complete without atleast a few failed bends.
bonus points if you actually run out of tube too!
-
Ross Siggers got a reaction from GDRRiley in SFF2: Electric Bugaloo... The PlayStation 2 build!
I've successfully cut my pipe too short. Is this a rite of passage? Am I a water cooler now?
R.I.P
-
 Ross Siggers got a reaction from Xychic in SFF2: Electric Bugaloo... The PlayStation 2 build!
So, first thing that happened was I finally bit the bullet and bought my low profile SODIMM. I must say, I'd been putting this off for a while. I mean, £160 (that's 210usd) for a pair of 8gb sticks? Ouch. But, well here they are, and yes, they're very smol. They're not even as tall as the retention clips on the socket! It's sort of adorable ngl.
And, look at all that space when the motherboard is mounted! Before, the regular ram would touch the metal spine of the case. Not only was that well, not ideal. It also made the motherboard sit a few mm proud of where it was meant to, so now the plastic PS2 shell slips over the top slightly better as well. And not having a 'barrier' there will definitey help with running cables and all sorts once we get to that stage.
So with regards to CPU bracket I tried and failed to make. Well I ended up buying a cheap 3D printer, so now I can try and fail repeatedly and brush it off as 'prototyping'! For real though, a £50 printer? I could hardly go wrong, and this sped up the design process tenfold. I dropped the longitudinal bracket....started designing one in the oppose orientation....and then ended up bridging it all together into a square anyway for strength. The waterblock is currently mounted with just some thumbscrews, that's temprary; I'd like to have some spring loaded screws for nicer mounting, but that's a problem for another time.
I still need to design the GPU mount, although that's proving to be a little bit more difficult because the 2060 has less than idea hole placements in the pcb. We shall overcome, though.
Next up, we prep for water!!! As in, we need to mark out where inlet/outlet fittings are going to land. Some of this is set in stone; The motherboard for example I know exactly where the ports for the block are going to be. In other cases, I actually had to wait until I got some piping, to test out how tight I could go with my bends. How close can I mount the pump to the motherboard? Well, the tighter the bed, the closer.
As it turned out, I was really worried about how tricky it was going to be to do hardline for the first time. Hell, I've never done any kind of watercooling before! My first attempt was a 180* bednd, and to be honest, I think it came out really well. But it wasn't particularly tight radius, so I heated it back up, and made it muuuuch smaller. Admittedly, this wasn't quite as clean, probably because I was trying to alter an existing bend rather than doing it from scratch.
I also tried a really small 90* as well, to see what it would do. The inside edge kind of kinked a little bit, even though I was using an insert. I think this may be something I have to put up with trying to manipulate such tight turns. Also maybe I need to heat up more on the outside, and stretch that rather than compress the inside? I don't know, anyone who's dealt with hardline before I'd love to ehar your thoughts.
Anyway that's all folks! See you in another 10 months 😉
(I hope not)
-
Ross Siggers got a reaction from DJ46 in SFF2: Electric Bugaloo... The PlayStation 2 build!
So, first thing that happened was I finally bit the bullet and bought my low profile SODIMM. I must say, I'd been putting this off for a while. I mean, £160 (that's 210usd) for a pair of 8gb sticks? Ouch. But, well here they are, and yes, they're very smol. They're not even as tall as the retention clips on the socket! It's sort of adorable ngl.
And, look at all that space when the motherboard is mounted! Before, the regular ram would touch the metal spine of the case. Not only was that well, not ideal. It also made the motherboard sit a few mm proud of where it was meant to, so now the plastic PS2 shell slips over the top slightly better as well. And not having a 'barrier' there will definitey help with running cables and all sorts once we get to that stage.
So with regards to CPU bracket I tried and failed to make. Well I ended up buying a cheap 3D printer, so now I can try and fail repeatedly and brush it off as 'prototyping'! For real though, a £50 printer? I could hardly go wrong, and this sped up the design process tenfold. I dropped the longitudinal bracket....started designing one in the oppose orientation....and then ended up bridging it all together into a square anyway for strength. The waterblock is currently mounted with just some thumbscrews, that's temprary; I'd like to have some spring loaded screws for nicer mounting, but that's a problem for another time.
I still need to design the GPU mount, although that's proving to be a little bit more difficult because the 2060 has less than idea hole placements in the pcb. We shall overcome, though.
Next up, we prep for water!!! As in, we need to mark out where inlet/outlet fittings are going to land. Some of this is set in stone; The motherboard for example I know exactly where the ports for the block are going to be. In other cases, I actually had to wait until I got some piping, to test out how tight I could go with my bends. How close can I mount the pump to the motherboard? Well, the tighter the bed, the closer.
As it turned out, I was really worried about how tricky it was going to be to do hardline for the first time. Hell, I've never done any kind of watercooling before! My first attempt was a 180* bednd, and to be honest, I think it came out really well. But it wasn't particularly tight radius, so I heated it back up, and made it muuuuch smaller. Admittedly, this wasn't quite as clean, probably because I was trying to alter an existing bend rather than doing it from scratch.
I also tried a really small 90* as well, to see what it would do. The inside edge kind of kinked a little bit, even though I was using an insert. I think this may be something I have to put up with trying to manipulate such tight turns. Also maybe I need to heat up more on the outside, and stretch that rather than compress the inside? I don't know, anyone who's dealt with hardline before I'd love to ehar your thoughts.
Anyway that's all folks! See you in another 10 months 😉
(I hope not)
-
Ross Siggers got a reaction from GDRRiley in SFF2: Electric Bugaloo... The PlayStation 2 build!
So, first thing that happened was I finally bit the bullet and bought my low profile SODIMM. I must say, I'd been putting this off for a while. I mean, £160 (that's 210usd) for a pair of 8gb sticks? Ouch. But, well here they are, and yes, they're very smol. They're not even as tall as the retention clips on the socket! It's sort of adorable ngl.
And, look at all that space when the motherboard is mounted! Before, the regular ram would touch the metal spine of the case. Not only was that well, not ideal. It also made the motherboard sit a few mm proud of where it was meant to, so now the plastic PS2 shell slips over the top slightly better as well. And not having a 'barrier' there will definitey help with running cables and all sorts once we get to that stage.
So with regards to CPU bracket I tried and failed to make. Well I ended up buying a cheap 3D printer, so now I can try and fail repeatedly and brush it off as 'prototyping'! For real though, a £50 printer? I could hardly go wrong, and this sped up the design process tenfold. I dropped the longitudinal bracket....started designing one in the oppose orientation....and then ended up bridging it all together into a square anyway for strength. The waterblock is currently mounted with just some thumbscrews, that's temprary; I'd like to have some spring loaded screws for nicer mounting, but that's a problem for another time.
I still need to design the GPU mount, although that's proving to be a little bit more difficult because the 2060 has less than idea hole placements in the pcb. We shall overcome, though.
Next up, we prep for water!!! As in, we need to mark out where inlet/outlet fittings are going to land. Some of this is set in stone; The motherboard for example I know exactly where the ports for the block are going to be. In other cases, I actually had to wait until I got some piping, to test out how tight I could go with my bends. How close can I mount the pump to the motherboard? Well, the tighter the bed, the closer.
As it turned out, I was really worried about how tricky it was going to be to do hardline for the first time. Hell, I've never done any kind of watercooling before! My first attempt was a 180* bednd, and to be honest, I think it came out really well. But it wasn't particularly tight radius, so I heated it back up, and made it muuuuch smaller. Admittedly, this wasn't quite as clean, probably because I was trying to alter an existing bend rather than doing it from scratch.
I also tried a really small 90* as well, to see what it would do. The inside edge kind of kinked a little bit, even though I was using an insert. I think this may be something I have to put up with trying to manipulate such tight turns. Also maybe I need to heat up more on the outside, and stretch that rather than compress the inside? I don't know, anyone who's dealt with hardline before I'd love to ehar your thoughts.
Anyway that's all folks! See you in another 10 months 😉
(I hope not)
-
 Ross Siggers got a reaction from IkeaGnome in SFF2: Electric Bugaloo... The PlayStation 2 build!
So, first thing that happened was I finally bit the bullet and bought my low profile SODIMM. I must say, I'd been putting this off for a while. I mean, £160 (that's 210usd) for a pair of 8gb sticks? Ouch. But, well here they are, and yes, they're very smol. They're not even as tall as the retention clips on the socket! It's sort of adorable ngl.
And, look at all that space when the motherboard is mounted! Before, the regular ram would touch the metal spine of the case. Not only was that well, not ideal. It also made the motherboard sit a few mm proud of where it was meant to, so now the plastic PS2 shell slips over the top slightly better as well. And not having a 'barrier' there will definitey help with running cables and all sorts once we get to that stage.
So with regards to CPU bracket I tried and failed to make. Well I ended up buying a cheap 3D printer, so now I can try and fail repeatedly and brush it off as 'prototyping'! For real though, a £50 printer? I could hardly go wrong, and this sped up the design process tenfold. I dropped the longitudinal bracket....started designing one in the oppose orientation....and then ended up bridging it all together into a square anyway for strength. The waterblock is currently mounted with just some thumbscrews, that's temprary; I'd like to have some spring loaded screws for nicer mounting, but that's a problem for another time.
I still need to design the GPU mount, although that's proving to be a little bit more difficult because the 2060 has less than idea hole placements in the pcb. We shall overcome, though.
Next up, we prep for water!!! As in, we need to mark out where inlet/outlet fittings are going to land. Some of this is set in stone; The motherboard for example I know exactly where the ports for the block are going to be. In other cases, I actually had to wait until I got some piping, to test out how tight I could go with my bends. How close can I mount the pump to the motherboard? Well, the tighter the bed, the closer.
As it turned out, I was really worried about how tricky it was going to be to do hardline for the first time. Hell, I've never done any kind of watercooling before! My first attempt was a 180* bednd, and to be honest, I think it came out really well. But it wasn't particularly tight radius, so I heated it back up, and made it muuuuch smaller. Admittedly, this wasn't quite as clean, probably because I was trying to alter an existing bend rather than doing it from scratch.
I also tried a really small 90* as well, to see what it would do. The inside edge kind of kinked a little bit, even though I was using an insert. I think this may be something I have to put up with trying to manipulate such tight turns. Also maybe I need to heat up more on the outside, and stretch that rather than compress the inside? I don't know, anyone who's dealt with hardline before I'd love to ehar your thoughts.
Anyway that's all folks! See you in another 10 months 😉
(I hope not)
-
Ross Siggers reacted to GDRRiley in SFF2: Electric Bugaloo... The PlayStation 2 build!
can't wait to see this build get finished.
-
Ross Siggers got a reaction from DJ46 in SFF2: Electric Bugaloo... The PlayStation 2 build!
Man....yknow....I just......
I JUST LOVE RESURRECTING DEAD THREADS...
And putting builds on indefinite hold...
And disappointing followers with lack of updates...
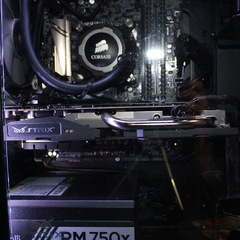
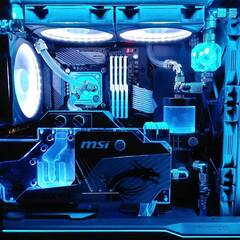
I'm going to assume you all forgive me. You're nice like that, right? So, the last post was May? Last year? Geeez.....Well, I picked this project back up, and I'm gonna make a proper post this weekend. I got some new bits that will make life easier for this build, but for now I'm gonna leave you with this picture;
-
 Ross Siggers got a reaction from adarw in SFF2: Electric Bugaloo... The PlayStation 2 build!
Man....yknow....I just......
I JUST LOVE RESURRECTING DEAD THREADS...
And putting builds on indefinite hold...
And disappointing followers with lack of updates...
I'm going to assume you all forgive me. You're nice like that, right? So, the last post was May? Last year? Geeez.....Well, I picked this project back up, and I'm gonna make a proper post this weekend. I got some new bits that will make life easier for this build, but for now I'm gonna leave you with this picture;
-
Ross Siggers got a reaction from GDRRiley in SFF2: Electric Bugaloo... The PlayStation 2 build!
Man....yknow....I just......
I JUST LOVE RESURRECTING DEAD THREADS...
And putting builds on indefinite hold...
And disappointing followers with lack of updates...
I'm going to assume you all forgive me. You're nice like that, right? So, the last post was May? Last year? Geeez.....Well, I picked this project back up, and I'm gonna make a proper post this weekend. I got some new bits that will make life easier for this build, but for now I'm gonna leave you with this picture;
-
Ross Siggers reacted to RollinLower in SFF2: Electric Bugaloo... The PlayStation 2 build!
well dang, nice to see this get back to life!
-
Ross Siggers got a reaction from GDRRiley in I have a Dream...The Dreamcast SFF build!
So this is kind of random, but I Googled Dreamcast PC to see if any other builds would show up. Believe it or not, I found a thread I've not read before! So I dug in, I was curious to see how they'd gone about building their own Dreamcast.
After reading for only a short while it became apparent that they'd seen my build, and it had inspired them to do their own! There are references to both this thread, and a second one I made on smallformfactor.net. A copy of my diagram that outlines the power setup for STX/PICO too!
It's very humbling that someone would do this based off of my build; I know how much time and effort these things take to build. So shoutout to @cityle, and if you enjoy a good build thread you should take a look at his one over at the Level1Techs forum. It's mad, it's actually a Gamecube build and a Dreamcast one both in the same thread, so there's plenty to look through!
P.S. It also made me realise that my idea about magnetic connectors wasn't as brilliant as I thought; they'd already done it on their Gamecube build 😛
-
Ross Siggers got a reaction from DJ46 in I have a Dream...The Dreamcast SFF build!
So this is kind of random, but I Googled Dreamcast PC to see if any other builds would show up. Believe it or not, I found a thread I've not read before! So I dug in, I was curious to see how they'd gone about building their own Dreamcast.
After reading for only a short while it became apparent that they'd seen my build, and it had inspired them to do their own! There are references to both this thread, and a second one I made on smallformfactor.net. A copy of my diagram that outlines the power setup for STX/PICO too!
It's very humbling that someone would do this based off of my build; I know how much time and effort these things take to build. So shoutout to @cityle, and if you enjoy a good build thread you should take a look at his one over at the Level1Techs forum. It's mad, it's actually a Gamecube build and a Dreamcast one both in the same thread, so there's plenty to look through!
P.S. It also made me realise that my idea about magnetic connectors wasn't as brilliant as I thought; they'd already done it on their Gamecube build 😛
-
Ross Siggers reacted to AdamxM07 in I have a Dream...The Dreamcast SFF build!
Thought about doing something similar with an xbox case


