


wise_rice
-
Posts
35 -
Joined
-
Last visited
1 Follower

wise_rice's Achievements
")
-
 My last Build of all time: Asus STRIX Z370-g, 9900K, Vega 64, All Water-cooled using Alphacool hardware, 2 pumps within the CPU and GPU-Block, Pumps running on 5-7V (Ultra-Silent), Noctua Redux fans (all throttled with low noise adaptors). Exhaust air to the front. Running latest Mac OS 10.15.4 with OpenCore. Golden build. Everything works.
 -
WaterMac - Apple Powermac G5 Case Modding - Watercooling experiments
wise_rice replied to wise_rice's topic in Build Logs
My last Build of all time: Asus STRIX Z370-g, 9900K, Vega 64, All Water-cooled using Alphacool hardware, 2 pumps within the CPU and GPU-Block, Pumps running on 5-7V (Ultra-Silent), Noctua Redux fans (all throttled with low noise adaptors). Exhaust air to the front. Running latest Mac OS 10.15.4 with OpenCore. Golden build. Everything works.- 5 replies
-
- 1
-

-
- watercooling
- powermac
- (and 4 more)
-
WaterMac - Apple Powermac G5 Case Modding - Watercooling experiments
wise_rice replied to wise_rice's topic in Build Logs
Second Iteration - finished WaterMac Build: (Internal / Case-Cooling) As you can see, the external cooling-tower is gone. No more Reserator. All the cooling will be in / on the machine now. Some of the tools and parts I used. Noctua fans. (gray= Redux 92mm pwm) Cigarre cutter as tubing cutter. Most important: head-lamp and iFixit Screwdriver kit. All The hardware that went into the machine I removed the mainboard before transforming the build. A ASUS Maximus VIII Z170 with waterblock on the VRMs. Awesome. It also has a backplate. Solid. I modded the BeQuiet Silent Loop 240. Instead of the normal fans I put the better SilentWings3 on there. Bigger fittings for my own tubing. And another 92mm Radiator for the back. The pump got a very special treatment. Bigger fittings on the BeQuiet Pump (made by Alphacool). On top there was a refill port. It had the standard G1/4" thread. So I added a 90° Adapter and connected that to a reservoir. This has never been done before. It ensures, the pump always has enough water and never runs dry. It also makes filling so much easier. This will be a real custom loop. Nothing left of the AiO. This will be the second pump in this build. The pump in the GTX1080 Waterblock (Alphacool Eiswolf GPX Pro) is the SAME. Even though they look a bit different on the outside. They can easily by undervolted to be literally inaudible. Delidding the i7 6700K – putting liquid metal on the IHS and the die. You can see the fresh high-temperature silicone around the IHS before putting it back on. Putting the IHS back on using der8auer Delid-Die-Mate 2. Simple and safe. The tool is just sold out most of the time. Mildly overclocked 6700K performance. The person I sold this machine to overclocked it to over 5Ghz, immediately. The SSD got a heatsink. Not that it was overheating. But this build is about being absolutely silent and cool without much airflow. And I had a spare heatsink… The heatsink helped with mounting the SSD on top of the Blu-Ray drive I have a second SSD installed in the M.2. Slot. This is basically the same Crucial SSD as in the 2,5” form factor. Just with a m.2 connector. It still hat SATA3 speeds. It also got a modded heatsink on (glued on using high-temperature silicone). M.2. SSDs get really warm! So here it was really necessary to do something, imho. The Alphacool GPX-N 1080 Waterblock (with pump) has a semi-passive cooling for the VRMs of the card. There are big aluminium fins, that get really warm during heavy gaming. So, I modded a 92mm noctua fan on, to help with cooling. It is only held in by the noctua rubber-holders, clamped between the fins. Re-wired the soft-tubing to the new front-radiator. Top fitting has a temperature sensor. Lower fitting is connected to the big case-radiator, that has some copper-tubing inside. Internal reservoir 240mm front-radiator with SilentWings 3 fans 92mm back-radiator with 92mm SilentWings 2 fan A lot of fine-tuning for the fans was involved. They all run on the lowest possible speed, that they would start. That is enough to keep the system cool. During heavy gaming they only ramp up slightly. 4x4 fenvi Wifi Card 32GB RAM (G.Skill TridentZ) 3200mhz (running at 2933mhz) The PSU housing was earthed, as it is glued in and might not even touch the rest of the case, otherwise. It is a Super Flower Leadex 80 Plus Titanium - 750 Watt. Sadly, the Case has some spots /stains on top, that I could not remove (not even by sanding). I did not think about painting the case, back then (like I did on my 26 PowerMac G5 Case Modding Project - a year later) Case-radiator + custom made bezel (mitre-cut) Finished build from the top Finished “WaterMac” build Thanks for reading.- 5 replies
-
- 2
-
-
- watercooling
- powermac
- (and 4 more)
-
WaterMac - Apple Powermac G5 Case Modding - Watercooling experiments
wise_rice replied to wise_rice's topic in Build Logs
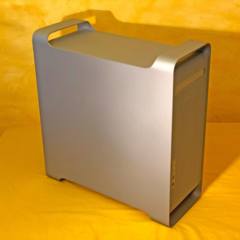
First Iteration WaterMac: (passive cooler-tower) This is will be a gaming machine and Hackintosh workstation. Modded Powermac G5 case with custom case-radiator and external passive radiator/reservoir. Quite a heavy beast. Silent and powerful. The back, ATX Tray and front panel was done with kits from TheLaserHive. A lot of cutting was involved. Two holes for the extra thick tubing were added. Internal Layout (without wifi card or Blu-Ray Drive, yet). I made up my own water-block mounting for the original Zalman ZM-WB2 Waterblock. There is only one pump. It is in the GTX1080 Waterblock (Alphacool Eiswolf GPX Pro). The one in the Reserator was removed. The passive radiator / reservoir is a “Zalman Reserator 1 plus” with new fittings. Material: Aluminium Size: 150x150x592mm Weight: 6,5kg It can hold up nearly 2,5 liters of coolant. I used special coolant that stops corrosion of of mixed copper and aluminium parts. OSX High Sierra is running, perfectly. Everything was installed. DSDT, BIOS, Clover & drivers. Also Windows dual boot for gaming.- 5 replies
-
- 1
-
-
- watercooling
- powermac
- (and 4 more)
-
I wanted to push watercooling to the most. Silent. Level. possible. While gaming and also for working. Quite a challenge and a lot to learn. Thoughts on water-cooling: It always depends on the use-case if water-cooling is more silent than air-cooling. My personal experience: Air-cooling is more silent in idle load scenarios (when you just do some easy tasks like browsing or office) Water-cooling is more silent for constant high load (e.g. when you are gaming/working for long times) Tricks to get the water-cooling as silent as possible: Configure the BIOS to turn off the radiator-fans in Idle load scenarios. That leaves only the pump running. Undervolt the pump (to e.g. constant 7V). This works best, if you can plug the pump into a fan or pump header and assign a constant (lower that 100%) speed to it in the BIOS. If your BIOS does not allow that, you could use a resistor-adaptor to slow it down. This project started before my 26 PowerMac G5 Case Modding Project
-
Third Iteration (Final Build): Varnished with the spray gun and compressed air. Even on the inside. DVD-Drive installed. 2,5” to 3,5” adapter to put an SSD into the Apple HDD Caddy. Later even three SSDs in RAID5. BeQuiet Dark Rock Pro 3. One of the biggest and most powerful Air-coolers on the market. These PowerMac cases can virtually fit any cooler - no matter how big. It also works out with the Aluminium coolers on the ram. Very lucky. Also: Always be grounded when handling electronic components. Still plenty of space left between door and cooler. The fan bracket is fitted with two NoiseBlocker 92mm fans. The empty Apple-PSU housing before modding. See the previous posts for details of the PSU-modding New NoiseBlocker Fans (BlackSilent Fan XR-1 - 60mm) Finished second iteration Build with new supermicro PSU in the original housing. GTX 1050Ti DVD drive 3x1TB SSD RAID5 Most cable-management can be done under the mainboard. Super-silent Air-cooling. 8 fans in total. All run near minimum speed. The back of the modded Case. This one has antennas build in and a C19 power-plug. The mainboard I/O is slightly set back from the case. Everything is accessible. Only the Ethernet-cable can be a bit tricky to remove on this particular build. Ethernet cables have this little barb on it. You need to press it down before you can get the cable out. The barb is hard to press because everything is recessed a bit. For a desktop computer this is totally fine. Other mainboards have the Ethernet port in a different position (not on the very top), so they will not have this “problem”. The barb is easily accessible when opening the door of the case and removing the back-fan bracket (that is clamped in). The LAN-cable will only be plugged in once, so it is fine. The machine will not be moved to a different room very often. No more dents or stains on the case. Freshly varnished. No more Apple-Logo on the side after painting. Just a clean silver look. That’s it for this build. I learned a lot and could improve the quality of all other barebones. Especially PSU-wise, as you can read in the first posts (page 1).
-
Second Iteration: Modded mATX Barebone Case for the second iteration. Everything is the same as in my final mATX barebones, except for the PSU. I was still working on the final PSU design at the time. This one has a BeQuiet 600W PSU. The finished first Iteration of the build. I did not like the PSU very much. It had to be glued in (silicone) and was non-removable. Then, the worst-case scenario happened. The fan suddenly made rattling noises and I had to remove this PSU again to return it. That was the moment I decided to re-use the original PSU-housing on the bottom - and no more glue.
-
First Iteration (oldest): mATX Board in an ATX Modded case. Not all mainboard-holes on the top have a screw, because the case was modded for full ATX sized boards. But that does not really matter. It is held in - safe and secure with around 6 screws. spray can varnish (1K): It worked. But it turned out to be NOT the best solution. The uniformity of the varnish using a can-spray-head is not as good as using a professional spray-gun & compressor. So, I switched to using a compressor, later. Also, the 1K-Spray-can-paint is not as sturdy as 2K varnish. So, I changed that later, as well Watercooling (CoolerMaster AiO) – a bit overkill for this 95W TDP processor, that will never be overclocked. The music-studio requested an air-cooler, anyway. So, I changed that later for a big air-cooler and saved the water-cooling for another case. It was good that I installed the water-cooler on this test-case. You could see the radiator through the front on the first test-build because I used a grey silicone on the front, covering some holes and the radiator was placed very close to the front. I changed that on the later builds. There I will use a black foam-seal to get some distance to the front. Also, no silicone on the front. Only at the top and sides. This is then invisible. Glad I tested this before modding all 6 mATX barebones.
-
8-Core Workstation for Audio Production: Before starting on the “26 PowerMac G5 Case Modding Project“ I did a couple of prototypes to figure out the best varnish, cooling and PSU design. I wanted to build a machine for a music production studio of a friend, because his machine was older and had only 4 cores. An 8-Core with 32GB of RAM will be the successor. I am a big fan of ECC RAM for productive systems. There is no ECC RAM with heatsinks on the market. So I put my own heatsinks / Aluminium coolers on the RAM to keep it cool even in a very silent, low-airflow environment.
-
The pop-in hard drives were only in the Mac Pro, not the PowerMac. The PowerMac used standard cables for the HDDs, just like in my Mods. I'll post more details of the two finished builds, in a separate thread, soon. When I find the time, again
-
Which Subforum would you suggest?
-
I live at Lake Constance (Konstanz) - German/Swiss Border Between Zürich and Stuttgart Americans will be like: Maaan, Europe is so small
-
Thanks for the feedback, mate ! I really appreciate it ! You can have a closer look if you come over for a beer to south Germany, its not far from the Netherlands...
-
The End: Thats it for now… What do you think? Was it worth it? What hardware would you put in? Please let me know… Yours, sincerely wise_rice
